Twilio migration guide (iOS)
This guide walks you through migrating your existing Twilio video application to Vonage Video.
For the most flexibility and versatility in programming your video solution, the Vonage Video API iOS SDK has you covered.
If your requirements extend beyond simple video functions and include features like broadcasting, SIP integration, media processing, and customizable stream settings, you'll discover that the Vonage Video iOS SDK offers unmatched power and flexibility.
Overview
Twilio and Vonage Video APIs have very similar concepts. This starter guide aims to assist you in migrating your video application.
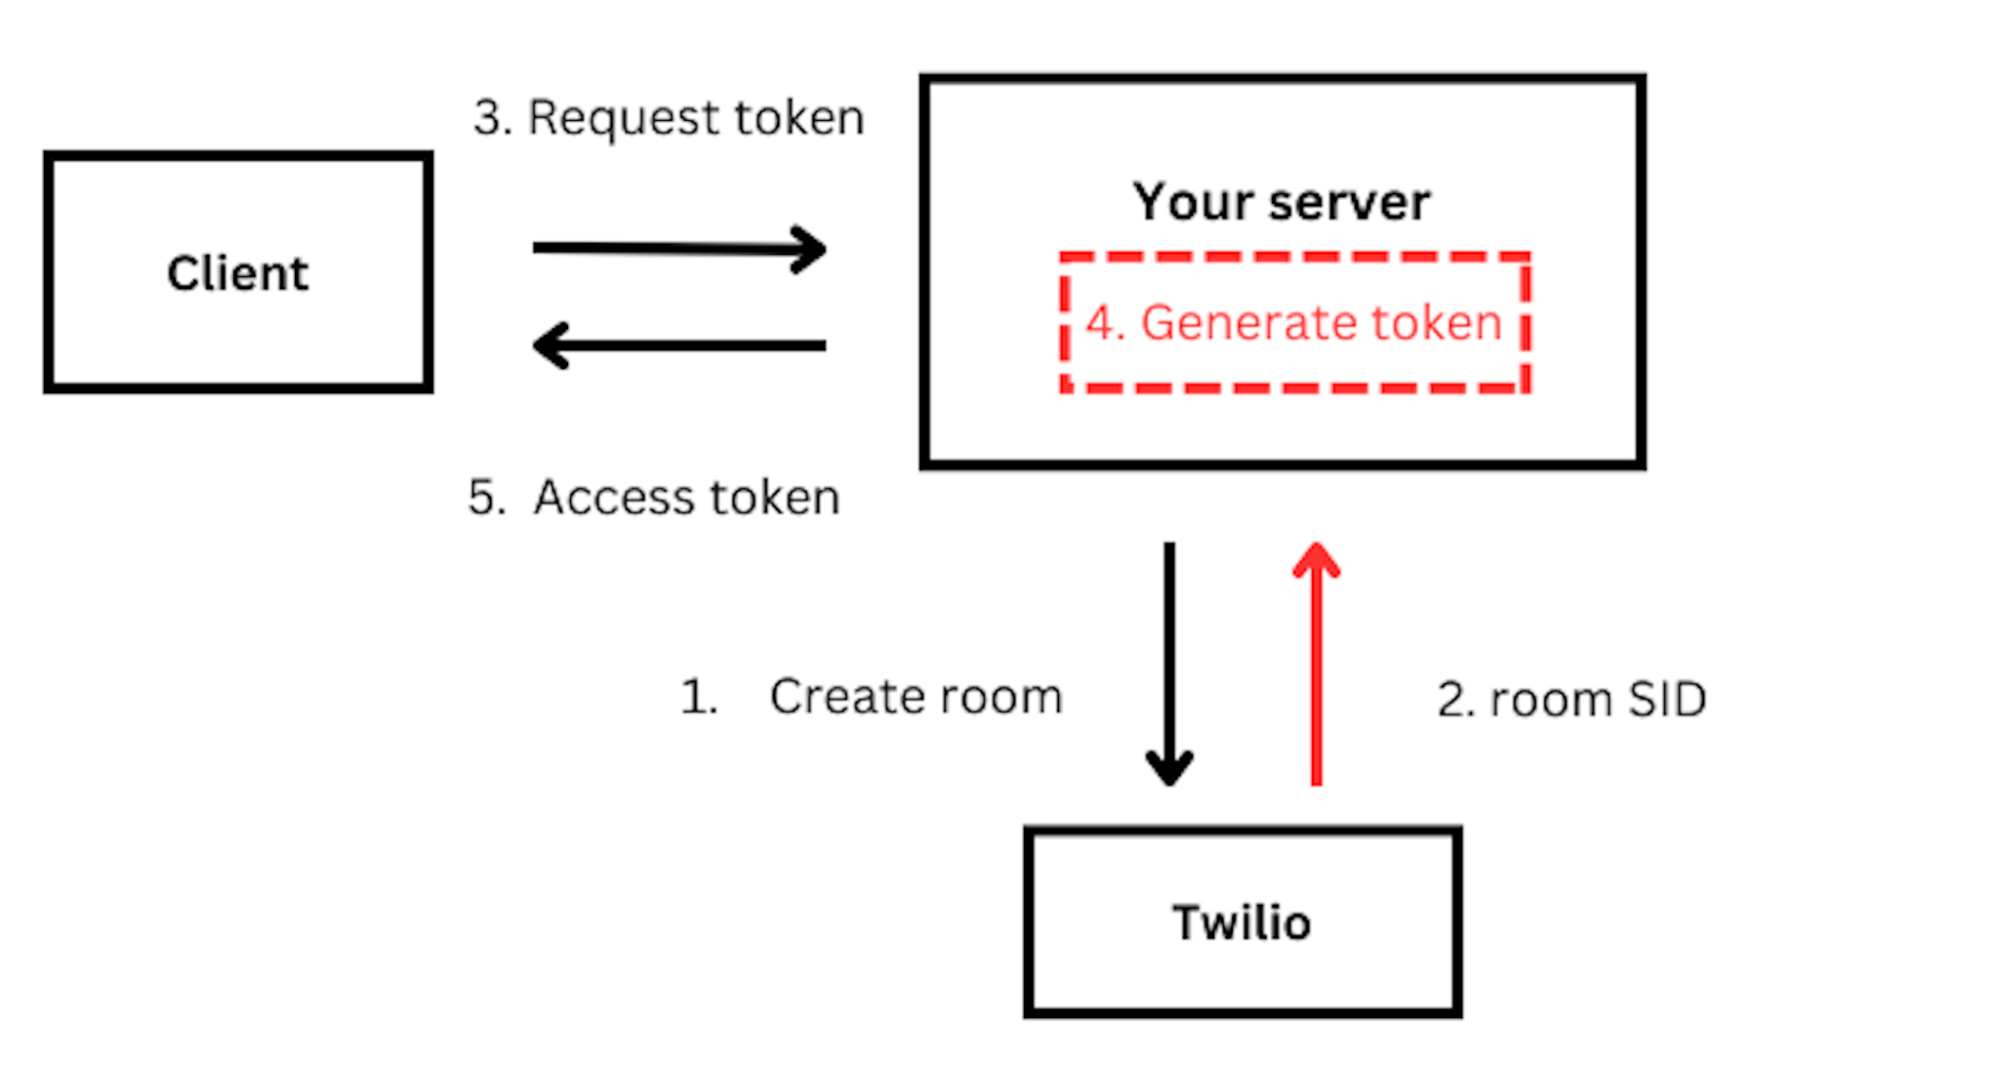
One key difference between Twilio and Vonage video implementation is the use of room SID, this is a session ID when it comes to Vonage. We will look at how to generate a sessionID in a later section.
You will also need an authentication token when connecting a client to an active session.
The diagram below illustrates the architectural differences between Twilio and Vonage video.

Twilio Vonage terminology mapping
| Twilio | Vonage |
|---|---|
| Room | Session |
| Participants | Subscriber(s) + Publisher(s) |
| Tracks | Stream |
| RemoteTracks | Subscribers(s).stream |
| LocalTracks | Publisher(s).stream |
Get Video SDK credentials
Create a developer Account to access the developer portal.
To get started with video you need to create an application. You can follow the create an application guide to obtain your application ID and private key.
Install the SDK
You can install the Vonage Video iOS SDK through the Swift Package Manager or Cocoapods:
Using Swift Package Manager
To add a package dependency to your Xcode project, select File > Swift Packages > Add Package Dependency and enter the repository URL:
Using Cocoapods
When adding the SDK using CocoaPods edit the Podfile and add the following line:
Save changes to the Podfile, open the root directory of the project in the terminal/command-line and run:
This should pull in the Vonage video SDK and its dependencies.
You can now add the SDK to your view controller.
In Xcode, open your ViewController.swift file and, at the very top of the file, add the following lines to import the video library:
import UIKit
import OpenTok
Authentication
The Vonage Video SDK uses tokens to authenticate users. When generating a token you can set the user’s role (subscriber, publisher, or moderator). Optionally, you can also assign a string of metadata to the token (i.e. to identify the connected client).
Please refer to our Token Creation guide to learn how to generate tokens. Tokens are generated on the server-side and then used on the client-side. Visit the Server-side SDKs guides to learn more.
Create a video session
A session is like a room. All clients using the same session ID will be able to communicate with each other.
Like tokens, sessions are created on the server side. Please refer to our Creating a session guide to learn more.
To create a session and generate a token, use one of our server SDKs.
You can declare all your keys as property in your ViewController.swift file:
// Replace with your Application ID
var kApplicationId = ""
// Replace with your generated session ID
var kSessionId = ""
// Replace with your generated token
var kToken = ""
Connect to a video session
With all your keys set you can now connect to an active video session.
You must do this before you can publish your audio-video stream to the session or view other participants streams.
Twilio
let twimlParamTo = "to"
let connectOptions: TVOConnectOptions = TVOConnectOptions(accessToken: accessToken) { (builder) in
            builder.params = [twimlParamTo : “{to}”]
        }
TwilioVoice.connect(with: connectOptions, delegate: self)
Vonage
class ViewController: UIViewController
   var session: OTSession?

override func viewDidLoad() {
   super.viewDidLoad()
   connectToAnOpenTokSession()
}

func connectToAnOpenTokSession() {
    // Important: Please note that your Application ID is your API key.
    session = OTSession(apiKey: kApplicationId, sessionId: kSessionId, delegate: self)
    var error: OTError?
    session?.connect(withToken: kToken, error: &error)
    if error != nil {
        print(error!)
    }
}
Event Listeners
Vonage and Twilio have delegate protocols to help you maintain the state of a session/call for all participants connected to a session.
Session/Room connection changes
Twilio
// MARK: TVOCallDelegate
func callDidStartRinging(_ call: TVOCall) {
        NSLog("callDidStartRinging:")
}
func callDidConnect(_ call: TVOCall) {
        NSLog("callDidConnect:")
}
func call(_ call: TVOCall, isReconnectingWithError error: Error) {
        NSLog("call:isReconnectingWithError:")
}
func callDidReconnect(_ call: TVOCall) {
        NSLog("callDidReconnect:")
}
func call(_ call: TVOCall, didFailToConnectWithError error: Error) {
        NSLog("Call failed to connect: \(error.localizedDescription)")
}
func call(_ call: TVOCall, didDisconnectWithError error: Error?) {
        NSLog("Call disconnected")
}
Vonage
// MARK: - OTSessionDelegate callbacks
extension ViewController: OTSessionDelegate {
   func sessionDidConnect(_ session: OTSession) {
       print("The client connected to the Vonage Video API session.")
   }
   func sessionDidDisconnect(_ session: OTSession) {
       print("The client disconnected from the Vonage Video API session.")
   }
   func session(_ session: OTSession, didFailWithError error: OTError) {
       print("The client failed to connect to the Vonage Video API session: \(error).")
   }
   func session(_ session: OTSession, streamCreated stream: OTStream) {
       print("A stream was created in the session.")
   }
   func session(_ session: OTSession, streamDestroyed stream: OTStream) {
       print("A stream was destroyed in the session.")
   }
}
Publishing Video
When a user is connected to an active session, it can publish an audio-video stream to the session, using the device's camera and microphone:
This is achieved by adding a publisher property to the ViewController class:
class ViewController: UIViewController, OTSessionDelegate {
   var session: OTSession?
   var publisher: OTPublisher?
Modify the implementation of the OTSessionDelegate.sessionDidConnect(_:) method to include code to publish a stream to the session. Here is an example:
func sessionDidConnect(_ session: OTSession) {
    print("The client connected to the OpenTok session.")
    let settings = OTPublisherSettings()
    guard let publisher = OTPublisher(delegate: self, settings: settings) else {
        Return
    }
    var error: OTError?
    session.publish(publisher, error: &error)
    guard error == nil else {
        print(error!)
        Return
    }
    guard let publisherView = publisher.view else {
        Return
    }
    let screenBounds = UIScreen.main.bounds
    publisherView.frame = CGRect(x: screenBounds.width - 150 - 20, y: screenBounds.height - 150 - 20, width: 150, height: 150)
    view.addSubview(publisherView)
}
The Vonage Video SDK handles the video quality automatically, based on network conditions and device capabilities. That said, you can configure certain properties, such as resolution, frame rate, and audio fallback.
Next we will implement methods from the OTPublisherDelegate protocol. This protocol includes methods for handling events related to the publisher.
To do so you can add the following code to your ViewController.swift file:
// MARK: - OTPublisherDelegate callbacks
extension ViewController: OTPublisherDelegate {
   func publisher(_ publisher: OTPublisherKit, didFailWithError error: OTError) {
       print("The publisher failed: \(error)")
   }
}
Turn the camera on/off
The Vonage SDK offers simple methods to control the camera.
Twilio
participant?.unpublishVideoTrack(cameraManager.track)
self.cameraManager = nil
Vonage
// This will only stop publishing Video to the session. You can still see your local preview

    publisher.publishVideo = false
// This will only stop publishing all media (audio and video) to the session. You can still see your local preview
    var error: OTError?
    session.unpublish(publisher, error: &error)
    guard error == nil else {
        print(error!)
        Return
    }
Render a remote user video
Similar to Twilio's participantDidConnect and didSubscribeToVideoTrack event listeners, Vonage also triggers connectionCreated and streamCreated events when a remote participant connects to the session and starts sending video.
Twilio
func participantDidConnect(room: Room, participant: RemoteParticipant) {
    print ("Participant \(participant.identity) has joined Room \(room.name)")

    // Set the delegate of the remote participant to receive callbacks
    participant.delegate = self
}

func participantDidDisconnect(room: Room, participant: RemoteParticipant) {
    print ("Participant \(participant.identity) has left Room \(room.name)")
}

 func didSubscribeToVideoTrack(videoTrack: RemoteVideoTrack,
                              publication: RemoteVideoTrackPublication,
                              participant: RemoteParticipant) {

    print("Participant \(participant.identity) added a video track.")
    if let remoteView = VideoView.init(frame: self.view.bounds,
                                       delegate:self) {
        videoTrack.addRenderer(remoteView)
        self.view.addSubview(remoteView)
        self.remoteView = remoteView
    }
}
Vonage
class ViewController: UIViewController {
   var session: OTSession?
   var publisher: OTPublisher?
   var subscriber: OTSubscriber?

func session(_ session: OTSession, streamCreated stream: OTStream) {
    subscriber = OTSubscriber(stream: stream, delegate: self)
    guard let subscriber = subscriber else {
        return
    }


    var error: OTError?
    session.subscribe(subscriber, error: &error)
    guard error == nil else {
        print(error!)
        return
    }


    guard let subscriberView = subscriber.view else {
        return
    }
    subscriberView.frame = UIScreen.main.bounds
    view.insertSubview(subscriberView, at: 0)
}


// MARK: - OTSubscriberDelegate callbacks
extension ViewController: OTSubscriberDelegate {
   public func subscriberDidConnect(toStream subscriber: OTSubscriberKit) {
       print("The subscriber did connect to the stream.")
   }


   public func subscriber(_ subscriber: OTSubscriberKit, didFailWithError error: OTError) {
       print("The subscriber failed to connect to the stream.")
   }
}
Audio
Vonage manages both audio and video using a single Publisher object. When you start publishing with the default options, the SDK publishes both audio and video. However, if you would prefer to have an audio-only session, you may configure the publisher object to not publish Video.
Mute microphone
With Twilio, you must get the audio track to mute the microphone. Vonage simplifies this by providing a single invocable method.
Twilio
guard let micTrack = LocalAudioTrack(options: nil, enabled: true, name: TrackName.mic) else {
           return
}
participant?.unpublishAudioTrack(micTrack)
Vonage
publisher.publishAudio = false
Unmute microphone
Similarly, with Twilio Video, you must get the audio track to unmute the microphone. Vonage simplifies this by providing a single invocable method.
Twilio
guard let micTrack = LocalAudioTrack(options: nil, enabled: true, name: TrackName.mic) else {
           return
}
participant?.publishAudioTrack(micTrack)
Vonage
publisher.publishAudio = true
Text chat
You can exchange data (i.e. text chat messages or custom JSON messages) between individual participants in a session, as well as all participants in a session.
The following method sends a message to clients connected to the session. Each signal is defined by a string type identifying the type of message (in this case "chat") and a string containing the message:
func sendChatMessage(message: String) {
    var error: OTError?
    session.signal(withType: "chat", string: message, connection: nil, error: &error)
    if let error {
        print(error)
    }
}
When another client connected to the session sends a message, the implementation of a callback from OTSessionDelegate allows you to receive the message:
func session(_ session: OTSession, receivedSignalType type: String?, from connection: OTConnection?, with string: String?) {
        print("Received signal type \(type) with message \(string)")
    }
Leave and End sessions The code below shows how to end an active session (disconnect a user from a session).
Twilio
// To disconnect from a Room, we call:
room?.disconnect()

// This results in a callback to RoomDelegate#roomDidDisconnect(room: Room, error: Error?)

// MARK: RoomDelegate

func roomDidDisconnect(room: Room, error: Error?) {
    print("Disconnected from room \(room.name)")
}
Vonage
var error: OTError?
session?.disconnect(&error)
if error != nil {
    print(error!)
}

// MARK: OTSessionDelegate

func sessionDidDisconnect(_ session: OTSession) {
print("The client disconnected to the OpenTok session.")
}
More information:
- Vonage Video API iOS SDK
- Vonage Video iOS SDK reference: List of all classes and methods available with the iOS SDK
- Code Samples (Objective C): Objective C based sample applications implemented using the Vonage iOS SDK
- Code Samples (Swift): Swift based sample applications implemented using the Vonage iOS SDK
- Tutorials on building Video applications using the Vonage SDKs