Bridging Phone Calls into Video Meetings
The Vonage Video API allows you to create just about any video experience you want. Many times a participant may be in an area where internet coverage is not great, either due to cellular network or ISP issues, but they still need to join in a meeting. We will show you how you can have non-video participants call into a meeting and participate.
In this tutorial
The Vonage Video API lets you allow users to dial into a video meeting, or dial out to a user and have them join directly. We will go over how to get a demo up and running with our existing demos so that you do not have to write any code, but we will also explain what the code is doing in the background.
- See the Demo - Check out the demo without writing any code
- How the Demo Works - The Client Side - What the Client Side code is doing
- How the Demo Works - The Server Side - What the Server Side code is doing
Prerequisites
To complete the tutorial, you need:
- A Vonage account - for your API key and secret
See the Demo
If you want to check out the demo before we write any code, we have a sample web server and JavaScript code to try out what a basic video call looks like. All of the code is open source and publicly available, so you can try out the demo and then use the code to make your own modifications.
Launch the Node.js Server
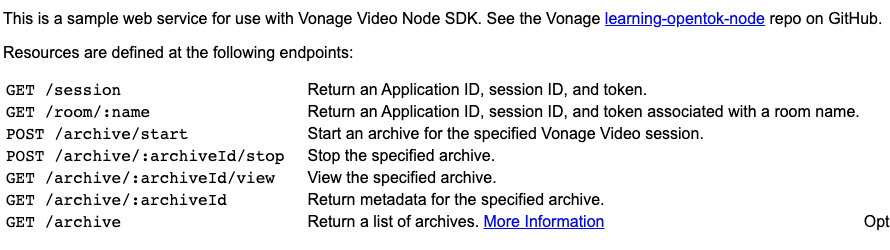
The video demo requires a backend server to handle things like creating client tokens for authorization and general session management. While you can build this in any language you want, we have a pre-built server you can use to get started over at the Vonage Video Learning Server (Node.js) on Code Hub. From the Developer Documentation, click on "Code Hub" in the top navigation bar, and then scroll down and find the card for "Vonage Video Learning Server (Node.js)." Click on it to open it up.
You will get a description of what this project does. For now, let's click on "Get code" so that we can load it into the Code Hub online editor. Click on "Create a new development environment." Name the workspace "Vonage Video Demo" as we can use this backend for multiple demos. This demo does require a number to be assigned to it, as the learning server supports telephone calls via SIP. While we will not use that in this demo, go ahead and click "Assign a number" to assign an existing number you have from Vonage, or purchase a new one to use with later demos.

Code Hub will create an application automatically for you, including setting up the public and private keys that our application will use. Once the workspace is created, you will be dropped into the code editor, which is an online version of Visual Studio Code. Feel free to follow along with later parts of this demo to view the code, and you can edit this code as needed for your own projects.

To run the application, click on "View" at the top of the editor, and then "Terminal." This will open a command line in which we can run commands. All we need to do is type vcr deploy and the code will be deployed. This will take a few moments as it packages up the code and executes it on the Vonage Code Hub servers. We will want to make note of the "instance host address" that it outputs near the end.
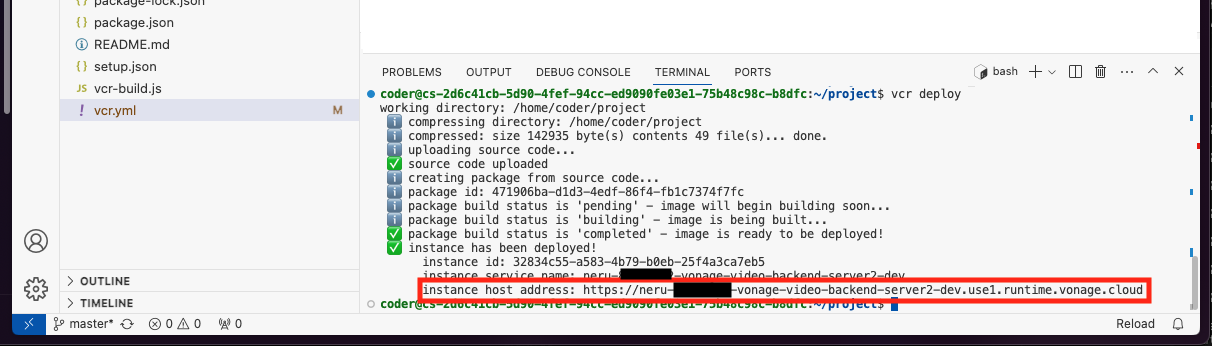
If everything is working properly, you should be able to visit the "instance host address" and be greeted with the following page:
Test the Front End
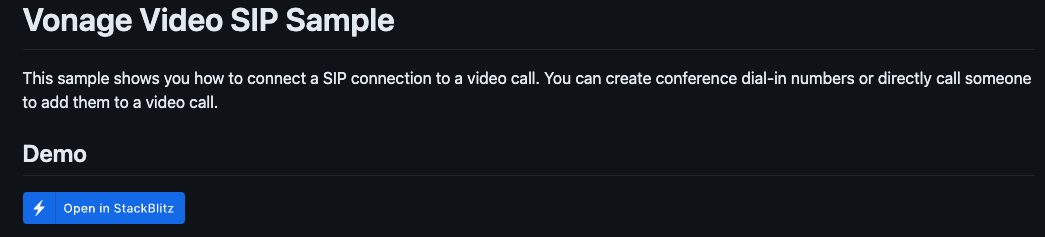
The backend server works directly with all of our pre-built demos, including this one-on-one demo. Head on over to https://github.com/Vonage-Community/video-api-web-samples/tree/main/SIP, which is the source code for the front-end part of this demo. This sample allows multiple users with the URL to join a voice chat through video or a telephone number, and to allow a host to dial out to a number.
The easiest way to run this demo is to click on the "Open in Stackblitz" button in the README.
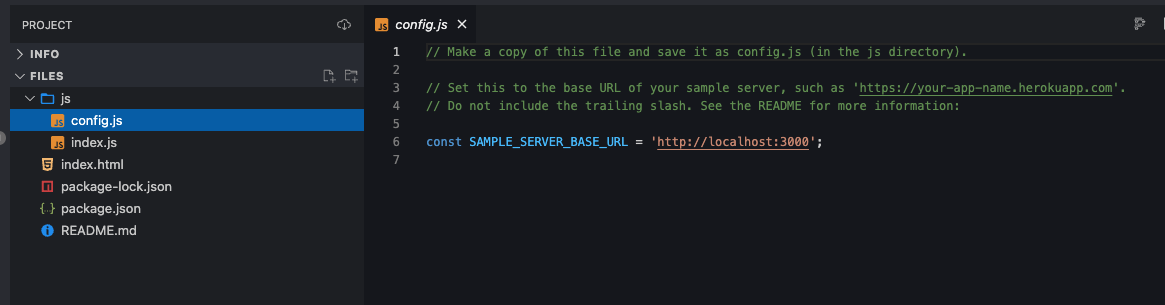
This will open the project in Stackblitz. As with the backend server, you can browse the code and modify it here if you would like. For this demo, all we will need to do is open the js/config.js file and plug in the Code Hub instance URL in the SAMPLE_SERVER_BASE_URL variable:
Once you save the file, you can refresh the demo view on the right-hand side of Stackblitz and your browser should ask you to allow your microphone and camera. Once you allow it, your image should appear in the bottom corner of the sidebar. If you copy that Stackblitz URL above the demo pane and visit it on your mobile device, another computer, or give it to a friend, anyone joining should be connected to your demo!
How the Demo Works
Configure a Vonage Application
For our video application to work, we need a way for our client and server to talk to the Vonage servers. Code Hub configures this for us, but if you are running the code locally or want to know what that entails a Video app is configured just like another other API. We need to set up a Vonage Application to house all of the configuration for our application, as well as help generate the necessary items for us to do authentication.
Head on over to your Vonage Customer Dashboard and log in. Once you are logged in:
- Click on "Applications" under "Build."
- Click on "Create a new application."
- Give the application a name, like "Basic Video Demo."
- Click on "Generate public and private key", which will have you download a file named
private.key. Keep track of this file for later. - Scroll down and toggle on "Video". We will leave these values empty for now.
- Click on "Generate new application" to create the application.
Once the application is created, note the Application ID. If you are running the code locally we will need this to configure the backend. If you are using Code Hub, the server code already has access to the Application ID and Private Key.
The Client Side
The client-side portion of the demo consists of a few different parts - some HTML elements to put the video feeds in, some JavaScript to fetch login information and talk to the Vonage Video servers, and some JavaScript code to call the backend server to dial out.
Since this is a browser demo, we use the JavaScript SDK located at https://unpkg.com/@vonage/client-sdk-video@latest/dist/js/opentok.js, and include that in a script tag in our HTML in index.html.
To add people to a room, we only need two elements - somewhere to put the current user, for example, You, which we call "publisher." We then need somewhere to put anyone else that joins, which you will "subscribe" to. We will put them in a "subscribers" element.
We will create two div elements, and give one an ID of publisher and the other an ID of subscriber. We will reference these elements in the JavaScript when the page is visited, and for when we detect another user has entered the video call.
We then have two sets of controls. The first allows our video conference to enable dial-in capabilities. We will create two buttons to enable this functionality.
We will then have a set of controls that will allow us to dial out to a user. You can enter a phone number and have our system dial out to the user, and when they accept the call they will be bridged into the conference.
Handling Video
On the JavaScript side, we will first get some information about the video call itself. To connect to the video call, we need an Application ID, a Session ID, and a token.
- The Application ID is an identifier that the client SDK uses to reference different settings for our video app on the Vonage side.
- The Session ID is a specific video session we want to connect to, as a single Application can have multiple concurrent video sessions at once.
- The Token is a JWT authentication token that allows you to join a specific session with specific rights.
While you can generate the Session ID and Token ahead of time, in the real world you will generate these on demand. Our code represents how you would do that. We will show how the information is created in a bit, but we will grab that information from the backend server we deployed.
Once we have all the connection information, we can go ahead and call the Vonage Video JavaScript SDK, which handles all the work to connect to the Vonage Video API on the front end. First, we grab a session object with OT.initSession(). We then start to listen on the streamCreated event with session.on(). This allows us to set a callback to run when a stream from another publisher is created. In this case, we use session.subscribe() to connect to the incoming event, and push it into the subscriber div we set up in the HTML. We also listen for the sessionDisconnected event to know when the other user disconnects, but all we do for this demo is just log that we noticed they left.
Then we create the publisher object with OT.initPublisher(). We tell it what div to attach to (publisher), and some basic formatting options. This connects your camera and microphone to the Video API.
We then call session.connect() to connect to the session, using the connection JWT token we grabbed from the server. That's all it takes for two people to join a room!
Handling Phone Calls
All of the heavy lifting for supporting calls will be handled by the Video API itself, and our backend server. The client-side code will just access some routes on the backend server to enable the SIP call, as well as disconnect from the phone conference when we are finished. Enabling telephony is done by hitting the /sip/session/dial route on our backend server, which we will detail later.
This same route can be used to dial out to a specific user. We simply pass along the telephone number typed into the client UI:
When a user enters the conference call, or we connect to them by dialing directly, a new subscriber will be added to the list of participants. The Video API will automatically forward the audio from the SIP connection to everyone connected to the video session.
Finally, we can end either type of phone call by accessing the /sip/session/hangup route on our backend server:
The Server Side
The server-side portion of any Vonage Video application is used to handle session creation, authentication token generation, and administrative tasks like starting and stopping archives. For this demo, all we are worried about is creating sessions and tokens so users can join the room. While the API itself is a REST API and can be called however you like, we encourage you to use the Vonage Node SDK which handles all the authentication and HTTP calls for you. You can install it in your own application with:
npm install -s @vonage/server-sdk
The demo code already has it pre-installed. If you are running the code locally, you will need to run:
npm install
to download all the dependencies, and then copy .envcopy to a new file named .env. You will need to fill in the requested information in .env like the Application ID, the Private Key location on disk, and your Vonage API Key and Secret.
Session Creation and Joining the Session
The first thing we do is look up if we already have a session for the room we are generating. We keep an in-memory dictionary in roomToSessionIdDictionary, and if the room already has a session we just pull the session from the dictionary. We then use the Vonage Video Node SDK to create a client token by calling vonage.video.generateClientToken(), passing it the session ID and an object with some configuration. At the moment all we do is set the user to a moderator role for this simple demo. We then return the configured Application ID, Session ID, and Token back to the front end.
If the session does not exist, we create a new one with vonage.video.createSession(). This contacts the Vonage API and creates a session that users can connect to. We don't have any specific settings for this session, but here would be where we set up things like archiving rules and how the session should be handled, like routing or peer-to-peer. Then like before we create a token, and send all that information back to the browser.
Connecting to the SIP Bridge
Vonage makes available a SIP bridge for the Video API to make use of. All you need to have is a telephone number subscribed to through your Vonage Customer Dashboard. We can then use that telephone number as a SIP interface for incoming calls. We will also use the Conversation functionality of the Vonage Voice API to bridge multiple users together into one audio conference.
The first thing we need to do is dial our video session into the conference call itself. We will create a client token for the SIP connection to join the video session, then make a call to vonage.video.initiateSIPCall() with our SIP configuration to bridge everything together.
Where does the Conversation get set up? When we initiate the SIP call, this causes our SIP bridge to dial out to a conference number through the Voice API. Our conference number is configured through the Customer Dashboard to hit the /sip/vapi/answer route in our backend server. If you are using Cloud Runtime this is configured automatically, but if you are setting this up by hand you will need to go into the Application settings for this application, and then set the "Answer URL" to https://your-domain.com/sip/vapi/answer, where your-domain is the domain name the demo is deployed to.
The route will return a NCCO Conversation action that creates a Voice API Conversation, bridging everyone together.
At this point, a user can dial into the conference to the conference number, and the Voice API will bridge everything together. If a user dials our conference number, it is routed to the /sip/vapi/answer endpoint. We add an additional action that tells the caller they are being connected to the conference, and then they are bridged in.
Dialing Out to a User
Overall, the process is the same for dialing out to a user as it is for setting up a conference call. The only difference is we pass along a number to dial to the /sip/:room/dial route, and we add that number as an option to the SIP headers.
When the SIP call is made, that additional X-learningserver-msisdn header is passed as part of the Voice API call that our backend server accepts. This triggers our code to add an additional NCCO step to first dial out to the requested telephone number via a Connect NCCO action, and when they answer then bridge them into the conversation.
Hanging Up
When we are finished, the UI gives us the option to disconnect from the SIP call directly. This is handled by the /sip/:room/hangup route and simply disconnects the SIP call's connection from the session.
If we do not manually hang up, we will watch for Voice API events that tell us when a conversation is completed. A conversation will automatically completed after all participants have disconnected. We wait until we get a completed event, and when we do we make sure to do the same disconnection from the session as we do above.
Conclusion
In this tutorial, you saw what goes into the backend server for handing telephony calls via SIP, how to create a web client for users to join a session and see and hear each other, and a peek at how easy it is to use the Vonage Code Hub and Stack Blitz to quickly test out samples.