Twilio移行ガイド(iOS)
このガイドでは、既存の Twilio ビデオアプリケーションを Vonage Video に移行する手順を説明します。
ビデオ・ソリューションのプログラミングの柔軟性と汎用性を最大限に高めるには Vonage Video API iOS SDK がカバーしてくれる。
要件が単純なビデオ機能だけでなく、ブロードキャスト、SIP統合、メディア処理、カスタマイズ可能なストリーム設定などの機能を含む場合、Vonage Video iOS SDKが比類のないパワーと柔軟性を提供することがわかります。
概要
Twilio と Vonage Video API のコンセプトは非常によく似ています。このスターターガイドは、ビデオアプリケーションの移行を支援することを目的としています。
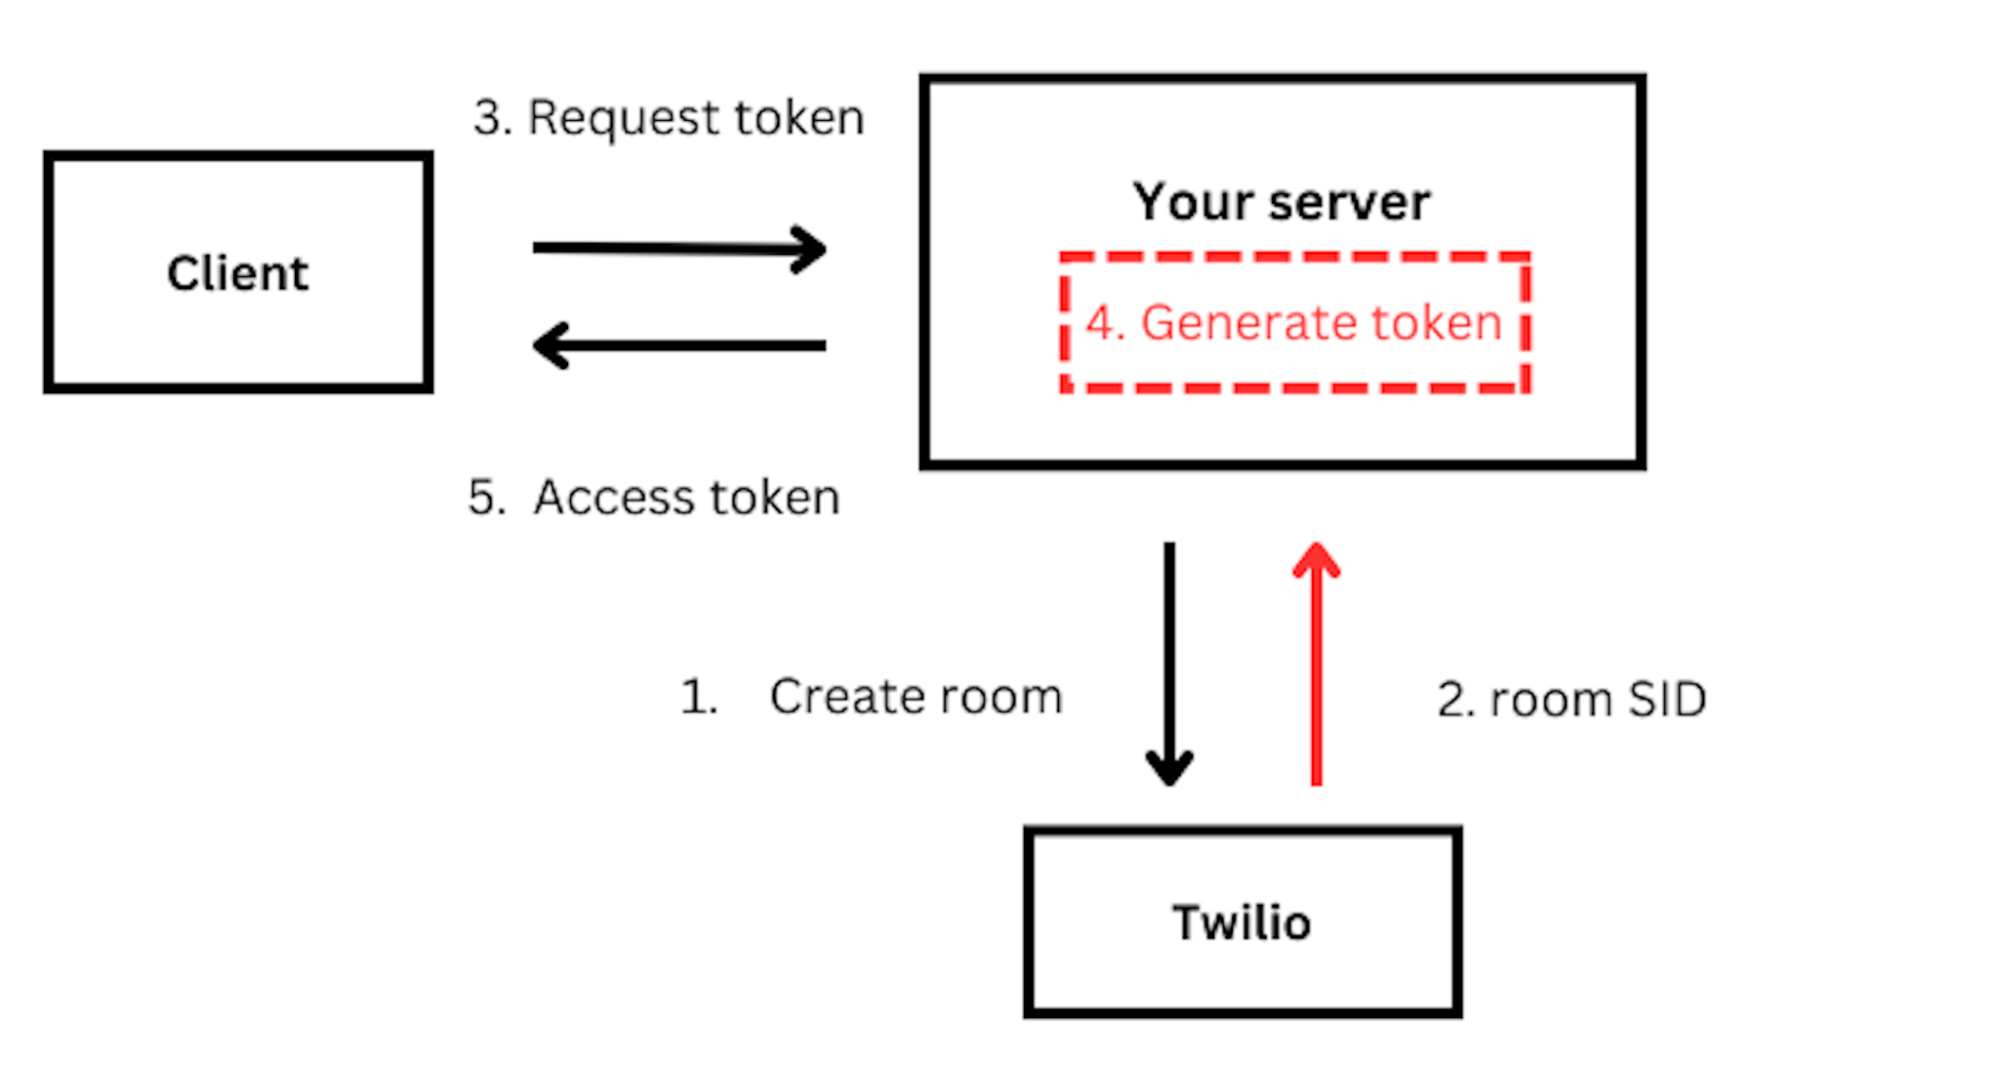
TwilioとVonageのビデオ実装の主な違いの1つは、次のものを使用することである。 ルームSIDこれは セッションID Vonageに関して言えば。私たちは セッションIDを生成する については後述する。
も必要です。 認証トークン アクティブなセッションにクライアントを接続するとき。
下図は、TwilioとVonageビデオのアーキテクチャの違いを示しています。

Twilio Vonage用語マッピング
| Twilio | Vonage |
|---|---|
| Room | Session |
| Participants | Subscriber(s) + Publisher(s) |
| Tracks | Stream |
| RemoteTracks | Subscribers(s).stream |
| LocalTracks | Publisher(s).stream |
ビデオSDKの認証情報を取得する
を作成する。 開発者アカウント をクリックして、開発者ポータルにアクセスしてください。
ビデオを始めるには、アプリケーションを作成する必要があります。アプリケーションは アプリケーションを作成する ガイド アプリケーションID そして 秘密鍵.
SDKのインストール
Vonage Video iOS SDKは、以下の方法でインストールできます。 スイフト・パッケージ・マネージャー または ココアポッド:
Swiftパッケージマネージャの使用
パッケージの依存関係を Xcode プロジェクトに追加するには ファイル > スイフト・パッケージ > 依存パッケージの追加 をクリックし、リポジトリのURLを入力する:
ココアポッドの使用
CocoaPodsを使用してSDKを追加する場合は、Podfileを編集し、以下の行を追加します:
Podfileに変更を保存し、ターミナル/コマンドラインでプロジェクトのルート・ディレクトリを開いて実行する:
これにより、Vonage video SDKとその依存関係が取り込まれるはずです。
これで、SDKをビュー・コントローラーに追加することができます。
Xcodeで ViewController.swift ファイルの一番上に以下の行を追加し、ビデオ・ライブラリをインポートする:
import UIKit
import OpenTok
認証
Vonage Video SDK は、ユーザを認証するためにトークンを使用します。トークンを生成する際に、ユーザの役割(サブスクライバ、パブリッシャ、モデレータ)を設定できます。オプションで トークンにメタデータの文字列を割り当てる。 (接続されているクライアントを識別するため)。
をご参照ください。 トークン作成ガイド でトークンの生成方法を学んでください。トークンはサーバー側で生成され、クライアント側で使用されます。トークンの生成方法については サーバーサイドSDKガイド をご覧ください。
ビデオセッションの作成
A セッション のようなものだ。 部屋.同じ セッションID は互いにコミュニケーションをとることができるだろう。
好き トークン, セッション はサーバー側で作成されます。私たちの セッションガイドの作成 をご覧ください。
セッションの作成とトークンの生成には サーバーSDK.
のプロパティとして宣言することができます。 ViewController.swift ファイル:
// Replace with your Application ID
var kApplicationId = ""
// Replace with your generated session ID
var kSessionId = ""
// Replace with your generated token
var kToken = ""
ビデオセッションに接続する
すべてのキーを設定したら、アクティブなビデオセッションに接続できます。
自分のオーディオ・ビデオストリームをセッションに公開したり、他の参加者のストリームを見たりする前に、この操作を行う必要があります。
トワイリオ
let twimlParamTo = "to"
let connectOptions: TVOConnectOptions = TVOConnectOptions(accessToken: accessToken) { (builder) in
            builder.params = [twimlParamTo : “{to}”]
        }
TwilioVoice.connect(with: connectOptions, delegate: self)
ボネージ
class ViewController: UIViewController
   var session: OTSession?

override func viewDidLoad() {
   super.viewDidLoad()
   connectToAnOpenTokSession()
}

func connectToAnOpenTokSession() {
    // Important: Please note that your Application ID is your API key.
    session = OTSession(apiKey: kApplicationId, sessionId: kSessionId, delegate: self)
    var error: OTError?
    session?.connect(withToken: kToken, error: &error)
    if error != nil {
        print(error!)
    }
}
イベント・リスナー
VonageとTwilioには、セッションに接続している参加者全員のセッション/通話の状態を維持するのに役立つデリゲート・プロトコルがあります。
セッション/ルーム接続の変更
トワイリオ
// MARK: TVOCallDelegate
func callDidStartRinging(_ call: TVOCall) {
        NSLog("callDidStartRinging:")
}
func callDidConnect(_ call: TVOCall) {
        NSLog("callDidConnect:")
}
func call(_ call: TVOCall, isReconnectingWithError error: Error) {
        NSLog("call:isReconnectingWithError:")
}
func callDidReconnect(_ call: TVOCall) {
        NSLog("callDidReconnect:")
}
func call(_ call: TVOCall, didFailToConnectWithError error: Error) {
        NSLog("Call failed to connect: \(error.localizedDescription)")
}
func call(_ call: TVOCall, didDisconnectWithError error: Error?) {
        NSLog("Call disconnected")
}
ボネージ
// MARK: - OTSessionDelegate callbacks
extension ViewController: OTSessionDelegate {
   func sessionDidConnect(_ session: OTSession) {
       print("The client connected to the Vonage Video API session.")
   }
   func sessionDidDisconnect(_ session: OTSession) {
       print("The client disconnected from the Vonage Video API session.")
   }
   func session(_ session: OTSession, didFailWithError error: OTError) {
       print("The client failed to connect to the Vonage Video API session: \(error).")
   }
   func session(_ session: OTSession, streamCreated stream: OTStream) {
       print("A stream was created in the session.")
   }
   func session(_ session: OTSession, streamDestroyed stream: OTStream) {
       print("A stream was destroyed in the session.")
   }
}
ビデオ出版
ユーザーがアクティブなセッションに接続している場合、デバイスのカメラとマイクを使用して、セッションにオーディオ・ビデオ・ストリームを公開することができます:
これは ViewController クラスに publisher プロパティを追加することで実現できます:
class ViewController: UIViewController, OTSessionDelegate {
   var session: OTSession?
   var publisher: OTPublisher?
の実装を変更する。 OTSessionDelegate.sessionDidConnect(_:) メソッドを使用して、ストリームをセッションに公開するコードを記述します。以下に例を示します:
func sessionDidConnect(_ session: OTSession) {
    print("The client connected to the OpenTok session.")
    let settings = OTPublisherSettings()
    guard let publisher = OTPublisher(delegate: self, settings: settings) else {
        Return
    }
    var error: OTError?
    session.publish(publisher, error: &error)
    guard error == nil else {
        print(error!)
        Return
    }
    guard let publisherView = publisher.view else {
        Return
    }
    let screenBounds = UIScreen.main.bounds
    publisherView.frame = CGRect(x: screenBounds.width - 150 - 20, y: screenBounds.height - 150 - 20, width: 150, height: 150)
    view.addSubview(publisherView)
}
Vonage Video SDKは、ネットワークの状況やデバイスの機能に基づいて、ビデオの品質を自動的に処理します。とはいえ、以下のような特定のプロパティを設定することもできます。 決議, フレームレートそして オーディオフォールバック.
次に OTPublisherDelegate プロトコルで定義されています。このプロトコルにはパブリッシャーに関連するイベントを処理するメソッドが 含まれています。
そのためには、以下のコードをあなたの ViewController.swift ファイル:
// MARK: - OTPublisherDelegate callbacks
extension ViewController: OTPublisherDelegate {
   func publisher(_ publisher: OTPublisherKit, didFailWithError error: OTError) {
       print("The publisher failed: \(error)")
   }
}
カメラのオン/オフ
Vonage SDKはカメラをコントロールする簡単な方法を提供します。
トワイリオ
participant?.unpublishVideoTrack(cameraManager.track)
self.cameraManager = nil
ボネージ
// This will only stop publishing Video to the session. You can still see your local preview

    publisher.publishVideo = false
// This will only stop publishing all media (audio and video) to the session. You can still see your local preview
    var error: OTError?
    session.unpublish(publisher, error: &error)
    guard error == nil else {
        print(error!)
        Return
    }
リモートユーザーのビデオをレンダリングする
Twilioの participantDidConnect そして didSubscribeToVideoTrack イベントリスナーをトリガーします。 connectionCreated そして streamCreated イベントは、リモート参加者がセッションに接続し、ビデオの送信を開始したときに発生する。
トワイリオ
func participantDidConnect(room: Room, participant: RemoteParticipant) {
    print ("Participant \(participant.identity) has joined Room \(room.name)")

    // Set the delegate of the remote participant to receive callbacks
    participant.delegate = self
}

func participantDidDisconnect(room: Room, participant: RemoteParticipant) {
    print ("Participant \(participant.identity) has left Room \(room.name)")
}

 func didSubscribeToVideoTrack(videoTrack: RemoteVideoTrack,
                              publication: RemoteVideoTrackPublication,
                              participant: RemoteParticipant) {

    print("Participant \(participant.identity) added a video track.")
    if let remoteView = VideoView.init(frame: self.view.bounds,
                                       delegate:self) {
        videoTrack.addRenderer(remoteView)
        self.view.addSubview(remoteView)
        self.remoteView = remoteView
    }
}
ボネージ
class ViewController: UIViewController {
   var session: OTSession?
   var publisher: OTPublisher?
   var subscriber: OTSubscriber?

func session(_ session: OTSession, streamCreated stream: OTStream) {
    subscriber = OTSubscriber(stream: stream, delegate: self)
    guard let subscriber = subscriber else {
        return
    }


    var error: OTError?
    session.subscribe(subscriber, error: &error)
    guard error == nil else {
        print(error!)
        return
    }


    guard let subscriberView = subscriber.view else {
        return
    }
    subscriberView.frame = UIScreen.main.bounds
    view.insertSubview(subscriberView, at: 0)
}


// MARK: - OTSubscriberDelegate callbacks
extension ViewController: OTSubscriberDelegate {
   public func subscriberDidConnect(toStream subscriber: OTSubscriberKit) {
       print("The subscriber did connect to the stream.")
   }


   public func subscriber(_ subscriber: OTSubscriberKit, didFailWithError error: OTError) {
       print("The subscriber failed to connect to the stream.")
   }
}
オーディオ
Vonageは、単一のPublisherオブジェクトを使用してオーディオとビデオの両方を管理します。デフォルトのオプションでパブリッシュを開始すると、SDKはオーディオとビデオの両方をパブリッシュします。ただし、音声のみのセッションを希望する場合は、Videoを公開しないようにパブリッシャーオブジェクトを設定することができます。
ミュートマイク
Twilioでは、マイクをミュートするためにオーディオトラックを取得する必要があります。Vonageでは、呼び出し可能な単一のメソッドを提供することで、これを簡素化しています。
トワイリオ
guard let micTrack = LocalAudioTrack(options: nil, enabled: true, name: TrackName.mic) else {
           return
}
participant?.unpublishAudioTrack(micTrack)
ボネージ
publisher.publishAudio = false
マイクのミュートを解除する
同様に、Twilio Videoでは、マイクのミュートを解除するためにオーディオトラックを取得する必要があります。Vonageは、単一の呼び出し可能なメソッドを提供することで、これを簡素化しています。
トワイリオ
guard let micTrack = LocalAudioTrack(options: nil, enabled: true, name: TrackName.mic) else {
           return
}
participant?.publishAudioTrack(micTrack)
ボネージ
publisher.publishAudio = true
テキストチャット
セッション内の個々の参加者間だけでなく、セッション内のすべての参加者間でデータ(テキストチャットメッセージやカスタムJSONメッセージなど)を交換することができます。
以下のメソッドは、セッションに接続しているクライアントにメッセージを送信します。各シグナルは、メッセージのタイプを識別する文字列型(この場合は "chat")と、メッセージを含む文字列で定義されます:
func sendChatMessage(message: String) {
    var error: OTError?
    session.signal(withType: "chat", string: message, connection: nil, error: &error)
    if let error {
        print(error)
    }
}
セッションに接続された他のクライアントがメッセージを送信するとき、コールバックの実装は OTSessionDelegate メッセージの受信を許可する:
func session(_ session: OTSession, receivedSignalType type: String?, from connection: OTConnection?, with string: String?) {
        print("Received signal type \(type) with message \(string)")
    }
セッションの離脱と終了 以下のコードは、アクティブなセッションを終了する(ユーザーをセッションから切断する)方法を示している。
トワイリオ
// To disconnect from a Room, we call:
room?.disconnect()

// This results in a callback to RoomDelegate#roomDidDisconnect(room: Room, error: Error?)

// MARK: RoomDelegate

func roomDidDisconnect(room: Room, error: Error?) {
    print("Disconnected from room \(room.name)")
}
ボネージ
var error: OTError?
session?.disconnect(&error)
if error != nil {
    print(error!)
}

// MARK: OTSessionDelegate

func sessionDidDisconnect(_ session: OTSession) {
print("The client disconnected to the OpenTok session.")
}
詳細はこちら:
- Vonage Video API iOS SDK
- Vonage Video iOS SDK リファレンス:iOS SDKで利用可能なすべてのクラスとメソッドのリスト
- コードサンプル(Objective C): Vonage iOS SDKを使用して実装されたObjective Cベースのサンプルアプリケーション
- コードサンプル(Swift):Vonage iOS SDKを使用して実装されたSwiftベースのサンプルアプリケーション
- チュートリアル Vonage SDKを使用したビデオアプリケーションの構築について