Migration from SMS API to Messages API
The Vonage Messages API is the recommended way to send and receive SMS. It supports multiple channels such as SMS, MMS, RCS, and WhatsApp through a single, consistent interface. This guide compares the HTTP-based SMS API and Messages API for SMS use cases, and walks through the account setup, outbound requests, inbound payloads, and status tracking changes you need to make during a migration. It does not cover SMPP integrations.
The SMS API continues to be supported for existing customers. However, the Messages API has a robust development road-map for new features and improvements, and it is the recommended path for all new integrations, or existing integrations looking to take advantage of the additional messaging channels and features provided.
Messages API currently supports two versions: v1 and the legacy v0.1. For the purpose of migrating from the SMS API to the Messages API, we strongly suggest that you use v1 of the Messages API.
Setting Up Your Vonage Account to Use the Messages API
Select the Messages API in the Dashboard
The first step in migrating from the legacy SMS API to the Messages API is to update the Messaging API type setting on the API Settings page of the Vonage Developer Dashboard. Select Messages API as the API type here.
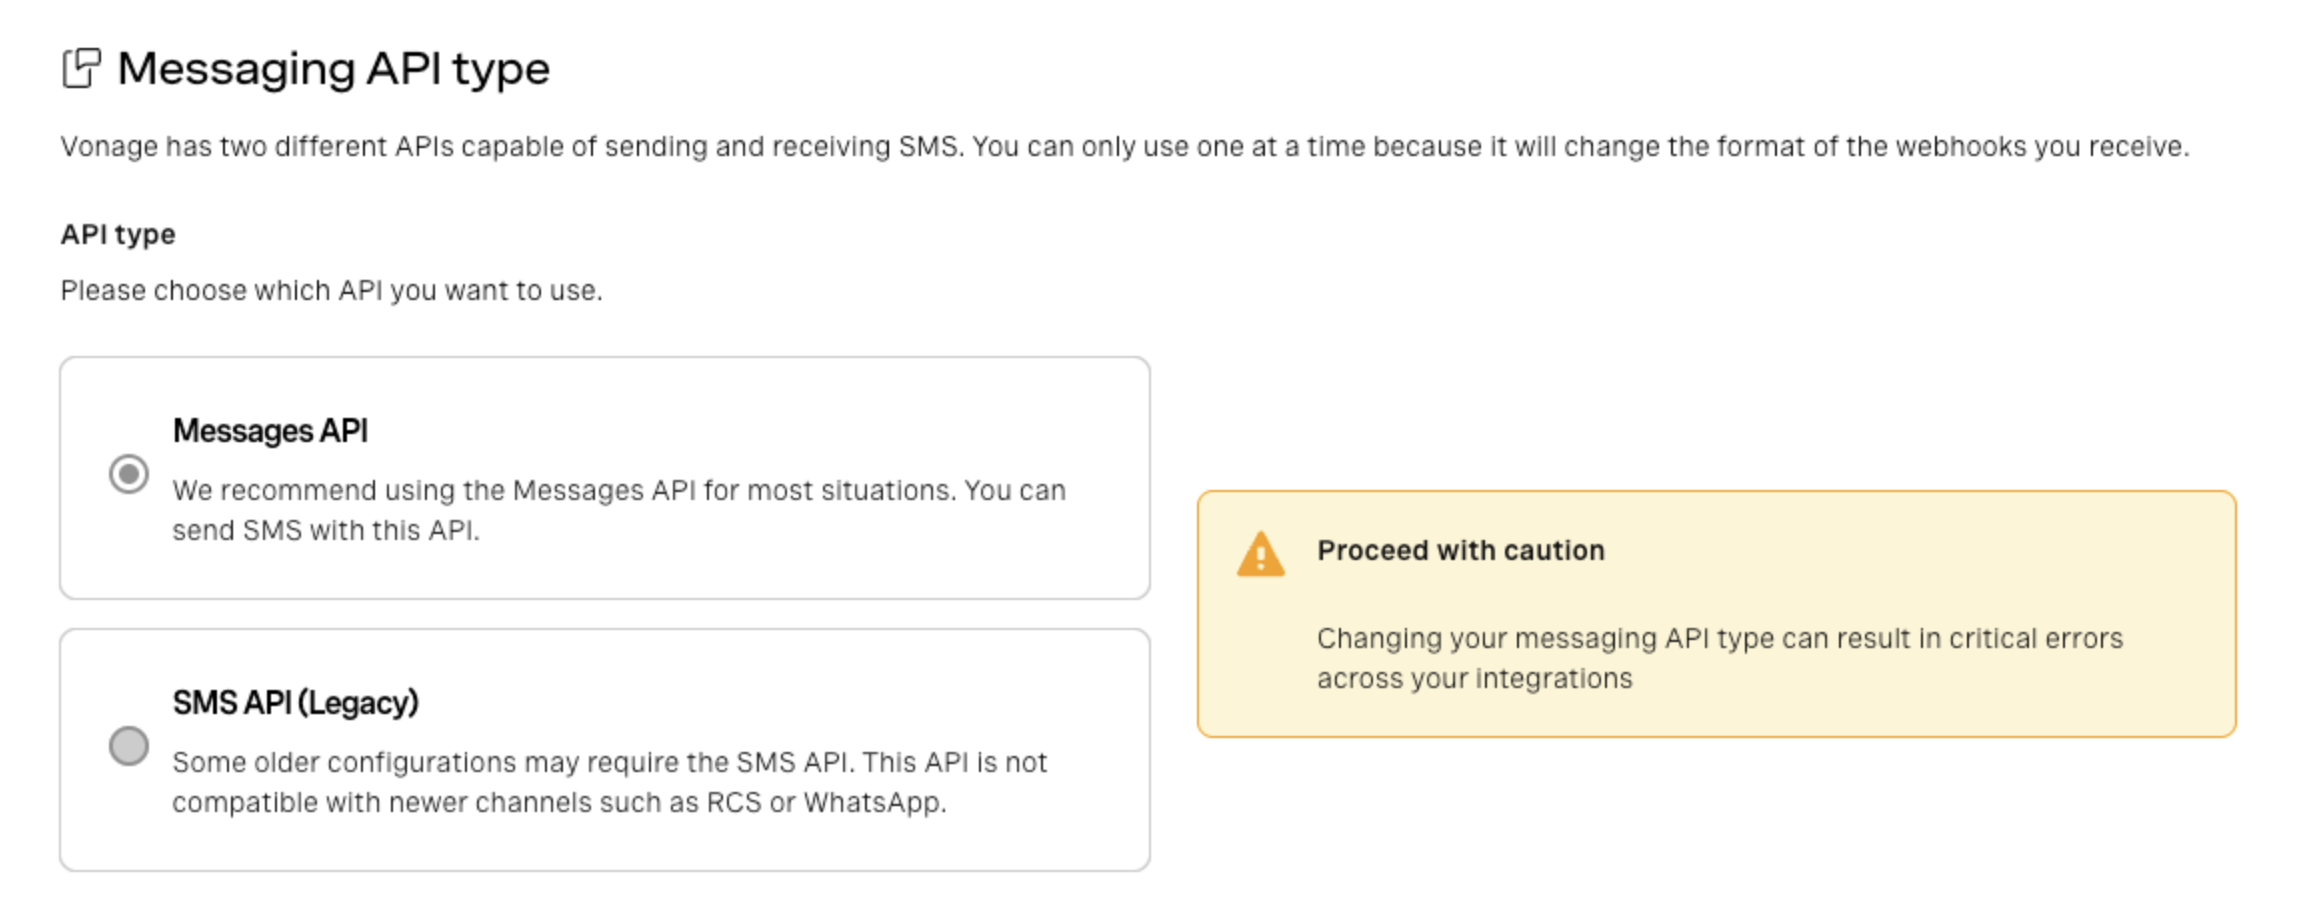
If you do not change this setting from SMS API (legacy), inbound messages and delivery receipts will continue to use the SMS API configuration in the Dashboard.
Account-level Settings vs. Vonage Applications
Once you've set your account to use the Messages API, you need to decide how you want to configure your Messages API settings. There are two ways to do this:
- Account-level settings
- A Vonage Application
The main differences between the two are where you configure webhooks and the credentials used for authentication (and therefore the authentication methods available). Using the Messages API with account-level settings is closer in terms of configuration to how settings for the SMS API are configured. The table below compares the differences in more detail.
| Decision area | SMS API (legacy) | Messages API (Account-level settings) | Messages API (Vonage Application) |
|---|---|---|---|
| Credentials | API key and secret (or signature secret) | API key and secret | Application ID and Private Key |
| Authentication | Basic Authentication or signature authentication | Basic Authentication | JWT signed with the private key |
| Inbound messages | Account-level inbound webhook URL in API Settings, with an optional per-number inbound override under Your Numbers | Account-level inbound webhook URL in API Settings | Application-level Inbound webhook URL on the Vonage Application linked to the number |
| Status callbacks1 | Account-level webhook URL in API Settings (labelled "Delivery receipts") | Account-level webhook URL in API Settings | Application-level Status URL |
| API Version2 | Only has one version | Account-level Messages API version setting | Application-level Messages API version setting |
| Additional Settings | None | None | Secure Inbound Media |
| Number of Configurations | One (Account level) | One (Account level) | Multiple (each Vonage Application has its own settings) |
- Both the SMS API and the Messages API also support overriding the configured DLR/Status webhook URL on a per-request basis.
- We strongly recommend using Messages API v1 for your migration. Ensure that the
Versionis set tov1either in your account settings or in any Vonage application you create (depending on the configuration approach you are using). This is the default for all new Vonage accounts, but may be set tov0.1on older accounts for backwards compatibility.
In general, we would recommend using Vonage Applications for your Messages API integration due to their increased flexibility, and use of JWTs for authentication. However, since account-level settings are closer to the approach used by the SMS API, you may want to consider a two-step approach for your migration, first moving to account-level settings and basic authentication for the Messages API before then using Vonage Applications.
What is a Vonage Application?
A Vonage Application may be a new concept for developers coming from the SMS API. It is essentially a container for the configuration and credentials. It is not the same as your software application.
Each Vonage Application holds:
- A name
- A unique Application ID
- A generated public/private key pair (used for JWT authentication)
- Additional product-specific settings. For the Messages API, these include webhook URLs for inbound messages and message status updates
The SMS API does not use applications. Webhooks are configured globally at the account level. Although you can still use account-level settings with the Messages API if you choose to, it also supports the use of Vonage Applications. Since each application has its own webhook configuration and settings, this makes it easier to manage multiple integrations independently.
Why are Vonage Applications Recommended?
The choice of configuration approach in the Messages API affects where your settings are configured and also the Authentication method used.
Vonage Applications are recommended because:
- Since settings are defined at the Vonage Application-level, and you can create many applications, this makes it easier to manage multiple integrations for different business workflows or use-cases.
- Vonage Applications can be created and managed programmatically using the Vonage CLI or Application API
- Vonage Applications enable the use of JWTs, generated using a public/private key pair, for authentication. This adds an additional layer of security to the authentication process compared to Basic Authentication.
Using Account-level Settings
If you want to use account-level settings with the Messages API webhooks, the basic setup flow is:
- Open API Settings in the Dashboard.
- Set the Messages API version to
v1. - Configure the account-level inbound and status webhook URLs.
- Review Your Numbers for any per-number inbound overrides that could change routing.
- Send Messages API requests using Basic Authentication.
- Validate that inbound messages and status callbacks are reaching the expected account-level endpoints before switching production traffic.
Using a Vonage Application for Messages API
If you want application-level routing and JWT authentication, the setup flow is:
- Create a new application, or open the existing application you want to use.
- Enable the Messages capability.
- Configure the application's inbound and status webhook URLs.
- Set the Messages API version to
v1. - Link the SMS-capable number to that application.
- Send Messages API requests using JWT authentication.
- Validate that inbound messages and status callbacks are reaching the application-level endpoints before switching production traffic.
Create a Vonage API Application
There are three alternative methods for creating a Messages application:
- Using the Vonage CLI
- Using the Dashboard
- Using the Application API
Each of these methods is described in the following sections.
How to Create a Messages Application Using the Vonage CLI
To create your application using the Vonage CLI, enter the following command into the shell:
This command creates a Vonage API application with a messages capability, and the webhook URLs are configured as specified. It also generates a private key file my_messages_app.key and creates or updates the vonage_app.json file.
How to Create a Messages Application Using the Dashboard
You can create a Messages application in the Dashboard.
To create your application using the Dashboard:
Under Applications in the Dashboard, click the Create a new application button.
Under Name, enter the Application name. Choose a name for ease of future reference.
Click the button Generate public and private key. This will create a public/private key pair and the private key will be downloaded by your browser.
Under Capabilities select the Messages button.
In the Inbound URL box, enter the URL for your inbound message webhook, for example,
https://example.com/webhooks/inbound-message.In the Status URL box, enter the URL for your message status webhook, for example,
https://example.com/webhooks/message-status.Click the Generate new application button. You are now taken to the next step of the Create Application procedure where you can link a Vonage API number to the application, and link external accounts such as Facebook to this application.
If there is an external account you want to link this application to, click the Linked external accounts tab, and then click the corresponding Link button for the account you want to link to.
You have now created your application.
NOTE: Before testing your application ensure that your webhooks are configured and your webhook server is running.
How to Create a Messages Application Using the Application API
The Application API lets you create and configure a Vonage Application programmatically — without using the dashboard or the CLI. A Vonage Application created via the Application API works the same as one created through the dashboard.
For a full overview of how to create a Vonage Application, see Create a Vonage Application.
Linking a Phone Number to Your Application
In the Dashboard, open the Applications page, select the application you want to use, and link the number from that application's Link numbers tab.
You can also manage number-specific inbound webhook settings from Your Numbers. The Dashboard indicates that a per-number inbound webhook overrides the account-level inbound webhook. If you are using numbers that are also linked to a Messages application, validate the resulting routing in your account before relying on that override behavior.
If a number is not linked to a Messages-enabled application, inbound SMS messages to that number will send a request to the inbound message webhook defined at the account level in the API settings dashboard configuration rather than the application-level Messages webhook configuration.
Sending an SMS (Outbound Messages)
Endpoint
| Aspect | Messages API | SMS API (legacy) |
|---|---|---|
| Send endpoint | POST /v1/messages | POST /sms/json |
| Method | POST | POST |
| Content-Type | application/json | application/x-www-form-urlencoded |
Request Structure
Messages API payload:
{
  "message_type": "text",
  "text": "Hello from Vonage",
  "to": "447700900000",
  "from": "Vonage",
  "channel": "sms"
}
SMS API (legacy) payload:
from=Vonage
text=Hello from Vonage
to=447700900000
Key Differences in the Request Body
| Field | Messages API | SMS API (legacy) |
|---|---|---|
to | to | to |
from | from | from |
text | text | text |
| Channel | "channel": "sms" (required) | Implicit (SMS only) |
| Message type | "message_type": "text" (required) | Implicit |
Code Snippets
The following code snippets include the cURL example and the available Server SDK examples for each API.
Messages API Code Snippets
| Key | Description |
|---|---|
VONAGE_APPLICATION_ID | The Vonage Application ID. |
VONAGE_PRIVATE_KEY | Private key for the Vonage Application. |
MESSAGES_TO_NUMBER | The number you are sending the to in E.164 format. For example |
SMS_SENDER_ID | The alphanumeric string that represents the name or number of the organization sending the message. |
Prerequisites
If you do not have an application you can create one. Make sure you also configure your webhooks.
Write the code
Add the following to send-sms.sh:
curl -X POST https://api.nexmo.com/v1/messages \
  -H "Authorization: Bearer "$JWT\
  -H 'Content-Type: application/json' \
  -H 'Accept: application/json' \
  -d $'{
    "to": "'${MESSAGES_TO_NUMBER}'",
    "from": "'${SMS_SENDER_ID}'",
    "channel": "sms",
    "message_type": "text",
    "text": "This is an SMS sent using the Vonage Messages API."
  }'
Run your code
Save this file to your machine and run it:
Prerequisites
If you do not have an application you can create one. Make sure you also configure your webhooks.
npm install @vonage/server-sdk @vonage/messagesCreate a file named send-sms.js and add the following code:
const { Vonage } = require('@vonage/server-sdk');
const { Channels } = require('@vonage/messages');

/**
 * It is best to send messages using JWT instead of basic auth. If you leave out
 * apiKey and apiSecret, the messages SDK will send requests using JWT tokens
 *
 * @link https://developer.vonage.com/en/messages/technical-details#authentication
 */
const vonage = new Vonage(
  {
    applicationId: VONAGE_APPLICATION_ID,
    privateKey: VONAGE_PRIVATE_KEY,
  },
  {
    ...(MESSAGES_API_URL ? {apiHost: MESSAGES_API_URL} : {}),
  },
);Write the code
Add the following to send-sms.js:
vonage.messages.send({
  messageType: 'sms',
  channel: Channels.SMS,
  text: 'This is an SMS text message sent using the Messages API',
  to: MESSAGES_TO_NUMBER,
  from: SMS_SENDER_ID,
})
  .then(({ messageUUID }) => console.log(messageUUID))
.catch((error) => console.error(error));Run your code
Save this file to your machine and run it:
Prerequisites
If you do not have an application you can create one. Make sure you also configure your webhooks.
Add the following to build.gradle:
implementation 'com.vonage:server-sdk-kotlin:2.1.1'Create a file named SendSmsText and add the following code to the main method:
val client = Vonage {
    applicationId(VONAGE_APPLICATION_ID)
    privateKeyPath(VONAGE_PRIVATE_KEY_PATH)
}Write the code
Add the following to the main method of the SendSmsText file:
val messageId = client.messages.send(
    smsText {
        to(MESSAGES_TO_NUMBER)
        from(SMS_SENDER_ID)
        text("This is an SMS text message sent using the Messages API")
    }
)Run your code
We can use the application plugin for Gradle to simplify the running of our application. Update your build.gradle with the following:
apply plugin: 'application'
mainClassName = project.hasProperty('main') ? project.getProperty('main') : ''
Run the following gradle command to execute your application, replacing com.vonage.quickstart.kt.messages.sms with the package containing SendSmsText:
Prerequisites
If you do not have an application you can create one. Make sure you also configure your webhooks.
Add the following to build.gradle:
implementation 'com.vonage:server-sdk:9.3.1'Create a file named SendSmsText and add the following code to the main method:
VonageClient client = VonageClient.builder()
		.applicationId(VONAGE_APPLICATION_ID)
		.privateKeyPath(VONAGE_PRIVATE_KEY_PATH)
.build();Write the code
Add the following to the main method of the SendSmsText file:
var response = client.getMessagesClient().sendMessage(
		SmsTextRequest.builder()
			.from(SMS_SENDER_ID).to(MESSAGES_TO_NUMBER)
			.text("This is an SMS text message sent using the Messages API")
			.build()
);
System.out.println("Message sent successfully. ID: " + response.getMessageUuid());Run your code
We can use the application plugin for Gradle to simplify the running of our application. Update your build.gradle with the following:
apply plugin: 'application'
mainClassName = project.hasProperty('main') ? project.getProperty('main') : ''
Run the following gradle command to execute your application, replacing com.vonage.quickstart.messages.sms with the package containing SendSmsText:
Prerequisites
If you do not have an application you can create one. Make sure you also configure your webhooks.
Install-Package VonageWrite the code
Add the following to SendSms.cs:
var credentials = Credentials.FromAppIdAndPrivateKeyPath(VONAGE_APP_ID, VONAGE_PRIVATE_KEY_PATH);

var vonageClient = new VonageClient(credentials);

var request = new Vonage.Messages.Sms.SmsRequest
{
    To = MESSAGES_TO_NUMBER,
    From = SMS_SENDER_ID,
    Text = "An SMS sent using the Vonage Messages API"
};

var response = await vonageClient.MessagesClient.SendAsync(request);Prerequisites
If you do not have an application you can create one. Make sure you also configure your webhooks.
composer require vonage/clientCreate a file named send-sms.php and add the following code:
Run your code
Save this file to your machine and run it:
Prerequisites
If you do not have an application you can create one. Make sure you also configure your webhooks.
pip install vonage python-dotenvWrite the code
Add the following to send-sms.py:
from vonage import Auth, Vonage
from vonage_messages import Sms

client = Vonage(
    Auth(
        application_id=VONAGE_APPLICATION_ID,
        private_key=VONAGE_PRIVATE_KEY,
    )
)

response = client.messages.send(
    Sms(
        to=MESSAGES_TO_NUMBER,
        from_=SMS_SENDER_ID,
        text='This is an SMS sent using the Vonage Messages API.',
    )
)
print(response)Run your code
Save this file to your machine and run it:
Prerequisites
If you do not have an application you can create one. Make sure you also configure your webhooks.
gem install vonageCreate a file named send-sms.rb and add the following code:
Run your code
Save this file to your machine and run it:
SMS API (Legacy) Code Snippets
| Key | Description |
|---|---|
VONAGE_API_KEY | Your Vonage API key (see it on your dashboard). |
VONAGE_API_SECRET | Your Vonage API secret (also available on your dashboard). |
SMS_TO_NUMBER | The phone number you are sending the message to. |
SMS_SENDER_ID | The alphanumeric string that represents the name or number of the organization sending the message. |
Write the code
Add the following to send-sms.sh:
curl -X POST https://rest.nexmo.com/sms/json \
  -u "$VONAGE_API_KEY:$VONAGE_API_SECRET" \
  -d "from=${SMS_SENDER_ID}" \
  -d "to=${SMS_TO_NUMBER}" \
  -d 'text=A text message sent using the Vonage SMS API'
Run your code
Save this file to your machine and run it:
Prerequisites
npm install @vonage/server-sdkCreate a file named send.js and add the following code:
const { Vonage } = require('@vonage/server-sdk');

const vonage = new Vonage({
  apiKey: VONAGE_API_KEY,
  apiSecret: VONAGE_API_SECRET,
});Write the code
Add the following to send.js:
vonage.sms.send({
  to: SMS_TO_NUMBER,
  from: SMS_SENDER_ID,
  text: 'A text message sent using the Vonage SMS API',
})
  .then((resp) => {
    console.log('Message sent successfully');
    console.log(resp);
  })
  .catch((err) => {
    console.log('There was an error sending the messages.');
    console.error(err);
});Run your code
Save this file to your machine and run it:
Prerequisites
Add the following to build.gradle:
implementation 'com.vonage:server-sdk-kotlin:2.1.1'Create a file named SendMessage and add the following code to the main method:
val client = Vonage {
    apiKey(VONAGE_API_KEY)
    apiSecret(VONAGE_API_SECRET)
}Write the code
Add the following to the main method of the SendMessage file:
val response = client.sms.sendText(
    from = SMS_SENDER_ID,
    to = SMS_TO_NUMBER,
    message = "Hello from Vonage SMS API"
)

println(
    if (response.wasSuccessfullySent())
        "Message sent successfully."
    else
        "Message failed with error: ${response[0].errorText}"
)Run your code
We can use the application plugin for Gradle to simplify the running of our application. Update your build.gradle with the following:
apply plugin: 'application'
mainClassName = project.hasProperty('main') ? project.getProperty('main') : ''
Run the following gradle command to execute your application, replacing com.vonage.quickstart.kt.sms with the package containing SendMessage:
Prerequisites
Add the following to build.gradle:
implementation 'com.vonage:server-sdk:9.3.1'Create a file named SendMessage and add the following code to the main method:
VonageClient client = VonageClient.builder().apiKey(VONAGE_API_KEY).apiSecret(VONAGE_API_SECRET).build();Write the code
Add the following to the main method of the SendMessage file:
TextMessage message = new TextMessage(
        SMS_SENDER_ID, SMS_TO_NUMBER,
        "A text message sent using the Vonage SMS API"
);

SmsSubmissionResponse response = client.getSmsClient().submitMessage(message);

if (response.getMessages().get(0).getStatus() == MessageStatus.OK) {
    System.out.println("Message sent successfully.");
} else {
    System.out.println("Message failed with error: " + response.getMessages().get(0).getErrorText());
}Run your code
We can use the application plugin for Gradle to simplify the running of our application. Update your build.gradle with the following:
apply plugin: 'application'
mainClassName = project.hasProperty('main') ? project.getProperty('main') : ''
Run the following gradle command to execute your application, replacing com.vonage.quickstart.sms with the package containing SendMessage:
Prerequisites
Install-Package VonageCreate a file named SendSms.cs and add the following code:
using Vonage;
using Vonage.Request;Add the following to SendSms.cs:
var credentials = Credentials.FromApiKeyAndSecret(
    vonageApiKey,
    vonageApiSecret
    );

var vonageClient = new VonageClient(credentials);Write the code
Add the following to SendSms.cs:
var response = await vonageClient.SmsClient.SendAnSmsAsync(new Vonage.Messaging.SendSmsRequest()
{
    To = SMS_TO_NUMBER,
    From = SMS_SENDER_ID,
    Text = "A text message sent using the Vonage SMS API"
});
Console.WriteLine(response.Messages[0].To);Prerequisites
composer require vonage/clientCreate a file named send-sms.php and add the following code:
Run your code
Save this file to your machine and run it:
Prerequisites
pip install vonage python-dotenvWrite the code
Add the following to send-an-sms.py:
from vonage import Auth, Vonage
from vonage_sms import SmsMessage, SmsResponse

client = Vonage(Auth(api_key=VONAGE_API_KEY, api_secret=VONAGE_API_SECRET))

message = SmsMessage(
    to=SMS_TO_NUMBER,
    from_=SMS_SENDER_ID,
    text="A text message sent using the Vonage SMS API.",
)

response: SmsResponse = client.sms.send(message)
print(response)Run your code
Save this file to your machine and run it:
Prerequisites
gem install vonageCreate a file named send.rb and add the following code:
Run your code
Save this file to your machine and run it:
Optional Parameters and Feature Differences
Once the required SMS fields are migrated, the next step is to review any optional SMS API parameters your integration relies on.
| SMS API parameter or aspect | Messages API equivalent | Notes |
|---|---|---|
ttl | ttl | Both APIs support TTL, but the units and limits differ. SMS API uses milliseconds with a range of 20000 to 604800000. Messages API uses seconds with a range of 20 to 604800. Both default to 72 hours. |
trusted-number | trusted_recipient | Same purpose: override Fraud Defender protections on a per-message basis for eligible accounts. |
message-class | No equivalent | No direct Messages API equivalent for SMS message-class. |
status-report-req | No direct equivalent | SMS API lets you request DLRs explicitly. Messages API status callbacks are driven by webhook configuration rather than a per-message boolean. |
callback | webhook_url | Both override the default status callback destination on a per-message basis. |
client-ref | client_ref | Both let you attach your own reference for correlation. |
entity-id | sms.entity_id | Same regulatory purpose; naming changes from hyphenated to underscored. Nested in the sms object. |
content-id | sms.content_id | Same regulatory purpose; naming changes from hyphenated to underscored. Nested in the sms object. |
pool-id | sms.pool_id | Same number pool behavior; naming changes from hyphenated to underscored. Nested in the sms object. |
account-ref | No equivalent | SMS API billing/account reference parameter does not have a direct Messages API equivalent. |
type / encoding control | sms.encoding_type with text, unicode, or auto | SMS API uses type with text, unicode, or binary. Messages API auto-detects encoding by default. |
body, udh, protocol-id / binary SMS fields | No equivalent | SMS API supports binary SMS through type=binary together with body, udh, and protocol-id. |
HTTP Response Codes
This is one of the most significant behavioural differences between the two APIs.
The SMS API always returns a 200 HTTP response code, regardless of success or failure, with a status parameter in the response body, the value of which maps to the outcome.
The Messages API returns a 202 response code for successful requests, and 4xx or 5xx codes for error responses.
Some examples are shown in the comparison table below.
| Scenario | Messages API | SMS API (legacy) |
|---|---|---|
| Success | Returns HTTP 202 Accepted on success. | Always returns HTTP 200. The actual status is in the response body ("status": "0" for success). |
| Auth error | HTTP 401 Unauthorized | HTTP 200 with body status 4 (Invalid Credentials). |
| Invalid parameters | HTTP 422 Unprocessable Entity | HTTP 200 with body status 2 (Missing Parameters) or 3 (Invalid Parameters). |
See Messages API errors, SMS API error codes, and the SMS API send endpoint for the full error details.
SMS API Success response
{
  "message-count": "1",
  "messages": [
    {
      "to": "447700900000",
      "message-id": "0A0000000123ABCD1",
      "status": "0",
      "remaining-balance": "3.14159265",
      "message-price": "0.03330000",
      "network": "23410"
    }
  ]
}
SMS API Error Response
{
  "message-count": "1",
  "messages": [
    {
      "status": "4",
      "error-text": "Bad Credentials"
    }
  ]
}
Messages API Success Response
{
  "message_uuid": "aaaaaaaa-bbbb-4ccc-8ddd-0123456789ab"
}
The Messages API returns a single message_uuid instead of an array of message objects. Use this UUID to correlate status callbacks.
Messages API Error Response (401 Unauthorized)
{
  "type": "https://developer.vonage.com/api-errors#unauthorized",
  "title": "Unauthorized",
  "detail": "You did not provide correct credentials.",
  "instance": "bf0ca0bf927b3b52e3cb03217e1a1ddf"
}
Receiving an SMS (Inbound Messages)
Both APIs deliver inbound SMS messages to a webhook URL you configure. There are some differences between the two APIs in the structure of the inbound payload and the naming of the parameters. Webhook setup is covered in Setting up your Vonage Account to Use the Messages API.
SMS API Inbound Payload
When a message is received on the SMS API, Vonage sends a
Example payload:
{
  "msisdn": "447700900001",
  "to": "447700900000",
  "messageId": "0A0000000123ABCD1",
  "text": "Hello from a user",
  "type": "text",
  "keyword": "HELLO",
  "message-timestamp": "2020-01-01 12:00:00"
}
Messages API Inbound Payload
When a message is received on the Messages API, Vonage sends a
Example payload:
{
   "channel": "sms",
   "message_uuid": "aaaaaaaa-bbbb-4ccc-8ddd-0123456789ab",
   "to": "447700900000",
   "from": "447700900001",
   "timestamp": "2025-02-03T12:14:25Z",
   "text": "Hello From Vonage!",
   "sms": {
      "num_messages": "2",
      "keyword": "HELLO"
   },
   "usage": {
      "currency": "EUR",
      "price": "0.0333"
   },
   "origin": {
      "network_code": "12345"
   }
}
Tracking Message Status
The Messages API uses status callbacks to notify your application when the state of a message changes. These are the Messages API equivalent of the Delivery Receipts (DLRs) used by the SMS API.
DLR Status Equivalents
The closest Messages API equivalents for SMS API DLR statuses are shown below:
| SMS API DLR status | Closest Messages API equivalent | Notes |
|---|---|---|
accepted | submitted | Occurs when the message has been passed to a provider gateway. This is the chargeable event. |
buffered | No equivalent | Rarely used in practice and not forwarded. |
delivered | delivered | Indicates receipt by the end-user device, depending on carrier support. |
expired | rejected | Typically corresponds to Messages API error code 1360. |
failed | rejected | Indicates provider failure or network error. |
unknown | rejected | Typically corresponds to Messages API error code 1330. |
rejected | rejected | See Messages API error codes. |
For more information, see Messages API Status Callbacks.
Additional Features of the Messages API
While this guide focuses on migrating your SMS integration, the Messages API offers a number of additional capabilities that are worth exploring once your migration is complete.
Multi-channel Messaging
The Messages API supports multiple channels through a single, consistent API interface. Once you have migrated your SMS integration, you can add new channels without changing your core integration:
| Channel | Description |
|---|---|
| MMS | Send multimedia content (images, audio, video) to US and Canadian numbers. |
| RCS | Rich Communication Services — send interactive messages with images, suggested replies, and action buttons to Android and iOS devices. |
| Send and receive messages on WhatsApp using a verified business account. | |
| Facebook Messenger | Engage customers on Messenger. |
| Viber | Send messages via Viber Service Messages. |
| Send transactional emails using the same unified API you already use for other messaging channels. |
The request structure is consistent across channels. To send a message on a different channel, you change the channel field and add any channel-specific parameters. Your webhook handler for status callbacks and inbound messages works the same way regardless of channel.
Failover
The Messages API supports failover workflows, which allow you to automatically retry a message on a different channel if the first attempt is rejected. For example, you can send a WhatsApp message and fall back to SMS if the message is rejected (for instance, because the recipient does not have WhatsApp).
Failover is currently triggered only when a message is rejected.
See Messages API Failover for more information.
Rich Content
On channels that support it (RCS, WhatsApp, MMS, Messenger, Viber), the Messages API allows you to send:
- Images, video, audio, and file attachments
- Interactive message templates
- Suggested reply buttons and action buttons (RCS, WhatsApp)
- Rich cards and carousels (RCS)