Create a Basic Android Application
Create MainActivity.kt
Open MainActivity.kt and add the following content. This corresponds to a minimal Activity.
package com.vonage.verify2.test

import android.os.Bundle
import androidx.activity.ComponentActivity

class MainActivity : ComponentActivity() {
    override fun onCreate(savedInstanceState: Bundle?) {
        super.onCreate(savedInstanceState)
    }
}
Then define the backend URL constant using BuildConfig:
private const val BACKEND_URL = BuildConfig.BACKEND_URL
Creating the UI with Jetpack Compose
In this section, we’ll build the user interface for our verification flow. There’s no networking yet because the goal is to create a clean UI that we can later connect to the backend endpoints.
The new MainActivity will look like this:
class MainActivity : ComponentActivity() {
    override fun onCreate(savedInstanceState: Bundle?) {
        super.onCreate(savedInstanceState)
        setContent { VerifyApp() }
    }
}
Let’s implement VerifyApp()
@Composable
fun VerifyApp() {
    MaterialTheme {
        Surface(modifier = Modifier.fillMaxSize()) {
            VerificationScreen()
        }
    }
}
Our UI has a small number of “moments” (screens) that depend on the current verification step:
- Enter phone number
- Loading
- Enter SMS code (fallback)
- Verified
- Error
Jetpack Compose makes this easy if we model the screen as a state machine.
Create a UI State Machine
We define a sealed class to represent all possible UI states:
private sealed class VerifyUiState {
    data object EnterPhone : VerifyUiState()
    data object Loading : VerifyUiState()
    data class EnterSms(val requestId: String) : VerifyUiState()
    data class Verified(val method: String) : VerifyUiState()
    data class Error(val message: String) : VerifyUiState()
}
Even though we’re not integrating with the backend yet, we already include a requestId in the SMS state because it will be needed later.
Create the Screen and Its Local UI State
Inside VerificationScreen() we store user inputs and current UI state with remember { mutableStateOf(...) }:
var phone by remember { mutableStateOf(DEFAULT_PHONE) }
var smsCode by remember { mutableStateOf("") }
var uiState by remember { mutableStateOf<VerifyUiState>(VerifyUiState.EnterPhone) }
var statusMessage by remember { mutableStateOf("") }
Build the Layout with a Simple Column
We create a centered layout using Column, Spacer, and Modifier:
Column(
    modifier = Modifier.fillMaxSize().padding(16.dp),
    verticalArrangement = Arrangement.Center,
    horizontalAlignment = Alignment.CenterHorizontally
) { ... }
Inside it we show:
- A title
- Phone input
- Optional SMS input
- Buttons based on the current UI state
- A status message at the bottom
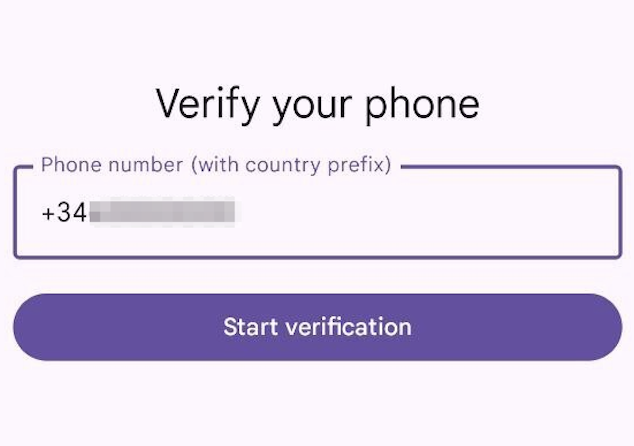
Phone Input
OutlinedTextField(
    value = phone,
    onValueChange = { phone = it },
    enabled = uiState !is VerifyUiState.Loading,
    label = { Text("Phone number") },
    placeholder = { Text("+34600000000") },
    keyboardOptions = KeyboardOptions(keyboardType = KeyboardType.Phone),
    modifier = Modifier.fillMaxWidth()
)
Notes:
- We disable input while loading to prevent double-submits.
- We use
KeyboardType.Phoneto show a phone-friendly keyboard.
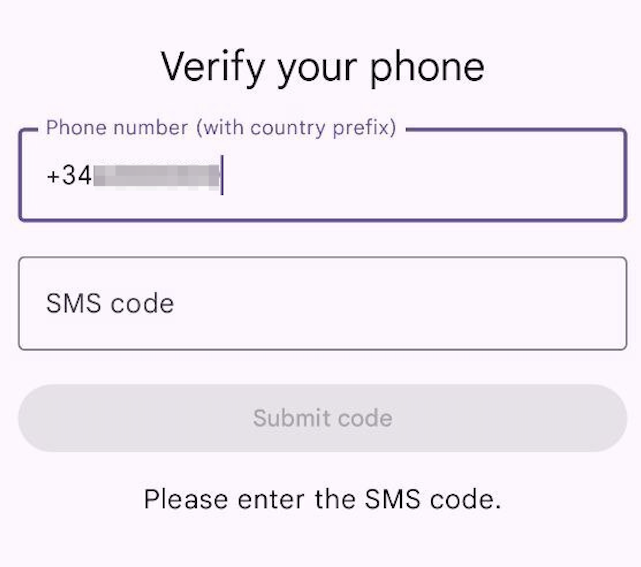
SMS Input
SMS input will be implemented with a conditional rendering. Compose makes conditional UI very straightforward.
We show the SMS input only if we are in EnterSms:
val requestIdForSms = (uiState as? VerifyUiState.EnterSms)?.requestId
if (requestIdForSms != null) {
    OutlinedTextField(
        value = smsCode,
        onValueChange = { smsCode = it },
        enabled = uiState !is VerifyUiState.Loading,
        label = { Text("SMS code") },
        keyboardOptions = KeyboardOptions(keyboardType = KeyboardType.Number),
        modifier = Modifier.fillMaxWidth()
    )
}
Later, when we integrate with the backend, this requestId will come from /verification.
Render the Correct Action Button Based on UI State
We use when (uiState):
- Loading → show a spinner
- EnterPhone / Error → show “Start verification”
- EnterSms → show “Submit code”
- Verified → show success + “Verify another number”
This is the core Compose pattern used in real apps: UI = function(state).
Getting Started with Silent Authentication
Silent Authentication takes quite a bit to understand. This tutorial shows you how to build an integration from scratch with Nodejs and Kotlin