Share:
Chris is the Developer Relations Tooling Manager and leads the team that builds your favorite tools. He has been programming for more than 15 years across various languages and types of projects from client work all the way up to big-data, large scale systems. He lives in Ohio, spending his time with his family and playing video and TTRPG games.
Using Vonage APIs with MongoDB Atlas - Part 4
In this series:
Part 4 - Using Atlas for User Authentication
We continue diving into MongoDB Atlas and its use with various Vonage APIs. In Part 1, we took a look at what MongoDB Atlas is and some of the services that it offers. In Part 2, we used Vonage Verify to increase user security during authentication. Part 3 revolved around contacting the customer for their order and what we can do when customers need to speak to the restaurant. For Part 4, we will put Atlas's user authentication system in place.
One common area that web applications share is the need to authenticate users. Frameworks help handle some of this, but each application builds similar code to do one thing - confirm a user's credentials. We can use MongoDB Atlas has a built-in system to authenticate and manage users.
This system is different from the authentication we do to MongoDB and is a service Atlas provides. You can manage users through Atlas as a third-party (to your application) authentication service. Using Atlas allows you to support many different authentication types securely.
To show this off, the administrative backend of our demo uses Atlas authentication instead of Verify. This backend will allow us to manage the inventory that we show users and orders that have come in. It will also allow us to join any video meetings customers have started. As a bonus, it will enable us to see what happens if we want to embed MongoDB access into our application instead of relying on a backend API.
Atlas supports both a web UI and configuration files for many application-centric features. We will use the web UI for the tutorial for configuration, but you can also use the supplied sample files in the demo repository. These files work with the Realm CLI tool, and we have provided them for you to compare to the web UI. If you are just getting started, I recommend using the web UI, but in a managed application, you will want to store the configuration and use the Realm CLI to deploy config changes. The demo includes an app-service/ folder with sample files you can edit to get started.
Atlas Apps are a combination of configuration details and deployed code. The Apps interface makes it easy to work with the settings and code a developer has offloaded to Atlas services.
For now, let's use the web UI. Once you log into your project, click "App Services" in the top secondary navigation bar. This will bring up a list of configured application projects. If this is the first application you are working with, a window will pop up, taking you to the App Services. Select "Build your own app" for now, as we will handle everything for the tutorial.
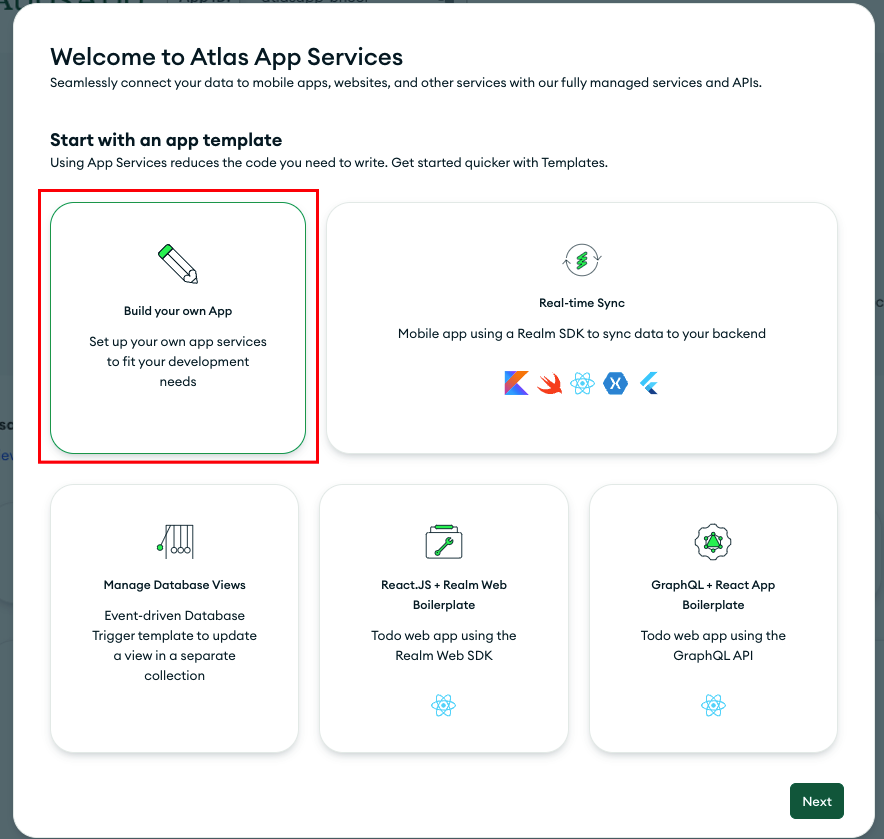 New Atlas App dialog
The next screen will have some configuration questions. Our Data Source, which is the cluster we use, should be filled in. Select the one you use for the tutorial if you have multiple clusters. You can also change the name of the application. I will name the application "Frontend" as this application service will handle our JavaScript frontend for the admin pages. Click Create App Service to continue, and then Close Guides to close the jumpstart window.
This brings us to the Apps dashboard for our Frontend application. As you can see, you can do many things with an Atlas App, but for now, we are focused on using user authentication. Under the "Data Access" section of the sidebar, click on Authentication so we can start to set it up.
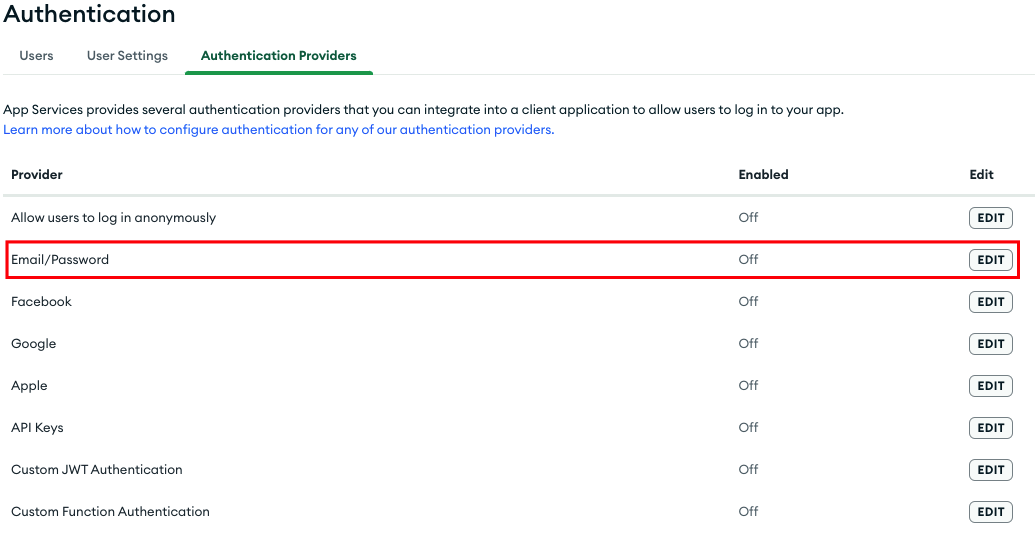 User authentication options
As mentioned before, Atlas supports multiple types of authentication. For now, we will only worry about "Email/Password." Click on the Edit button to start setting it up.
On the configuration page, toggle "Provider Enabled" to on. For the tutorial, we will automatically confirm new users, so go ahead and also select "Automatically confirm users." In a production application, you will want the user to verify their email to validate that the email address exists, but we can skip that step for now. While we will not go over implementing it, you must enter a "Password Reset URL." For now, enter "https://example.com/reset" to satisfy the form. Click on Save Draft when you are finished.
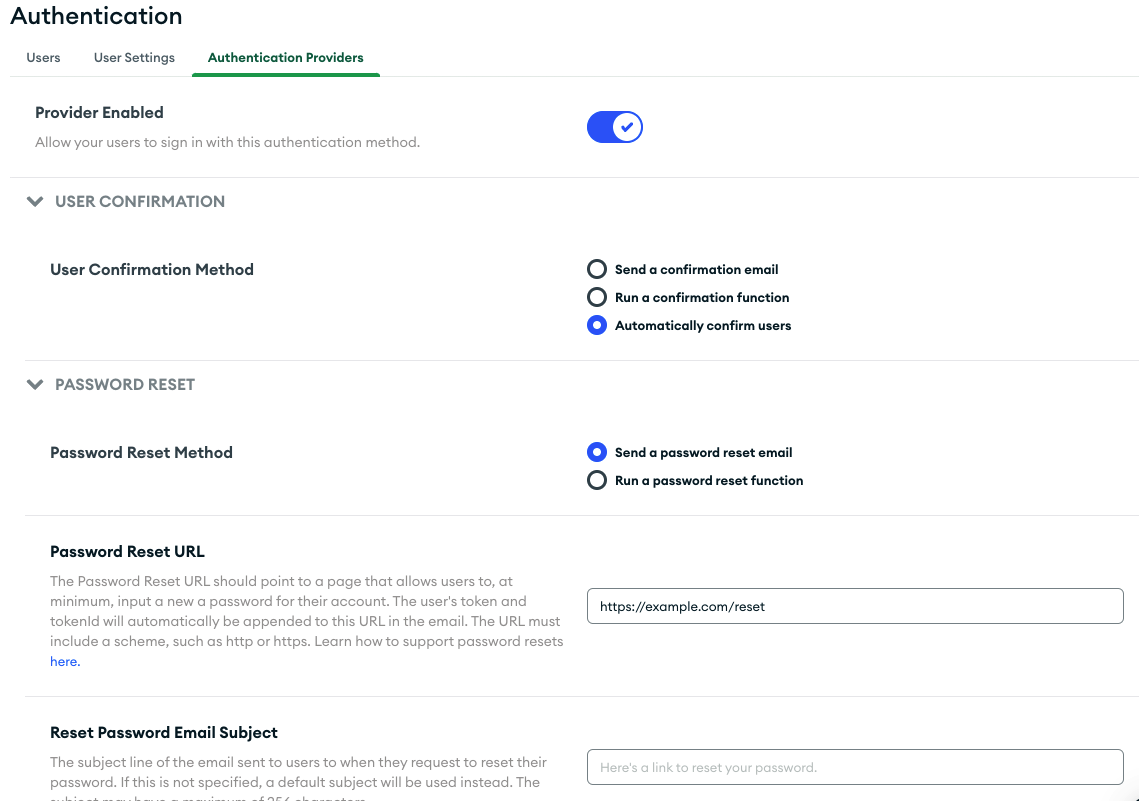 Email/Password options
Wait, "Save Draft?!" If you skip past the panel that comes up, any changes you make in Atlas are considered Draft changes. You can stage a set of different draft stages and deploy them when everything is set up. All of this information is saved in configuration files that can be pushed and pulled using the Realm CLI, and the files mentioned above are stored in app-service/ as examples.
Once you've made a change, you will see a banner along the top of the page that now says "Changes have been made" with a button to review. Go ahead and click on Review Draft & Deploy. You will see a JSON blob that is a text diff between the old and new settings. This will look very familiar if you have used GitHub's pull request system. Since we just made this change, click on Deploy. These settings will be pushed out to the app service, and we can start to use the authentication.
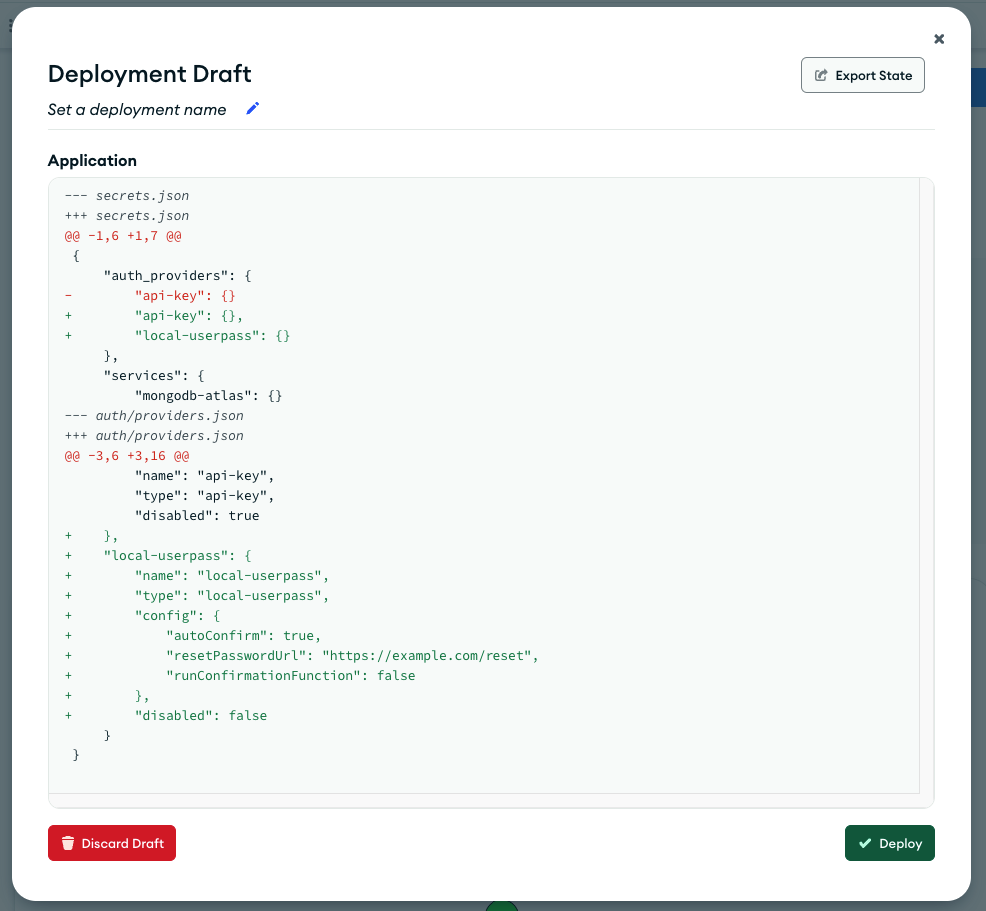 Deployment Diff dialog
Now we need a user. Click on App Users in the sidebar, and then the Add New User button. Fill in a valid e-mail address and password, then click Create. Creating users like this will not scale, so there are options to create users programmatically through a signup process, but for now, we will use one we make by hand.
At this point, authentication is configured for our application. We could use the MongoDB Realm SDK to authenticate a user, but our current user is nothing more than an e-mail address and password. We cannot store extra information or denote that the user is an administrative user. This is where Custom User Data comes in. We can link a User to a document collection that will house additional user content, like Name, Phone, or even if they are flagged as an admin.
Click on User Settings. This will bring up the configuration page for our user data linking.
 Custom User Information Settings
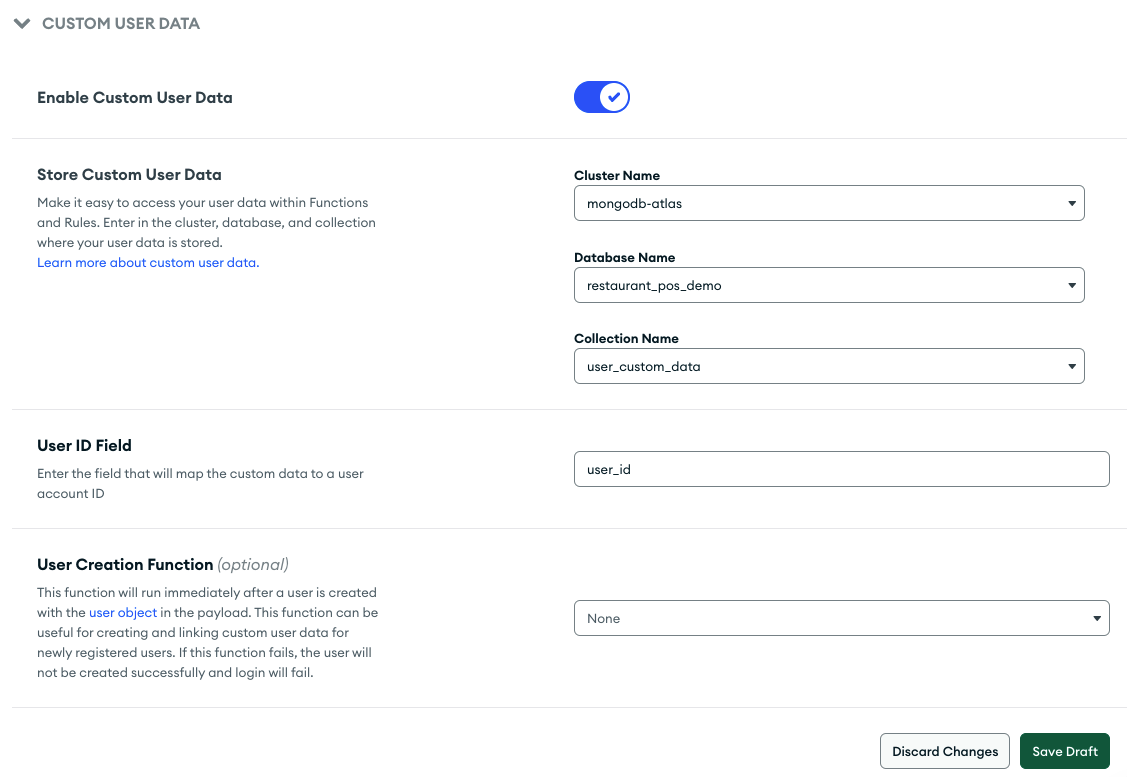
Toggle "Enable Custom User Data." Then select your cluster and database from the dropdown menus for "Cluster Name" and "Database Name," respectively. For the "Collection Name," select "Create new Collection." This will make an additional text box appear. In this new box, enter user_custom_data and click Create. This will store our custom data in a separate collection from our customer data.
For the "User ID Field," enter user_id. This will act as a foreign key to the user the data is attached to. While we mentioned not doing this in Part 3, this is one of those times when doing something like a relational database foreign key makes sense. The table storing user data is fully managed, so we do not get direct access to it, which means we cannot embed this data in the user record nor want to store the user credentials with the user data.
Once that is all done, click on Save Draft and then Review Draft & Deploy to save the new settings.
Once deployed, head back to the Users tab. We want to flag our new user as an admin, so let's create that custom user data. We will need the ID of the user we just created, so copy down that ID for the user. Then head back to Data Services in the top navbar and go into Browse Collections.
We need to make a new collection, so hover over the restaurant_pos_demo database name, and a + will appear to the right of the text. Click that, and then enter user_custom_data as the collection name. Go ahead and click Create to make an empty collection. Once that's created, click on Insert Document, switch over to the {} view, and paste in the following JSON document.
{
 "user_id": "<user-id-we-just-copied>",
 "admin":true
}
When we get to the code where we log in inside our application, the admin flag will be added to the user when it is returned. You can also arbitrarily add any information to this document for any more user information you may want to track in your application. For our tutorial, we need a boolean admin flag.
We will look at one more section while we are in the Atlas web UI. One feature our administrative backend for the tutorial uses is querying the database directly from our client-side application. In many applications, like the customer side of our tutorial, we have a backend API that accesses our data. Atlas allows us to query the database from the browser through a combination of user authentication, which we just set up, and rules-based data access controls.
Click over to Rules from the App Services screen under "Data Access." This will take you to the Rules screen, where we can control authenticated users' access. Right now, our application does not do any authorization checking, but adding it is only a few clicks.
 Atlas App Rules configration
We want to ensure that any user that accesses is an admin, as admins will be the only ones who currently should access this data. For our application, we want only to allow someone with the admin flag set to true on their account (see why we went ahead and set that up earlier?). You can impose restrictions on the entire database or per schema. Since we only allow our admin backend to access the database directly, we can add these rules to the database itself. From the Rules screen, click on Default roles and filters just above the database name.
We can set up some preset roles, like deny all or allow all. We want to create a rule that uses our custom data, so go down and click on Skip (start from scratch).
 Admin-Write rule config
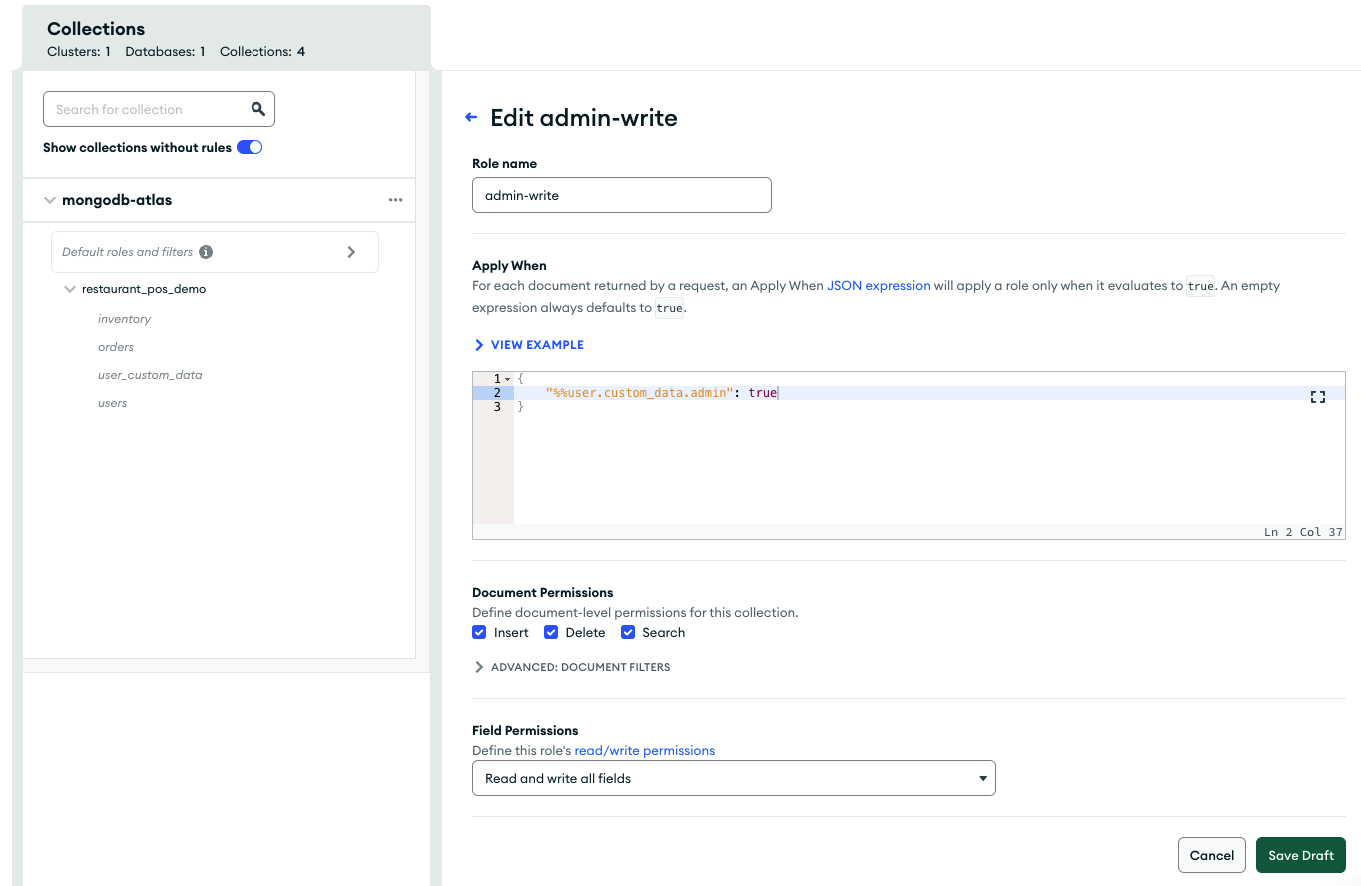
We need to give our role a name, so let's name it "admin-write." We then need to set the rules for when our role will apply. Since we are worried about getting access to data when we are an admin, we can establish a simple rule that ensures that the user has a custom data attribute called admin and that it is set to true. Copy and paste the block of JSON below into the editor.
{
    "%%user.custom_data.admin": true
}%%user tells the rule system to check the authenticated user. When we authenticate, the information stored in user_custom_data is attached to the user returned and assigned to the custom_data property. You can add any number of rules to help make this as granular as you want in an actual application.
Below this, we can set document permissions. Since we are an admin user, select "Insert," "Delete," and "Search." This will give any admin user full access to all the documents in any collection. Finally, we have the field permissions. You can set access rules down to the specific file for a collection. Right now, select "Read and write all fields."
These two settings will be more useful when you want to do things like all read-only views to specific user roles or restrict fields from roles that only have some access to information. These rules can be used in conjunction with broader Filter rules that restrict what data can even be returned from a query.
Save all these settings and then review and deploy our new access controls.
The last thing we need to do is tell our application which Atlas app to talk to. On the homepage for the Atlas app we are using, near the top is an App ID. Copy that down, and enter it into the .env file for the web app under VITE_REALM_ID.
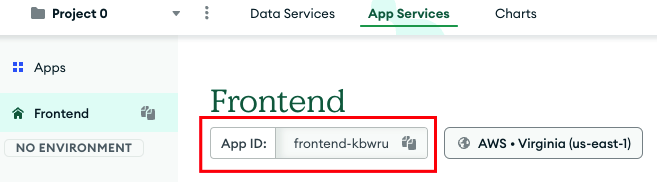 App ID location
Yes!
Head to http://localhost:5173/login and log in using the email address and password you assigned the user in Atlas. You should be greeted with an inventory screen and the option to add new dishes. If you see this, you are authenticated!
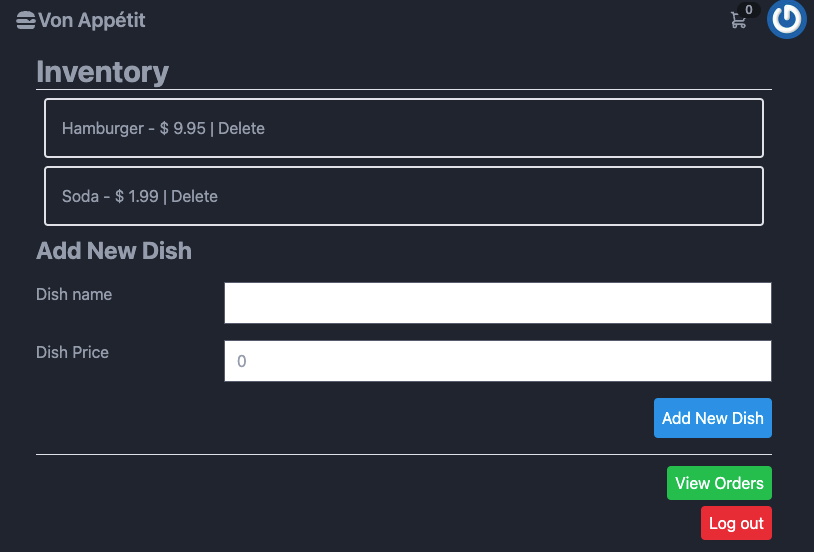 Tutorial Admin Area
MongoDB Atlas has a browser SDK that can be used to contact our cluster and Atlas app. We must take in an email address and password for our application and pass it into the SDK's authentication calls.
import { MongoDBRealmError } from 'realm-web';
import { ref } from 'vue'
import { useRouter } from 'vue-router';
import { authenticationStore } from '../stores/authenticationStore';

const router = useRouter();
const username = ref('')
const password = ref('')
const authStore = authenticationStore()

const login = async () => {
    try {
        await authStore.login(username.value, password.value)
        router.push({ name: 'inventory.home' });
    } catch (error) {
        if (error instanceof MongoDBRealmError) {
            console.log(error.errorCode)
        }
    }
}
The VueJS code is relatively minimal. Our Login.vue component, we have a pull in an Authentication Store, which like our shopping cart is a wrapper to make it easier to pass logged in user information around. This store will use the SDK to log in. On this page, we only need to watch for the user to log in using the form and call authStore.login() with the username and password.
import { defineStore } from 'pinia'
import * as Realm from 'realm-web'

const realmApp = new Realm.App({id: import.meta.env.VITE_REALM_ID})

export const authenticationStore = defineStore('authenticationStore', {
    state: () => {
        return {
            token: null,
            user: null,
        }
    },
    actions: {
        async login(username, password) {
            const creds = Realm.Credentials.emailPassword(username, password);
            this.user = await realmApp.logIn(creds)
            return this.user
        },
        setToken(token: string) {
            this.token = token
        },
        logout() {
            this.token = null
        }
    }
})
The Authentication Store is little more than a wrapper for the MongoDB SDK and some places to keep user information. We create a store using Pinia and create a new Realm.App() object with a link to our App ID we added to our .env file. Inside our authenticationStore object is a login() method called Realm.Credentials.emailPassword(). This generates a set of user credentials we can pass into the app object to authenticate. If the call to realmApp.login() is successful, we get a user back. We store that user off and can pull it from the store at any time.
From this point on, our user is considered authenticated. At any time we can check authenticationStore.user and if one exists, we are authenticated. Since we have logged in to Atlas via the SDK, we can also now access the database directly from the front end. We do this through a Database Store. All this store does is hold a connection back to our MongoDB cluster, and uses the logged in user's credentials.
This is powerful as we can perform data lookups directly in the browser instead of relying on our backend API. We can lock down this access to just admin users using the Rules we set up in the Atlas App configuration. If we wanted to throw away all of the MongoDB code in our backend API, we could add additional rules and filters to lock users to see only the data they can access. It's a great way to sketch together an application quickly.
import { defineStore } from 'pinia'
import { authenticationStore } from './authenticationStore'

const authStore = authenticationStore()
const dataSource = import.meta.env.VITE_MONGODB_DATA_SOURCE
const databaseName = import.meta.env.VITE_MONGODB_DATABASE

export const mongodbStore = defineStore('mongodbStore', {
    state: () => {
        return {
            restaurantDb: authStore.user.mongoClient(dataSource).db(databaseName),
        }
    },
    actions: {
        getInventoryCollection() {
            return this.restaurantDb.collection('inventory')
        }
    }
})
The database store is very minimal. We make pulling the database object and collection easier from the Realm connection we established in the Authentication Store. We can then query the database from our VueJS code, like on the Inventory component:
import { ref } from 'vue';
import { mongodbStore } from '../stores/mongodbStore';

const dbStore = mongodbStore()
let inventory = ref(Array());

async function getInventory() {
    const dishes = await dbStore.getInventoryCollection().find()
    inventory.value = Array()
    dishes.forEach(dish => {
        if (dish.name) {
            inventory.value.push(dish)
        }
    })
}
In our VueJS component, we pull in the database store as mongodbStore. We can then use the MongoDB SDK syntax to find documents for us to use. Since we want all of the documents in the inventory collection, we can use dbStore.getInventoryCollection().find() to return all the documents we have access to. We can then push those into a VueJS ref() object to display on the page.
An essential part of that sequence is "we have access to." The Rules page in the Atlas App can be used to restrict what documents we can see. For example, it's common to tie a document to a user, such as an Author (or, in our case, the person who made an order). You can set up a Filter that would only return that user's orders, even if they did a call to find() to return everything. The restrictions and filters set up in the Rules section of the Atlas app will augment any query performed by the browser.
Atlas Apps can help drastically reduce some of the development time of applications through things like user authentication and query access. We can completely skip a lot of functionality, like the ability to publish functions to a serverless platform or enable an API gateway to create a micro-service architecture for your browser or mobile application. There are even data replication systems to provide offline and data syncing capabilities to applications.
Now that we are logged in, we have one more piece to look at. When a user has a problem, how do we know? We will look at the admin Orders screen and how we can leverage Vonage In-App messaging to get in-browser notifications that a user has submitted a meeting request and how we use the Meetings API to give the restaurant video hosting capabilities that are not available to the customer.
Part 4 - Using Atlas for User Authentication
Share:
Chris is the Developer Relations Tooling Manager and leads the team that builds your favorite tools. He has been programming for more than 15 years across various languages and types of projects from client work all the way up to big-data, large scale systems. He lives in Ohio, spending his time with his family and playing video and TTRPG games.