Share:
Benjamin Aronov is a developer advocate at Vonage. He is a proven community builder with a background in Ruby on Rails. Benjamin enjoys the beaches of Tel Aviv which he calls home. His Tel Aviv base allows him to meet and learn from some of the world's best startup founders. Outside of tech, Benjamin loves traveling the world in search of the perfect pain au chocolat.
How to Send RCS Rich Card Carousels With Node.js
Time to read: 5 minutes
Rich Communication Services (RCS) gives you the tools to build modern, interactive brand experiences right inside a user’s default messaging app. Among its most powerful features is the rich card carousel: a horizontally scrollable set of cards that can include videos, images, text, and tappable actions.
In this tutorial, you’ll learn how to send an RCS carousel using Node.js and the Vonage Messages API. You’ll combine video and image cards with actions to boost engagement.
>> TL;DR: View the full working code on GitHub
Let’s say your brand is launching a limited-time fashion pop-up shop. You want to generate buzz and showcase key items. With an RCS carousel, you can package this all in one clean, interactive message.
Your RCS carousel will include media and suggested actions:
Card 1: Event Launch Video
Video trailer for the popup
2 actions: “Save the Date” and “See Location”
Card 2: T-Shirts image:
An image of the featured tee
action: “See All Shirts”
Card 3: Hats image:
An image of your hat collection
action: “See All Hats”
An RCS carousel is a set of swipeable rich cards, each with its own:
A title (max 200 characters)
A description (max 2000 characters)
Media: image or video
Up to four suggested replies or actions
The cards appear horizontally, allowing users to swipe through them.
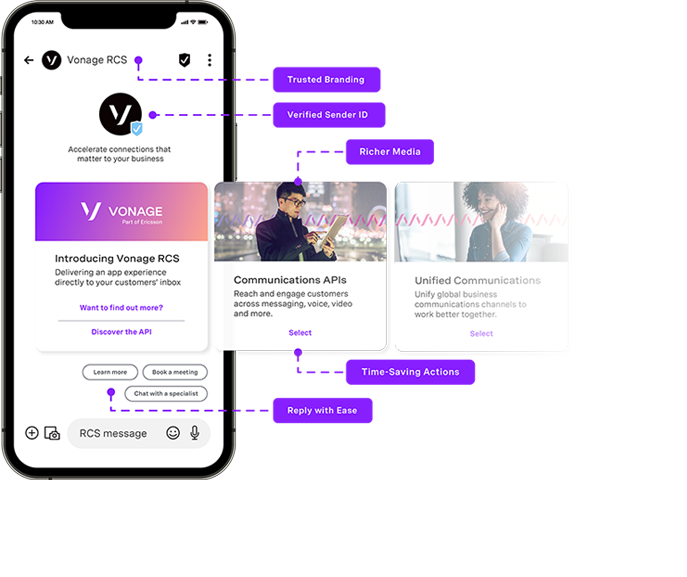 Illustration of an RCS carousel message in the Android Messages app, annotated to show benefits like trusted branding, verified sender ID, richer media cards, time-saving action buttons, and quick-reply suggestions.
Important notes:
All cards in a carousel must use the same type of suggestion.
Media files must be publicly accessible and under 100MB.
You can include between 2 and 10 cards.
Before you start, you’ll need:
Node.js installed on your machine.
ngrok installed for exposing your local server to the internet.
A Vonage API account.
A registered RCS Business Messaging (RBM) Agent, see managed accounts below.
A phone with RCS capabilities for testing.
In order to send and receive RCS capabilities in your Vonage application, you will need to have a registered Rich Business Messaging (RBM) agent and a phone with RCS capabilities.
Currently, RCS Messaging through Vonage is only available for managed accounts. You will need to contact your account manager to request Developer Mode activation for your RBM agent. Developer Mode allows you to test RCS messaging to allow-listed numbers before completing the Agent Verification process and launching in production.
Please contact our sales team if you do not have a managed account.
>> Understand the difference between RCS and RBM.
This guide assumes you're familiar with JavaScript and Node.js basics.
Create a new directory and initialize a Node.js project:
mkdir rcs-carousel-node
cd rcs-carousel-node
npm init -y
Install the necessary node packages with Node Package Manager (NPM):
npm install express dotenv @vonage/server-sdkexpress: Creates the web server
dotenv: Loads your environment variables
@vonage/server-sdk: Sends messages through the Vonage Messages API
Create the main application file and environment configuration file:
touch index.js .env
In the .env file, add your Vonage credentials and configuration:
VONAGE_APPLICATION_ID=your_application_id
VONAGE_API_SIGNATURE_SECRET=your_api_secret
VONAGE_PRIVATE_KEY=./private.key
RCS_SENDER_ID=your_rbm_agent_id
PORT=3000VONAGE_APPLICATION_ID: Your Vonage application ID.
VONAGE_API_SIGNATURE_SECRET= Your Vonage API Secret
VONAGE_PRIVATE_KEY: Your Vonage application’s private key file.
RCS_SENDER_ID: Your RBM SenderID (the Name of the Brand). The SenderID requires special formatting, such as not having any spaces. Check with your account manager if you’re unsure.
PORT: Port number for the Express server.
You will obtain your Vonage Application ID and private.key file below, in the “How to Create and Configure Vonage Application” section. Find your API Secret in the developer dashboard homepage.
Now that your environment is set up, let’s write the code that actually sends your RCS rich card carousel.
In this step, you’ll create an Express server that sends a custom RCS message using the Vonage Messages API. The carousel will contain three swipeable product cards, each with media (video or image), a title and description, and actionable buttons your users can tap.
We’ll start by importing the necessary packages, loading your environment variables, and initializing the Vonage client. Add the following code to your index.js file to get things going:
const express = require('express');
const fs = require('fs');
const dotenv = require('dotenv');
const { Vonage } = require('@vonage/server-sdk');
const { verifySignature } = require('@vonage/jwt');

dotenv.config();

const app = express();
app.use(express.json());

const PORT = process.env.PORT || 3000;

const VONAGE_API_SIGNATURE_SECRET = process.env.VONAGE_API_SIGNATURE_SECRET;

const privateKey = fs.readFileSync(process.env.VONAGE_PRIVATE_KEY);

const vonage = new Vonage({
  applicationId: process.env.VONAGE_APPLICATION_ID,
  privateKey: privateKey
});
A few small but important details are worth knowing before we send the carousel. All media files must be publicly accessible over HTTPS, ideally hosted on a CDN or cloud storage. We’re using GitHub-hosted assets for simplicity in this example, but in production, you’ll want faster, more reliable media hosting.
>> Keep individual media files under 100MB to meet RCS constraints.
Each card includes one or more action buttons using postbackData, openUrlAction, or createCalendarEventAction. The postbackData value is a short string (50 characters max) that your server can use to track what users tap. You can also link directly to maps or pre-filled calendar events for added interactivity, making the carousel feel more like a mini-app than just a message.
app.post('/send-rcs-carousel', async (req, res) => {
  const toNumber = req.body.to;

  const message = {
    to: toNumber,
    from: process.env.RCS_SENDER_ID,
    channel: 'rcs',
    message_type: 'custom',
    custom: {
      contentMessage: {
        richCard: {
          carouselCard: {
            cardWidth: "MEDIUM",
            cardContents: [
              {
                title: "Fashion Popup Launch 🎉",
                description: "Join us this weekend for limited drops & exclusive looks.",
                media: {
                  height: "TALL",
                  contentInfo: {
                    fileUrl: "https://raw.githubusercontent.com/Vonage-Community/tutorial-messages-node-rcs_carousel-rich-card/main/rcs-fashion-video.gif",
                    thumbnailUrl: "https://raw.githubusercontent.com/Vonage-Community/tutorial-messages-node-rcs_carousel-rich-card/main/rcs-fashion-thumbnail.png",
                    forceRefresh: true
                  }
                },
                suggestions: [
                  {
                    "action": {
                      "text": "Save the Date",
                      "postbackData": "save_event",
                      "fallbackUrl": "https://www.google.com/calendar",
                      "createCalendarEventAction": {
                        "startTime": "2024-06-28T19:00:00Z",
                        "endTime": "2024-06-28T20:00:00Z",
                        "title": "Fashion Popup Launch",
                        "description": "Join us this weekend for limited drops & exclusive looks."
                      }
                    }
                  },
                  {
                    action: {
                      text: "See Location",
                      postbackData: "view_location",
                      openUrlAction: {
                        url: "https://maps.google.com/?q=Galleria+Vittorio+Emanuele+II,+Milan,+Italy"
                      }
                    }
                  }
                ]
              },
              {
                title: "Drop 01: T-Shirts",
                description: "Bold graphics. Oversized fit. Designed to stand out.",
                media: {
                  height: "TALL",
                  contentInfo: {
                    fileUrl: "https://raw.githubusercontent.com/Vonage-Community/tutorial-messages-node-rcs_carousel-rich-card/main/rcs-fashion-tshirt.png"
                  }
                },
                suggestions: [
                  {
                    action: {
                      text: "See All",
                      postbackData: "see_tshirts",
                      openUrlAction: {
                        url: "https://github.com/Vonage-Community/tutorial-messages-node-rcs_carousel-rich-card/blob/main/rcs-fashion-tshirt.png"
                      }
                    }
                  }
                ]
              },
              {
                title: "Drop 02: Hats",
                description: "Top off your look. Fresh colors, bold logos.",
                media: {
                  height: "TALL",
                  contentInfo: {
                    fileUrl: "https://raw.githubusercontent.com/Vonage-Community/tutorial-messages-node-rcs_carousel-rich-card/main/rcs-fashion-hat.png",
                  }
                },
                suggestions: [
                  {
                    action: {
                      text: "See All",
                      postbackData: "see_hats",
                      openUrlAction: {
                        url: "https://github.com/Vonage-Community/tutorial-messages-node-rcs_carousel-rich-card/blob/main/rcs-fashion-hat.png"
                      }
                    }
                  }
                ]
              }
            ]
          }
        }
      }
    }
  };

  try {
    const response = await vonage.messages.send(message);
    console.log("Carousel sent:", response);
    res.status(200).json({ message: "Carousel sent successfully." });
    console.log("Vonage API response:", JSON.stringify(response, null, 2));
  } catch (error) {
    console.error("Error sending carousel:", error);
    res.status(500).json({ error: "Failed to send carousel." });
  }
});
Sending off a carousel is great! But wouldn’t it be nice to know if your user interacted with your carousel? With Vonage webhooks, you can do just that.
Create the following endpoint, which will handle inbound RCS requests from our Vonage application. This code:
Validates that the request is coming from Vonage using a JWT signature
Looks for the button property since you’re expecting an action instead of a reply property, and stores the payload in userAction
Logs the userAction to our Node server to see what the user selected
app.post('/inbound_rcs', async (req, res) => {
  const token = req.headers.authorization?.split(' ')[1];

  if (!verifySignature(token, VONAGE_API_SIGNATURE_SECRET)) {
    res.status(401).end();
    return;
  }

  const inboundMessage = req.body;

  if (inboundMessage.channel === 'rcs' && inboundMessage.message_type === 'button') {
    const userAction = inboundMessage.button.payload;
    const userNumber = inboundMessage.from;

    console.log(`User ${userNumber} tapped action: ${userAction}`);
  }

  res.status(200).end();
});
At the bottom of your index.js, add this code to build your Express server.
app.listen(PORT, () => {
  console.log(`Server is running on port ${PORT}`);
});
And finally run your server from the command line:
node index.js
To receive webhooks from Vonage, your local server must be accessible over the internet. Use ngrok to expose your server by running the following command in a separate tab from your Express sever:
ngrok http 3000Note the HTTPS URL provided by ngrok (e.g., https://your-ngrok-subdomain.ngrok.io).
You can read more about testing with ngrok in our developer portal tools.
Now that your Node App is ready, you’ll also need to create and set up your Vonage Application. First, create your app in the Vonage Dashboard. Give the app a name and turn on the Messages capability.
 Vonage dashboard showing the creation of a new application configured for RCS messaging.
In your Vonage application settings:
Set the Inbound URL to https://YOUR_NGROK_URL/inbound_rcs.
Set the Status URL to https://example.com/rcs_status.
** Message statuses will be covered in a future article.Generate a public and private key by clicking the button. Ensure to move your private.key file to the project root directory (rcs-carousel-node).
Save the changes.
Then link your RCS Agent by clicking the “Link external accounts” tab:
 Dashboard view showing the Vonage-Node-RCS application linked to the Vonage RoR RCS external account, with voice and message capabilities enabled.
Use this curl command to trigger your endpoint (replace placeholders):
curl -X POST https://YOUR_NGROK_URL/send-rcs-carousel \
  -H "Content-Type: application/json" \
-d '{"to": "YOUR_RCS_TEST_NUMBER"}'On the recipient's phone, the Rich Card Carousel will appear and they can select an action!
You’ve now built an interactive RCS product carousel with Node.js and the Vonage Messages API. This is a great way to showcase products, promote events, or offer dynamic choices in a single message.
Want to go further?
Respond to taps and selections via postbackData
Load product cards dynamically from an API
Add location-based filters or categories
Come show off what you’re building in the Vonage Community Slack or tag us on X (formerly Twitter). We’d love to see your carousels in the wild!
Share:
Benjamin Aronov is a developer advocate at Vonage. He is a proven community builder with a background in Ruby on Rails. Benjamin enjoys the beaches of Tel Aviv which he calls home. His Tel Aviv base allows him to meet and learn from some of the world's best startup founders. Outside of tech, Benjamin loves traveling the world in search of the perfect pain au chocolat.