
Share:
Benjamin Aronov is a developer advocate at Vonage. He is a proven community builder with a background in Ruby on Rails. Benjamin enjoys the beaches of Tel Aviv which he calls home. His Tel Aviv base allows him to meet and learn from some of the world's best startup founders. Outside of tech, Benjamin loves traveling the world in search of the perfect pain au chocolat.
Send and Receive RCS Suggested Replies with ASP.NET Core and Vonage
Rich Communication Services (RCS) represents the evolution of SMS: bringing branded, interactive, and app-like experiences into your native messaging app. With Vonage’s Messages API, you can deliver RCS messages with Suggested Replies: clickable options that improve engagement and streamline response handling.
In this tutorial, you’ll build an ASP.NET Core Web API from scratch that uses Vonage’s .NET SDK to send and receive RCS suggested reply messages. You’ll also learn how to configure the application, set up secure webhooks, and test the end-to-end flow using ngrok and your RCS-enabled phone.
>> TL;DR: View the full working code on GitHub
 RCS message sent using the Vonage Messages API, prompting the user to select a preferred appointment time with suggested reply buttons.
Before we get started, make sure you have:
Visual Studio 2022+ or VS Code
ngrok for local tunneling
A Vonage API account and a registered RBM agent. (See below)
An RCS-capable device for testing
In order to send and receive RCS capabilities in your Vonage application, you will need to have a registered Rich Business Messaging (RBM) agent.
Currently, RCS Messaging through Vonage is only available for managed accounts. You will need to contact your account manager to request Developer Mode activation for your RBM agent. Developer Mode allows you to test RCS messaging to allow-listed numbers before completing the Agent Verification process and launching in production.
Please contact our sales team if you do not have a managed account.
>> Understand the difference between RCS and RBM.
We’ll start by generating a minimal ASP.NET Core Web API using the built-in CLI template.
dotnet new web -n RcsSuggestedReplies
cd RcsSuggestedReplies
Install the necessary dependencies:
dotnet add package Vonage
dotnet add package Microsoft.AspNetCore.Mvc.NewtonsoftJson
dotnet add package Microsoft.AspNetCore.OpenApi
dotnet add package Swashbuckle.AspNetCoreVonage: To use the Messages API
Newtonsoft.Json: JSON handling for API requests and responses
OpenApi: OpenAPI specification support for your endpoints
Swashbuckle: Swagger UI for testing your API in the browser
Create CustomConfiguration.cs in the root of your project and add:
namespace RcsSuggestedReplies;

public record CustomConfiguration
{
    public string SenderId { get; init; } = string.Empty;
}This class uses C#'s record type to define a simple immutable configuration object. It allows you to bind strongly typed settings from appsettings.json, making your code cleaner and less error-prone than using raw strings everywhere.
Create or update your appsettings.json file:
{
  "Logging": {
    "LogLevel": {
      "Default": "Information",
      "Microsoft.AspNetCore": "Warning"
    }
  },
  "AllowedHosts": "*",
  "Vonage": {
    "Application.Id": "YOUR_APPLICATION_ID",
    "Application.Key": "-----BEGIN PRIVATE KEY YOUR_PRIVATE_KEY"
  },
  "CustomConfiguration": {
    "SenderId": "YOUR_SENDER_ID"
  }
}Your appsettings.json stores runtime configuration such as credentials, sender ID, and log levels. Keeping sensitive settings like these in a config file allows for the separation of code and environment-specific values.
Update these variables once you have completed the “Create and Configure Your Vonage Application” section below.
Create a file named SendRcsMessageEndpoint.cs in the root of your project. This file defines the API logic for sending RCS messages. The SendRcsRequest record models the incoming JSON body, while the SendRcsMessageEndpoint handles the logic for sending the message via the Vonage Messages API. We separate the logic that builds the message payload into its own method, BuildRcsCustomRequest. This improves readability and makes the function easier to test or extend. For example, you could customize the suggestions dynamically in the future.
For now, this endpoint handles sending RCS messages with 3 hardcoded suggested replies for appointment scheduling.
using Microsoft.Extensions.Options;
using Vonage.Messages;
using Vonage.Messages.Rcs;

namespace RcsSuggestedReplies;

public record SendRcsRequest(string To);

public class SendRcsMessageEndpoint(IMessagesClient messagesClient, IOptions<CustomConfiguration> customConfiguration)
{
    public async Task<IResult> SendRcsMessage(SendRcsRequest request)
    {
        try
        {
            var response = await messagesClient.SendAsync(BuildRcsCustomRequest(request));
            Console.WriteLine($"Message sent: {response.MessageUuid}");
            return Results.Ok();
        }
        catch (Exception exception)
        {
            Console.WriteLine($"Error sending message: {exception.Message}");
            return Results.Problem(exception.Message);
        }
    }

    private RcsCustomRequest BuildRcsCustomRequest(SendRcsRequest sendRcsRequest)
    {
        return new RcsCustomRequest
        {
            From = customConfiguration.Value.SenderId,
            To = sendRcsRequest.To,
            Custom = new
            {
                ContentMessage = new
                {
                    Text = "What time works best for your appointment?",
                    Suggestions =
                        new[]
                        {
                            new
                            {
                                Reply = new
                                {
                                    Text = "9am",
                                    PostbackData = "time_9am"
                                }
                            },
                            new
                            {
                                Reply = new
                                {
                                    Text = "11am",
                                    PostbackData = "time_11am"
                                }
                            },
                            new
                            {
                                Reply = new
                                {
                                    Text = "2pm",
                                    PostbackData = "time_2pm"
                                }
                            }
                        }
                }
            }
        };
    }
}
Create another file called ReceiveRcsInboundEndpoint.cs in the root of your project.This class handles inbound webhook messages from Vonage. It verifies the request's authenticity using JWT validation and sends a confirmation reply when the user selects one of the suggested responses. JWT signature verification ensures you're not processing spoofed or malicious messages, and that incoming requests are indeed coming from Vonage.After parsing the user's reply, we send a friendly confirmation message. Keeping this logic in a separate method keeps the ReceiveRcsInbound function focused and easier to read.
using Microsoft.Extensions.Options;
using Vonage;
using Vonage.Messages;
using Vonage.Messages.Rcs;
using Vonage.Messages.Webhooks;
using Vonage.Request;

namespace RcsSuggestedReplies;

public class ReceiveRcsInboundEndpoint(IMessagesClient messagesClient, IOptions<CustomConfiguration> customConfiguration, Credentials credentials)
{
    public async Task<IResult> ReceiveRcsInbound(HttpContext httpContext, MessageWebhookResponse messageWebhookResponse)
    {
        var token = httpContext.Request.Headers.Authorization.ToString().Split(' ')[1];
        if (!Jwt.VerifySignature(token, credentials.ApplicationKey))
        {
            return Results.Unauthorized();
        }

        if (messageWebhookResponse is {Channel: "rcs", MessageType: "reply"})
        {
            var userSelection = messageWebhookResponse.Reply?.ToString();
            Console.WriteLine($"User {messageWebhookResponse.From} select: {userSelection}");
            try
            {
                var response =
                    await messagesClient.SendAsync(BuildConfirmationMessage(messageWebhookResponse, userSelection));
                Console.WriteLine($"Confirmation sent: {response.MessageUuid}");
            }
            catch (Exception exception)
            {
                Console.WriteLine($"Error sending confirmation: {exception.Message}");
            }
        }

        return Results.Ok();
    }

    RcsTextRequest BuildConfirmationMessage(MessageWebhookResponse messageWebhookResponse1, string? s) =>
        new()
        {
            To = messageWebhookResponse1.From,
            From = customConfiguration.Value.SenderId,
            Text = $"{s} is a great choice!",
        };
}
This endpoint handles incoming RCS messages, verifies their authenticity, and sends confirmation responses.
Update your Program.cs file to the following.
Here, we configure dependency injection, which is a core part of ASP.NET Core's design. We register the Vonage client and our custom endpoints so they can be injected where needed, making the code more modular.
using RcsSuggestedReplies;
using Vonage.Extensions;
using Vonage.Messages.Webhooks;

var builder = WebApplication.CreateBuilder(args);

// Add services to the container
builder.Services.AddControllers();
builder.Services.AddEndpointsApiExplorer();
builder.Services.AddSwaggerGen();

// Register Vonage and application services
builder.Services.AddVonageClientScoped(builder.Configuration);
builder.Services.Configure<CustomConfiguration>(builder.Configuration.GetSection("CustomConfiguration"));
builder.Services.AddScoped<SendRcsMessageEndpoint>();
builder.Services.AddScoped<ReceiveRcsInboundEndpoint>();

var app = builder.Build();

// Configure the HTTP request pipeline
if (app.Environment.IsDevelopment())
{
    app.UseSwagger();
    app.UseSwaggerUI();
}

app.MapControllers();

// Define our API endpoints
app.MapPost("send-rcs",
    async (SendRcsMessageEndpoint endpoint, SendRcsRequest request) => await endpoint.SendRcsMessage(request));
app.MapPost("inbound-rcs",
    async (ReceiveRcsInboundEndpoint endpoint, HttpContext context, MessageWebhookResponse inbound) =>
        await endpoint.ReceiveRcsInbound(context, inbound));

app.Run();
To receive webhooks from Vonage, your local server must be accessible over the internet. Use ngrok to expose your ASP.NET Core server, which will run on port 5000:
ngrok http 5000Note the HTTPS URL provided by ngrok (e.g., https://your-ngrok-subdomain.ngrok.io).
You can read more about testing with ngrok in our developer portal tools.
>> Your application might be running on a different port. You can check in launchSettings.json to confirm.
Now that your ASP.NET App is ready, you’ll also need to create and set up your Vonage Application. First, create your app in the Vonage Dashboard. Give the app a name and turn on the Messages capability.
To create an application, go to the Create an Application page on the Vonage Dashboard, and define a Name for your Application.

If you intend to use an API that uses Webhooks, you will need a private key. Click “Generate public and private key”, your download should start automatically. Store it securely; this key cannot be re-downloaded if lost. It will follow the naming convention private_<your app id>.key. This key can now be used to authenticate API calls. Note: Your key will not work until your application is saved.
Choose the capabilities you need (e.g., Voice, Messages, RTC, etc.) and provide the required webhooks (e.g., event URLs, answer URLs, or inbound message URLs). These will be described in the tutorial.
To save and deploy, click "Generate new application" to finalize the setup. Your application is now ready to use with Vonage APIs.
In your Vonage application settings:
Set the Inbound URL to https://YOUR_NGROK_URL/inbound-rcs.
Set the Status URL to https://example.com/rcs-status.
** Message statuses will be covered in a future article.Generate a public and private key by clicking the button. Ensure to move your private.key file to the project root directory (RcsSuggestedReplies).
Save the changes.
Then link your RCS Agent by clicking the “Link external accounts” tab:
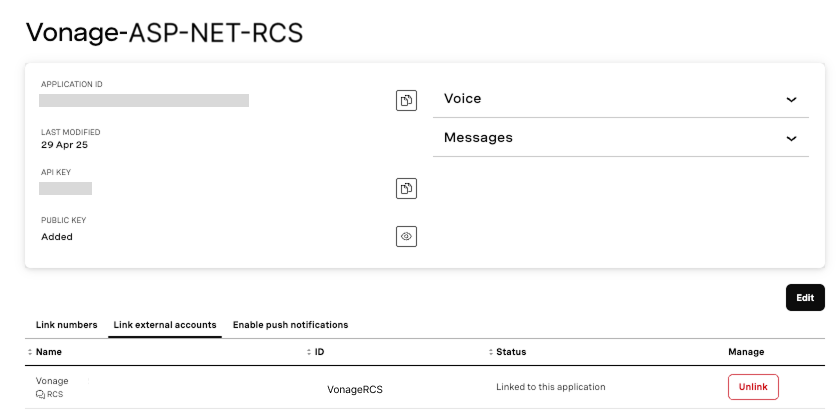 Dashboard view showing the Vonage-ASP-NET-RCS application linked to the Vonage RoR RCS external account, with voice and message capabilities enabled.
Replace the placeholder values in appsettings.json with your actual Vonage credentials:
"Vonage": {
  "Application.Id": "YOUR_ACTUAL_APPLICATION_ID",
  "Application.Key": "YOUR_PRIVATE_KEY"
},
"CustomConfiguration": {
  "SenderId": "YOUR_ACTUAL_SENDER_ID"
}
Start your application:
dotnet runYour RCS messaging application is now running! You can use a tool like Postman or cURL to send a POST request to your /send-rcs endpoint with the recipient's phone number:
curl -X POST https://**YOUR_NGROK_URL***/send-rcs \
  -H "Content-Type: application/json" \
  -d '{
    "to": "**YOUR_RCS_TEST_NUMBER"
}'
On the recipient's RCS-enabled device, the message with suggested replies should appear.
When the recipient selects a suggested reply, your /inbound-rcs endpoint will handle the response, and a confirmation message will be sent back.
 RCS conversation where a user selects a time from suggested replies and receives a confirmation message, powered by the Vonage Messages API.
You’ve now built a working ASP.NET Core application that can send and receive RCS Suggested Replies using the Vonage Messages API. This simple UI improvement, letting users tap a response instead of typing, can dramatically enhance how users interact with your app.
With webhook verification, structured response handling, and confirmation messages, this template gives you a solid foundation to expand on. You try adding RCS Cards, storing replies in a database, or dynamically generating suggested replies from user history
If you run into any questions or have ideas for what you'd like to build next, come join the conversation in our Vonage Community Slack or reach out on X (formerly Twitter). We’d love to see what you build!
Share:
Benjamin Aronov is a developer advocate at Vonage. He is a proven community builder with a background in Ruby on Rails. Benjamin enjoys the beaches of Tel Aviv which he calls home. His Tel Aviv base allows him to meet and learn from some of the world's best startup founders. Outside of tech, Benjamin loves traveling the world in search of the perfect pain au chocolat.