
Build a Storytelling Service With RCS Rich Cards and Gemini
This tutorial shows you how to build a generative AI storytelling service using the Vonage Messages API for RCS and Google’s Gemini AI. You'll learn what RCS is, how to send and receive RCS Rich Card messages, and how to integrate Gemini to generate short bedtime stories.
Inspired by my toddler's bedtime routines, I wanted to create something useful. So I combined RCS messaging with Gemini AI to develop a simple storytelling service.
 RCS Story Demonstration
You can find the complete source code on the Vonage Community GitHub repository.
Node.js is installed on your machine.
An API tunneling service, such as ngrok.
A registered RCS Business Messaging (RBM) agent.
To send and receive RCS messages in your Vonage application, you need a registered RBM agent and a phone with RCS capabilities.
RCS through Vonage is currently only available for managed accounts. You’ll need to contact your account manager to activate Developer Mode, which allows testing with allowlisted numbers.
If you don't have a managed account, reach out to the Vonage Sales Team for support.
RCS (Rich Communication Services): An industry standard that enhances traditional messaging with rich media, branded content, and read receipts. If a recipient’s device or network doesn’t support RCS, messages automatically fall back to SMS to ensure they are still delivered.
Learn more in our RCS documentation.
SMS (Short Message Service): Traditional SMS supports only plain text. RCS allows branded buttons, images, and message status updates. Learn to send SMS messages with Node.js.
MMS (Multimedia Messaging Service): Unlike MMS, which often has lower media quality and file size limits, RCS supports high-quality media and features such as typing indicators and delivery status updates. Learn what you can do with MMS and how to send MMS with Node.js.
To create an application, go to the Create an Application page on the Vonage Dashboard, and define a Name for your Application.

If you intend to use an API that uses Webhooks, you will need a private key. Click “Generate public and private key”, your download should start automatically. Store it securely; this key cannot be re-downloaded if lost. It will follow the naming convention private_<your app id>.key. This key can now be used to authenticate API calls. Note: Your key will not work until your application is saved.
Choose the capabilities you need (e.g., Voice, Messages, RTC, etc.) and provide the required webhooks (e.g., event URLs, answer URLs, or inbound message URLs). These will be described in the tutorial.
To save and deploy, click "Generate new application" to finalize the setup. Your application is now ready to use with Vonage APIs.
If you haven’t used ngrok before, you can start here. I’ve added the steps to run an instance below the image in the next section.
Run the following command to start an ngrok tunneling instance.
ngrok http 3000In the output, you’ll find a URL that starts with https:// and ends in .ngrok.app/. Make a note of it as you’ll need it for the next step to configure your webhooks.
Forwarding https://94cd51b63460.ngrok.app/ -> http://localhost:8000
Back in the Vonage API Dashboard, under your Apps, toggle the Messages option under capabilities and set your server's public URL from ngrok as the endpoint for inbound messages and events. it should look like: https://94cd51b63460.ngrok.app/webhooks/inbound for inbound and https://94cd51b63460.ngrok.app/webhooks/status for status. If you’d like to learn more about webhooks, you can find information on our Vonage documentation.
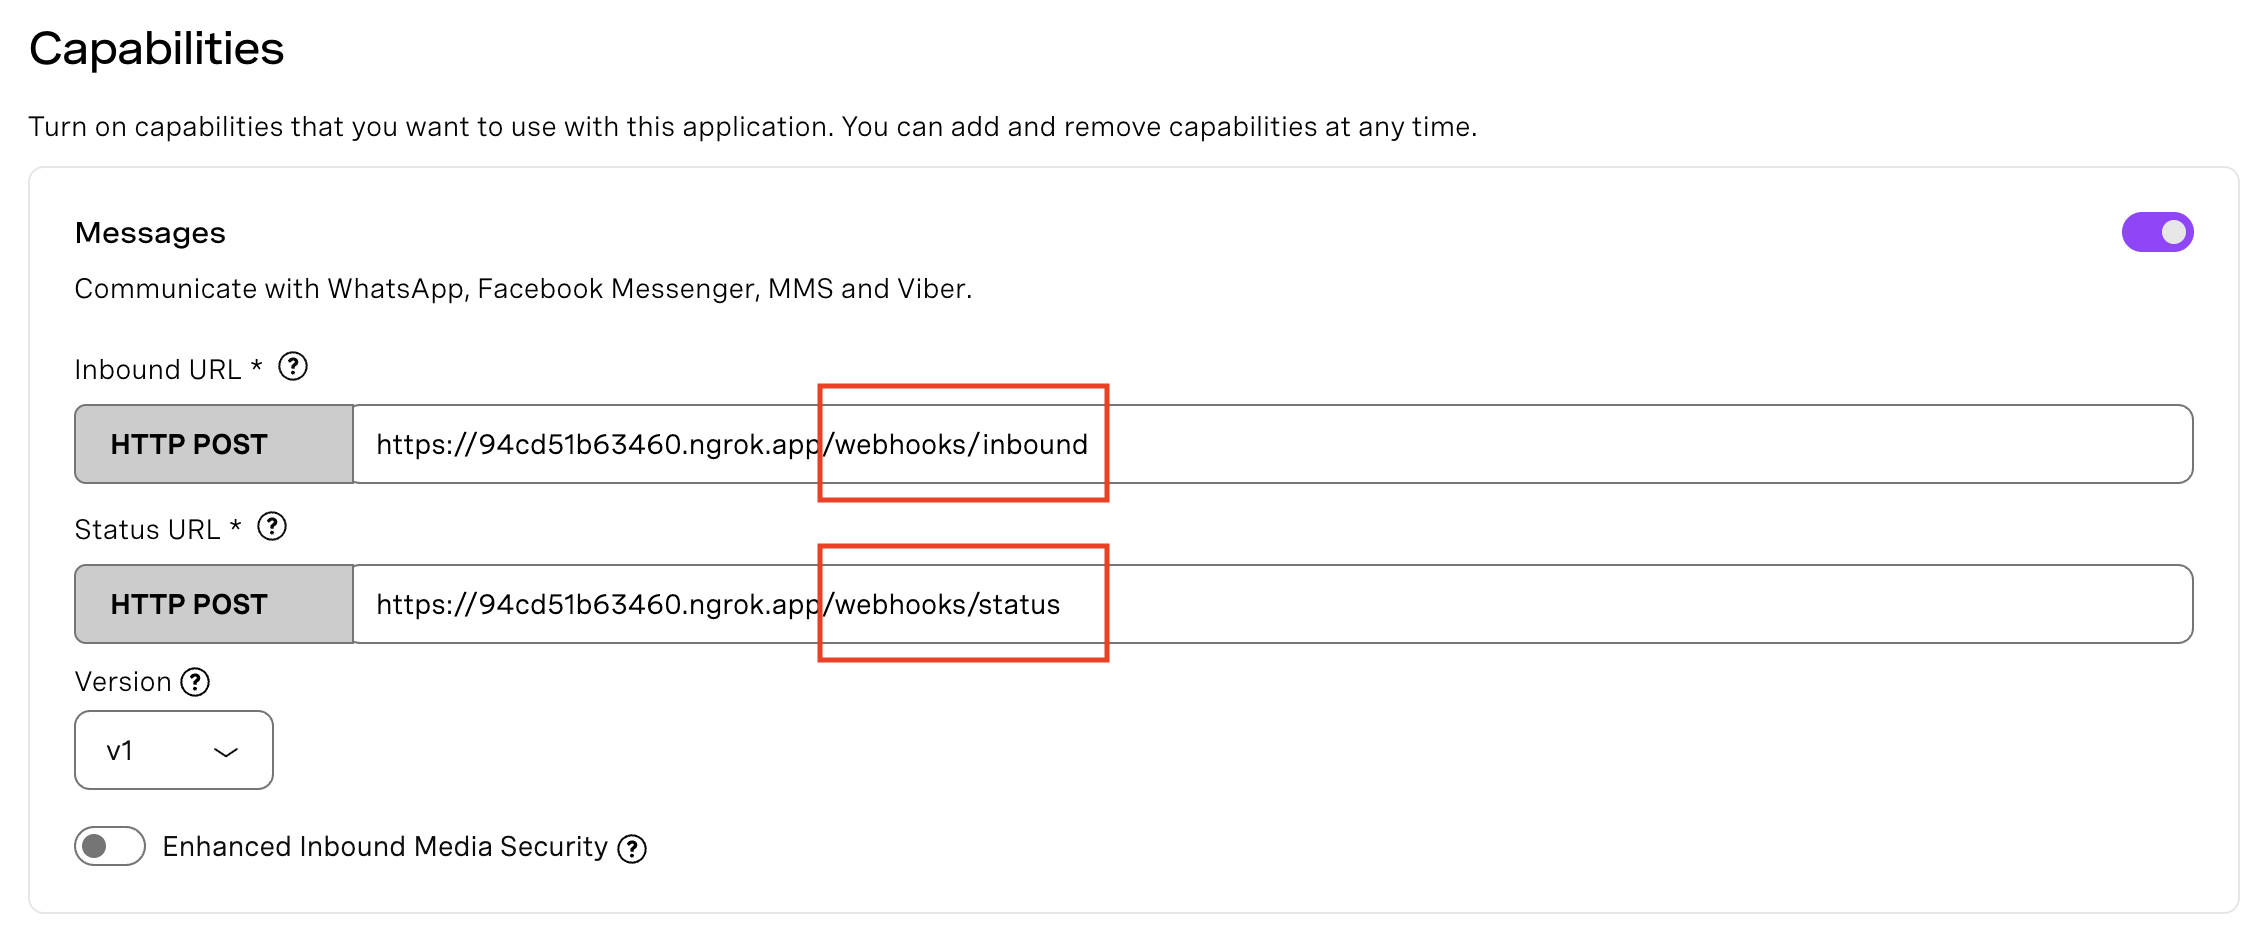 webhooks
Clone the Vonage Community GitHub repository for this project and npm install the dependencies.
npm install express debug @vonage/messages @vonage/server-sdk dotenv
Create a .env file in your project root.
VONAGE_APPLICATION_ID=YOUR_VONAGE_APPLICATION_ID, can be found within the application you’ve created

VONAGE_PRIVATE_KEY=./private.key, is the path to the private.key file that was generated when you created your application

RCS_SENDER_ID=YOUR_RCS_SENDER_ID

PHONE_NUMBER=YOUR_PHONE_NUMBER_E164 that will receive the RCS messages

PORT=3000

VONAGE_API_SIGNATURE_SECRET= is the secret used to sign the request that corresponds to the signature secret associated with the api_key included in the JWT claims. You can identify your signature secret on the Dashboard settingsIn your project, you'll also find a vonage.js file that contains the Dotenv and Vonage Client Setup.
Add a JWT verification function to verify if the incoming request (e.g., message or call) came from Vonage.
The VONAGE_API_SIGNATURE_SECRET variable is the secret used to sign the request corresponding to the signature secret associated with the API key included in the JWT claims. You can identify your signature secret on the Dashboard settings.
You can learn more about verifying the request.
const verifyJWT = (req) => {
  // Verify if the incoming request came from Vonage
  const jwtToken = req.headers.authorization.split(" ")[1];
  if(!verifySignature(jwtToken, process.env.VONAGE_API_SIGNATURE_SECRET)) {
    console.error("Signature does not match");
    throw new Error("Not a Vonage API request");
  }

  console.log("JWT verified");
}Make sure to install the @vonage/jwt dependency.
npm install @vonage/jwt
In your server.js file, you'll find the finalized code with Gemini integration, but I wanted to give you a starting point on how to send a Rich Card Message in RCS with a hardcoded text so you can have a first experience with it and see it running before any more complex setup, with everything we've set up so far.
Start off by adding the imports and defining your variables.
import Express from "express";

import { RCSCustom, RCSText } from "@vonage/messages";

import { vonage } from "./vonage.js";

import "dotenv/config";

const app = new Express();

const port = process.env.PORT || 3000;

const recipientNumber = process.env.PHONE_NUMBER;

if (!recipientNumber) {

  process.exit(1);

}

if (!process.env.RCS_SENDER_ID) {

  process.exit(1);

}We'll also use an async wrapper for error handling in routes.
const catchAsync = (fn) => (req, res, next) => {

  fn(req, res, next).catch(next);

};

app.use(Express.json());

app.get(

  "/send-story-request",

  catchAsync(async (req, res) => {

    await sendBedtimeStoryRequest(recipientNumber);

    res.status(200).json({ message: "Bedtime story request sent!" });

  })

);Create the /webhooks/status endpoint.
app.post(

  "/webhooks/status",

  catchAsync(async (req, res) => {

    res.status(200).json({ ok: true });

  })

);
Create the /webhooks/inbound endpoint.
app.post(

  "/webhooks/inbound",

  catchAsync(async (req, res) => {

    const { channel, message_type, reply, from } = req.body;

    if (channel === 'rcs' && message_type === 'reply' && reply) {

      const receivedId = reply.id;

      const receivedTitle = reply.title;

      if (receivedId === 'GENERATE_STORY_REQUEST' || receivedTitle === 'Generate Story') {

        const replyToNumber = from;

        const helloWorldMessage = "Hello world!";

        await sendRCSGreeting(replyToNumber, helloWorldMessage);

      } else {

        // Unhandled reply

      }

    } else if (channel === 'rcs' && message_type === 'text') {

      if (req.body.text && req.body.text.toLowerCase() === 'generate story') {

        await sendRCSGreeting(from, "Hello world!");

      } else {

        await sendRCSGreeting(from, "I received your message: " + req.body.text);

      }

    }

    res.status(200).json({ ok: true });

  })

);Add some error handling messages, and the app listens on the defined port (3000).
app.all("*", (req, res) => {

  res.status(404).json({

    status: 404,

    title: "Not Found",

  });

});

app.use((err, req, res, next) => {

  res.status(500).json({

    status: 500,

    title: "Internal Server Error",

    detail: err.message,

  });

});

app.listen(port);Create the sendBedtimeStoryRequest that sends a new RCS Custom message that says ‘Bedtime Story Generator’, containing a button to generate a new story.
const sendBedtimeStoryRequest = async (number) => {

  const message = new RCSCustom({

    to: number,

    from: process.env.RCS_SENDER_ID,

    custom: {

      contentMessage: {

        richCard: {

          standaloneCard: {

            cardOrientation: "VERTICAL",

            cardContent: {

              title: "Bedtime Story Generator",

              description: 'Tap "Generate Story" for a magical tale!',

              media: {

                height: "MEDIUM",

                contentInfo: {

                  fileUrl:

                    "https://cdn-icons-png.flaticon.com/512/2917/2917637.png",

                },

              },

              suggestions: [

                {

                  reply: {

                    text: "Generate Story",

                    postbackData: "GENERATE_STORY_REQUEST",

                  },

                },

              ],

            },

          },

        },

      },

    },

  });

  try {

    await vonage.messages.send(message);

  } catch (err) {

    if (err.response) {

      err.response.text().catch(() => {});

    }

  }

};
Create the sendRCSGreeting that sends an RCS message using the Vonage Messages API.
const sendRCSGreeting = async (to, messageText) => {

  const message = new RCSText({

    to: to,

    from: process.env.RCS_SENDER_ID,

    text: messageText,

  });

  try {

    await vonage.messages.send(message);

  } catch (err) {

    if (err.response) {

      err.response.text().catch(() => {});

    }

  }

};To run the app, start the server:
node server.jsThen visit the following URL in your browser, which triggers the first message to the user’s phone, inviting them to generate a story. The JSON confirmation in your browser, along with the received RCS message on your phone, are signs that the system is working.
http://localhost:3000/send-story-request
Now that we have the RCS messaging and webhook working, let's add Google Gemini to our storytelling service.
When you navigate to AI Studio, log in, and create a new chat, you can see ‘<\>Get Code' at the top right and select your programming language of choice. Choose the model. I've used “Gemini 1.5 Flash Experimental,” but you can choose the one that makes the most sense for your project.
To learn more, visit the Gemini Developer API documentation page.
npm install @google/generative-aiAdd your Gemini API key to .env.
GEMINI_API_KEY="YOUR_GEMINI_API_KEY"
import { GoogleGenerativeAI } from "@google/generative-ai";

const genAI = new GoogleGenerativeAI(process.env.GEMINI_API_KEY);

const geminiModel = genAI.getGenerativeModel({ model: "gemini-1.5-flash" });
With Gemini initialized, we update our /webhooks/inbound handler. When the user clicks "Generate Story," instead of replying "Hello world!", we now call geminiModel.generateContent with a specific prompt for a bedtime story.
The generated text is then sent back to the user using sendGeneratedStory. We also added handling for users who might type "Generate Story" manually.
The sendGeneratedStory function now takes the generated story text and uses RCSText to send it back as a regular RCS text message.
To run the app, (re)start the server:
node server.jsThen visit the following URL in your browser: http://localhost:3000/send-story-request
From your device, you'll receive an RCS message. Tap the "Generate Story" to receive a Gemini-created bedtime story.
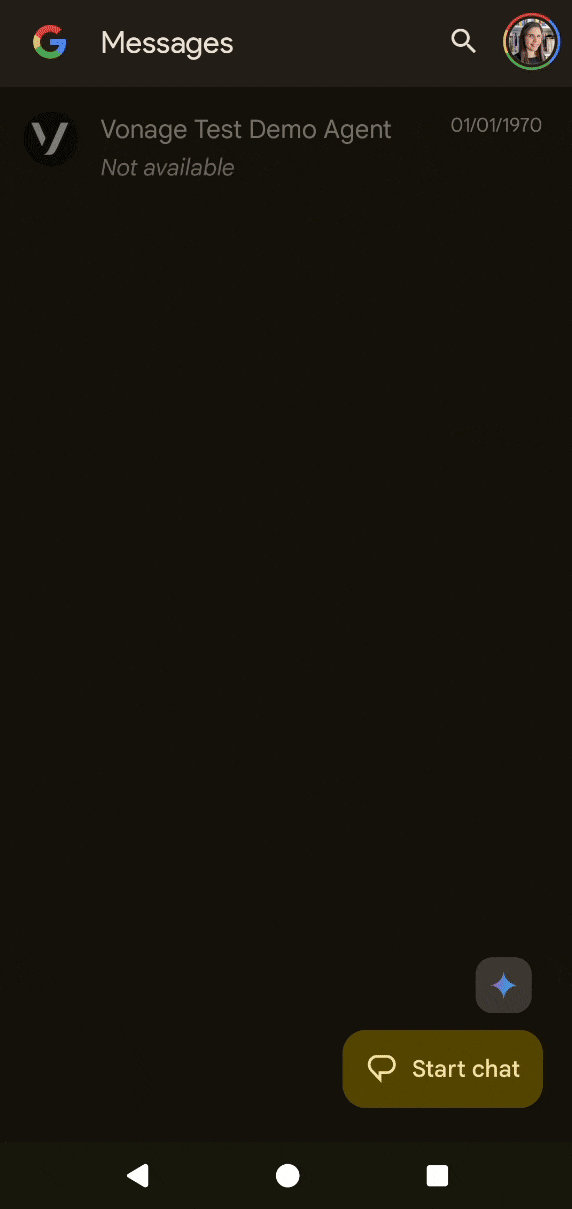 RCS Project
Conclusion
This tutorial showed you how to build a Gemini-powered storytelling service using Vonage’s RCS API. The last time I did anything related to RCS was in 2020. I participated in a workshop where each attendee was sent an RCS-enabled SIM card. It was nice to get back to working with RCS again, and I can't wait to write more blog posts about this.
Have a question or want to share what you're building?
Subscribe to the Developer Newsletter
Follow us on X (formerly Twitter) for updates
Watch tutorials on our YouTube channel
Connect with us on the Vonage Developer page on LinkedIn
Stay connected and keep up with the latest developer news, tips, and events.