Build an Interactive Board: WhatsApp, SMS, and MMS to a Website (Part 2)
Time to read: 8 minutes
In Part 1, we created an interactive message board to receive SMS, MMS, and WhatsApp messages and display them on a webpage. This application used the Vonage Messages API and an Express server.
In Part 2, we will replicate this functionality with a twist. We'll useVonage AI Studioto handle inbound messages. Our messages will be stored in an Airtable database and then displayed by our Node.js application.
Vonage AI Studio is a low-code platform that makes it easy for developers and non-developers to build virtual assistants. With its intuitive drag-and-drop interface, you can design conversational flows.
You can find the code for the Admin Dashboard Display on this GitHub repository. Clone, and let’s follow the tutorial below I’ve prepared for you, explaining all the bits step by step.
User Interaction: A user starts the interaction by sending a WhatsApp message to a specific Vonage virtual phone number linked to the Vonage Application containing the flow.
Message Reception: The conversation flow starts with the ‘Start’ node, allowing the user to send or see messages.
Data Storage: Once processed, the message is saved to Airtable, an online platform for creating and sharing relational databases.
Display: Build our Admin Dashboard: A web page, continually updated, fetches these messages from Airtable and displays them.
First, let's create our data storage so create an account on Airtable. Once logged in, find the below steps from the Airtable dashboard. Compared to part 1, I chose to simplify it for part 2 and create just one table called Messages.
Create a base called "Interactive Board" by clicking “+ Create a base”, and pick a theme color and icon optionally; I have skipped the rest of the setup, but feel free to fill it in if you wish and go through the end of the base creation where I am taken to the Messages base.
You can now see some empty numbered rows. Let’s go ahead and create a table called Messages. It has the following columns: ‘Message’, ‘Number’ (phone number), ‘Status’ of type ‘Single Select’ and add options ‘Accepted’, ‘Pending’, and ‘Rejected. And finally, ‘ImageUrl’.
Create views like 'Grid view' to filter messages
Once the records are logged into airtable, they have ‘Pending’ status. Your moderators can access the Airtable Database and manually change the status of each record to either ‘Rejected’ or ‘Accepted’. If accepted, they will be output in the interactive board website.
I’ll break down each step for you to create the flow for our conversational app.
Accessing AI Studio:
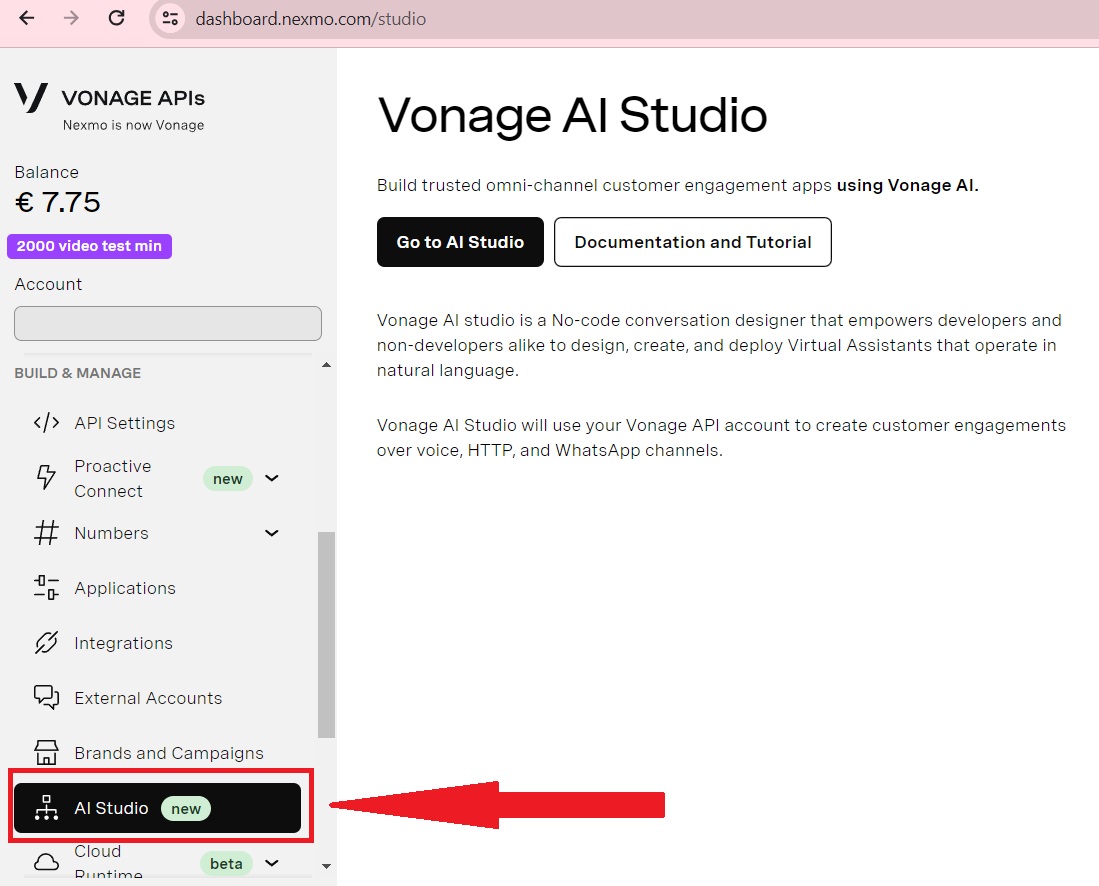
Log in/ Sign up to Vonage AI Studio. You'll find it on the Vonage Dashboard, under the menu to the left. Select "AI Studio" and click “Go to AI Studio”.
 AI Studio
Setting Up WhatsApp Agent:
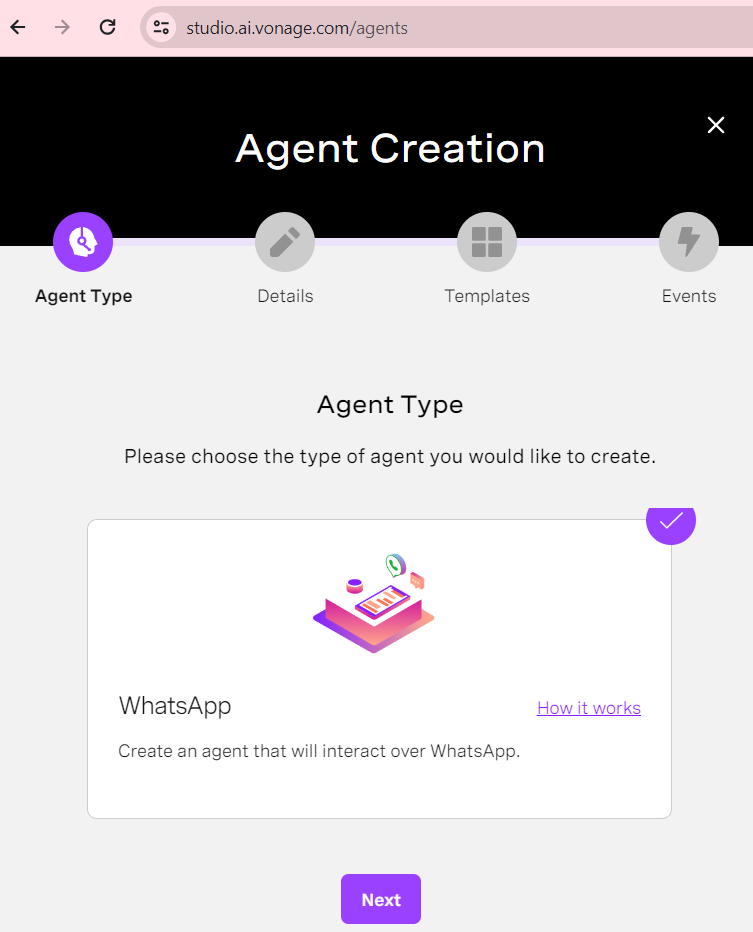
Choose 'WhatsApp' as your agent type and click ‘Next’.
 Whatsapp Agent Creation
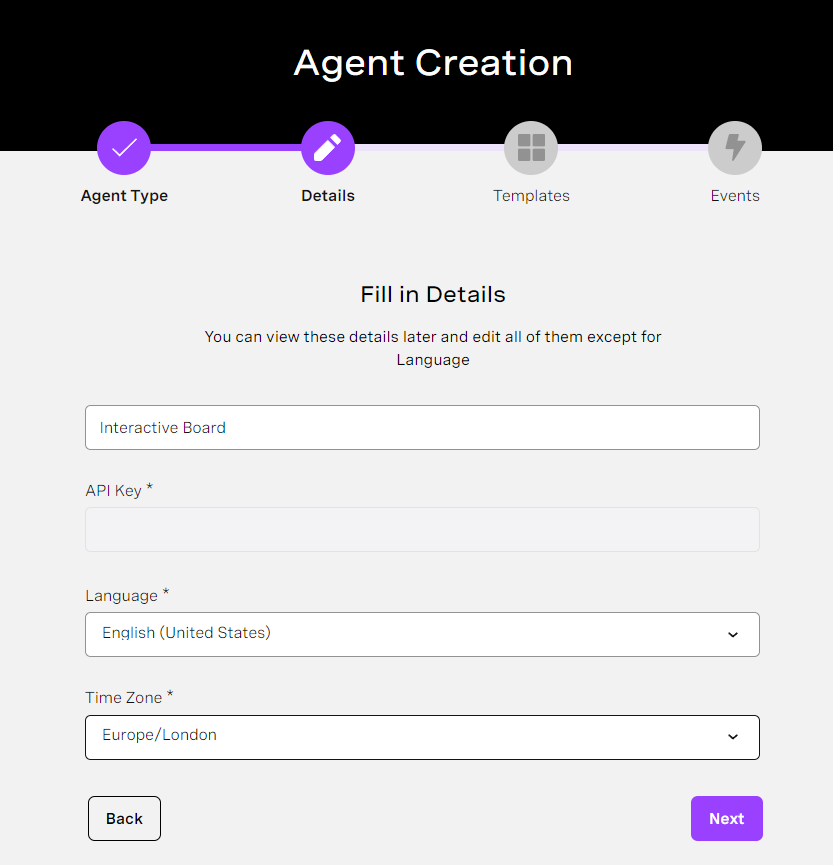
Fill in the required details such as Region, Agent Name (e.g., 'Interactive Board'), Language, and Time Zone (e.g., Europe/London) and click ‘Next’.
 Agent Creation Details
Template Selection:
Click “Create Agent”. To create a new app, visit Vonage AI Studio Agents.
Choose the "Start from Scratch" template.
Select 'Inbound Session Event' and click 'Create'. This step is essential so the users initiate the session with the agent.
This section will dive into the specifics of creating a conversational application with WhatsApp integration:
 Vonage AI Agent Dashboard
Create a ‘Greeting’ (Send Message) block right after the START route welcoming users, explain the bot's capabilities in the ‘Agent says’ input, and click ‘Save and Exit’.
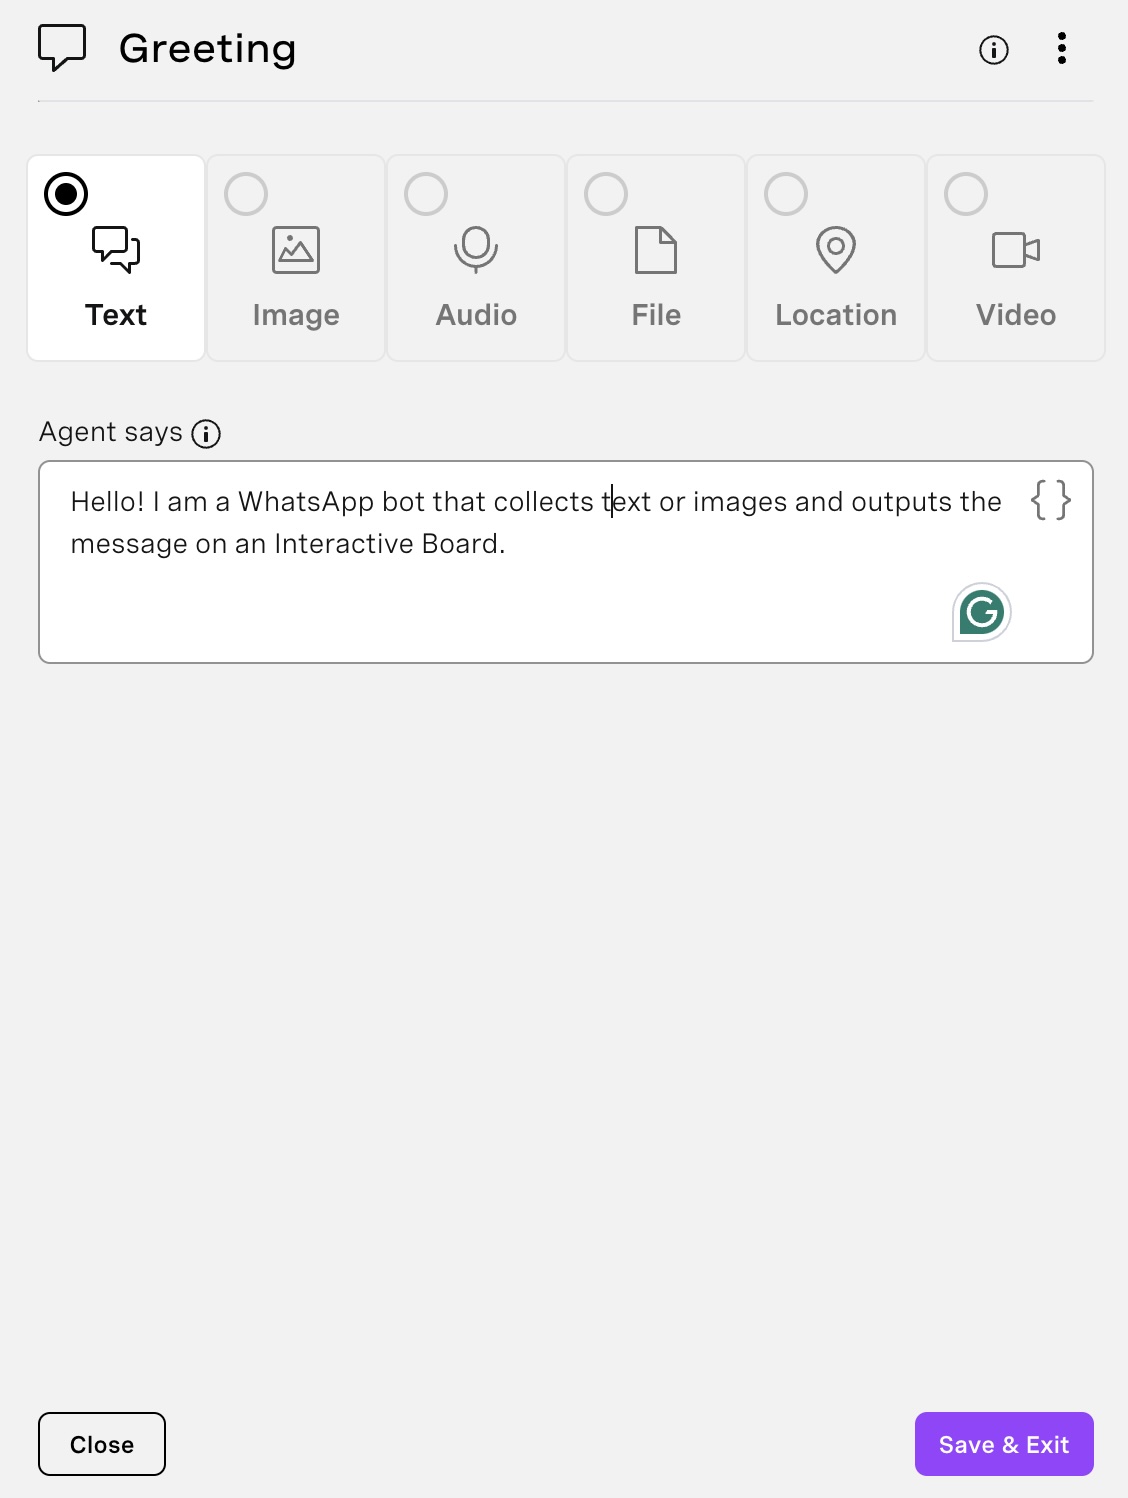 Greeting Node
Create a Collect Input conversation node, choose the parameter MESSAGE, choose ‘List Messages’, and add one section for ‘See Messages’ and another section for ‘Send Messages’, add any other information you see fit to make it described and user for the user to understand it and click ‘Save and Exit’.
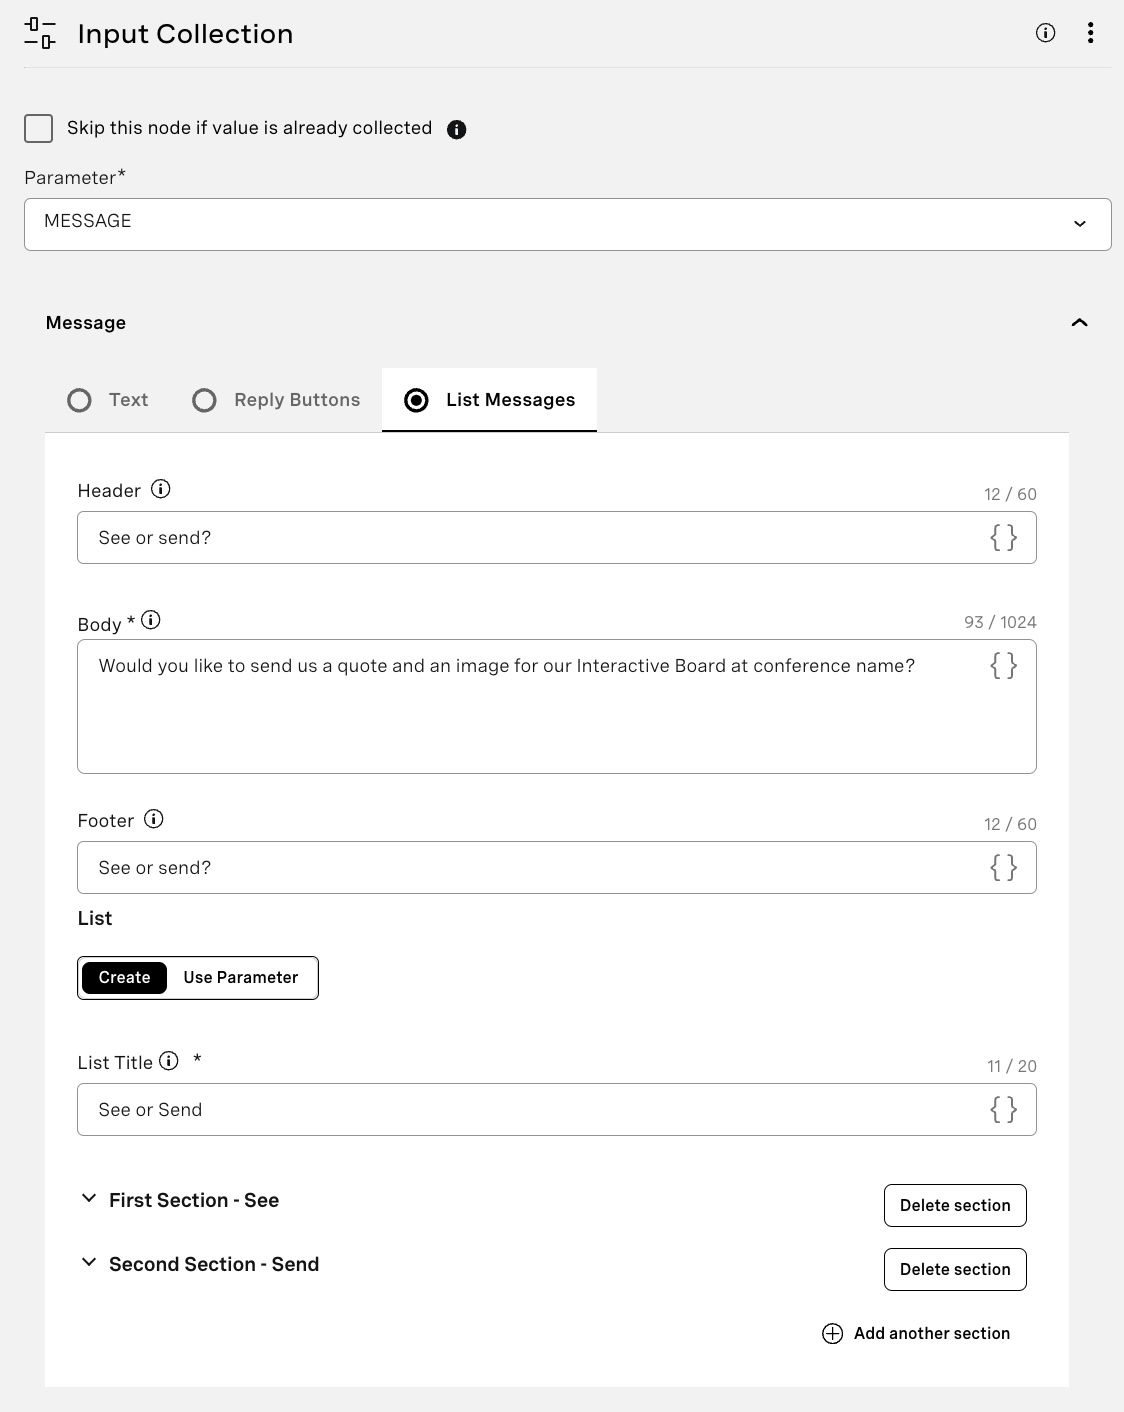 Input collection
Create a ‘Conditions’ conversation node (I have named it "Menu Condition: see or send") with two conditions: ‘See Message’ and ‘Send Message’. The first condition should be Parameter: MESSAGE, Operation: Contains, Value: See. The second one should be Parameter: MESSAGE, Operation: Contains, Value: Send.
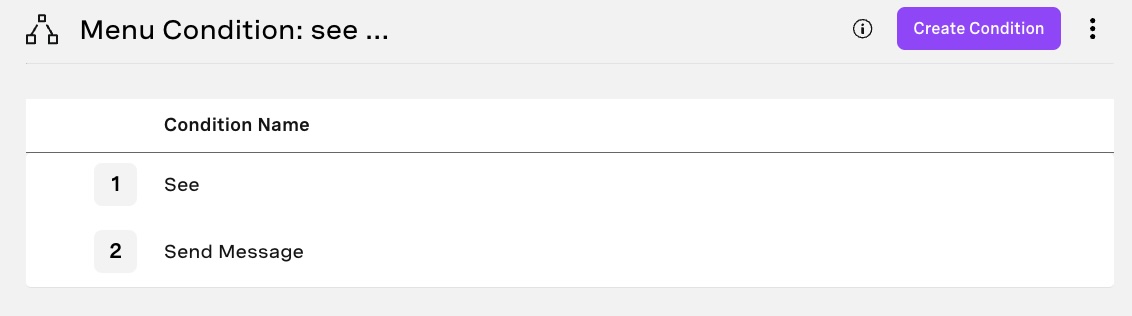 Menu Condition
Following the conditions block, we will create two blocks:
A 'Send Messages' node linked to our ‘See’ condition (I have named it Message to See Messages). The message should read: If you'd like to see all the output messages, please access this link.
We'll update this link later with the ngrok link you will have running with your express server. For now, you can leave it with a dummy message.
 Message to See Messages
A second node linked to ‘Send’ of type ‘Collect Input’ (I have named it "Send Messages") and in the prompt, add a message along the lines of ‘Go ahead and send me the message or image you'd like to share!’ and select ‘Text’ and ‘Image’ as expected input, as this is what we expect our users to send!
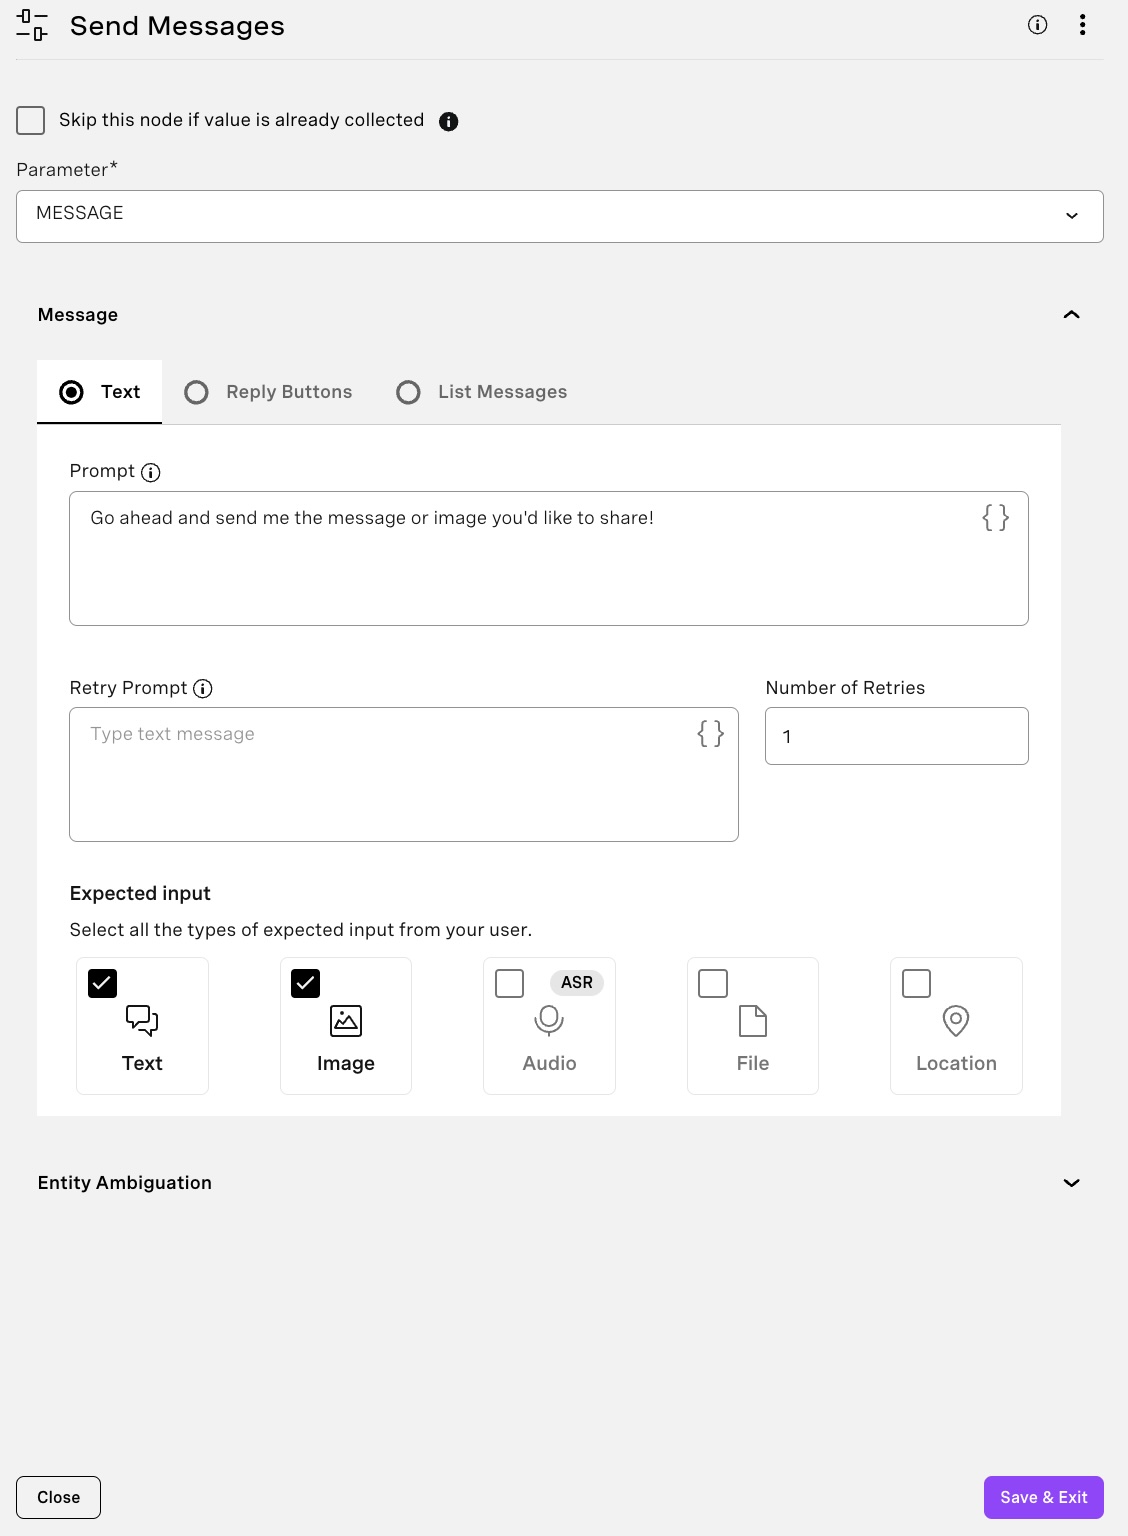 Send Message
Let’s now use Classification to handle our users' input. In part 1, we have added a file containing the blocked words for our web application. Now, in part 2, with Vonage AI Studio, we can add a Classification Node. It can be found on the menu on the left: Node > Conversation > Classification. Add that block to the flow right after ‘Send Messages’ and fill it with the following information:
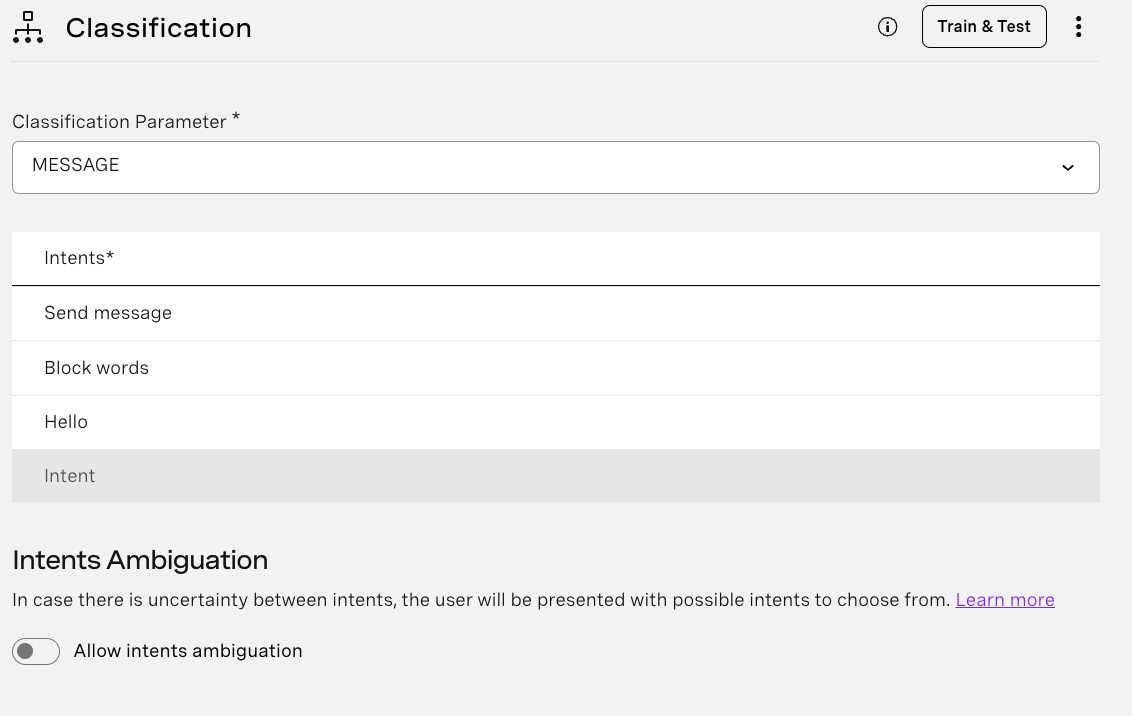 Classification Intent
Classification Parameter: MESSAGE We will create two intents: Send Message and Block Words From the Menu on the left, you can click on ‘Properties’ and create a new intent, or even from the classification view you currently are in, you can click on ‘Intent’ and create a new one from there and add the Training set for each intent.
Block Words: You can add the words that are blocked for your flow (for instance, curse words).
Send Message: you can add some examples of messages that users can send, for instance: ‘Great Event’, ‘I am having a great time’, ‘I love this, but I wish there were sushi’.
Learn more about Classification and think of future enhancement steps by adding sentiment analysis integration to detect negative messages automatically.
Create a send message node called "Allowlist alert". The agent should say "The previous message went against our guidelines of allowlisted words. Please send another message.".
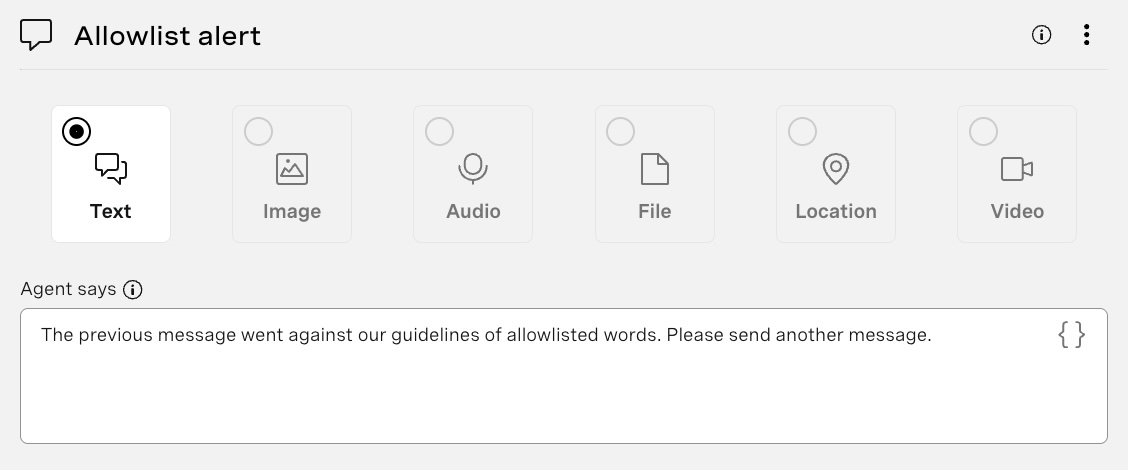 Allowlist alert
The Classification "blocklist" option should be linked to it, and it should be linked back to the Send Messages Message Input.
 Links
Links
Next, we will use a Webhook Node (I have named it "Webhook: Create record") to add our Messages to our Airtable backend. To add records to Airtable, Click on Integrations > Webhook and fill in the following information:
Method: POST Request URL: https://api.airtable.com/v0/BASE_URL/Messages Headers: Key: Authorization, Value: Bearer ‘YOUR_AIRTABLE_ACCESS_TOKEN’ Key: Content-Type, Value: application/json
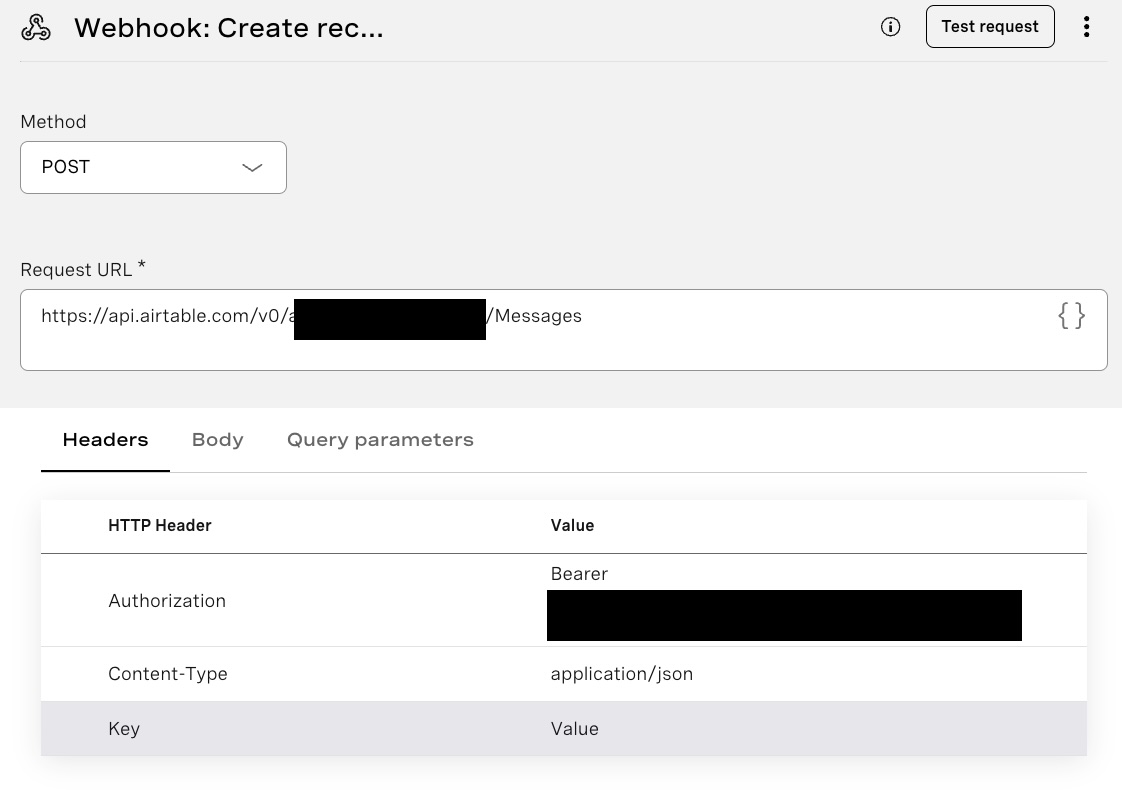 Webhook node
Note: The Request URL has to line up with your table in Airtable
If you get stuck or have doubts, for a more detailed explanation, check out Low Code Leverage: AI Studio with Airtable by Benjamin Aronov, where he explains in detail how to use AI Studio with Airtable.
On the second webhook tab called ‘Body’, add the following information of type JSON. That means we are adding the message the user sent containing either text or image, assigning the phone number of the person interacting with this agent, and setting the status of Pending, where the moderators can change it to Accepted or Rejected from Airtable.
{
 "records": [
  {
   "fields": {
   "Message":"$MESSAGE",
    "Number": "$SENDER_PHONE_NUMBER",
	"ImageUrl": "$MESSAGE",
    "Status":"Pending"
   }
  }
 ]
}Link the webhook success option to a new ‘Send Message’ node. Create a new ‘Send Message’ node, name it ‘Media Receipt’, and add under Agent Says ‘Thanks for sending this over!’ and click save and exit.
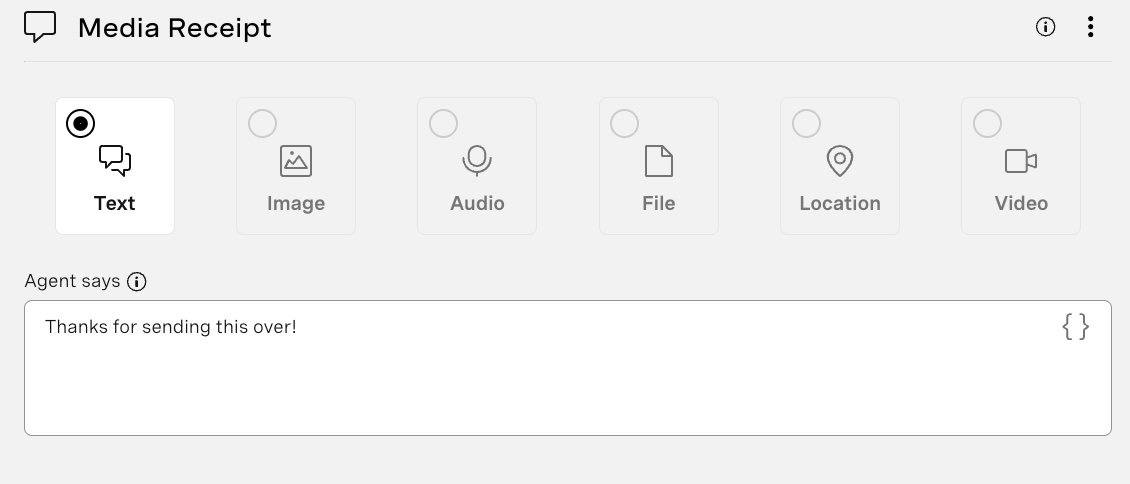 Media receipt
Link the webhook fail option to the previous send Message Collect Input to request it from them again. Link the ‘Media receipt’ node to the pre-existing ‘Message to See Messages’, then link to ‘End Conversation’.
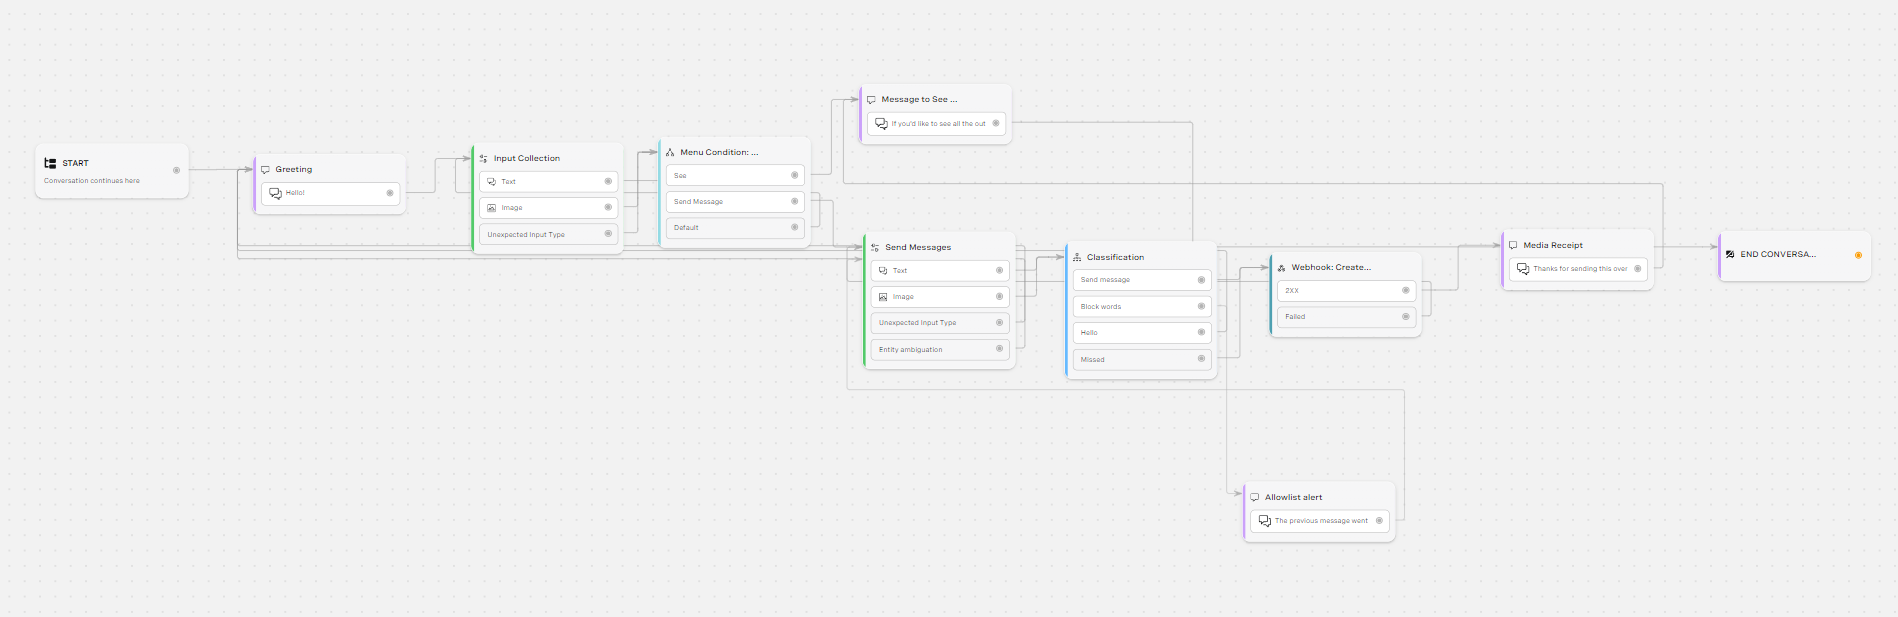
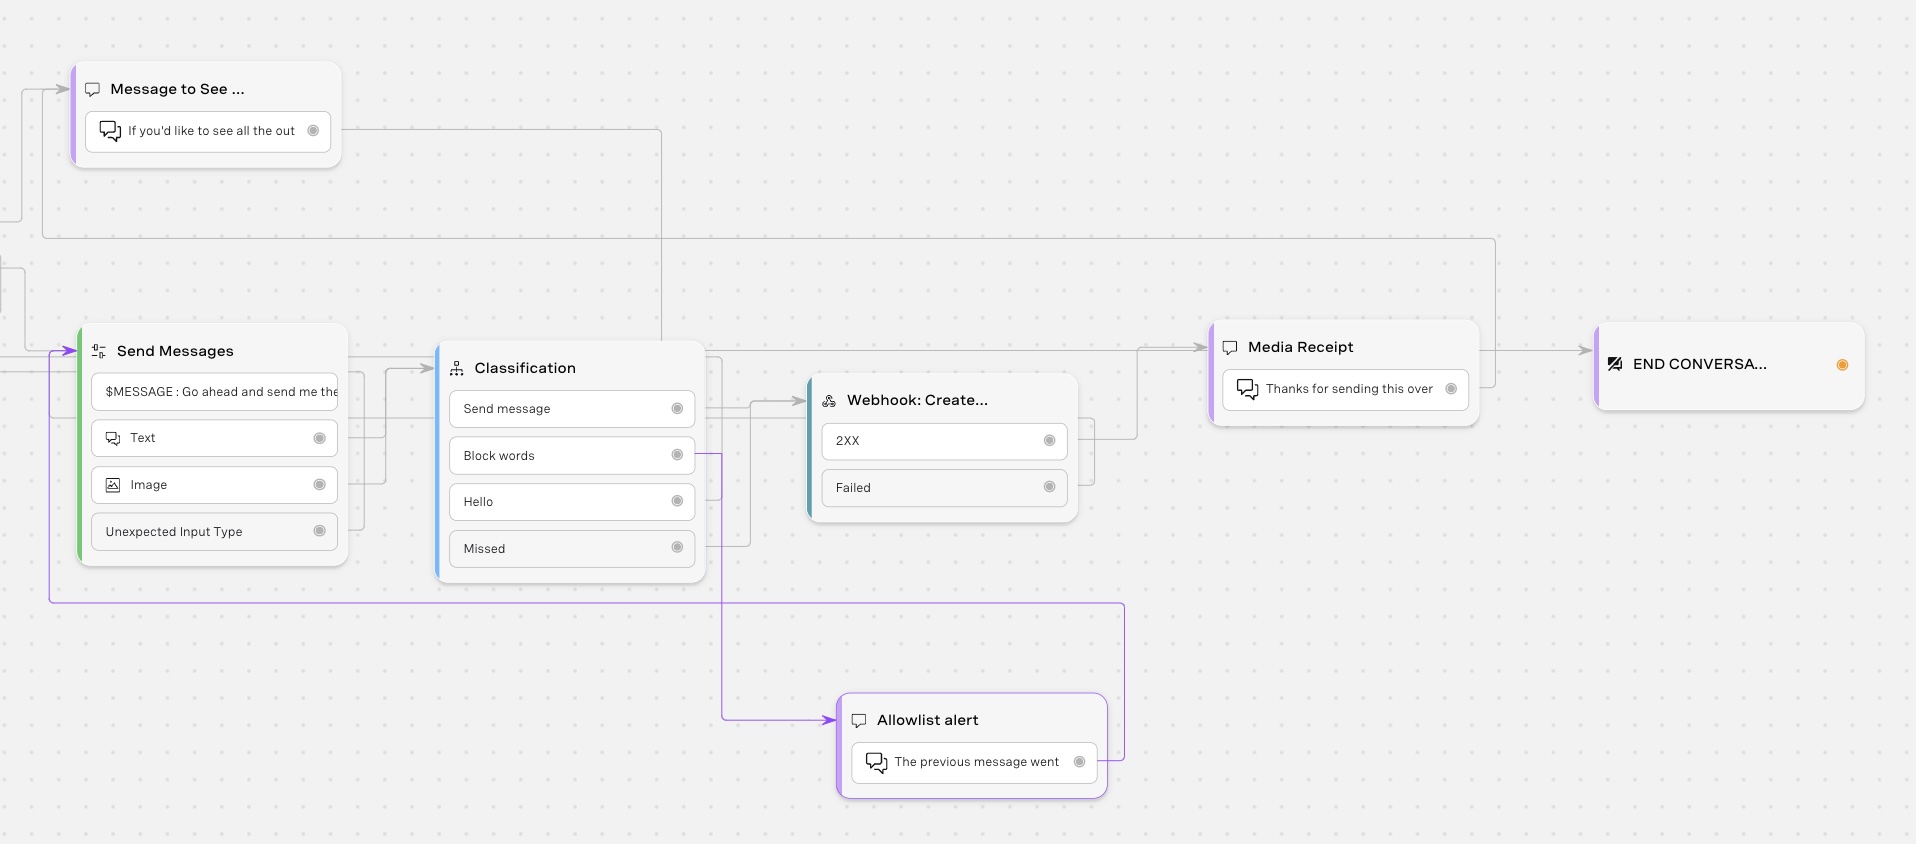 Flow
Flow
The code is similar to what we have seen in part 1. However, we can eliminate the blocklist.txt as this is now handled within the conversation flow in Vonage AI Studio and the user creation and inserting the records into Airtable. However, we keep the endpoint that changes the state of the message "/messages/:messageId/:status" in addition to the endpoint that fetches the messages /messages. This is what the index.js for this project looks like.
Just as mentioned in part 1, you should have ngrok running and go back to the AI Studio Agent Flow and update the See Messages node with the ngrok URL provided; you could always host your website and add the webpage linked there for this demonstration tutorial using ngrok from our localhost suffices.
You can see a Tester button at the top right of the Vonage AI Studio; you can test your conversation without publishing it. Go ahead and select ‘Inbound Session’ and click on the ‘Start chat’ button. You can pre-fill the Parameters you want the agent to work with (by clicking on the settings/ gear icon) and choose the testing mode. Check out the Tester Page to learn more.
We have used the inbound to start with WhatsApp messages, but if we were to use MMS, you could always use the same number assigned to the WhatsApp chatbot. There are some requirements for an MMS Number from the US 10DLC, TFN, and Shortcode numbers you have in your dashboard to other numbers within the United States. You can learn more about How to Send MMS Messages with Node.js.
Within Vonage AI, there is an Action called ‘Send SMS’. You can add that block to your conversation flow to send an SMS message, fill in the fields containing the sender and receiver numbers and the body of the message, click ‘save and exit’, and connect it to the node you’d like the message to be sent. You can learn more about Sending SMS Using Vonage AI.
When I was done building this demonstration conversational app, I wanted to see how it looked on WhatsApp and to be able to version and publish my changes. To do so, I purchased a phone number, assigned it to the agent, linked it using the Messages API, and made a WhatsApp Business Account with my newly purchased number. You can learn further about how to publish your agent to publish yours and share it with others!
Check the Vonage AI docs, share your experiences, feedback, and any innovative uses you’ve found using our APIs with our community through X, previously known as Twitter or the Slack Community.