Share:
Benjamin Aronov is a developer advocate at Vonage. He is a proven community builder with a background in Ruby on Rails. Benjamin enjoys the beaches of Tel Aviv which he calls home. His Tel Aviv base allows him to meet and learn from some of the world's best startup founders. Outside of tech, Benjamin loves traveling the world in search of the perfect pain au chocolat.
Low Code Leverage: AI Studio with Airtable
Time to read: 8 minutes
A few months ago I was in Dubai for a hackathon. The hotel taxi driver was very friendly and wanted to make sure I made the most of my two-day trip. He began offering all kinds of services, like picking me up at the start and finish of each day of the event, doing different kinds of specialized tours of the city, or even doing a trip to Abu Dhabi.
He gave me his business card with a QR code to message him on WhatsApp. I scanned the code and it took me to a chat window with his business account. But that was it! None of the cool services he had just told me about were presented to users. So my business brain got to working and I suggested to him, you know you can really help empower your customers with Vonage’s AI Studio!
 An example of a QR code Taxi Driver card. Credit to zazzle.com
Last year Vonage launched AI Studio, a NoCode/LowCode platform that allows anyone to build Conversational AI agents, fast! Typical use cases for Conversational AI are chatbots for customer support or marketing. But chatbots can improve the user experience for so many more applications!
In this tutorial, I’ll show you how to build an AI Studio WhatsApp agent for this taxi service which uses Airtable as a backend database to store and access information.
Yalla, let’s go!
Vonage Developer Account. To use AI Studio you'll need a Vonage Developer Account. Details to get started just below.
Airtable Account - sign up here. We'll be using Airtable as our backend database.
Postman Account - sign up here. We'll be using Postman to send requests in the advanced section of this tutorial.
Optional: Miro Account - sign up here. I use Miro to mockup my AI Studio agents. More information about this below.
Before building any agent in AI Studio, I highly recommend mapping out your agent's flow using a visual tool. You can read more about creating a high-fidelity Conversational AI mockup here.
In our app we'll let users look up taxi prices to popular locations and also add their contact info to subscribe to future taxi deals. The mockup for those flow look like this:
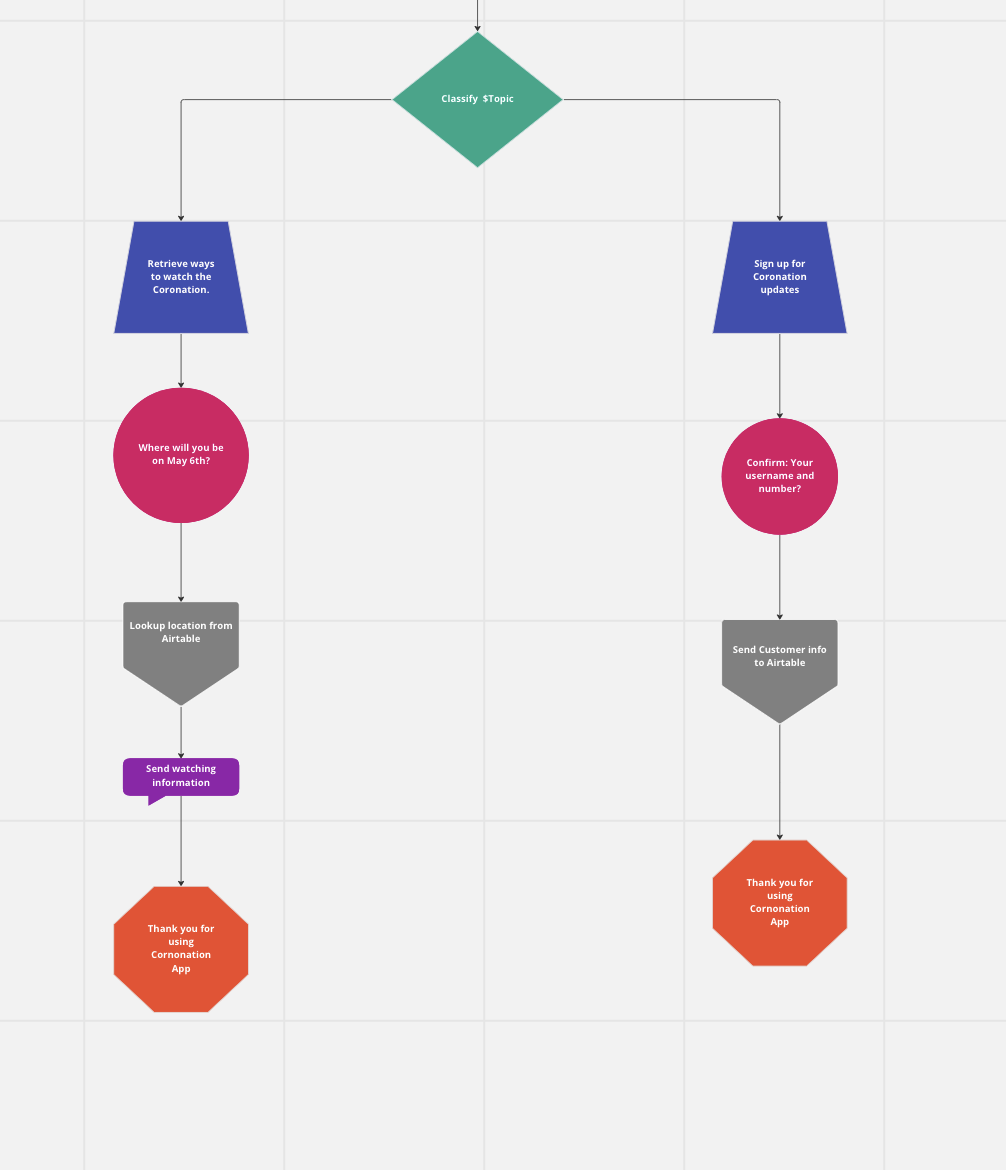 Example of mockup for inbound flows of AI Taxi Demo
Now that we have a clear picture of what we want to build, let's get building!
Before we can get started with AI Studio, we'll need to setup our Airtable database. Airtable is a cool tool that is like Excel with superpowers! The documentation is fantastic and a great place to get started.
Once you've gotten comfortable, you'll want to build a new base. We'll call it "AI Taxi Demo". In this base we'll have two tables: Destinations and Customers.
For Destinations, we'll keep it simple. There will just be two fields: Name and Price.
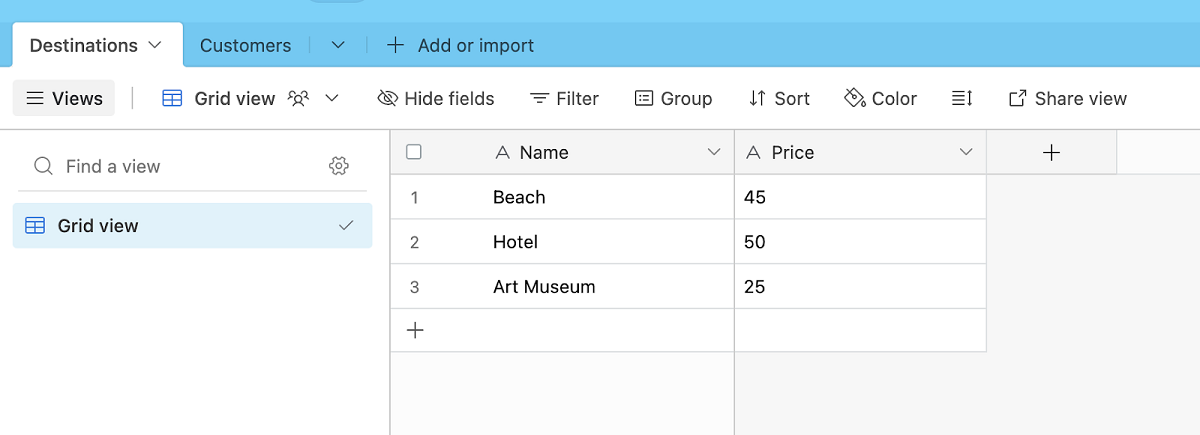 Destinations table with fields Name and Price
Similarly for the Customers tables, we will just use two fields: Name and Phone_Number:
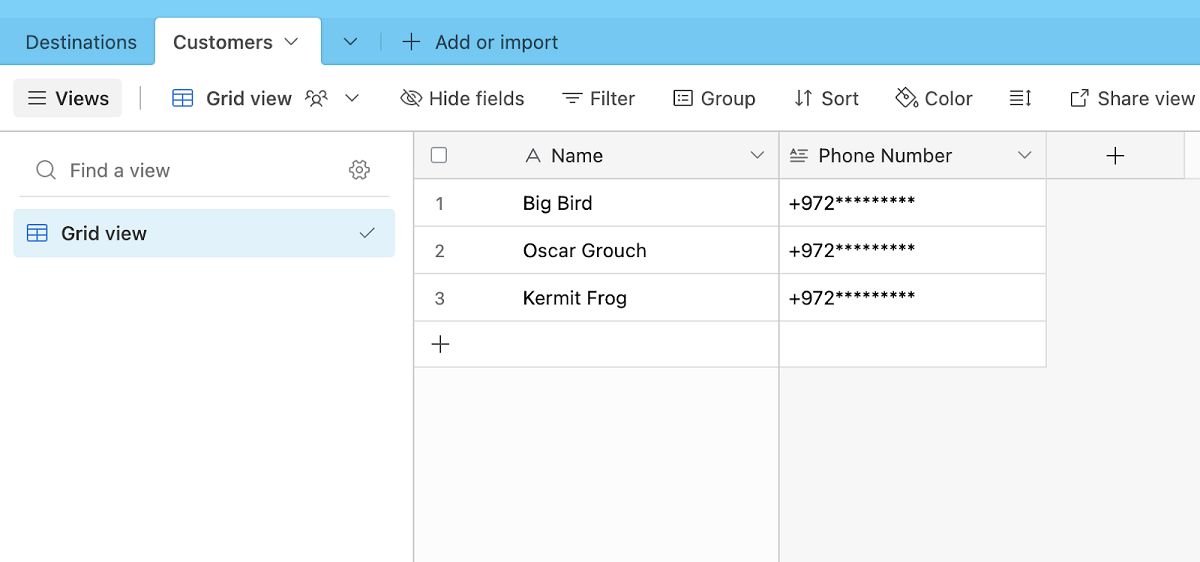 Customers table with fields Name and Phone_Number
We can add some dummy data for these tables, so our API calls return values. Phone numbers should be entered with only digits, no plus sign (+).
Now that we've got our database set up, we can start to build out our AI Studio agent which will interact with the user and then pass data to and from Airtable. Follow the instructions found in the AI Studio documentation here. There are three important options for our agent, select:
Type: WhatsApp
Template: Start From Scratch
Event: Inbound
Now let's get started building out our flows. The great thing is that we've basically done all the work already! We just need to turn our vertical flowchart into a horizontal agent.
Our steps:
Send Message Node: send a welcome message, "Welcome to AI Taxi"
Collect Input Node: ask the user, "How can I help you?". The user's response will be stored in a parameter called TOPIC.
Parameters are like variables, which can be accessed throughout the agent. You can read more about parameters here. Just like variables in code have data types, parameters have entities. For simplicity, all parameters will be of type @sys.any.
Classification Node: classify the
TOPICparameter. We will have two intents:Retrieve PricesandSign Up For Promotions. Here we could've used a simple condition since in this example we only have two intents. However, the beauty and power of AI Studio is the Classification feature. We want to allow our users the freedom to enter any request they desire and write it naturally. You can see how powerful and easy to use the Classification node with suggested User Expressions is; here.Collect Input Node: ask the user, "Where would you like to go?". The user's response will be stored in a parameter called DESTINATION.
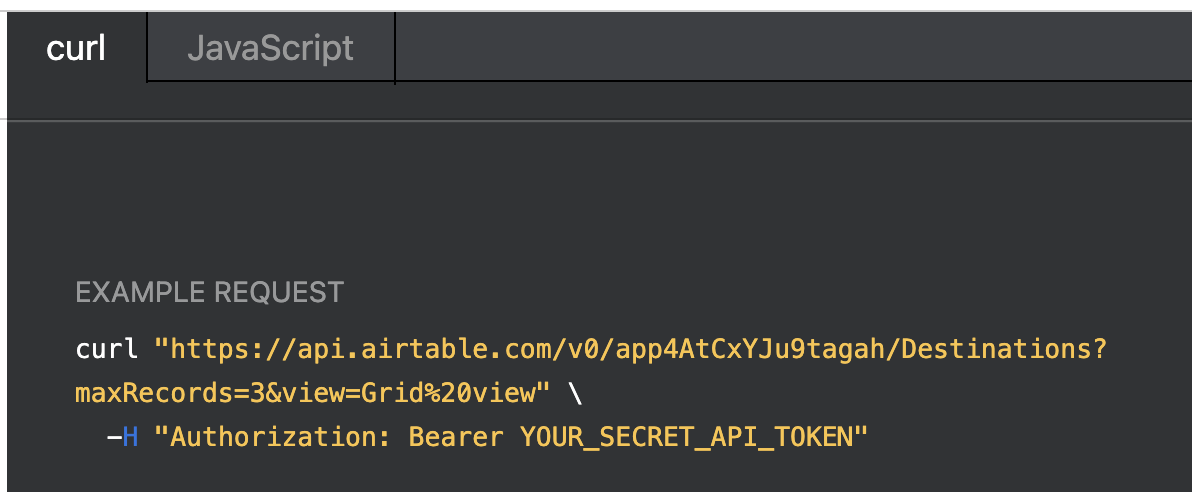
Now we have the search term that we want to send to Airtable and receive back our stored price info. But how can we pass it to Airtable? The great thing about Airtable is their built-in API for each base and helpful documentation. From our AI Taxi Demo base, click on help in the top right corner. Then in the sidebar, at the very bottom, you will find API Documentation. The really cool thing is that Airtable generates the required request for you! Here you will find the prebuilt curl request, it will look something like this:
Now we'll need to add this to our AI Studio agent. So we'll add a Webhook node that allows us to make REST API requests. Learn more about Webhook nodes here.
In the node, we'll add our endpoint in the Request URL:
https://api.airtable.com/v0/app4AtCxYJu9tagah/Destinations
You'll also need to add your Airtable Personal Access Token in the Header parameters under the Headers tab. You can learn how to generate and use your Personal Access Token here. Make sure to give it scopes: data.records:read and data.records:write. This token can only be seen once, so you should save it somewhere safe that you can copy/paste it later.
Now your webhook node should look like this:
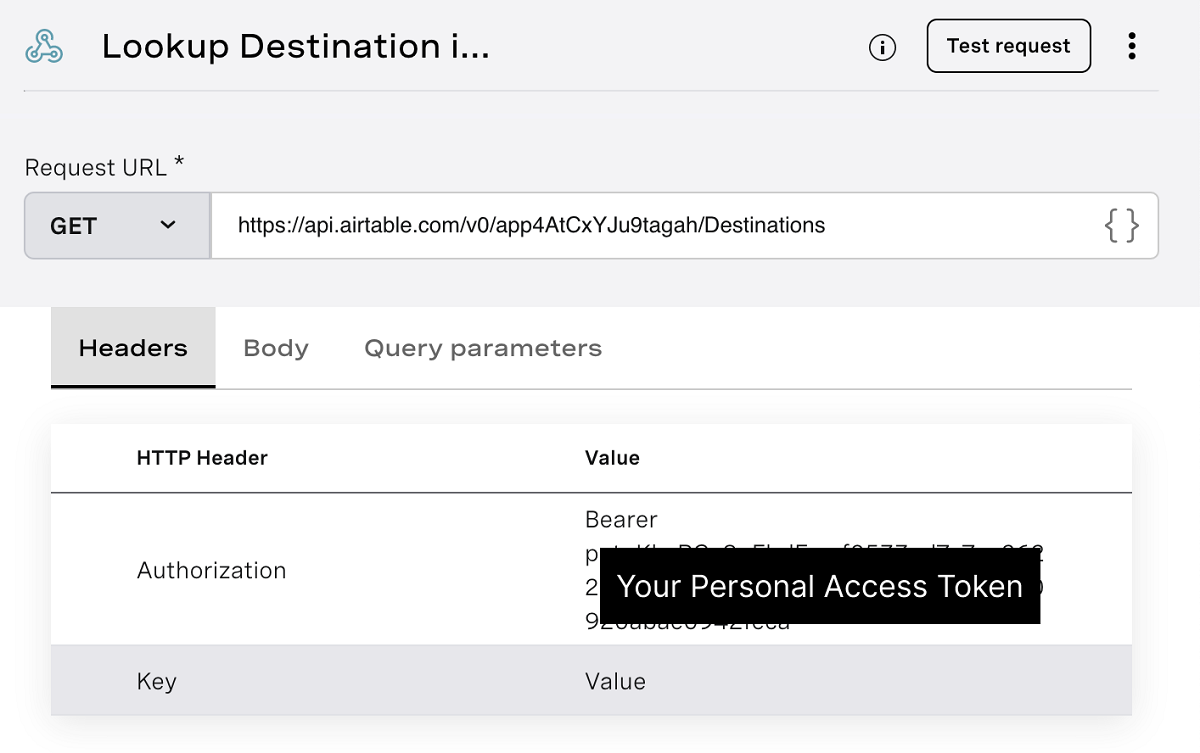 Example of Lookup Destination Webhook Node
We can test that our webhook is working by clicking the test request button in the top right. You'll see that it returns all our Destinations in the table. You can see under the response tab what data will be returned:
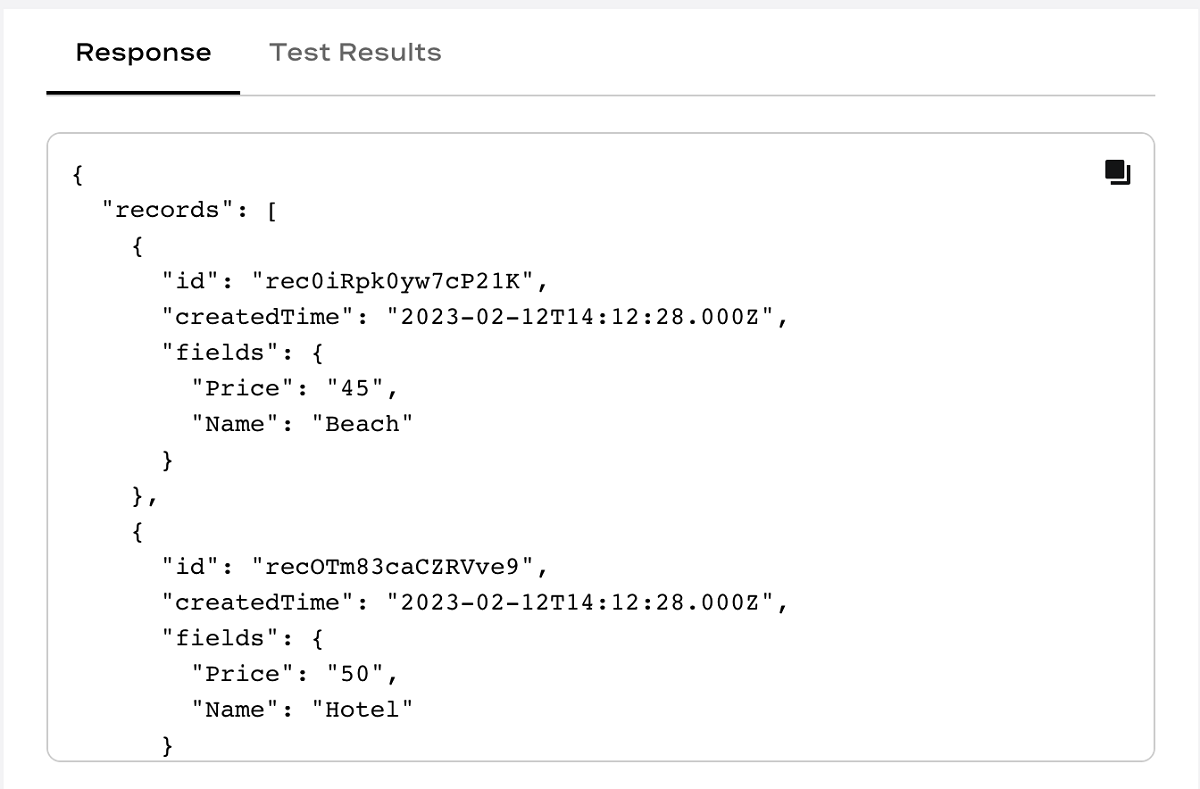 Example of Destinations Lookup Response
But we don't want all the of the destinations, we want to be able to search by our user input. Luckily for us, Airtable has some cool search features. For instance, I've used the filterByFormula to create a global table search. We'll use filterByFormula here to search against the Destination column. And now our webhook node looks like this:
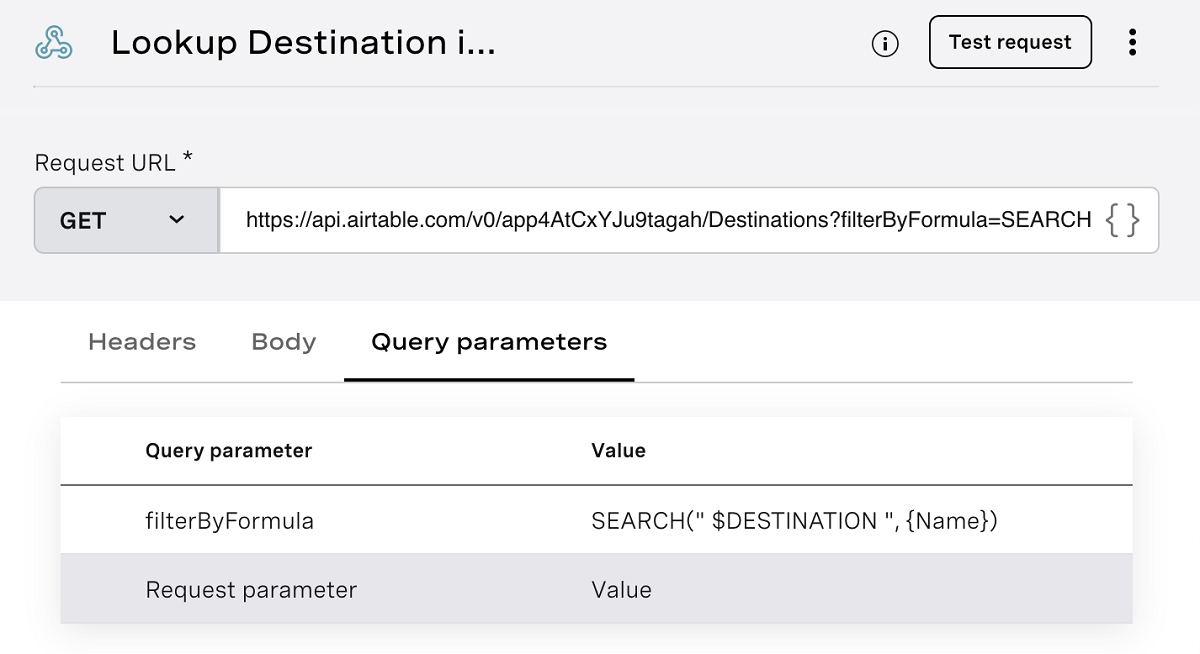 Example of Webhook Node with Query Parameters
You must click on the Query parameters tab and fill out the parameter and value, writing directly into the URL path will not save.
If you are having trouble with your request, try to encode your $DESTINATION parameter with the Airtable encoding tool. Encoding our request should look like:
filterByFormula==SEARCH(%22$DESTINATION%22%2C+%7BName%7D)
Now we can run the test again and see that the request returns an object which inside it has something called “records”, which itself contains an array of record objects.
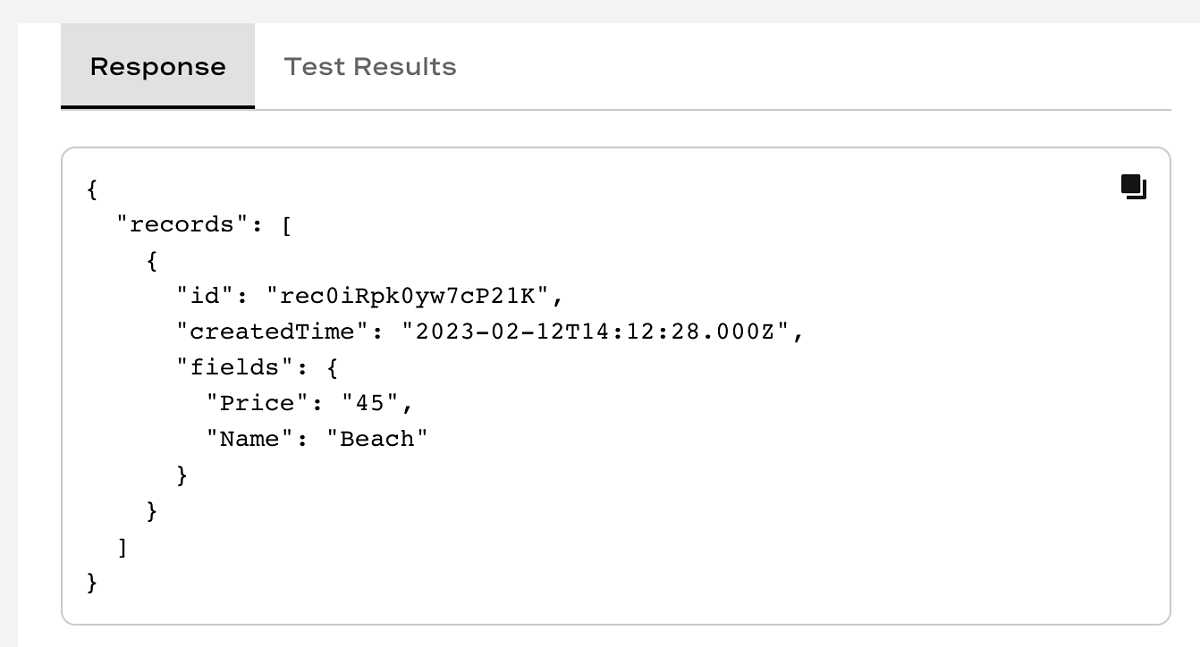 Example of Filtered Response
AI Studio allows us to handle API responses with the Response Mapping feature. We need to map the returned object to a parameter that we will then be able to use inside AI Studio. We can do so like this:
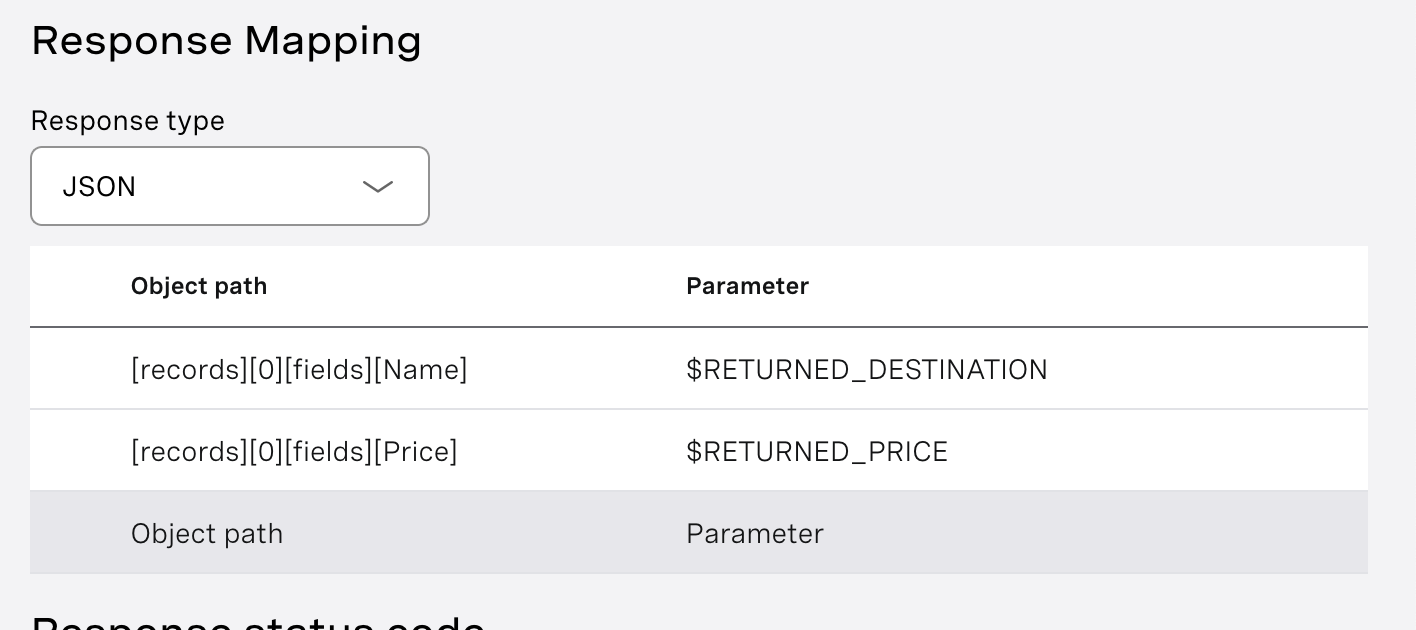 Example of Response Mapping
And now that we have mapped our response data, we can run the test and see some values returned to our parameters!
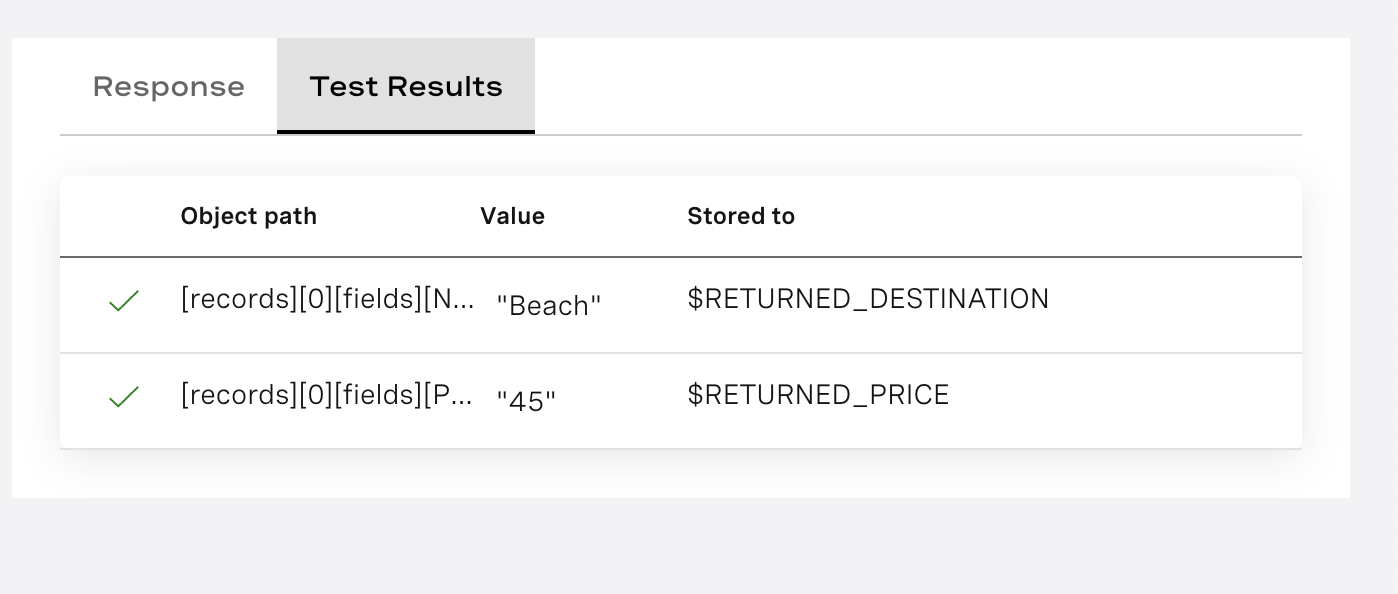 Example of Response Mapping Test Results
We did it! We've connected our AI Studio agent to our Airtable data and now we can use this information in our agent. One last step is to use our data now in our agent and make a nice message to our user:
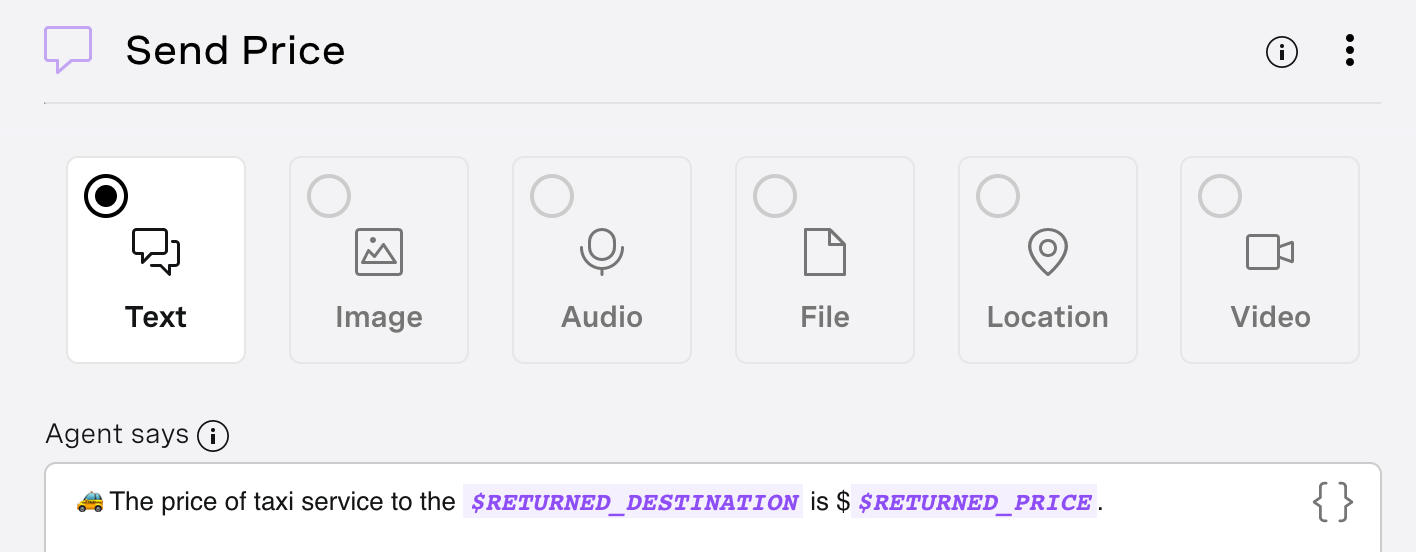 Example of Send Price Node
If we open our tester, we can now see the full user journey to ask for a taxi price.
 Testing Our Completed Flow
Now that we’ve connected with our Airtable DB and begun receiving information, sending information will be a piece of cake!
We’ll start again from our Topic Classification node. We’ll add a new Intent called “Sign Up For Promotions” and add some user expressions. Something like this:
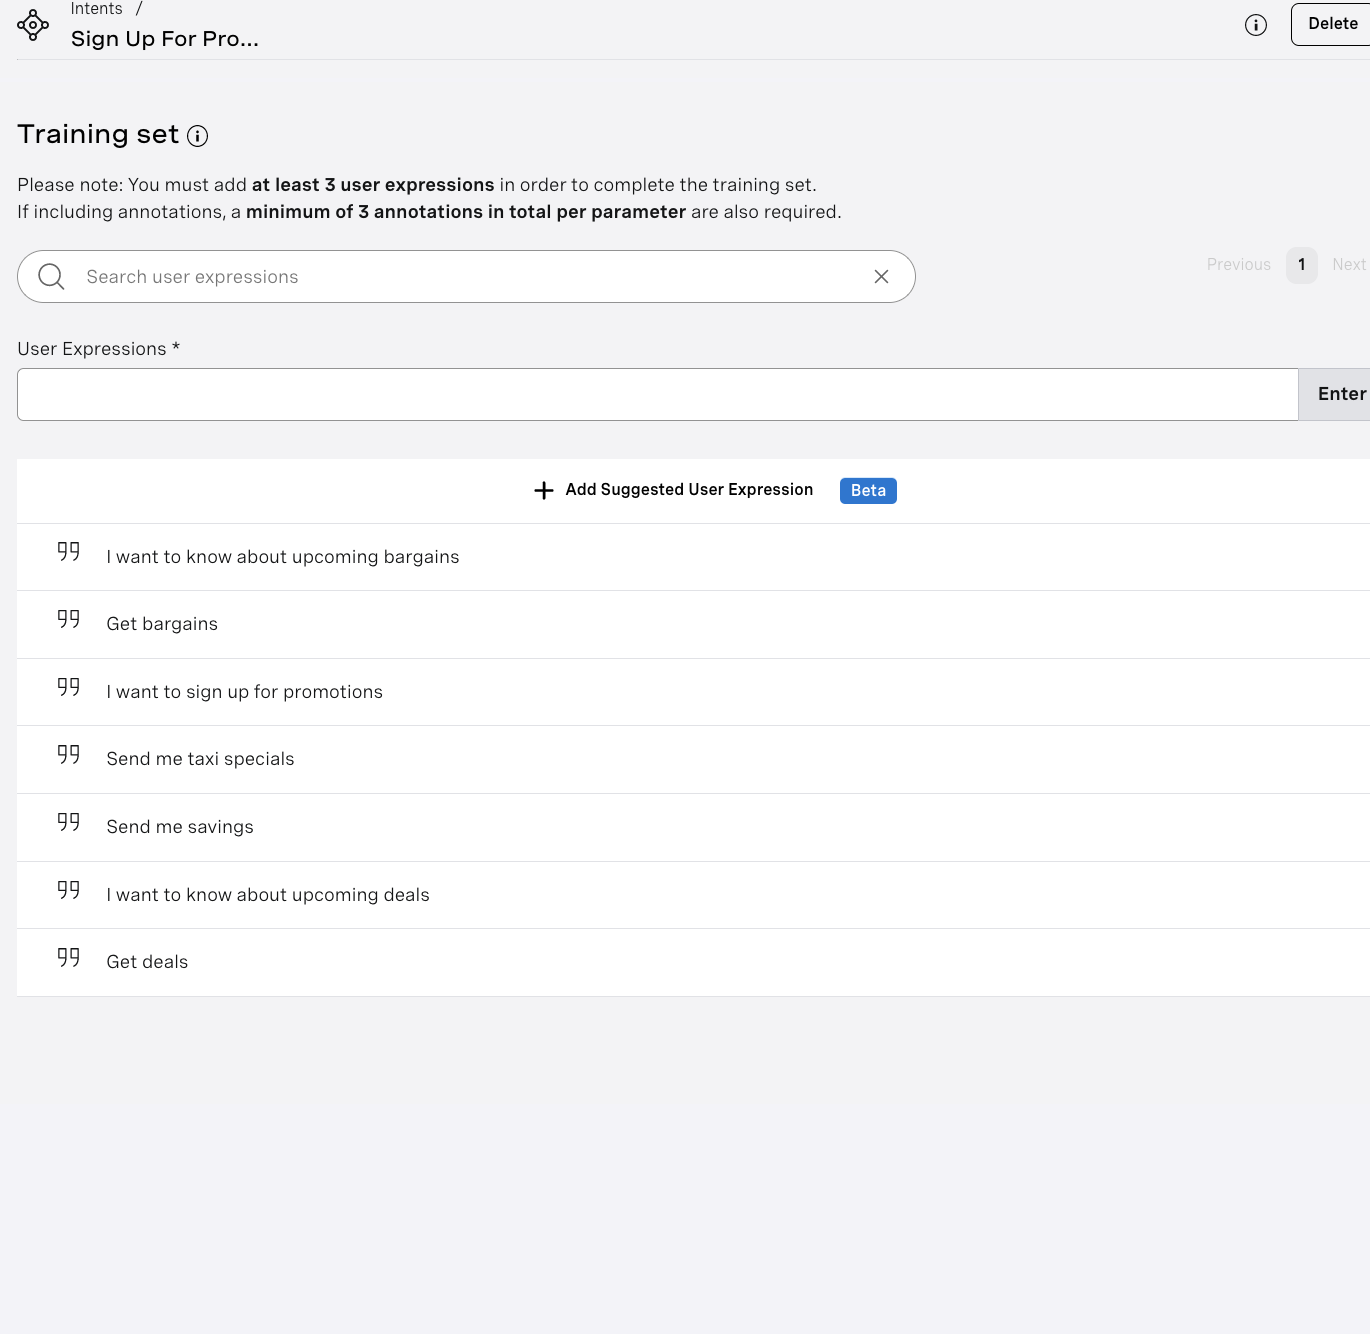 Example of Adding User Expressions To Training Set
Now we are ready to connect to our webhook. So let’s take a look at the Airtable documentation again. It shows us exactly how to format our request. We find in the generated request something like this:
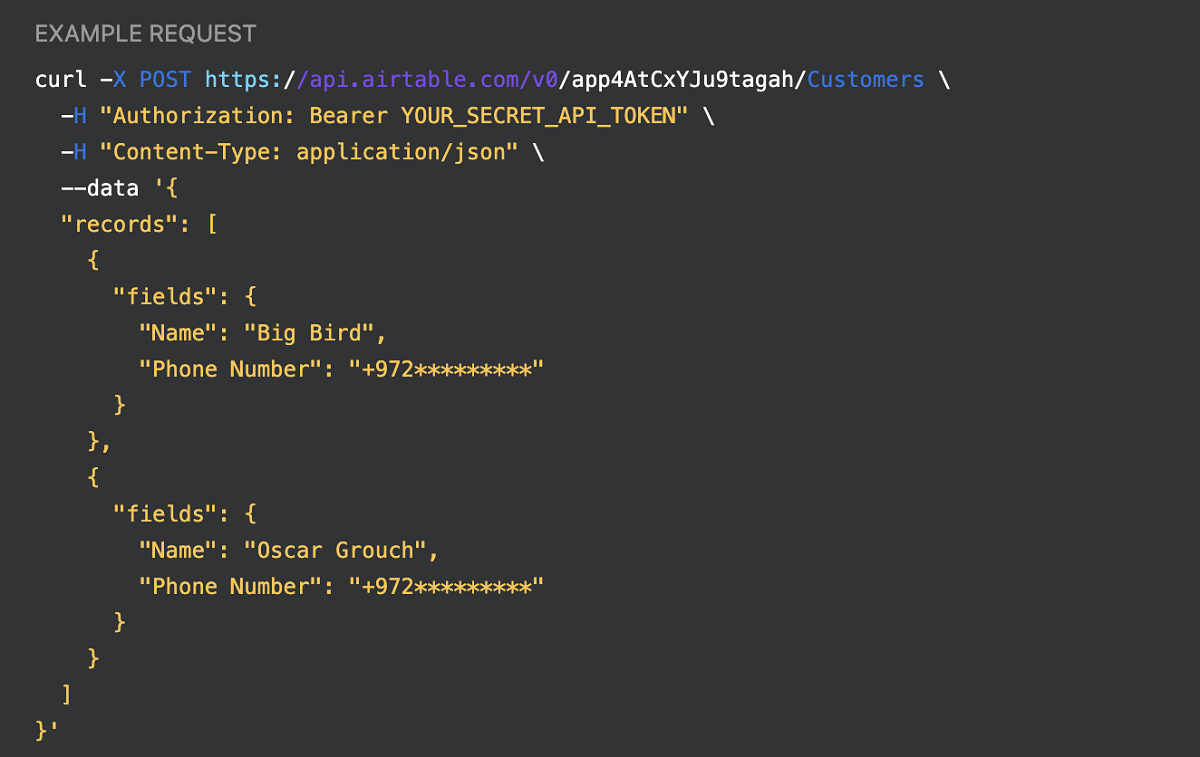 Example of Airtable POST Request
Now we just need to open our new webhook node. First, we change our request type from GET to POST. We can see that we (again) need to pass our personal access token in the Authorization key in the header. But now we also have a second field to pass. Let's add Content-Type to tell that we are sending json with the request. And finally, we’ll pass through our data in the body with an object that has records of customers.
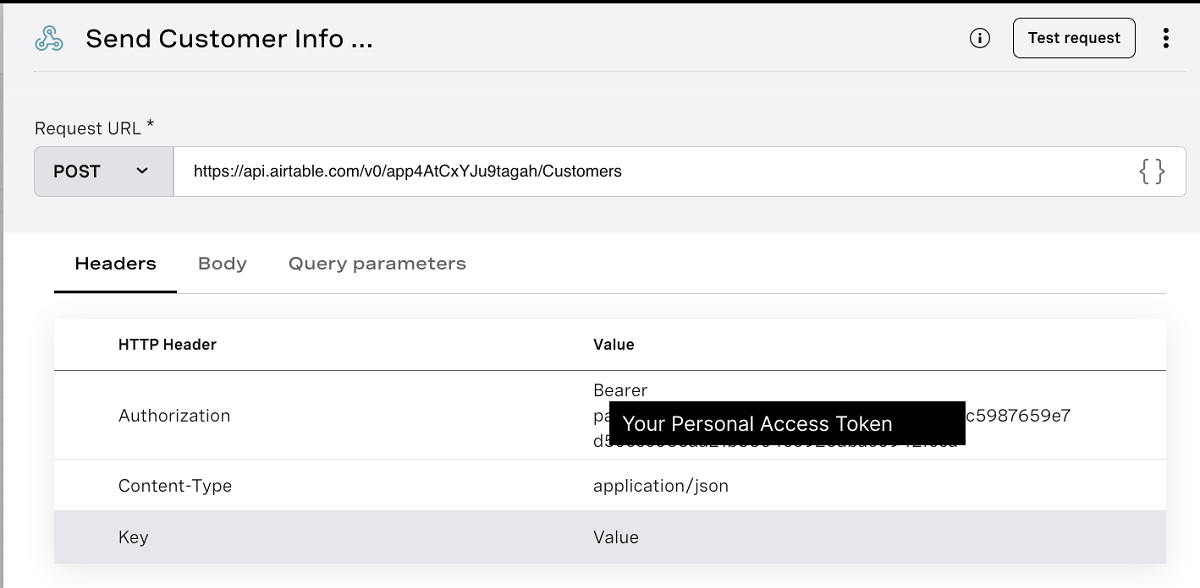 Example of POST request webhook node
First, let’s pass through a test customer. Let’s say, Miss Piggy.
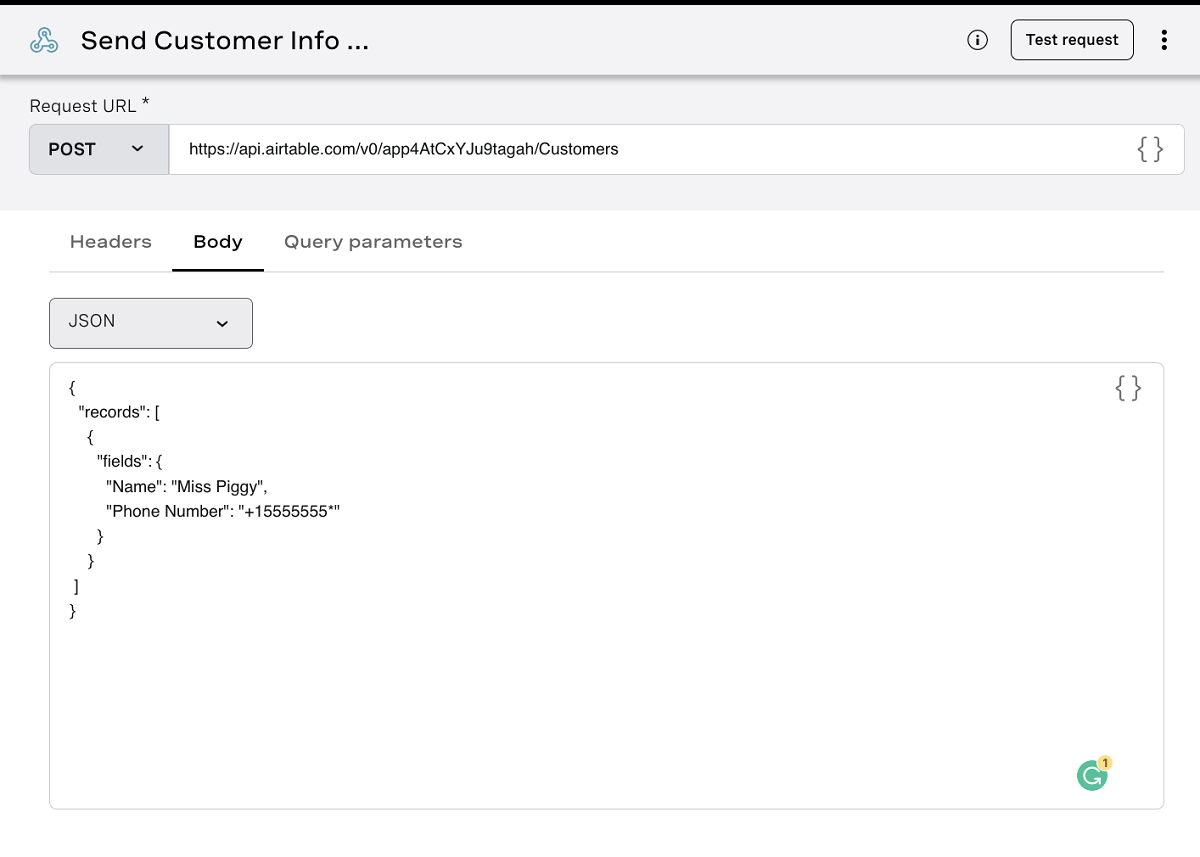 Example of sending Miss Piggy customer to Airtable
And now if we hit Test Request, we should see a new entry in Airtable.
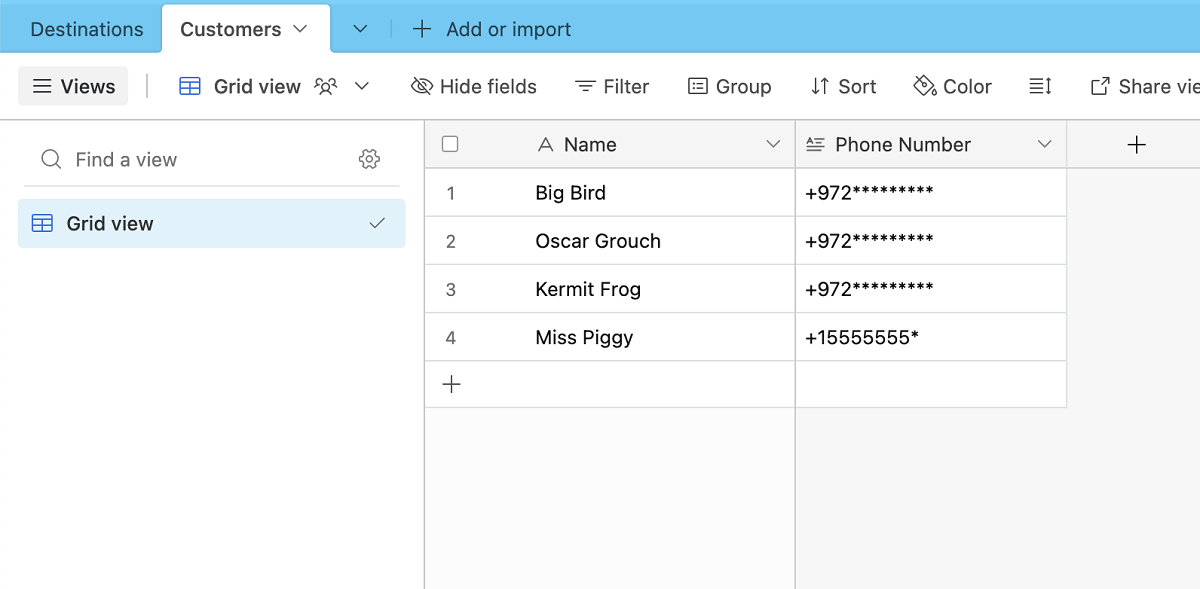 New entry in Airtable; Miss Piggy
But we don’t want to add Miss Piggy in our database! We want to add our actual user. Now you could ask for the user’s name and number here and if you require more information, you’ll probably need to use some collect input nodes here. But for this app, we just care about the user name and number. We can use AI Studio’s built-in system parameters for this! So we update Miss Piggy’s name and phone number with the system parameters $PROFILE_NAMEand $SENDER_PHONE_NUMBER. So our request body now looks like this:
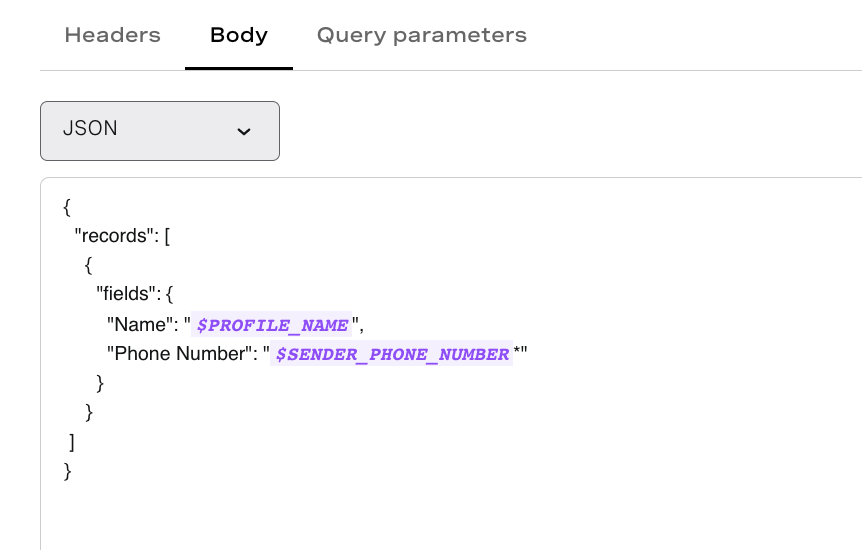 Example of POST request with dynamic variables
Lastly, let’s add a thank you message with a send message node. And now we can test this flow:
 Testing Our Completed Flow 2
Now you've seen how to implement AI Studio with an easy-to-use Airtable database. What will you build with your new skills? Please let me know on Twitter or the Vonage Community Slack (we even have a channel for AI Studio). I’m really interested to see what you’re building with Low Code!
Share:
Benjamin Aronov is a developer advocate at Vonage. He is a proven community builder with a background in Ruby on Rails. Benjamin enjoys the beaches of Tel Aviv which he calls home. His Tel Aviv base allows him to meet and learn from some of the world's best startup founders. Outside of tech, Benjamin loves traveling the world in search of the perfect pain au chocolat.