
Share:
Benjamin Aronov is a developer advocate at Vonage. He is a proven community builder with a background in Ruby on Rails. Benjamin enjoys the beaches of Tel Aviv which he calls home. His Tel Aviv base allows him to meet and learn from some of the world's best startup founders. Outside of tech, Benjamin loves traveling the world in search of the perfect pain au chocolat.
Receive Voice Call Events with Ruby on Rails
Time to read: 3 minutes
Previously, we learned how to make outbound calls using Ruby on Rails Voice integration. However, so many things can happen when you try to make a phone call. Was the call successful? Did the recipient pick up? Did the phone even ring? With Ruby on Rails Voice applications, we can track call statuses programmatically with the Voice API and the Call Events Webhook.
This tutorial will show you how to integrate voice call events in a Ruby on Rails application using Vonage webhooks.
TL;DR Skip ahead and find all the Quickstart code on GitHub.
Vonage Virtual Number
Ruby on Rails application, as described previously
When you make a voice call using the Voice API, the platform doesn’t just send the call and forget about it; it tracks everything that happens to the call, step by step. Each significant action during the call’s lifecycle triggers a call event.
A call event is a real-time notification that tells your application what’s happening with the call. For example:
When the call is created, you’ll get a started event.
When the phone begins ringing, you’ll get a ringing event. When the call is answered, you’ll get an answered event.
If the line is busy, the call is rejected, or the call fails for some reason, you’ll get events like busy, rejected, or failed.
Each of these events is sent to your server via a webhook so that you can react programmatically. You might update a user interface, log call details, trigger an automated response, or handle billing.
To capture these events, you’ll need to configure an event webhook URL when setting up your Voice API call. That way, Vonage will automatically POST detailed event data to your server as the call moves through its different stages.
Continuing from the previous blog post, our Ruby on Rails application is running in development on port 3000, so we can access it locally at localhost:3000. However, that only works on our computer!
You can use ngrok to safely expose your local server publicly over HTTP. So now, in a separate tab from your rails server, open an ngrok tunnel on port 3000.
ngrok http 3000Be sure to add your ngrok URL as a config.host in your development.rb file. We’ll use the environment variable VONAGE_SERVER_HOSTNAME, to make our app more dynamic.
For more help, see how to get started and use ngrok in Rails.
# config/environments/development.rb

Rails.application.configure do
   config.hosts << ENV['VONAGE_SERVER_HOSTNAME']
Now in our .env file, set your VONAGE_SERVER_HOSTNAME to your ngrok URL.
# .env

# ngrok URL, don't include the protocol (https://)
VONAGE_SERVER_HOSTNAME=''Edit your Vonage application from the previous tutorial in the dashboard to add the ngrok URL in your webhooks. In the Status URL field, add your ngrok URL followed by /call_events. Ensure the request is being sent as POST.
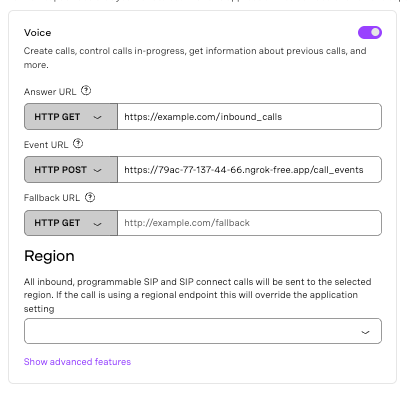 Configuring Voice API webhooks in the Vonage dashboard with answer, event, and fallback URLs
Once you hit save ngrok will now forward requests made to the /call_events endpoint to your Rails application! But there’s one small problem: our Rails application doesn’t have that endpoint.
Now that Vonage is forwarding statuses to the /call_events endpoint, let’s update our application and create a route to handle it.
# config/routes.rb


Rails.application.routes.draw do
 resources :call_events, only: [:create]


...previous routes...But what’s going to happen there? Our application is going to accept the call event and parse it for the relevant information. You can see what a typical call event looks like:
{
"from": "442079460000",
"to": "447700900000",
"uuid": "aaaaaaaa-bbbb-cccc-dddd-0123456789ab",
"conversation_uuid":
"CON-aaaaaaaa-bbbb-cccc-dddd-0123456789ab",
"status": "ringing",
"direction": "outbound",
"timestamp": "2020-01-01T12:00:00.000Z"
}The format of the data included depends on which event has occurred. See the full list of call events for more details. The most important field is the status because it tells you whether your message was delivered and, if not, what went wrong.
We’re going to create some logic to update our call status based on the received call event. Let’s generate a new controller in the command line to handle this.
rails g controller CallEvents createOur controller has a single, simple create method. First, the method parses our call event and extracts the uuid; it uses this foreign ID to find the Call in our local database. It then updates the status for this call to the current status we received in the call event.
# app/controllers/call_events_controller.rb
class CallEventsController < ApplicationController
  # We disable CSRF for this webhook call
  skip_before_action :verify_authenticity_token

  def create
    if params[:uuid]
      Call.where(uuid: params[:uuid])
		.find_or_create_by
          .first_or_create
          .update(
            status: params[:status],
            conversation_uuid: params[:conversation_uuid]
          )
    end

    head :ok
  end
endYou can now start a call to your Vonage number and watch your rails server to see as the call moves from ringing to answered to completed. And at each step ActiveRecord updates the database!
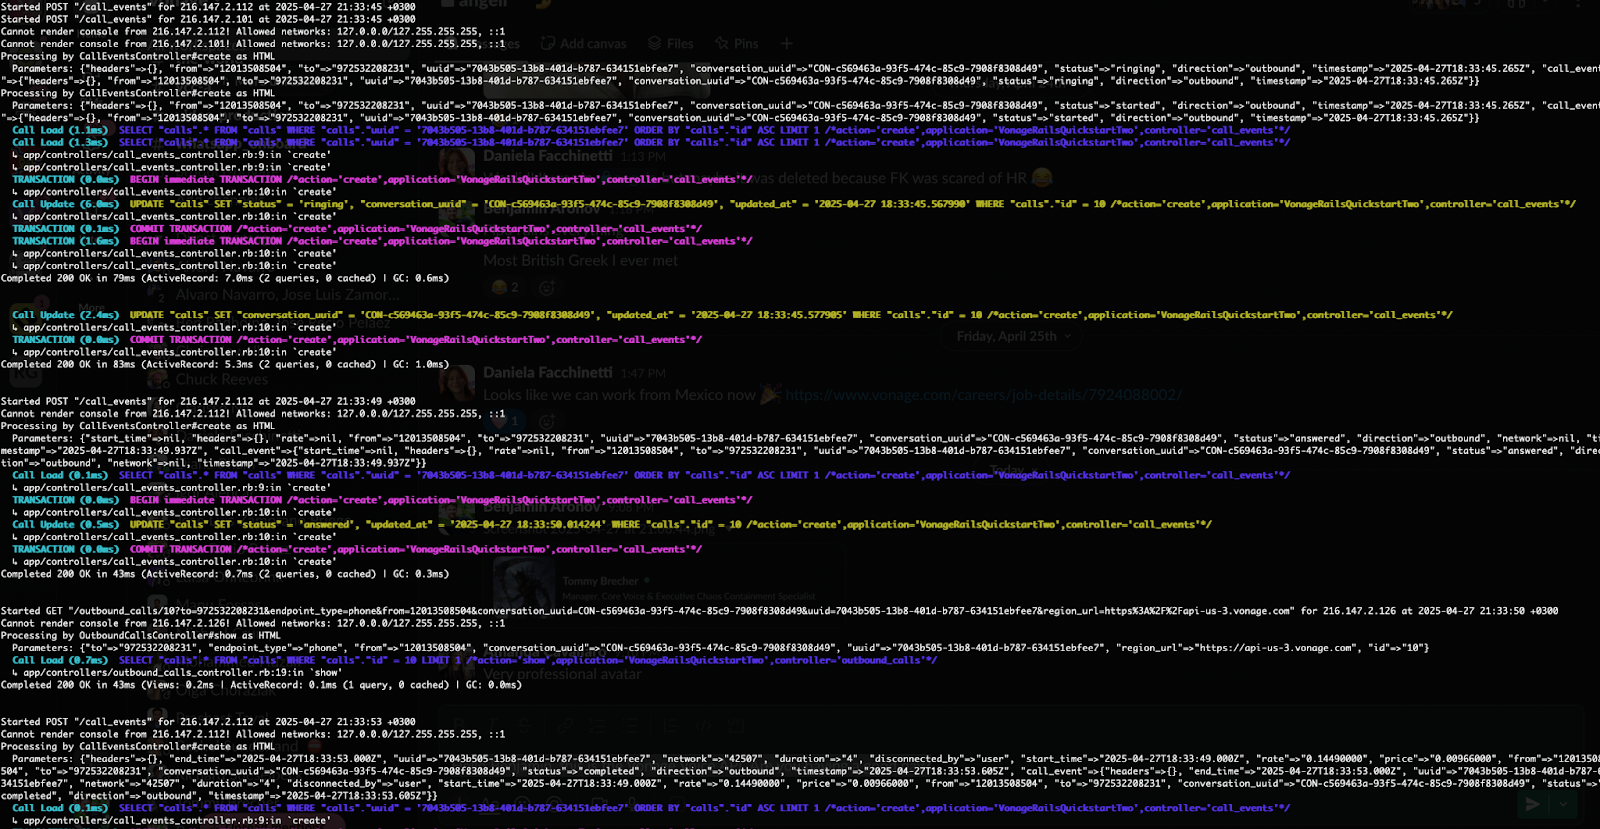 Terminal log output showing Vonage Voice API call event lifecycle using a Rails controller
You did it! You learned how to expose your Ruby on Rails application to listen for a webhook via ngrok, updating your database in the process! We’ll continue to build on this application by accepting incoming calls in the next post.
If you have any questions or suggestions for more Ruby content, send us a message over on the Community Slack. You can also stay in the loop on our developer content and events on X, formerly known as Twitter.
Share:
Benjamin Aronov is a developer advocate at Vonage. He is a proven community builder with a background in Ruby on Rails. Benjamin enjoys the beaches of Tel Aviv which he calls home. His Tel Aviv base allows him to meet and learn from some of the world's best startup founders. Outside of tech, Benjamin loves traveling the world in search of the perfect pain au chocolat.