Share:
Benjamin Aronov is a developer advocate at Vonage. He is a proven community builder with a background in Ruby on Rails. Benjamin enjoys the beaches of Tel Aviv which he calls home. His Tel Aviv base allows him to meet and learn from some of the world's best startup founders. Outside of tech, Benjamin loves traveling the world in search of the perfect pain au chocolat.
Using ngrok in Rails in 2025
Time to read: 3 minutes
This article was updated in August 2025
There are many times in development when a localhost server just won’t cut it. That’s when we can use a nifty tool called ngrok. ngrok creates tunnels. These tunnels connect your local codebase with a public site, without having to do any annoying configuration. The main use case for Vonage developers is when using an API that relies on webhooks to send automated information. For example, if you're building messaging features like RCS suggested replies with Ruby on Rails, ngrok makes it easy to test locally by exposing your webhook endpoints to the public internet.
The use case we’re interested in this article is using ngrok with Ruby on Rails when building a project and allowing other users to access it from their browser. This allows for the most realistic simulation. Also, it’s pretty sweet to share something with friends, even if you never deploy it publicly.
You can read more about that in Testing with ngrok in our developer portal tools.
Straight from the ngrok documentation, the full installation of ngrok is 3 steps: installing the ngrok agent, creating an account, and then connecting to your agent to your account. And for Rails we have one additional step, adding ngrok to your development environment.
For MacOS, use HomeBrew:
brew install ngrokFor Linux, use Apt:
curl -sSL https://ngrok-agent.s3.amazonaws.com/ngrok.asc \
  | sudo tee /etc/apt/trusted.gpg.d/ngrok.asc >/dev/null \
  && echo "deb https://ngrok-agent.s3.amazonaws.com buster main" \
  | sudo tee /etc/apt/sources.list.d/ngrok.list \
  && sudo apt update \
&& sudo apt install ngrokFor Windows, use Chocolatey:
choco install ngrok
On Linux or Mac OS X you can unzip ngrok from a terminal with the following command. On Windows, just double-click ngrok.zip to extract it.
unzip /path/to/ngrok.zip
If you don’t have an account sign up for one at the ngrok dashboard. If you have an account then login. Either way with your free account you will need to retrieve your authtoken for the next step.
Free ngrok accounts generate temporary, random URLs. For custom or persistent subdomains, a paid account is required.
Here we will need that authtoken from the last step. The authtoken is what the agent uses to login to your account when creating a tunnel.
Run the following line in the command line. Don’t forget to replace TOKEN with your actual authtoken.
ngrok config add-authtoken TOKEN
The best part of ngrok is that it has the easiest command ever. Just a single line to tell it which port to listen for and serve up. In a Rails application, we know that Puma loves port 3000!
ngrok http 3000
In your application, you’ll have a file config/environments/development.rb. This file tells Rails how to configure the development environment.
Here we’ll need to add one line:
config.hosts << "\[ngrok url]"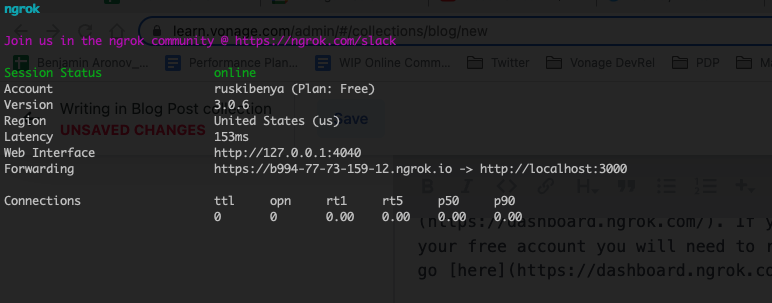 ngrok terminal output showing active tunnel forwarding localhost:3000 to a public ngrok URL.
For example, in the above instance of running ngrok I would add:
Rails.application.configure do
config.hosts << "XXXX.ngrok.app"It is important that this line is added within the Rails.application.configure do block.
Now we can run our rails server:
rails sAnd now our app is up and running and you can invite friends to join try it out by sending them the ngrok URL.
If you're using environment variables to manage settings like the ngrok URL or Rails host configuration, check out our guide on working with environment variables in Ruby
If you are using a free ngrok account, the URL will change frequently. You can use the following regex to set the host configuration once and never have to update it.
Rails.application.configure do
  config.hosts << /.*\.ngrok-free\.app$/
These are some common mistakes I make, no matter how many times they always seem to persist.
Leaving https in the config.hosts
Leaving a space in the config.hosts
Forgetting to restart the rails server after adding or updating the config.hosts in development
Adding the config.hosts outside of “Rails.application.configure do”
Now that you're set up, you can test webhook-based workflows like sending SMS messages with Ruby on Rails, or any feature that depends on external callbacks to your local server.
Share your thoughts on tooling with us! Come join the conversation on our Vonage Community Slack or send us a message on Twitter.
Share:
Benjamin Aronov is a developer advocate at Vonage. He is a proven community builder with a background in Ruby on Rails. Benjamin enjoys the beaches of Tel Aviv which he calls home. His Tel Aviv base allows him to meet and learn from some of the world's best startup founders. Outside of tech, Benjamin loves traveling the world in search of the perfect pain au chocolat.