
Build an Interactive Board: WhatsApp, SMS, and MMS to a Website (Part 1)
Time to read: 11 minutes
Are you interested in creating an interactive board to display messages at events? This tutorial on building a Node.js Express web application will guide you through receiving SMS, MMS, and WhatsApp messages, saving them in a database, and displaying them on a website. Plus, I’ll share tips for family-safe messaging. In Part 2 I will show you how to build the web application using AI Studio, so stay tuned!
The project code is on GitHub. Clone it, and let’s get to the tutorial below. I’ve prepared for you to explain all the bits step by step.
Some things are expected from you before we get started with this project. I’ll list them below:
A Vonage Account - to use the communication APIs to receive SMS, MMS, and WhatsApp messages.
An Airtable account - to store the phone number, text messages, and images
ngrok - is a tunnel to expose the local code to the internet
The interaction starts with a user sending an SMS, MMS, or WhatsApp message to a number. The project structure we will create step by step should look like this by the end of the tutorial.
We use Express.js and the following routes (endpoints that expose different functionality of a web app) the app exposes for incoming messages, outputting them to a website by fetching data on Airtable.
/inbound: POST route for incoming messages, interacting with Airtable for storage./messages/:messageId/:status: POST route for updating message status in Airtable./messages: GET route for fetching messages filtered by status from Airtable.
We will add all the building blocks as we go through this tutorial; for now, let’s expose the project we will have running locally to the internet; we will use ngrok.
Run ngrok http 3001 from your terminal, in this case, because it's running on port 3001. We will then add the generated webhook endpoint to our Vonage Dashboard using the Messages API in the following sub-section.
As stated at the beginning of this article, having a Vonage account is a prerequisite for this tutorial. You can follow the steps below to sign up to create a new account.
Login to your Vonage Dashboard
Go to "Numbers" and click "Buy Numbers" on the menu on the left
Search and buy a phone number in your country
Go to "Applications" on the menu on the left and click "Create a new application"
Give the application a name like "Interactive Board"
Under Capabilities, enable Messages
Under Inbound SMS Webhook, set the URL to your server URL + '/inbound' route
Under Status Webhook, set the URL to your server URL + '/status’ route
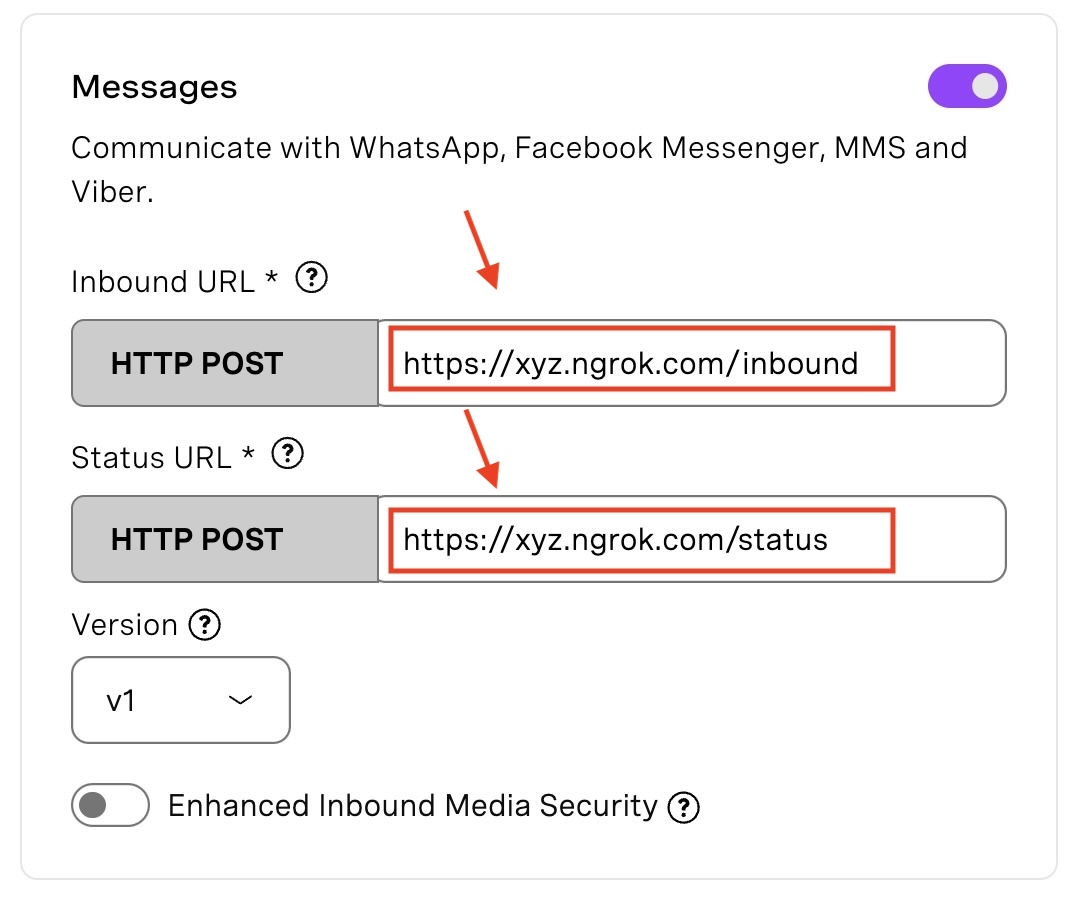 Messages Inbound and Status URLs.
Click to save the application at the bottom of the page on the right
Link your purchased number at the bottom of the application page by clicking on ‘Link’ in front of it.
Any SMS or MMS sent to that number will hit the /inbound route and be processed. There are some requirements for the number to have the ability to send MMS messages; I’ve listed them in this blog post, How to Send MMS Messages with Node.js.
The steps below are on how to set up your WhatsApp messages sandbox to test it out. You could also set it up with virtual and WhatsApp business phone numbers.
Login to your Vonage Dashboard
Click on “Messages Sandbox” under “Developer Tools” on the menu on the left "Messages API" and click "Create a new WhatsApp Sandbox"
Choose the WhatsApp Sandbox. You can connect to that sandbox by WhatsApp messaging the phone number allowed to by scanning the QR code provided.
Under Webhooks, set the Inbound Message URL to your server URL + '/inbound' route
Your phone number can send and receive WhatsApp messages with the Vonage Messages API sandbox.
Whether you’ve cloned the provided GitHub repository link or are creating the project folder now, make sure you have a main folder for this project; we can call it ‘interactive-board’. After that, ensure there's a .env file containing our environment variables for this project, we will add the following variables:
Create an Airtable Access Token, and add the scopes we will use for this project: data.records:read to See the data in records and data.records:write to create, edit, and delete records. Finally, give it access to the workspace we currently use for this project. Click to create and add the token to the ‘AIRTABLE_ACCESS_TOKEN’ environment variable. We will also need our Airtable Base ID. You can check their documentation for help Finding IDs in the Airtable API. Your base URL should look something like https://airtable.com/AIRTABLE_BASE/string-of-characters. The AIRTABLE_BASE is the first set of characters after airtable.com/ and before the second /.
We will use HTML and CSS to display the messages the file main.js fetches from our API and handles the javascript logic. Create a public folder followed by an index.html file to render the message board UI and import the main.js file to access the message data.
Add the CSS styling that features three fundamental classes: .message-record for individual messages with a gradient background and padding; .event-title for the main title, also with a gradient for emphasis, and .message-grid to arrange messages in a responsive grid layout. I am using a <style> tag in this code, but if you prefer, you could create a CSS file and import it to your HTML file.
<!DOCTYPE html>
<html lang="en">
  <head>
    <meta charset="UTF-8" />
    <meta name="viewport" content="width=device-width, initial-scale=1.0" />
    <title>Interactive Board</title>
    <style>
      .message-record {
        background: linear-gradient(135deg,#871fff,#7ec9f4);
        padding: 10px;
        box-sizing: border-box;
      }
      .event-title {
        background: linear-gradient(135deg,#d41f9c,#ffa78c);
      }
      .message-grid {
        display: grid;
        grid-template-columns: repeat(auto-fill, minmax(250px, 1fr));
        grid-gap: 10px;
      }
    </style>
  </head>
  <body>
    <h1 class="event-title">Vonage ♥s <Event Name></h1>
    <div id="messages"></div>
    <script type="module" src="/main.js"></script>
  </body>
</html>
It’s time to create the main.js file under the public folder we’ve imported in our HTML and add the code to fetch messages from the Express server and display them in a grid layout.
Create the main.js file in the public folder and add the following pieces of code:
const messagesDiv = document.getElementById("messages");
messagesDiv.className = "message-grid";Fetch messages from the server:
function fetchMessages() {
  fetch("http://localhost:3001/messages?status=Accepted")
    .then(response => response.json())
    .then(data => {
      // Process data...
    })
    .catch(error => console.error(error));
}
Refresh messages every 60 seconds:
setInterval(fetchMessages, 60000);
Let's see how the Express server handles incoming messages and saves them to Airtable. Add the following code inside the ‘index.js’ file.
We import the dotenv dependency to load environment variables from .env, Express to handle web requests, and the Airtable SDK to integrate with the Airtable API.
const dotenv = require('dotenv').config(); // loads environment variables
const express = require('express') // web framework
const Airtable = require('airtable') // Airtable SDK
const base = new Airtable({apiKey: process.env.AIRTABLE_ACCESS_TOKEN})
.base(process.env.AIRTABLE_BASE)Use the Airtable Access Token and base ID stored in .env to initialize the Airtable base. (Check the Environment Variables step of this tutorial). This base contains the Numbers and Messages tables.
/inbound Requests
app.post('/inbound', (req, res) => {

  // ... handle incoming messages
  const { from, text, channel, message_type } = req.body;
  console.log(JSON.stringify(req.body));
  res.send('Message received!');
})
We define a POST route at /inbound to receive inbound messages. This would display "Message received!" on the screen when a request hits the /inbound route. We'll replace this later with saving to the database, but it's a quick way to verify messages are coming in.
base('Numbers').select({
  filterByFormula: `Number=${from}`
}).eachPage(records => {

  if(records.length == 0) {
    // create a new user
  } else {
    // existing user, get ID
  }

})
Look up the sender's number in the Numbers table. If there is no match, create a new user. Otherwise, get the existing user's record ID.
let status = 'Pending'

base('Messages').create({
  Message: text,
  Number: [numberId],
  Status: status,
  ImageUrl: imageUrl
})Create a new message record in Airtable with the message contents, sender ID, status, and image URL.
Our application uses a manually editable blocklist.txt file for message moderation, allowing you to add any words or phrases deemed inappropriate or irrelevant.
Load the Blocklist: The
blocklist.txtfile is initially read using Node.js's fs file system module. Each line in this file represents a word or phrase to be blocked. This is achieved with the following code:let blocklist = fs.readFileSync('blocklist.txt', 'utf8').split(/\s+/);Copy
This line reads the file content, splitting it into an array of words/phrases based on spaces and line breaks.
Message Checking: When the app gets a new message at the ‘ /inbound’ route, it checks if the text contains blocked words. The check compares the message text to each blocked word without caring about upper or lower case letters. This ensures the filter works even if someone types a bad word with weird capitalization.
if (blocklist.some(word => message.toLowerCase().includes(word.toLowerCase()))) { // actions to reject the message }CopyHandle Matches: If a message contains any word from the blocklist, its status is promptly set to "Rejected". By default, each message's status is "Pending", indicating it awaits moderation.
let status = "Pending"; if (blocklist match) { status = "Rejected"; } // Code to save the message with its updated statusCopyUpdate the Blocklist: To add new words or phrases, open
blocklist.txt, insert the new entries (one per line), and save the file. A restart of the server might be required for the changes to take effect.
This blocklist mechanism is a fundamental layer of content moderation, allowing filtering unwanted messages based on specific criteria. While it's a manual process, it offers a straightforward and effective way to maintain the quality and relevance of the messages displayed on your board.
Integrating AI into the blocklist system could significantly enhance message filtering. AI can understand context and sentiment, improving the detection of spam or inappropriate content. This advanced approach allows for more accurate and adaptable moderation.
As the prerequisites state, you should create an account on Airtable. Once logged in, find the below steps from the Airtable dashboard.
Create a base called "Messages" by clicking "+ Create a base", and pick a theme color and icon optionally; I have skipped the rest of the setup, but feel free to fill it in if you wish, and went through the end of the base creation where I am taken to the Messages base.
You can now see some empty numbered rows. Let’s go ahead and create two tables: Numbers to store user phone numbers and Messages to store incoming messages.
Add a ‘Number’ column to the Numbers table.
The Messages table should have the following columns: ‘Message’, ‘Number’ (linked to the Numbers table), and 'Status' of type ‘Single Select’ and add options ‘Accepted’, ‘Pending’, and ‘Rejected. And finally, ‘ImageUrl’.
Create views like 'Grid view' to filter messages
In the below steps, I will show you how to match the Airtable base to the code, use the Numbers and Messages tables, and perform CRUD operations like create, select, update, and use filters to query message statuses, go ahead and add the below steps to your ‘index.js’ file.
It’s time to initialize ‘Base’; we will add the Airtable API Key and Base in our JavaScript code.
const base = new Airtable({apiKey: process.ENV.AIRTABLE_KEY}).base(process.ENV.ACCESS_TOKEN);The Numbers table is used to look for or create new users:
base('Numbers').create({Number: phoneNum})

base('Numbers').select({filterByFormula: `Number=${phoneNum}`})Messages table is used to create new incoming messages:
base('Messages').create({
  Message: text,
  Number: [numberId],
  Status: status,
  ImageUrl: imageUrl
})Messages are selected using filters:
base('Messages').select({
  filterByFormula: `Status="${statusFilterValue}"`
})Message statuses are updated:
base('Messages').update(messageId, {
  Status: status
})
Now that we have the code and the database in place, it’s time to test everything. Make sure all the dependencies are installed by running npm install. Run the project by typing the command node index.js from your terminal, and make sure you have a ngrok instance running.
Navigate to localhost:3001 on your browser. Send an SMS, MMS, or WhatsApp message to the Vonage phone virtual number associated with your web app. Go to your Airtable base and change the message status you received. If accepted, you’ll see the message output on the website running on localhost:3001.
Today, you learned how to build an interactive board that receives SMS, MMS, or WhatsApp messages and outputs them. I've used Airtable for this example, but you can use any other database of your choice (e.g., MongoDB / Firebase) to store and retrieve information. For the next series of this tutorial, you'll learn how to do the same functionality using our AI Studio.
Feel free to chat with us and share what you thought of this tutorial on our X, previously Twitter or Slack Community!