Share:
Richard is a Senior Video API Support Engineer at Vonage with over 25 years of experience in product, support, and engineering roles in Manufacturing, Telecoms, and Networking.
How to Create a Virtual Green Screen Using the Vonage Video API
Time to read: 9 minutes
This article describes how to use the Vonage Video API to overlay presenters onto shared content using background replacement and HTML5 canvas to create a virtual green screen.
You can find the code on GitHub.
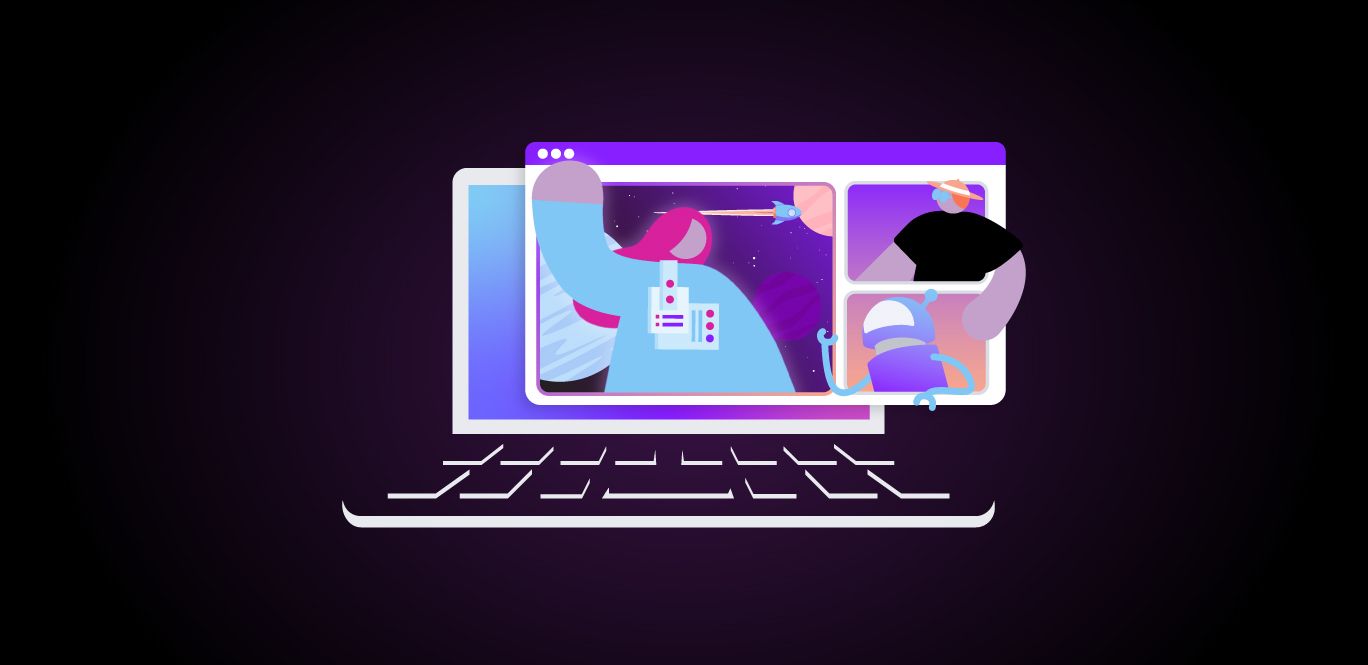
 Presentation Example
When presenting online, presenters and participants need to share the available desktop space with their presentations and other media. This can often make the content too small to read for many participants. In the example above, we have used the Vonage Video API features to create a virtual green screen so that the presenter can be displayed over the top of the presentation. This allows the presentation itself to take centre stage, where all can see it in full.
The main problem with achieving something like this is that Web Real-Time Communication (WebRTC) and Video Codecs do not tend to support transparency. Sending transparent video over the Internet isn’t going to work. However, the Vonage Video API does provide some features that can help, and one of these is Background Replacement. Read more about Filters and Effects in our documentation.
What we will do through this tutorial is use the Background Replacement feature with a background image of a single colour to create a virtual green screen. This allows us to let our Video Transformers do what they need to do to provide a clean background detection and replacement. We will use a small image (16x16) with the solid colour RGB(61,180,60). This image is included in the GitHub repository for this tutorial along with all the code you need to run the sample.
 greenscale backgroundUsing the process below, we can remove the background completely so that, when rendered, the video can be displayed over the top of existing media, web pages, or other videos.
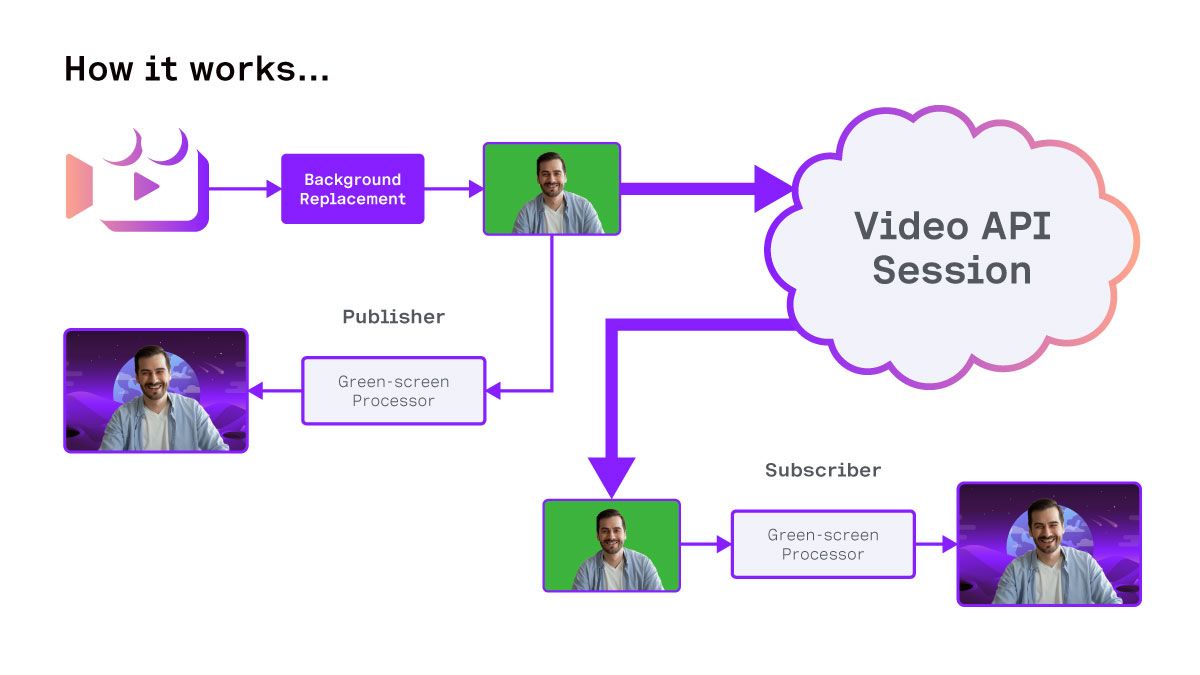 Application Workflow
Before we get started, please check out the GitHub repository so that you can download the code and run the samples.
You will need:
Some experience with JavaScript and HTML5 Canvas.
Some previous experience with the Vonage Video API is preferred, but not essential.
A basic video application is included with this project, but falls outside the remit of this tutorial. You can find further samples in our Video Web Samples Repository.
You will need a functioning camera and microphone to run the sample.
A Vonage Video API key, Session ID, and Token. You can create these in the dashboard or through the Video API Playground. You can access this through your online API account.
The sample application comprises several components. A landing page (app.html) with a form that helps identify users and roles for use in the application. The main application page (liveroom.html) loads the Video JavaScript SDK and executes our JavaScript code. In this sample, the code is loaded in as ES6 modules.
When the liveroom.html page is loaded, the user’s name, room name, and role are included in the URL as URL parameters. These are collected and passed to the Liveroom class constructor to create the room.
let urlRoomName = new URLSearchParams(window.location.search).get('roomName')

let urlUserName = new URLSearchParams(window.location.search).get('userName')

let urlUserRole = new URLSearchParams(window.location.search).get('userRole')Once we have the parameters and checked that they are valid and populated, we can create the room.
const liveroom = new Liveroom(urlRoomName, urlUserName, urlUserRole)The Liveroom object will first make a call to fetch session credentials from a server. To make things simple, we have set this to get a config.json file from the current folder that contains valid session credentials. You will need to enter your session ID, API Key, and token in this file before running the sample.
// config.json

{

   "apiKey": "your api key",

   "sessionId": "your session id",

   "token": "your token"

} Liveroom also instantiates a Display object.
this.display = new Display()The Display class manages the width and height of the display area and adds a listener to ensure that these attributes are updated when the application window is resized. The code for this class is in the display.js file.
Once the application has the credentials, the Liveroom class will then create a Video object that will manage the media and connect to the vonage session.
this.getVideoCredentials(this.roomName)

       .then(()=>{

           this.video = new Video(this.sessionCredentials, {})

           return this.video.connectSession()

       })

       .then(()=>{

           console.log(`User Role: ${this.userRole}`)

           if(this.userRole == 'composer'){

               this.display.enableComposerMode()

               this.composer = true

           }

           if(this.userRole != 'viewer'){

               this.video.publishCamera(this.userRole)

           }

           if(this.userRole == 'presenter'){

               this.video.publishScreen()

           }

           this.updateDisplay(this.video.participants, this.video.mainstage)

       })

       .catch((error)=>{

           console.log(error)

})We are using promises to ensure that we do not launch anything until all the required information and objects are in place. First, the credentials are gathered and passed to the Video class constructor. This then calls the connectSession() function, which connects the Video JavaScript SDK to the session ID. Once this is done, it then launches the appropriate member functions based on the user role that was passed.
As we mentioned before, we cannot send transparency via WebRTC, so we need to replace the background with the green screen effect. This is handled by the publishCamera() function. This function creates a new CameraPublisher object, which uses the following settings to create the publisher:
 let publisherOptions = {

           showControls: false,

           videoFilter: {

               type: "backgroundReplacement",

               backgroundImgUrl: "/images/greenscreen.png" // r:61 g:180 b:60    #3db43c

           }

}This instructs the SDK to replace the background with our greenscreen.png image. Because it will stretch and scale and is only one colour, the file is only 16x16 pixels.
When we create the publisher, we pass the HTML DOM object to which we want the video to be appended. In this case, there is a DIV object that is a member of the CameraPublisher class. This DIV object is hidden from view with CSS display: none; because it will contain the unprocessed video.
We also create an HTML5 Canvas object to receive the output of the video with transparency. This is also a member of the object and is named outputCanvas.
  this.publisher = OT.initPublisher(this.publisherDiv, publisherOptions, (event)=>{

           this.videoElement = this.publisherDiv.querySelector("video")

           this.videoElement.onloadeddata = (event)=>{

               console.log("Video Loaded Data")

               this.renderer = new VideoRenderer(this.videoElement, this.outputCanvas)

               this.renderer.processFrames()

               this.session.publish(this.publisher)

           }

})In this code, we also pass a function to the callback for the OT.initPublisher() function. When this runs, we know the video element will have been added to our DIV. This means we can use the querySelector() function to find it and add another callback function. This executes when the video media is ready and creates the VideoRenderer instance.
Once we have the video element and a canvas to write to, this code creates a new VideoRenderer object.
To receive media, we follow the same process in the CameraSubscriber() class, creating another instance of the VideoRenderer class to render the received video.
The VideoRenderer class is the final piece to make this work. It takes an input <video> element and an output <canvas> HTML5 element. When enabled, it copies the video frame from the VIDEO element. It pastes it with a green background into an internal CANVAS (“builderCanvas”), allowing us to access the pixel data for each video frame.
Let’s take a closer look at what the VideoRenderer does and how it works.
constructor(sourcevideo, outputcanvas){

       let randomIcon = (Math.floor(Math.random()*14)+1) + '.png'

       this.imageIcon = new Image()

       this.imageIcon.src = /images/${randomIcon}

       console.log('Random icon for user: ', this.imageIcon.src)


       this.targetFPS = 30

       this.videoElement = sourcevideo

       this.width = sourcevideo.videoWidth

       this.height = sourcevideo.videoHeight

       this.outputCanvas = outputcanvas

       this.builderCanvas = document.createElement("canvas")

       this.enabled = false

}The constructor for the class sets up our builder canvas, as well as containing some functions to replace the video feed with a random image if the video is disabled.
Next, we have two short functions that just enable and disable the video renderer. This helps save resources for participants who are not being displayed or are muted.
   enable(){

       if(!this.enabled){

          this.enabled = true

           this.processFrames()

       }

   }

   disable(){

       this.enabled = false

}Next, we have the processFrames() function. This is called for the first time when the renderer is enabled and then uses requestAnimationFrame() to call itself again. Requesting an animation frame in this way reduces resource usage when the frame is not being displayed.
The processFrames function will exit if the renderer is not enabled. This disables the renderer completely.
   processFrames() {

      if(!this.enabled) return

}Next, capture the width and height of the video element to ensure that all of our canvases have the same dimensions. It also creates a sourceImage variable as a pointer to the video element. If the video is not enabled, the sourceImage is set to the imageIcon selected by the constructor.
this.width = this.videoElement.videoWidth

       this.height = this.videoElement.videoHeight

       let sourceImage = this.videoElement


       if(!this.videoElement.srcObject.getVideoTracks()[0].enabled){

           sourceImage = this.imageIcon

           this.width = sourceImage.width

           this.height = sourceImage.height

}The canvas width for the builder is set, and the canvas context is created. This context builderCtx allows us to read and write to the canvas. First, we clear it, and then we draw our sourceImage to the builderCanvas.
       this.builderCanvas.width = this.width

       this.builderCanvas.height = this.height

       let builderCtx = this.builderCanvas.getContext("2d")

       builderCtx.clearRect(0,0,this.width, this.height)

builderCtx.drawImage(sourceImage, 0, 0, this.width, this.height)With the builderCanvas and context setup, we then move on to the outputCanvas. We make sure the width and height match our source media.
NOTE: This does not change the display width and height in CSS. It only changes the width and height of the internal canvas. The DOM will scale the internal canvas to match the external node.
       this.outputCanvas.width = this.width

       this.outputCanvas.height = this.height

       let outputCtx = this.outputCanvas.getContext("2d")
We now have our builder and output contexts in place. To proceed, we create an ImageData object from the builder context. This grants access to the pixel-level data within the canvas through the ImageData.data array. This is a flat, one-dimensional array containing the red, green, blue, and alpha attributes for each pixel, presented sequentially.
var imgdata = builderCtx.getImageData(0, 0, this.width, this.height);

var pix = imgdata.data;Our function needs to iterate through all of these pixels in the array and assess each one to determine whether it matches the green of our background. This uses the adjustPixel() function, which we will cover shortly.
 for (var i = 0, n = pix.length; i < n; i += 4) {

           let r = pix[i]

           let g = pix[i+1]

           let b = pix[i+2]

           let a = pix[i+3]

           let newColor = this.adjustPixel(r,g,b,a)

           pix[i] = newColor.r

           pix[i+1] = newColor.g

           pix[i+2] = newColor.b

           pix[i+3] = newColor.a

}Once all of the pixels in our imgdata have been updated, we then clear the builder context and push the imgdata back into the canvas. We can then draw from this hidden canvas to our visible outputCanvas context. With requestAnimationFrame(), this function will run between 30 and 60 times per second.
       builderCtx.clearRect(0,0,this.width,this.height)

       builderCtx.putImageData(imgdata, 0, 0)

       outputCtx.drawImage(this.builderCanvas, 0, 0, this.width, this.height)

       this.animationFrameId = window.requestAnimationFrame(()=>{this.processFrames()})

   }
The adjustPixel() function of the VideoRenderer class accepts a colour with independent red, green, blue, and alpha values. It then returns an object with four members, r, g, b, and a. The first line creates an output object.
adjustPixel(r,g,b,a){

  let c = {r: r, g: g, b: b, a: a}
}The function then takes an average of the red and blue values and stores it as rb.
let rb = (r + b) / 2This next line of code determines whether the pixel should be transparent or not. It first uses the withinRange() function to see if the difference between red and blue is less than 40. If red and blue have dissimilar values, then the colour will not be green.
The second part of the argument checks whether the value for green is at least 20 more than the average of red and blue. This covers a number of green shades and hues that best match our original 16x16 image.
if((this.withinRange(r, b, 40) && g - rb > 20)){

           c.a = 0

       }

       return c

   }

   withinRange(val1, val2, range){

       let diff = val1 - val2

       if(diff < 0) diff = diff * -1

       if(diff < range){

           return true

       } else {

           return  false

       }

   }
In the screenshot below, you can see an example of how multiple speakers have been accommodated by fading out those who are not currently speaking and keeping all aligned at the bottom left. At this point, there are three speakers on the call, but only one person can speak at a time.
 Multiple Speaker
By fading out and removing inactive speakers, the number of speakers and the resolution of the shared screen or presentation can be increased without compromising the quality of the experience.
You need to enter your API Key, Session ID, and Token into the config.json file provided, and then you can serve these files on your favourite web server. If you are using Node, you can run the following commands from the root of the cloned repository:
npm install

npm run serveThen, simply open your browser and navigate to http://127.0.0.1:3000. When you speak, the mic should pick up your voice and enable your video feed.
That’s it for this tutorial. Whether you are presenting a slideshow, editing a spreadsheet, or watching a video, your camera feed will only show when you are speaking and will not take up additional space onscreen. I hope you have found it interesting. Other implementations and enhancements could include:
Video backgrounds for publishers
Watchparty applications
The complete code for this post can be found on GitHub.
Have a question or want to share what you're building?
Subscribe to the Developer Newsletter
Follow us on X (formerly Twitter) for updates
Watch tutorials on our YouTube channel
Connect with us on the Vonage Developer page on LinkedIn
Stay connected and keep up with the latest developer news, tips, and events.