Share:
Former Director of Developer Education at Vonage. With a background as a creative developer, product manager, and hack day organizer, Martyn has been working as a technology advocate since 2012 having previously spent time in broadcasting and major record companies. Educating and empowering developers all over the world.
Build a Facebook Messenger Bot with Dialogflow (API Tutorial)
Time to read: 17 minutes
Post updated by Amanda Cavallaro
In this tutorial, you’ll learn how to build a Facebook Messenger bot on your Facebook page using Google Dialogflow and the Vonage Messages API.
The chatbot app in this example will take inbound messages via the 'Send Message' button on a Facebook page or via the Facebook Messenger app. Both will work just fine with the chatbot application.
Messages will be routed through our app to Google Dialogflow. Dialogflow will then use natural language processing (NLP) to generate responses to questions. Our chatbot will then send these responses back to Facebook Messenger via API.
In this example, we're using the prebuilt Small Talk agent in Dialogflow. We’ll use the Small Talk agent to build a Facebook bot that will responds with chirpy answers to inbound questions. The Small Talk agent is easy to use and is great for development purposes.
We’ve included step-by-step instructions for building a Facebook Messenger bot with a Dialogflow integration using the Vonage Message API. Throughout the tutorial, you’ll find sample code that you’ll use to build your chatbot.
You can download the code from this GitHub repository.
To create a Dialogflow bot for Facebook Messenger, you’ll need the following prerequisites:
A Facebook account with a brand/business page you can use for testing
A Google Dialogflow ES account
Node.js v12 or above
A free Vonage API account
To make a bot using Facebook Messenger, Dialogflow, and the Messages API, follow the steps below:
Create a Skeleton Application for the Facebook Bot
Create a Messages Application in the Vonage API
Connect the Vonage Messages API to Facebook
Send Facebook Messages to Dialogflow
Send Dialogflow Replies to Facebook
Test Your Facebook Messenger Bot
The first step in making your Facebook Messenger bot is to create a skeleton application.
To receive messages from Facebook, you need to set up two webhooks that allow the app to receive data about messages and delivery statuses.
We'll start by building the basic application with these two routes.
In a new folder, initialize a new Node.js application by running
Next, install the dependencies for the project:
Additionally, we'll be using the excellent Nodemon and DotEnv packages to keep our app up and running whilst changes are made, so you don't have to keep restarting it. Install these as devDependencies.
Finally, add a little folder structure by creating routes and controllers folders in the root of your directory.
The GitHub code comes with a .env.sample file; copy it and rename it to env. You'll be expected to add the values to the following keys.
VONAGE_API_KEY: It can be found on the Vonage Dashboard homepage when signed in.
VONAGE_API_SECRET: When signed in, it can be found on the Vonage API Dashboard.
VONAGE_APPLICATION_ID: It can be found on the Vonage Dashboard inside the application.
VONAGE_PRIVATE_KEY: A file downloadable from the Vonage Dashboard inside the application with message capabilities.
FACEBOOK_PAGE_ID: You can find this information by accessing the profile settings. You will see it right under Summary > Page Info.
DIALOGFLOW_PROJECT_ID: You can find the project ID both in the Google Cloud Platform or under the 'General' tab of the settings of the Dialogflow project in the Dialogflow ES dashboard. Here is an alternative way of finding the page ID provided by their FAQs.
DIALOGFLOW_SESSION_ID: The session ID can be a randomly generated string or hashed user identifier. Its length should be at most 36 characters.
DIALOGFLOW_LANGUAGE_CODE: You can choose several languages; add the one you find on your Dialogflow dashboard.
GOOGLE_APPLICATION_CREDENTIALS: You can create a service account key here.
Koa is a framework for Node.js written by the creators of Express. It's lightweight and comes with only a basic set of features out of the box which makes it perfect for creating a small webhook server like the one we need here.
Create the main file for the server by adding a new file in your root directory called server.js.
In this new file, add the following code:
const Koa = require('koa');
const router = require('koa-route');
const bodyParser = require('koa-bodyparser');
const routes = require('./routes');
const port = process.env.PORT || 3000;

// Set up a new Koa app and tell it to use
// the bodyParser middleware for inbound requests
const app = new Koa();
app.use(bodyParser());

// Routes
app.use(router.post('/webhooks/status', routes.status));
app.use(router.post('/webhooks/inbound', routes.inbound));

// Have the app listen on a default port or 3000
app.listen(port, () => console.log(`App is waiting on port ${port}`));
The routes constant is used to store and access the routes in the application:
const routes = require('./routes');We will also need a new file in the routes folder called index.js. Go ahead and create that, and add the following code:
const routes = {
  inbound: async ctx => {
    // Get the detail of who sent the message, and the message itself
    const { from, message } = ctx.request.body;
    console.log(from, message);
    ctx.status = 200;
  },
  status: async ctx => {
    const status = await ctx.request.body;
    console.log(status);
    ctx.status = 200;
  }
};

module.exports = routes;
With that in place, run the following command to start up the server:
The app will launch on port 3000.
Use Ngrok to open up this port to the world and make note of the URLs it produces for you; it should look something like: https://f70f-82-10-85-156.ngrok.io
Here is a handy guide to working with Ngrok if this is your first time using it.
TLDR? You can start up Ngrok (if installed) by running this command in a separate terminal tab:
Next, you’ll need to create a Messages application in your Vonage API account. This application will let you connect Facebook and Dialogflow and send messages between them.
Set up a new Messages application via the Vonage Dashboard.
Ensure you append /webhooks/inbound and /webhooks/status to the URL you get from Ngrok when you paste them into the form (like in the image below).
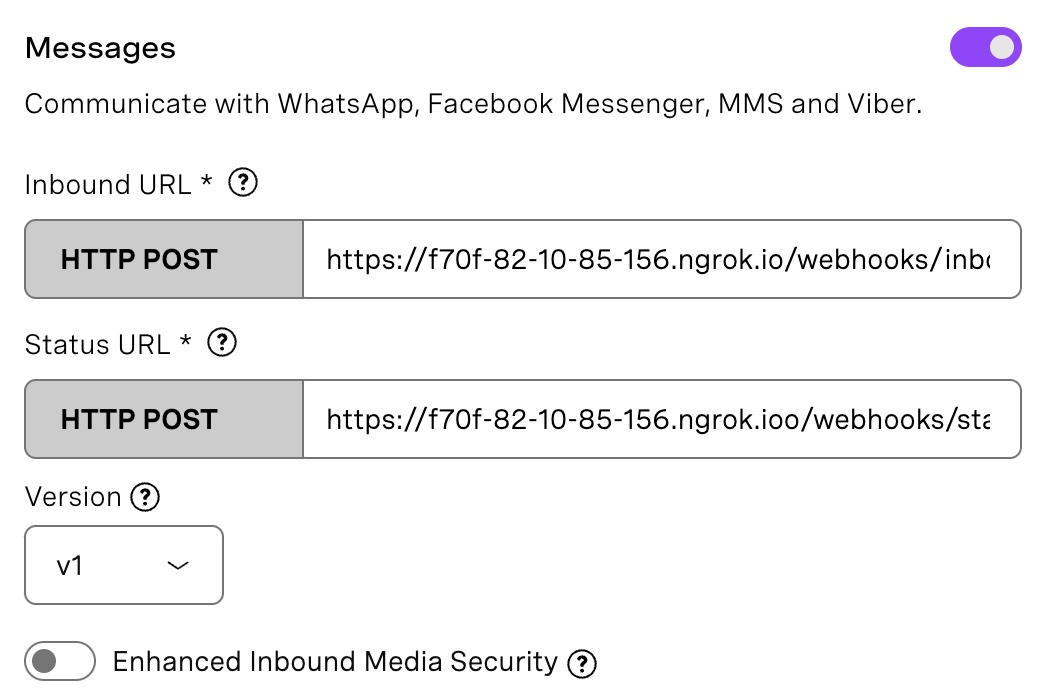 Messages Webhook
Remember to also click the Generate public/private key pair link. This will download a file called private.key.
Locate the private.key file on your system and move it to the root folder for your application.
Finalize the app setup by clicking the Create Application button, and you're done with the config.
Note your Application ID; you'll need it in the next step.
For Facebook to be aware of your newly created chatbot app, you must connect the chatbot application to Facebook..
First, you'll need to create a JSON Web Token to authorize Facebook to use your application, and you can do this with the Vonage CLI.
Open your terminal and ensure you are at your application folder's root.
Using the Vonage CLI, run the following command:
Be sure to replace VONAGE_APPLICATION_ID with the ID of the application you just created.
Running this command will result in a big string of letters and numbers - this is your JSON Web Token. Copy the whole thing.
You can then view the JWT with:
To connect your Facebook page to your app, we've created a handy page:
Complete the following steps:
Login with your Facebook credentials.
Select the Facebook page you want to connect to your Vonage app.
Click Complete Setup.
If all is well, you'll see a green dialog pop-up congratulating you on your success and letting you know the ID of your Facebook page.
Make a note of this ID.
You can verify the content of your JWT by using jwt.io.
Note: If any element of this needs to be clarified, there's a guide to creating JWTs for use in this context in our Facebook Messenger tutorial._
Your application is now connected to your Facebook page.
With your server still running, and Ngrok still exposing it to the world, head over to your Facebook page and locate the messaging button.

Click it to open the messaging window and start sending some wonderful missives. Alternatively, just start with 'Hello'.
Any message you send will be passed along to the Inbound Webhook you specified in your application set up. This maps directly to the inbound function in the routes.js file.
Currently, the inbound function is set to log the from and message portion of what is being sent from Facebook out to the console.
You should see your messages appearing in the console.

Now that the application is receiving incoming messages, it's time to send it over these messages to Dialogflow.
In the controllers folder, create a new file called dialogflow.js and add the contents of the JavaScript file controllers/dialogflow.js.
The exported function in the file achieves the following:
An async function called
dialogflowHandleris instantiated and it accepts a param calledquery.An object called
requestis created, containing all the keys that Dialogflow expects.The request object is sent to Dialogflow.
The reply from the Small Talk agent, contained within
result[0].queryResult.fulfillmentTextis returned.
const dialogflowHandler = async query => {
  // Create a text query request object
  const request = {
    session: sessionPath,
    queryInput: {
      text: {
        text: query,
        languageCode: languageCode
      }
    }
  };

  // Send the text query over to Dialogflow and await the result
  // using .catch to throw any errors
  const result = await sessionClient
    .detectIntent(request)
    .catch(err => console.error('ERROR:', err));

  // Pick out the response text from the returned array of objects
  const reply = await result[0].queryResult.fulfillmentText;

  // Return the reply
  return reply;
};

module.exports = dialogflowHandler;
To make use of this dialogflowHandler function, open the routes/index.js file and require it at the top:
const dialogflowHandler = require('../controllers/dialogflow');Modify the inbound function so it looks like this:
inbound: async ctx => {
  const { from, message } = await ctx.request.body;

  console.log(from, message);

  const dialogflowResponse = await dialogflowHandler(message.content.text);

  console.log(dialogflowResponse);

  ctx.status = 200;
};
Send a new message (something akin to 'Hello!') from your Facebook page (or via your Facebook Messenger app).
This time you'll see the incoming message being logged to the console, as well as the response coming back from Dialogflow.

Note: If you need help setting up Dialogflow, follow the SmallTalk Prebuilt Agent guide.
The final piece in this puzzle is to take the Dialogflow response and send it to the user via the Facebook Messenger bot.
The Vonage Messages API will handle all of this for us.
Create a new file in the controllers folder called vonage.js and populate it with the contents of this file: controllers/vonage.js.
The main function being exported in this file is called messageResponder.
This function uses the Vonage Node.js Client Library to send a message back to the user.
The function is passed an object called message that will contain the id of the user to send the reply to and the dialogflowResponse (the text to send in the message).
const messageResponder = async (message) => {

  vonage.messages.send(
    new MessengerText({
      text: message.dialogflowResponse,
      to: process.env.FACEBOOK_PAGE_ID, // Who the message goes to
      from: $FB_RECIPIENT_ID, // Who the message comes from. The PSID of the user you want to reply to. The FB_RECIPIENT_ID is the PSID of the Facebook User you are messaging. This value is the from.id value you received in the inbound messenger event on your Inbound Message Webhook URL.
    }),
    (err, data) => {
      if (err) {
        throw new Error(err);
      } else {
        console.log(
          `Replied to ${message.id} with '${message.dialogflowResponse}' (ID: ${
            data.message_uuid
          })`
        );
      }
    }
  );
};
To make use of this messageResponder function, import it in the routes/index.js file:
At the top of the file, underneath the require statement for the dialogflow.js file created earlier, add the following:
const messageResponder = require('../controllers/vonage');Then, in the inbound function, add the following code just above the ctx.status = 200 line:
messageResponder({ from, dialogflowResponse });
ctx.status = 200;As you can see, we're passing an object into messageResponder with the content of from, with the response from Dialogflow ES.
This will make the object being passed to the function look like this:
{
  from: '111111111111', // ID of the user on Facebook that sent the message
  dialogflowResponse: 'Greetings!'
}
The stage is set. With that final file, the loop has been closed, and any incoming message should receive a reply immediately. You’re now ready to test your Facebook Messenger bot and your Dialogflow integration.
Once again, send a message from your Facebook page. The response from Dialogflow should now pop up in the same window!
Congratulations! By following the steps in this tutorial, you’ve built a Facebook Messenger bot powered by Dialogflow, with a helping hand from the Vonage Messages API.
The prebuilt Small Talk agent is great for testing, but the next step here would be to build an agent of your own that can relay some knowledge of some worth to the user.
For more information on getting up and running with building Dialogflow agents, you can check the Dialogflow how-to guides.
With the code from this tutorial, you already have the link between Facebook and Dialoglow, so you can go ahead and build the mightiest agent of all time.
If you have any questions about this blog post, feel free to reach out to us on our Vonage Community Slack or message us on X, previously known as Twitter.
Share:
Former Director of Developer Education at Vonage. With a background as a creative developer, product manager, and hack day organizer, Martyn has been working as a technology advocate since 2012 having previously spent time in broadcasting and major record companies. Educating and empowering developers all over the world.