Share:
I'm a JavaScript developer and a Developer Educator at Vonage. Over the years I’ve been really excited about templates, Node.js, progressive web apps, and offline-first strategies, but what I’ve always really loved is a useful, well-documented API. My goal is to make your experience using our APIs the very best I can help it be.
How to Send a Facebook Messenger Message With Node.js
Time to read: 2 minutes
With Facebook Messenger, people connected to your organization on Facebook can access useful automated services. You might take orders, provide updates, or answer questions. If you're new to communicating this way or have relied exclusively on Facebook for your web presence until now, you might want to try it out first using Vonage's Messages API Sandbox.
In this example, you'll set up a quick service to respond to Messenger messages with a recommendation of what to have for lunch. Messenger is a little unusual in that your customer has to initiate the conversation with you before you can message them. Thus we can't test it out by just sending a message, we have to listen for a received message first. To do that, we'll need a Node server in addition to the general prerequisites to use the sandbox:
Node and npm
A Vonage Developer account
A whitelisted Messenger client to test with
Express.js and the body-parser middleware
axios to send messages
To receive messages, your server will need to be publicly available. You can do this on your development machine with ngrok, or use Glitch as I've done with the example code.
Create a new server.js file in your working directory. Your server will look a lot like most minimal Express servers. You'll require the package and get an instance, and also require body-parser and axios. Then you'll configure the middleware and listen on port 3000 at the end.
The purpose of the server here is to provide endpoints for your webhooks. You can add those, too: one for incoming messages and one for statuses. For now, they can just respond with a confirmation that the request reached its destination:
const express = require('express');
const app = express();
const bodyParser = require('body-parser');
const axios = require('axios');

app.use(bodyParser.json());

// when someone messages the number linked to this app, this endpoint "answers"
app.post('/answer', function(req, res) {
  res.status(204).end();
});

// this endpoint receives information about events in the app
app.post('/event', function(req, res) {
  res.status(204).end();
});

app.listen(3000);Note: Don't forget to set your webhook endpoints in your dashboard. You can set both in the Messages API Sandbox. For this example they should be POST requests that look like https://YOUR-SERVER/answer and https://YOUR-SERVER/event.
To send messages, you'll need your API credentials and the sandbox Messenger ID to send the message from. You can get all those values from the cURL command on the sandbox page. Since you'll be sending lunch suggestions, you can also create an array of ten lunches for test data.
You won't see your end user's Messenger ID until they've messaged you. Once your /answer endpoint receives a request you can get the from_id from the request body. You can save that to use as the "to" ID in your message:
var user = '12ab3456';
var password = '123AbcdefghIJklM';
var my_id = '123456789012345';

var lunches = ['bbq','teriyaki','salad','a bagel','curry','dumplings','tacos','a sub','bibimbap','pizza'];

// when someone messages the number linked to this app, this endpoint "answers"
app.post('/answer', function(req, res) {
  var from_id = req.body.from.id;

  res.status(204).end();
});
Now you have all the pieces in place to build a reply to your user. For this one-off example you can just use axios to make the request. You'll provide it the sandbox URL, a data object, and your API key and password. The data object contains the sandbox ID to send the message from, the stored user ID to send it to, and some text containing a random lunch suggestion.
After sending the request you can wait for a response or any errors. Under ideal circumstances, you won't see anything there aside from confirmation of what you sent:
// when someone messages the number linked to this app, this endpoint "answers"
app.post('/answer', function(req, res) {
  var from_id = req.body.from.id;

  axios.post('https://messages-sandbox.nexmo.com/v0.1/messages',{
    "from": { "type": 'messenger', "id": my_id },
    "to": { "type": 'messenger', "id": from_id },
    "message": {
      "content": {
        "type": 'text',
        "text": 'You should have ' +
          lunches[Math.floor(Math.random() * 10)] + ' for lunch.'
      }
    }
  },{
    auth: {
      username: user,
      password: password
    }
  })
  .then(function (response) {
    console.log('Status: ' + response.status);
    console.log(response.data);
  })
  .catch(function (error) {
    console.error(error);
  });

  res.status(204).end();
});
Start your server with node server.js if it isn't running already. From your whitelisted Messenger client, send a message to the Vonage sandbox account. (It doesn't matter what it says.) You should receive a message back, and the confirmations in your console.
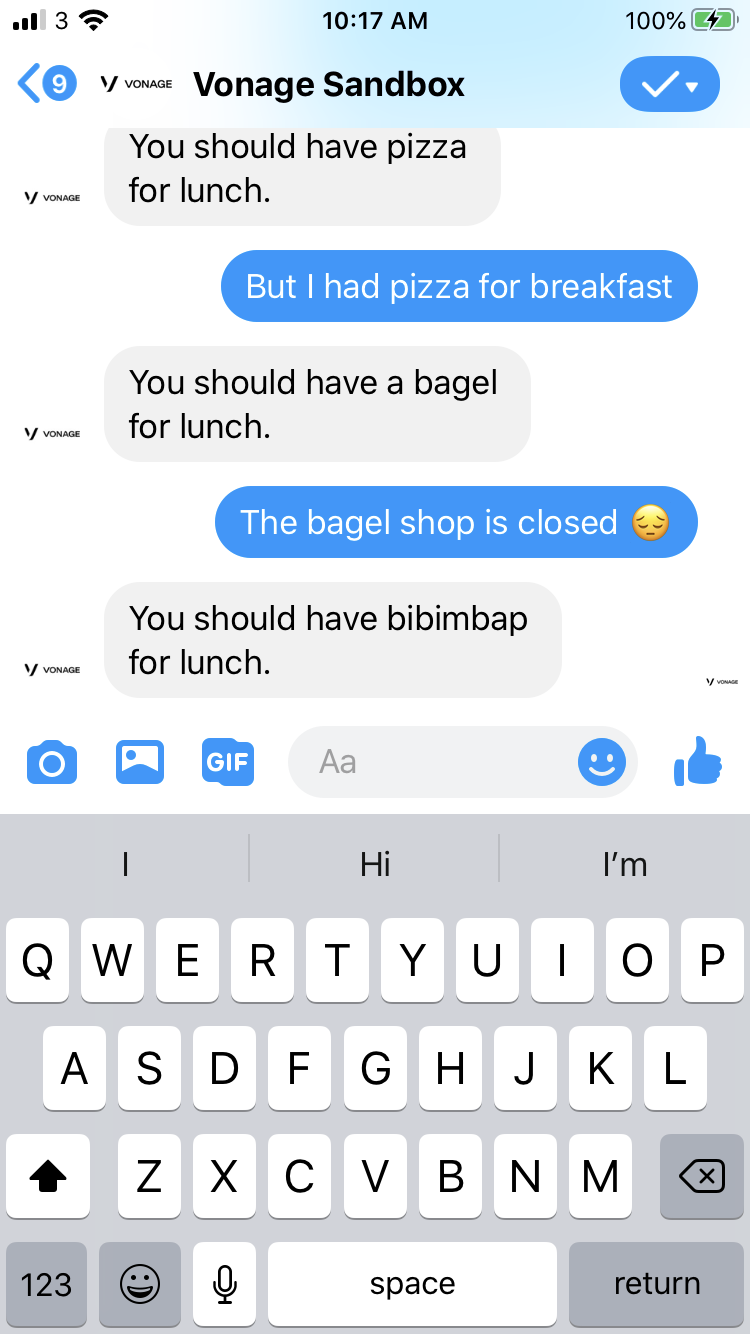 Messenger Sandbox
Now that you've seen how communications with Messenger work, you can begin building it into your real-world apps. You can use the Vonage Messages API Sandbox for development with the Vonage Node.js SDK. When you're ready, you can connect your own Facebook Page and go live!
View and remix the example on Glitch to see all the code together.
Share:
I'm a JavaScript developer and a Developer Educator at Vonage. Over the years I’ve been really excited about templates, Node.js, progressive web apps, and offline-first strategies, but what I’ve always really loved is a useful, well-documented API. My goal is to make your experience using our APIs the very best I can help it be.