Integrate Phone Calls to a Dialogflow Chatbot Via WebSockets
Time to read: 12 minutes
This tutorial will show you how to make a phone call to a Dialogflow agent using Dialogflow Essentials and a Vonage WebSockets integration.
The diagram below shows an overview of the architecture.
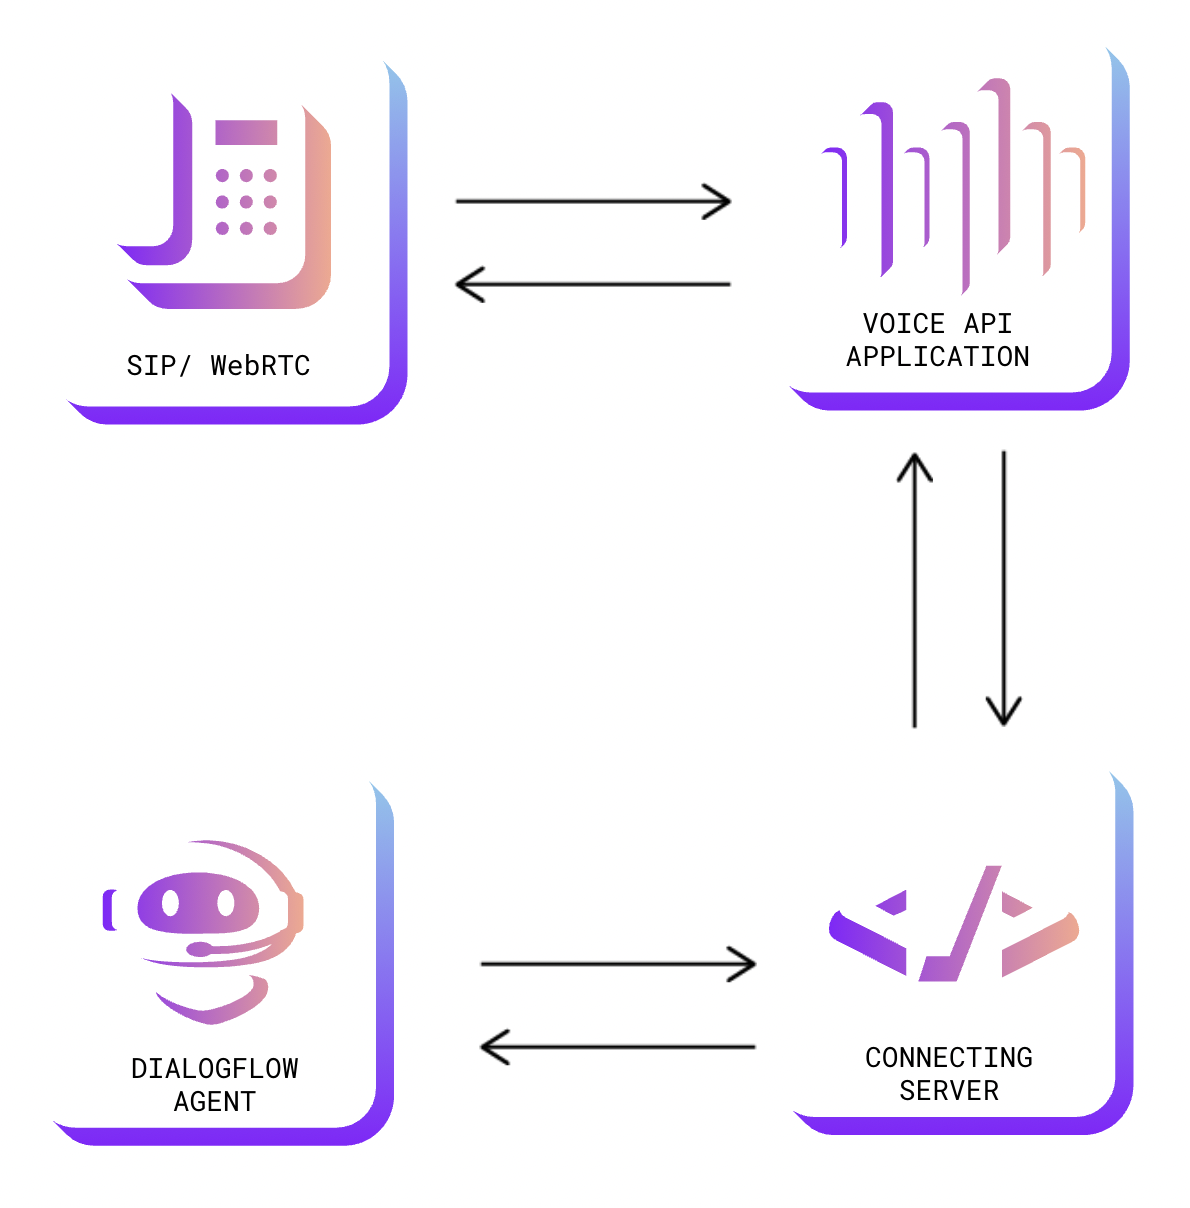 Diagram of the call
To perform the actions outlined in the following steps, you will need to create:
Dialogflow is a Software as a Service (SaaS) and a Natural Language Understanding platform used to build conversational user interfaces.
An agent is a Dialogflow instance, which you can think of as your chatbot application. It allows you to take what the users say, map it to intents and provide them with responses.
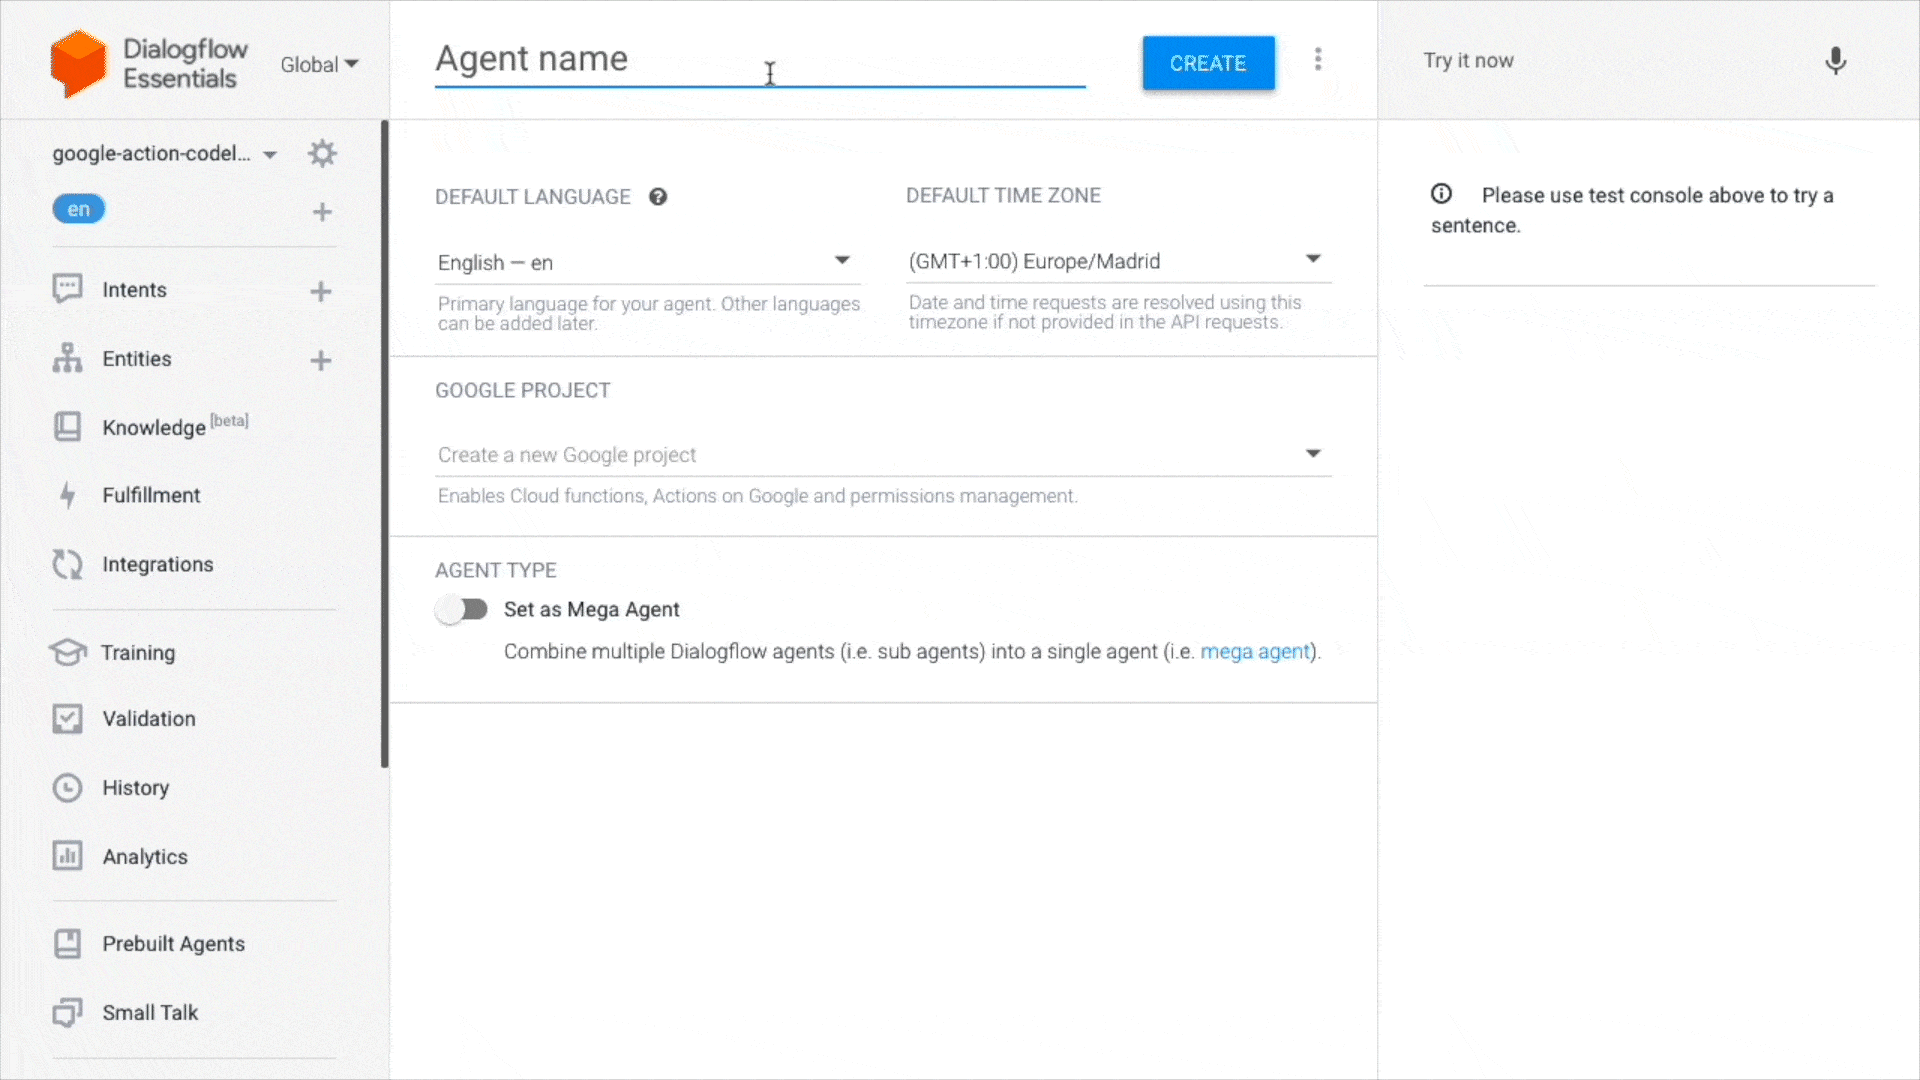
Open the dialogflow console
Create an agent by giving it a name, setting the default language, choosing the timezone, and clicking on the button to create an agent. The button can either be shown as
CreateorCreate AgentOn the menu on the left click on the gear icon
Under Google Project, click on the project ID name. For instance,
VonageDFThis will take you to the Google Cloud console
 Gif showing the steps to create the dialogflow Agent
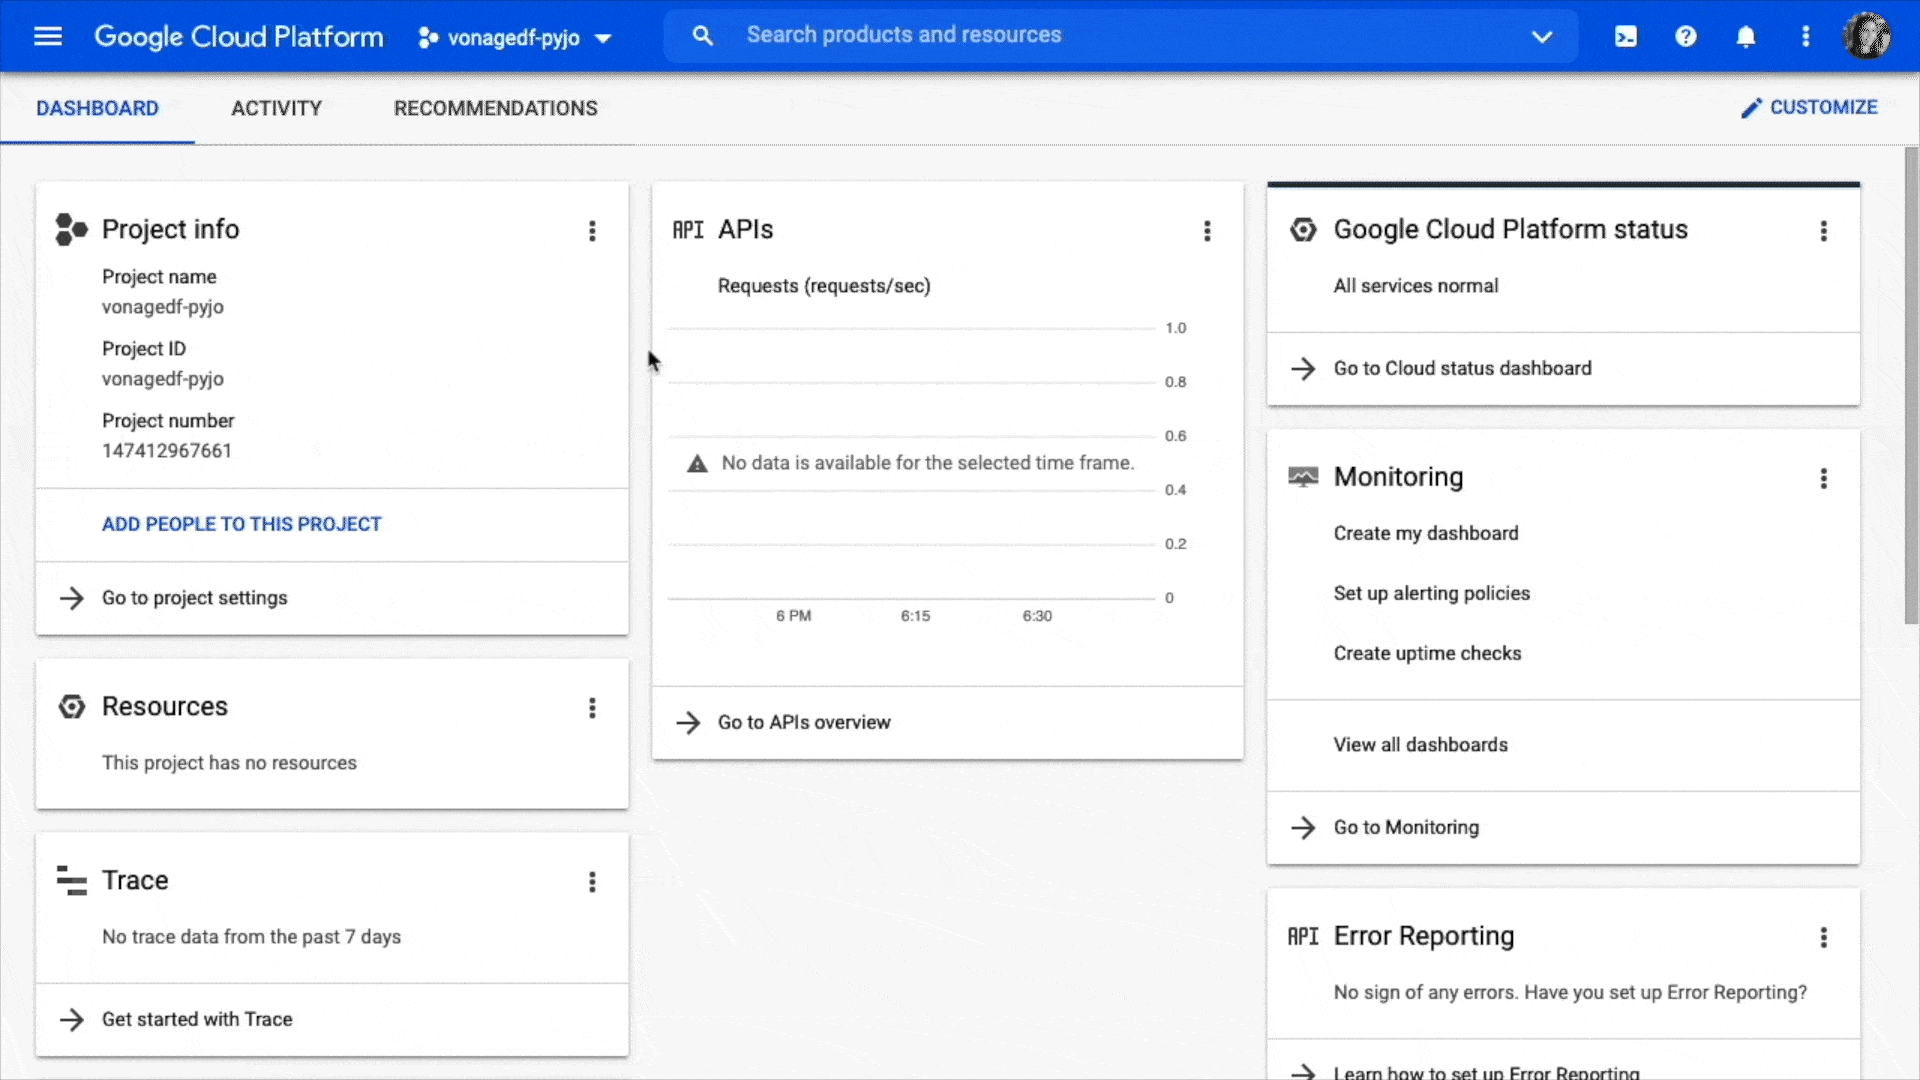
We will use the graphical user interface to manage our Google Cloud project and resources via the Google Cloud console using the same project created in Dialogflow. In the following steps, we will create a service account for access control and authentication.
From the Google Cloud console, click on
Go to project settingsOn the menu on the left, click on
Service accountsAt the top bar, click on
+ Create Service AccountGive it a Service Account Name you'll remember, for instance
VonageDFAdd a service account description
Click on
Create and ContinueUnder
Grant this service account access to project, filter and select the roleDialogflow API Admin
 Gif showing the seven above steps while creating the Service Account
You are now taken back to the Service Accounts page
Click on the three dots under
actionClick on
Manage keysClick on
Add KeyClick on
Create new KeySelect
JSONClick on
CreateYou can see one
.jsonfile was downloaded. We will add this file to the Dialogflow Reference Connection GitHub repository we will clone in the next step
 Gif showing the above steps to generate the keys
The Dialogflow Reference Connection makes use of the WebSockets feature of the Vonage Voice API. When a voice call is established, a Voice API application triggers a WebSocket connection to the Dialogflow-reference-connection. It streams the audio to and from the voice call in real-time.
In the following steps below, we will give two options as examples. Using ngrok to tunnel the connecting server, which is interacting with our Dialogflow Agent and deploying it Heroku.
Clone the dialogflow-reference-connection repository from GitHub and change the directory
git clone https://github.com/nexmo-community/dialogflow-reference-connection && cd dialogflow-reference-connectionOpen the code in your favorite IDE or text editor
Add the
.jsonfile just downloaded to the root of the projectCreate a
.envfile from the.env.examplePopulate the environment variables:
GCLOUD_PROJECT_ID=<TheProjectIdFoundOnDialogflow>GOOGLE_CLOUD_CREDENTIALS=<TheJSONFileYouDownloaded.json>From the terminal:Install the dependencies
npm installRun the file Dialogflow connecting server
node df-connecting-server.jsThere are many deployment types, such as App Engine, Heroku, Cloud Run.
For this tutorial, we will show examples using the ngrok tunneling. Here's a link explaining more about ngrok and Heroku.
Option 1: Example with ngrok
Run
ngrok http 5000Make a note of the URL found in the console (e.g.
xxxx.ngrok.io). We will add this information in theDF_CONNECTING_SERVERargument of Set Up the Dialogflow Voice API Sample Application' part of the tutorial
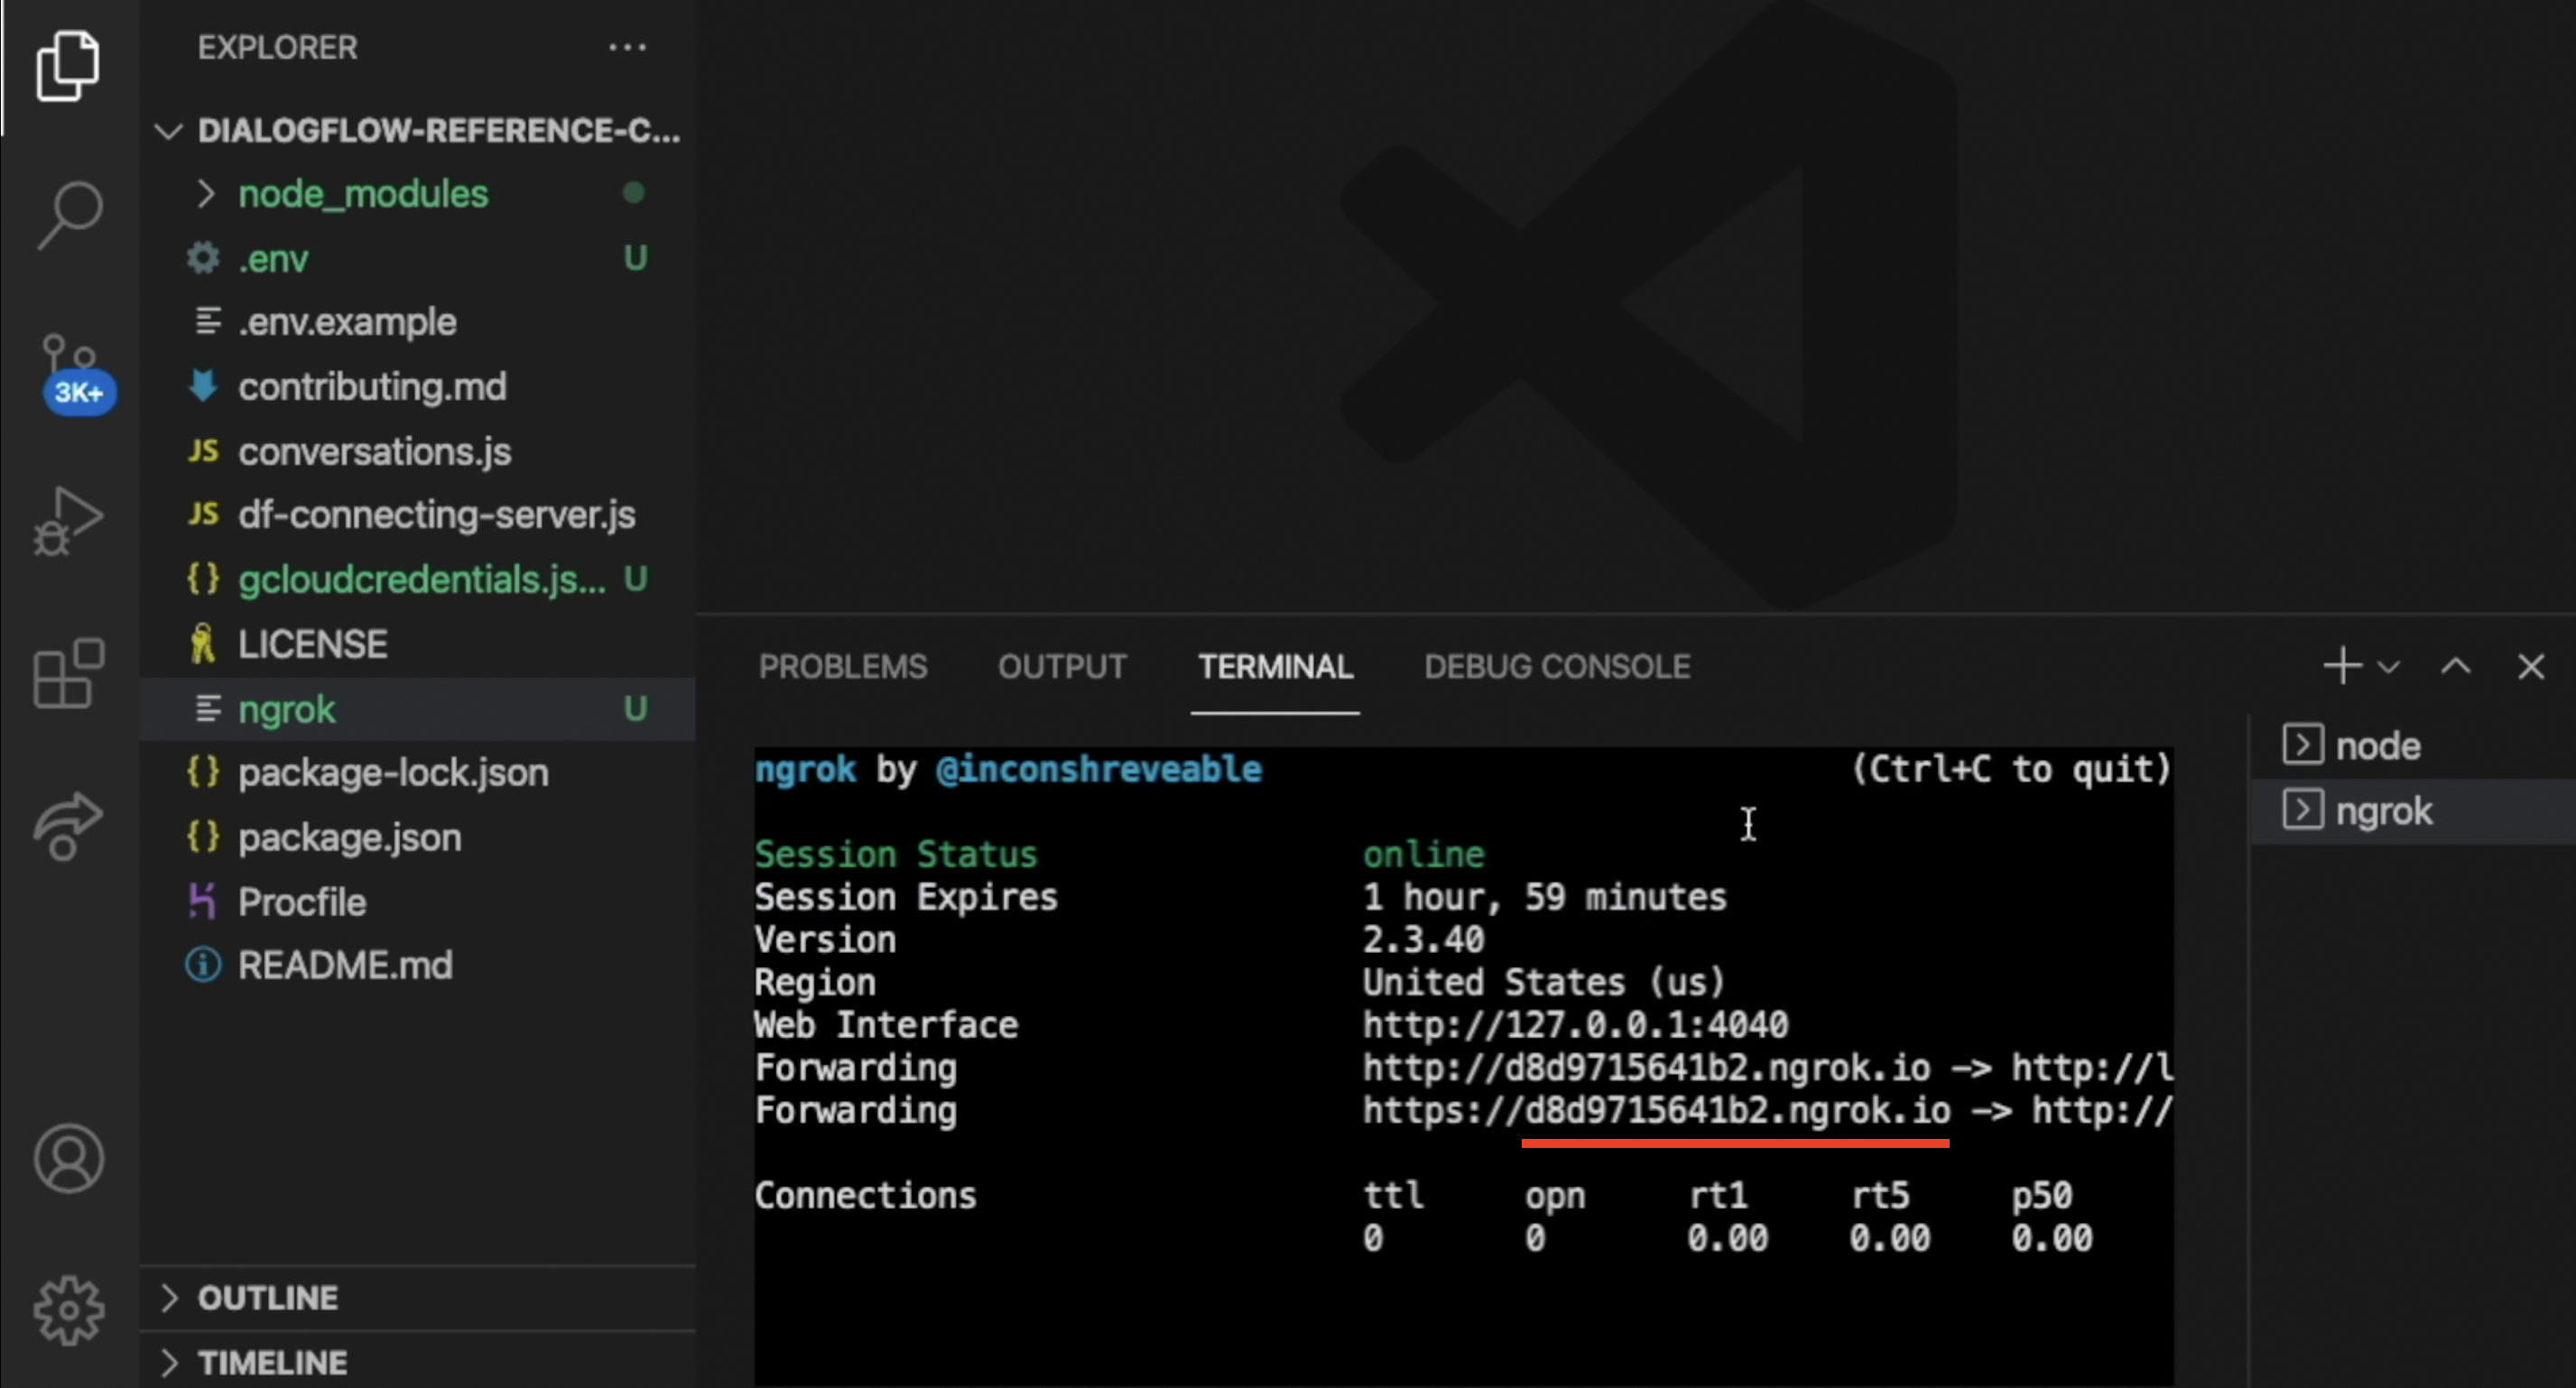 The ngrok URL highlighted on the IDE
Option 2: Example with Heroku
Install git
Install Heroku command line and login to your Heroku account
If you do not yet have a local git repository, create one:
git initStart by creating this application on Heroku from the command line using the Heroku CLI. Note: In the below command, replace
thisappnamewith a unique name on the whole Heroku platform.heroku create thisappnameOn your Heroku dashboard where your application page is shown, click on
Settingsbutton, add the followingConfig Varsand set them with their respective values:
Deploy the application
git push heroku masterorgit push heroku maindepending on your branch name.Make a note of the URL found in the console (e.g.
thisappname.herokuapp.com). We will add this information in theDF_CONNECTING_SERVERargument of 'Set Up the Dialogflow Voice API Sample Application' part of the tutorial
Create an Application from the Vonage API Dashboard
Give the application a name, for instance
VonageDFClick on the button to generate a public and private key, a
private.keyfile will be downloaded. We will add it to the Dialogflow Voice API Sample Application in the next section of this tutorialLink a phone number to this application. If you do not already have one, on the menu on the left click on
Numbersand thenBuy Numbersand follow the steps to purchase it
We will set up the Dialogflow Voice API Sample application and get back to this Vonage application dashboard soon to add more information.
This sample application uses the Vonage Voice API to answer incoming voice calls and set up a WebSocket connection to stream audio to and from the Dialogflow reference connection for each call.
The dialogflow reference connection code will:
Send audio to the Dialogflow agent from caller's speech,
Stream audio responses from the Dialogflow agent to the caller via the WebSocket,
Post back in real-time transcripts and caller's speech sentiment scores via webhooks callbacks to this Voice API Sample Application.
Once this application is running, you will call the phone number linked to your application to interact via voice with your Dialogflow agent.
We will use ngrok to tunnel the connecting server which is interacting with our Dialogflow Agent, but if you'd like to see an example using Heroku you can follow the steps from Dialogflow Voice API Sample Application from GitHub.
From your terminal, clone the Dialogflow Voice API Sample Application from GitHub and change the directory
git clone https://github.com/nexmo-community/dialogflow-sample-voice-application && cd dialogflow-sample-voice-applicationYou can continue to follow the below steps explanation or from the readme file of the Dialogflow Voice API Sample ApplicationAdd the
private.keygenerated from the Vonage Dashboard and downloaded to your machine to the project rootFrom the
.env.examplecreate a.envfilePopulate the environment variables with the information present on the Vonage API Dashboard
The
SERVICE_NUMBERis the virtual number you purchased. Remember to add the country code without any 00s or + beforehandThe
DF_CONNECTING_SERVERis the server from the Dialogflow Reference you already have running (the one you previously took note of)
Install the dependencies
npm installRun the
df-application.jsnode df-application.jsBelow you can find the next steps for ngrok and for Heroku respectfully:Option 1: Below are Steps using ngrok
On a separate terminal tab run
ngrok http 8000Get back to the Vonage Dashboard website and under capabilities:Toggle Voice to enable this capability
Add the ngrok URL running on
dialogflow-sample-voice-applicationfollowed by/answeron the Answer URL. Make sure HTTP GET is selected.Add the ngrok URL running on
dialogflow-sample-voice-applicationfollowed by/eventon the Event URL. Make sure HTTP POST is selected.Click on Save Changes
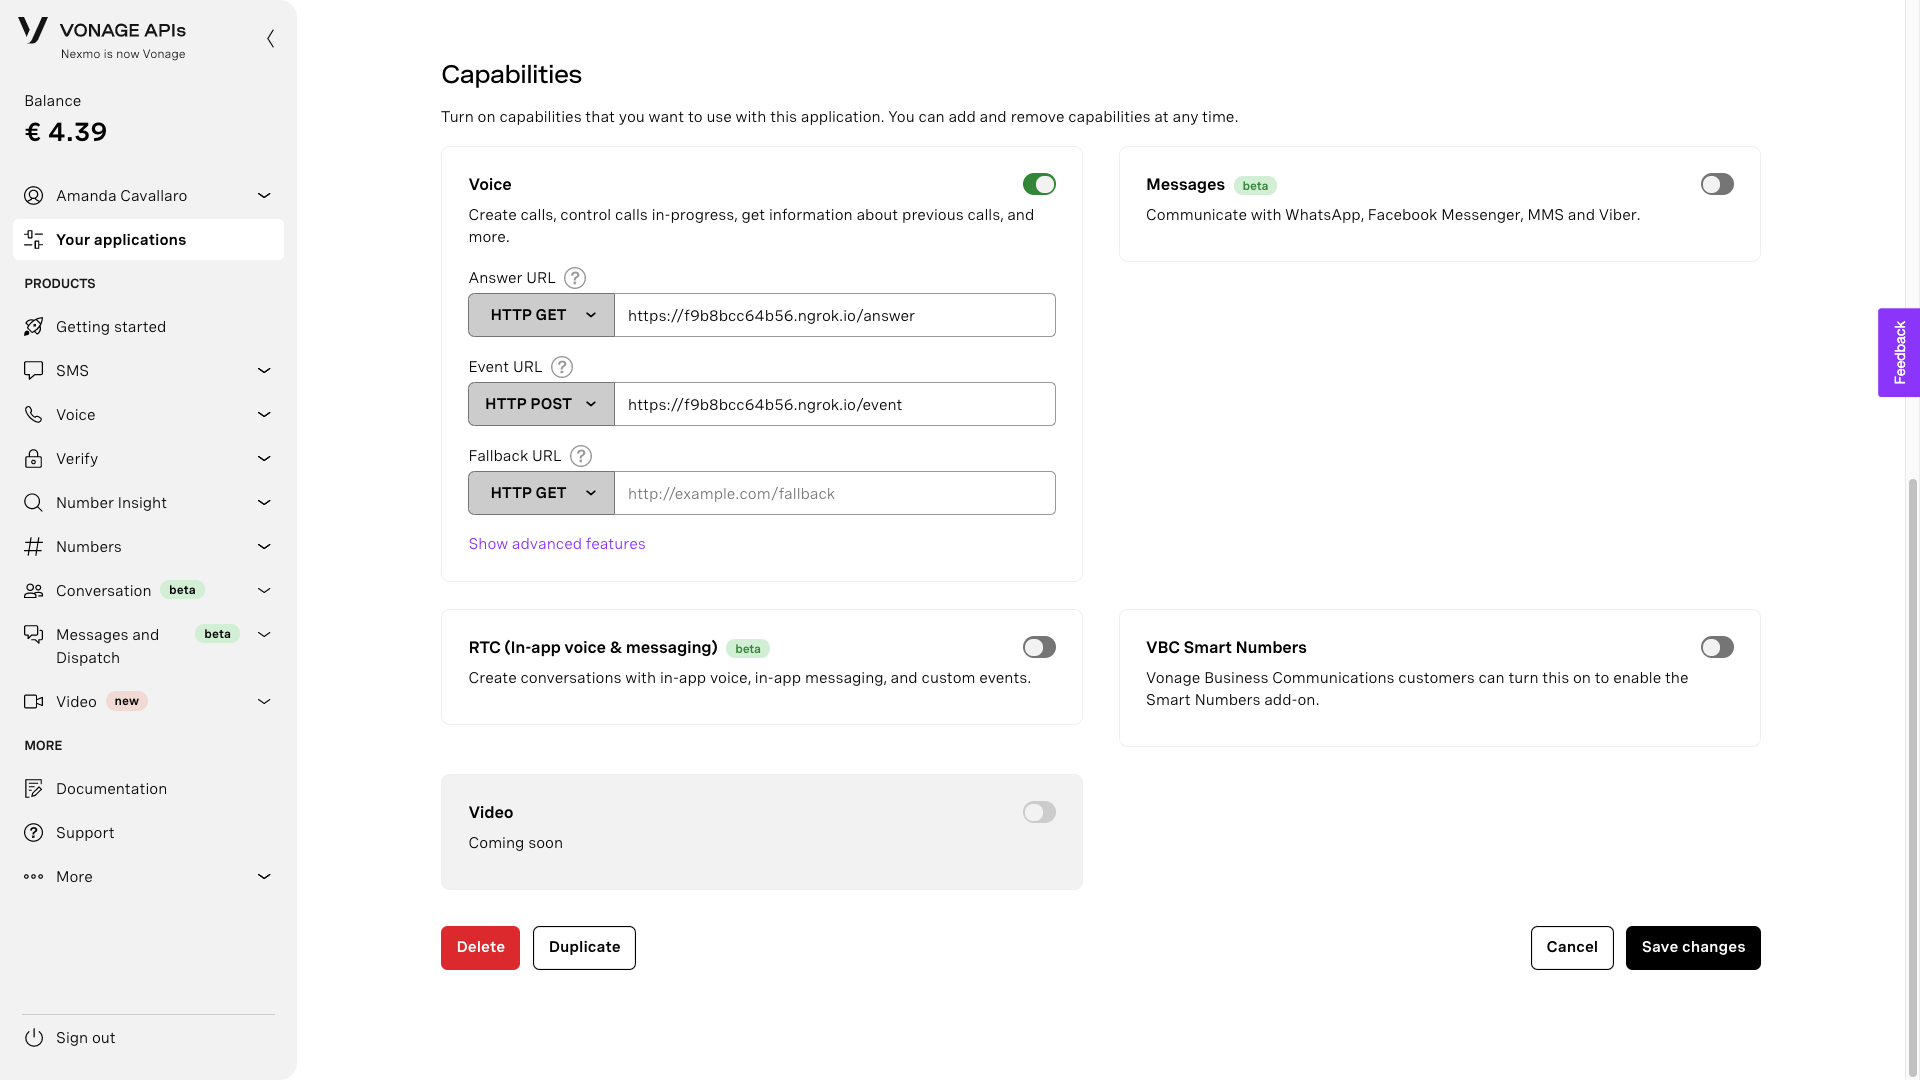 Vonage Dashboard
Option 2: Below Steps using Heroku
On a separate terminal tab, If you do not yet have a local git repository, create one:
git initStart by creating this application on Heroku from the command line using the Heroku CLI. Note: In command, replace
myappnamewith a unique name on the whole Heroku platform.heroku create myappnameOn your Heroku dashboard where your application page is shown, click on
Settingsbutton, add the followingConfig Varsand set them with their respective values found in your.envfile.
Add also the parameter PRIVATE_KEY_FILE with the value ./private.key
On your Heroku dashboard where your application page is shown, click on the
Open Appbutton and copy the URLNow, let's deploy the application. Get back to the Vonage Dashboard website and under capabilities:
Toggle Voice to enable this capability
That hostname (the URL you just copied from Heroku) will be used followed by
/answeron the Answer URL. Make sure HTTP GET is selectedDo the same for
/eventon the Event URL. Make sure HTTP POST is selectedClick on Save Changes
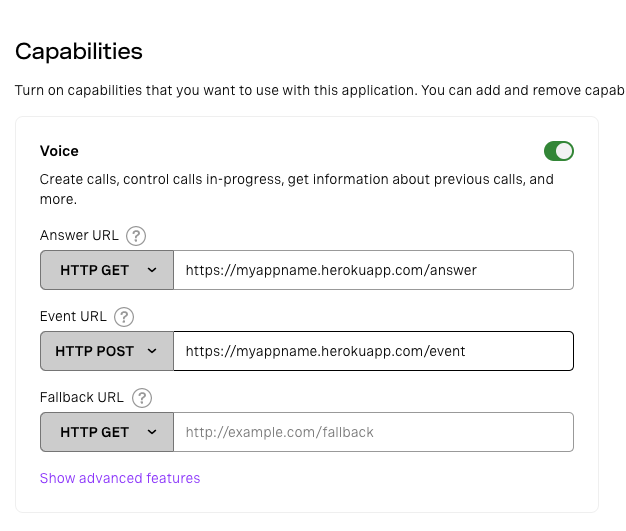 Vonage Dashboard
If you were to try and call the phone number at this point of the tutorial, you would be able to interact with the starting point of the conversation from the Dialogflow perspective, the Default Welcome Intent.
A message would be sent back to the caller from the list of the user responses. But the conversation would not take turns as we do not have any other data trained for other turns of conversation.
Let's take a step back and explore some of the concepts of Dialogflow to add the utterances the users might say, provide them with a response, and add the end of the conversation, so that you can see a full conversation in turns taking place.
Once you create an agent, you will create intents that will handle and shape the conversation.
In the event of a user utterance, Dialogflow matches what is being said to an intent, which is based on the NLP and the training phrases that a user could potentially say to match that intent. Once the intent classification happens, a response is sent back to the user.
Entities are the types of information that we will extract from the conversation. For the use-case we will see below, we are booking a table via a phone call. The information we will extract from the conversation are person, date and time.
Let's improve the Default Welcome Intent, create an intent, outline the entities, and add an end to the conversation and test it out.
Open the dialogflow console and make sure you're in the correct agent for this tutorial
Click on the
Default Welcome IntentScroll down, erase the responses and add:
Welcome to our Demonstration Restaurant. When and for whom would you like to book a table?Click Save
Click on the Intents menu item
Click on the New Intent button
Give it the name of
Table BookerUnder Training Phrases add the following training phrases
A table for Nicole on the 10th at 13:00, please.
Could I book a slot at 14:00 on 10/12/2021 for Joseph?
I'd like to book a table on the 10/09/2020 at 16:00 for Amanda You will notice that as you type these sentences, some words will be outlined in a colorful highlight, make sure to double click the words and make sure they are using the correct entities
@sys.person,@sys.dateand@sys.time.
Under Actions and Parameters, tick
requiredforperson,dateandtimeAdd prompts for each one of the parameters because in case they haven't said that specific piece of information during the conversation, they'll be prompted to add them
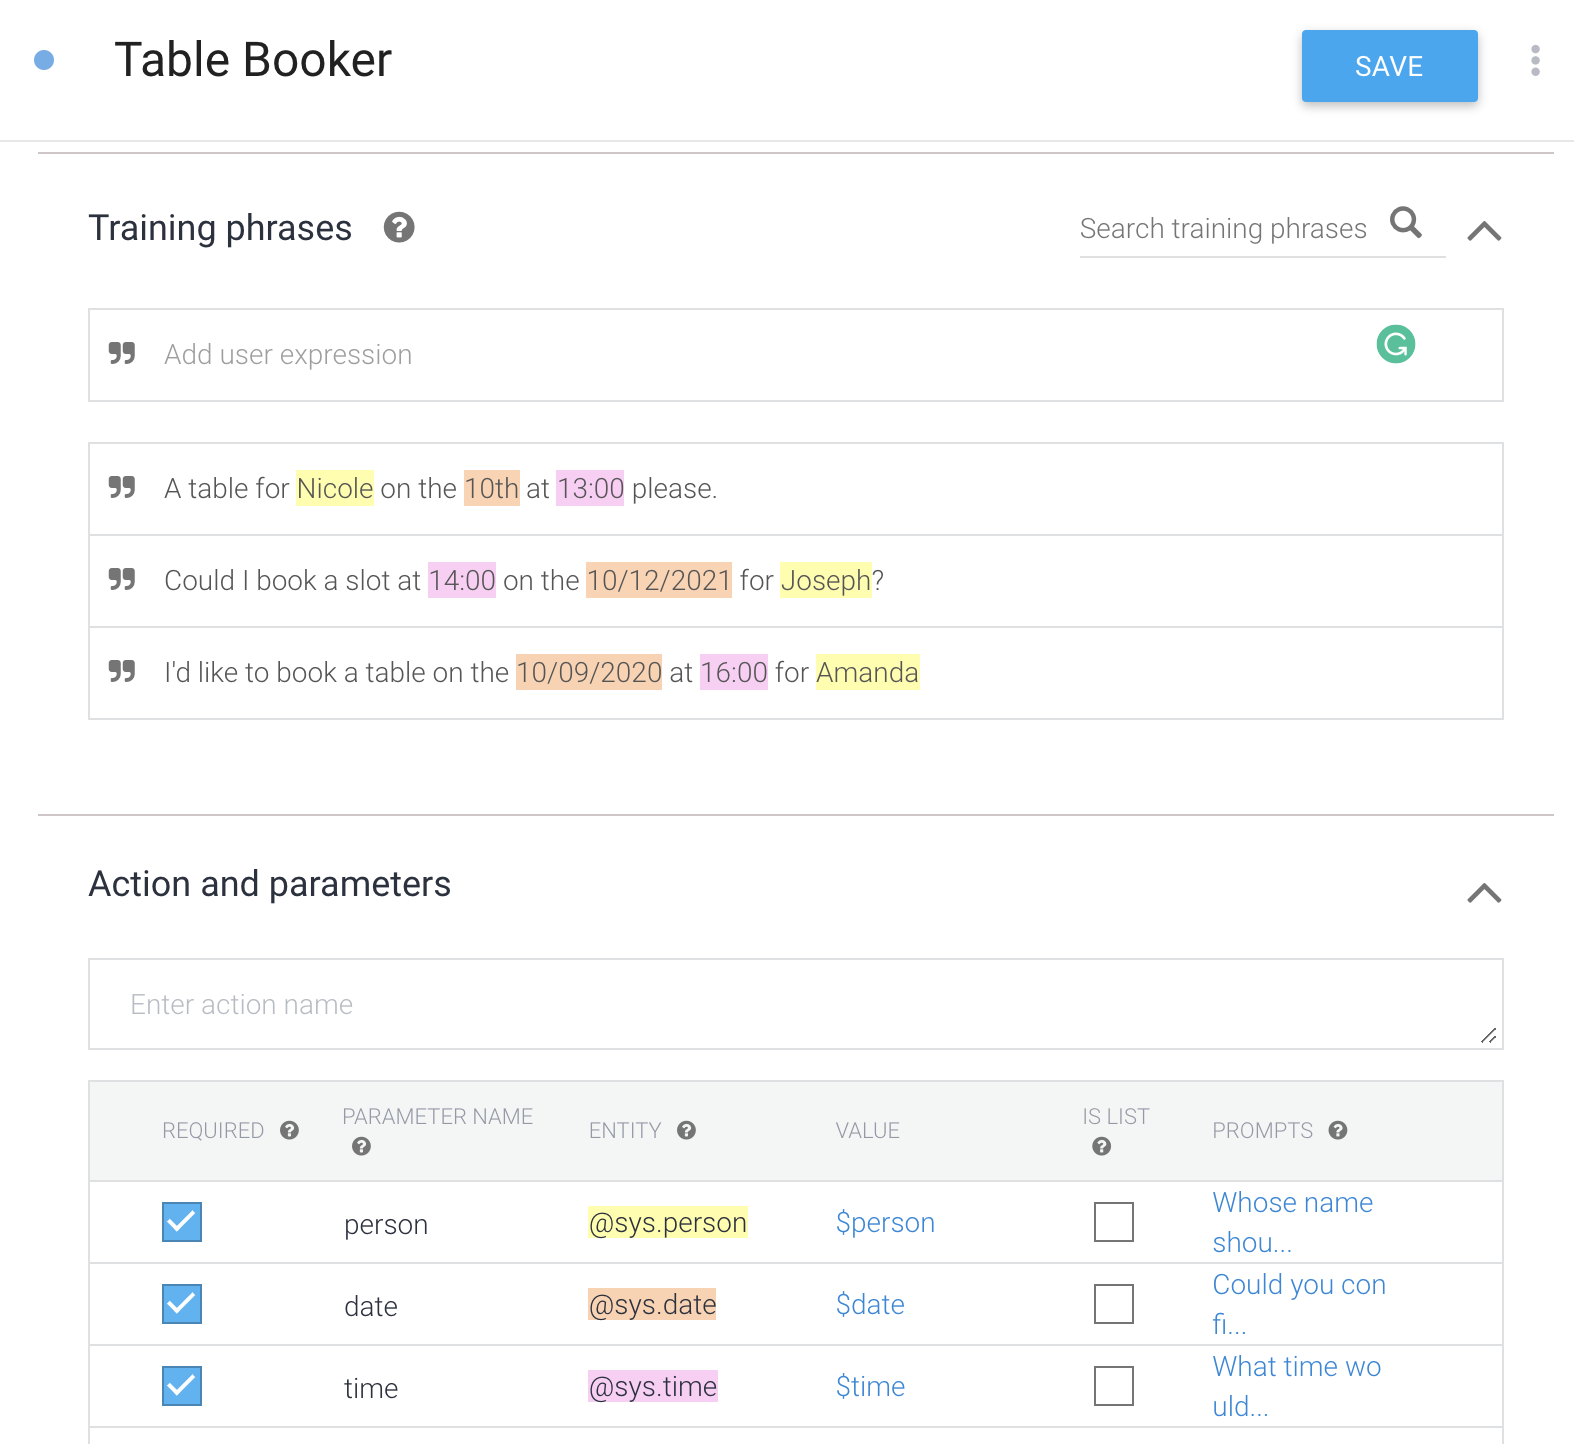 Training phrases examples
In the response, you can add the following:
Table booked for $person at $time on $date. Thank you!Toggle
Set this intent as end of conversation, below responsesClick Save
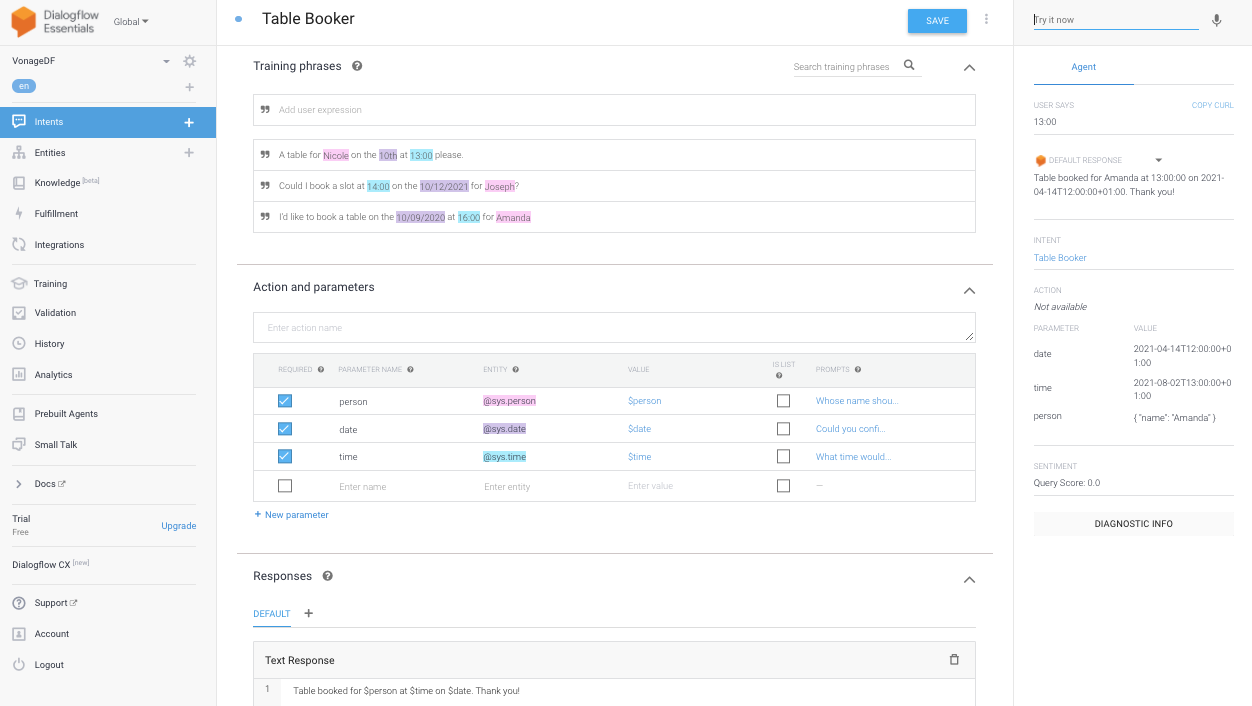 Table Booker Intent Overview
Now that we have all the parts set up it's time to call your virtual phone number and test it out, let's go through what is going on and then follow our final step to make the call!
Once you call the phone number linked to your Voice API application to interact with the Dialogflow Agent You will hear the confirmation message: Connecting your call, please wait.. That Text To Speech from the Vonage API platform is played as soon as the platform answers your call.
Once the WebSocket is established, the Vonage API platform plays the Text To Speech Hello to the Dialogflow Agent (you as the caller will not hear that).
You just set up read back to you by the Dialogflow agent.
At this point, you will interact with the intents you set up in the previous section of this tutorial to book a table.
You will see the transcriptions on the Dialogflow reference connection application console and also on the Dialogflow sample voice API application console.
If you'd like to see the sentiment analysis results, you'll have to enable the Cloud Natural API from the Google Cloud console. If it's not enabled you'll get an error similar to PERMISSION_DENIED: Cloud Natural Language API has not been used in project xxxx before or it is disabled.
Let's go to our final step and see all the building blocks together in action!
Call the phone number linked to your Voice API application and interact with the Dialogflow Agent
Here's a potential way you could test the conversation:
Vonage Websocket: Connecting your call, please wait.
Bot: Welcome to our Demonstration Restaurant. When and for whom would you like to book a table?
You: I'd like to book a table at 10:00 am on 01/09/2022 for Tanya
Bot response: Table booked for Tanya at 10:00 on 01/09/2022. Thank you!
End of call
You have completed this tutorial on making phone calls to a Dialogflow agent using a Vonage WebSockets integration.
You can find the Dialogflow Reference sample and Sample Voice Application on Github.
Check the WebSockets reference guide.
Check the A blog post explaining ngrok.
You can also look at a similar example using an Amazon Lex Bot.
I hope you enjoyed this. Feel free to contact me on Twitter or join our Community Slack Channel.