
Access LLMs Over Limited In-Flight Wi-Fi with Vonage Messages API
Time to read: 6 minutes
Stuck on a plane with limited text-only Wi-Fi? Learn how to use Vonage's Messages API to build a chatbot on WhatsApp or Messenger that connects to a powerful LLM, giving you access to AI without full internet access.
To complete this tutorial, we need to set up some items. Go ahead and install them.
A text editor or IDE
Clone the project's GitHub repository
Run
npm installto install all the project dependencies
I’ll show you how to create a new Vonage application from the dashboard in the steps below. Alternatively, you can use the CLI to create an application.
Go to 'Your Applications' in the dashboard and click to create a new application.
Create a public/private key pair for API authentication. Click 'Generate public and private key’ to obtain the private key. The file will be downloaded to the location you set on your browser for downloaded files. Be sure to add that file to the project folder.
 Generate and save private key
The Vonage Messages API integrates SMS, MMS, RCS, WhatsApp, Messenger, and Viber, allowing you to communicate with your customers on the channels they like. Toggle the Messages option under capabilities; we will use Messages API v1.
Set your server's public URL from ngrok as the endpoint for inbound messages and events. it should look like: https://xyz.ngrok.com/inbound for inbound and https://xyz.ngrok.com/status for status.
If you haven’t used ngrok before, you can start here. I’ve added the steps to run an instance below the image. And if you’d like to learn more about webhooks, it’s on our Vonage documentation.
 Messages capability
Run the following command to start an ngrok tunneling instance. You can see that a ‘Forwarding’ URL has been generated, which is used to add the Messages API capabilities.
ngrok                                                                 (Ctrl+C to quit)

👋 Goodbye tunnels, hello Agent Endpoints: https://ngrok.com/r/aep

Session Status                online
Account                       plan name
Version                       3.19.1
Region                        Europe (eu)
Latency                       31ms
Web Interface                 http://127.0.0.1:4040
Forwarding                    https://xyz.ngrok.app -> http://localhost:8000

Connections                   ttl     opn     rt1     rt5     p50     p90
                              14      0       0.03    0.03    6.10    7.79
Now that we have set up the Vonage application, we will use the WhatsApp Sandbox environment. Once you're ready to put your application in production, you can use a WhatsApp business account. With a few lines of code and setup adjustments, you can also integrate this application with channels such as Viber, Facebook Messenger, and Instagram.
Navigate to the Vonage Messages API Sandbox page and set up your Messages API WhatsApp Sandbox.
Add the ngrok-generated URL to your application and to the Messages API Sandbox, append /inbound and status, respectively, and click 'Save webhooks.'
 Webhooks
We have created the function sendMessage() to send a WhatsApp text message using the Vonage API sandbox. It prepares the necessary payload (sender, recipient, message), includes the required authentication headers, and sends a request to the Vonage sandbox API to deliver the message.
The endpoint /inbound processes incoming WhatsApp messages via a webhook from Vonage. When a message is received, the handler extracts the message content and sender’s number and then uses the getLLMResponse() function to generate a reply. This response is sent back to the user using the sendMessage function. If an error occurs, a message is sent to the user, and the issue is logged for debugging. The /status endpoint logs the request data, checks if the user is authorized using a JWT, and then responds with a success message.
We will use Gemini as an example for this tutorial. When you navigate to AI Studio, log in, and create a new chat, you can see ‘<> Get Code’ at the top right and select your programming language of choice.
The code generated requires using a Gemini API key. You can Generate an API key and check the chosen quota and service details.
Choose the model. I've used “Gemini 2.0 Flash Experimental,” but you can choose the one that makes the most sense for your project. To learn more, visit the Gemini Developer API documentation page.
You could use Open AI's ChatGPT instead of Gemini when you do all the chat integration. In the server.js file, you should replace the function getLLMResponse() that currently holds the Gemini code to use the LLM of your choice.
If you want to use OpenAI's ChatGPT, here's ChatGPT WhatsApp Integration in 5 Easy Steps (How to Guide). You can also chat with the unofficial ChatGPT bot by adding “+1 1800 242 8478” to your WhatsApp contacts.
Now that we have gone through what the server.js file holds, we have to update the .env file, replacing these with the needed environment variables. We've generated some of these before, but I'll explain where to find each one.
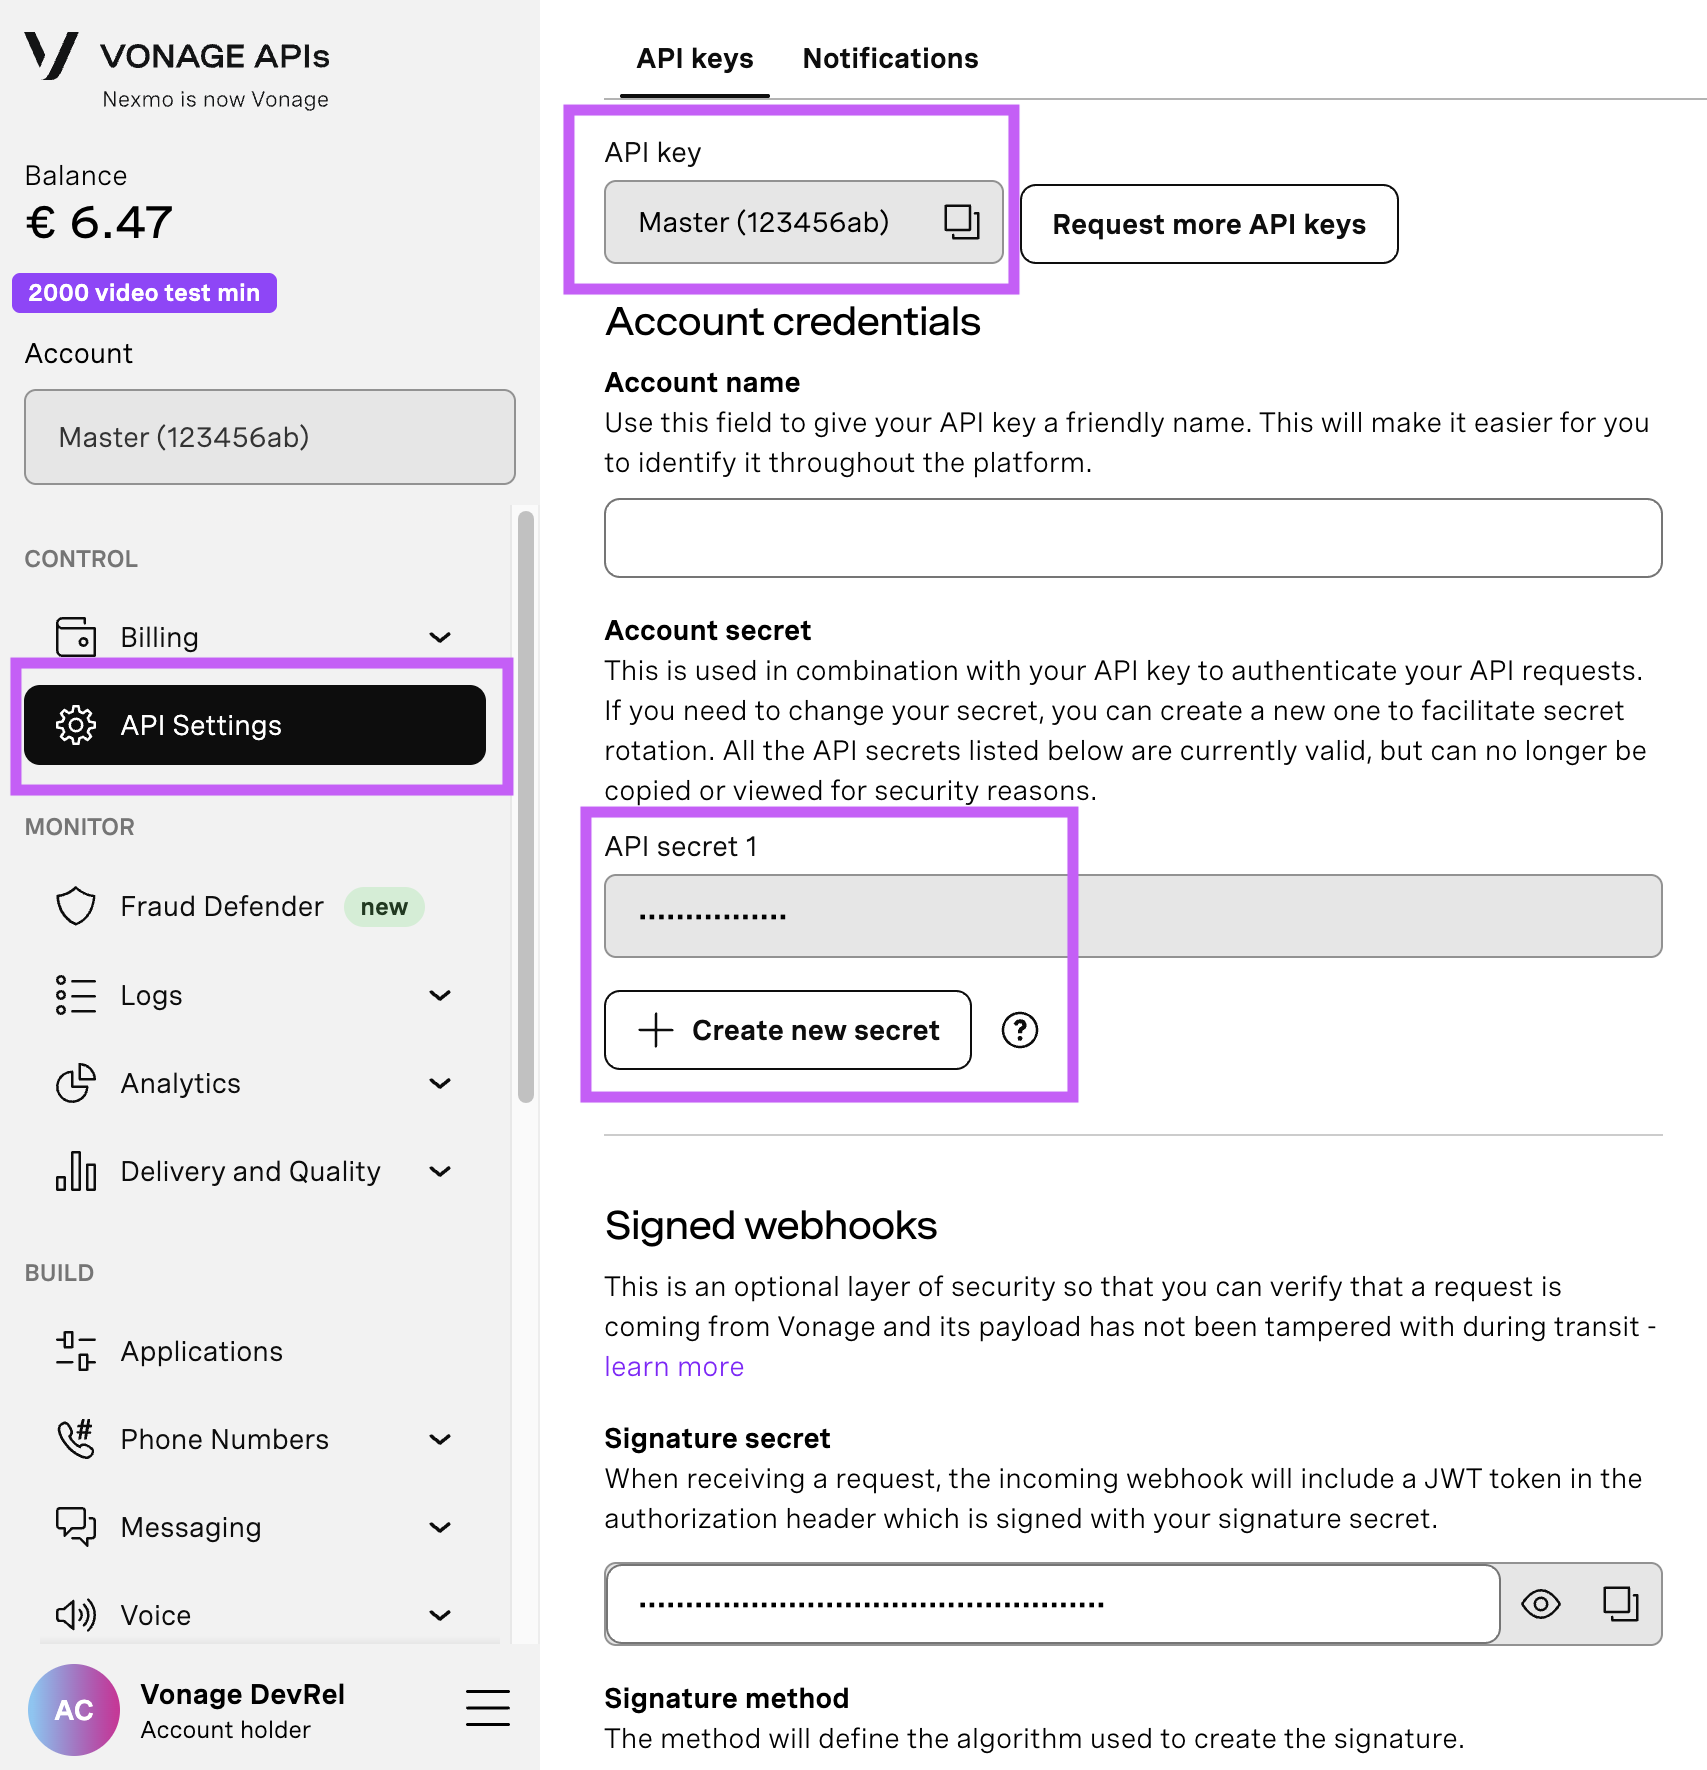
Open your API Settings Page to access your Vonage API Key and Secret, both of which are displayed as shown in the screenshot below. The API Key is located at the top of the page, and to access your API Secret, please refer to the “Account secret” subsection.
Note: In case you cannot remember your previously created API Secret, click on “+ Create new secret” and save it securely.
The VONAGE_WHATSAPP_NUMBER, which you will use to send a WhatsApp message, can be found on the Messages Sandbox Page. For sandbox testing, the number is 14157386102.
The VONAGE_APPLICATION_ID can be found within the application you’ve created.
The VONAGE_PRIVATE_KEY is the path to the private.key file that was generated when you created your application.
The VONAGE_API_SIGNATURE_SECRET is used to set up an application and use the JWT auth method. JWT authentication uses a JSON Web Token generated using a private key and application ID.
> NOTE: When entering a phone number, don't use a leading + or 00; start with the country code, such as 16600700000.
The Gemini API Key is the one you generated earlier in this tutorial.
The port is the one our express server will be running. I've set it to 8000, but feel free to change it.
# Vonage API keys

VONAGE_API_KEY=

VONAGE_API_SECRET=

VONAGE_APPLICATION_ID=

VONAGE_PRIVATE_KEY=

VONAGE_API_SIGNATURE_SECRET=

VONAGE_WHATSAPP_NUMBER=

# Gemini API key

GEMINI_API_KEY=your_gemini_api_key

# Server port (optional; default is 8000)

PORT=8000
Now that the application and environment variables are set up, make sure your ngrok instance is still running; if not, generate a new one and update the webhook in the above slots.
To run the file, open a terminal or command prompt tab, navigate to your project folder (the folder containing server.js), and then run:
node server.jsTo start, send a message from your WhatsApp to the Messages API WhatsApp number and add the number to the allowlist. Your first message serves as authentication. After that, the LLM (Gemini, in this case) will automatically respond to any messages you send.
Et voilà, that's the end of our tutorial. Today's blog post taught you how to build the whole application using the Vonage Messages API Whatsapp Sandbox to perform searches using LLMs, which are helpful on limited Wi-Fi flights.
Another suggestion is to use Vonage AI Studio to design the conversation and integrate your backend. It even has a Generative AI node that lets you use the power of OpenAI’s Large Language Model.
Congratulations on reaching the end of this tutorial. Let us know what you build on our Vonage Community Slack, or message us on X!
Building a FAQ Answering Service with OpenAI and Vonage AI Studio
Build a WhatsApp Events Reminder App
Send a WhatsApp Message Tutorial
ChatGPT WhatsApp Integration in 5 Easy Steps (How to Guide)
Build an Interactive Board: WhatsApp, SMS, and MMS to a Website (Part 1)