ChatGPT WhatsApp Integration in 5 Easy Steps (How to Guide)
Published on October 3, 2023

Introduction

Today, almost anyone can access generative AI with models like ChatGPT. Thanks to the OpenAI API, you can bring the power of generative AI into messaging platforms like WhatsApp. By creating a ChatGPT WhatsApp integration, you can even make your own WhatsApp chatbot applications.

Follow the steps below to learn how to integrate ChatGPT with WhatsApp.

Prerequisites

To ensure a seamless experience in this tutorial, make sure you're equipped with the basics.

In this tutorial, you’ll need the following prerequisites to integrate ChatGPT with WhatsApp:

How to Integrate ChatGPT in WhatsApp

  1. Create a Messages API Sandbox for WhatsApp

  2. Obtain an OpenAI API Key

  3. Use WhatsApp to Send/Receive Messages

  4. Use the Flask Server to Receive Incoming Requests

  5. Test Your ChatGPT WhatsApp Integration

1. Create a Messages API Sandbox for WhatsApp

To create your integration, you’ll start by setting up a Vonage Messages API Sandbox for Whatsapp. Setting up the sandbox involves two parts: the QR code and the webhooks.

Screenshot of Vonage API Messages Sandbox with WhatsApp QR code and Webhooks highlighted.Screenshot of Vonage API Messages Sandbox with WhatsApp QR code and Webhooks highlighted.

Scan the QR Code

Scan the QR code and send a WhatsApp message. This will allowlist the mobile number from the messages that will be received.

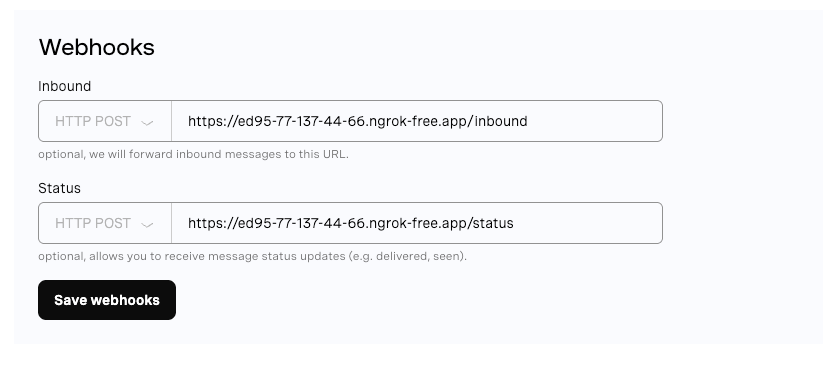
Create the Webhooks

Next, go to the section for webhooks. This section will contain two fields: inbound and outbound.

Inbound

The ‘Inbound’ webhook will receive the messages forwarded by the sandbox. Because you will have a Flask server running on your computer, you can use ngrok to host the web server on your local machine and receive requests from the inbound webhook. Once you have ngrok setup, run the following command:

ngrok http 8080

After ngrok runs, it will give you a Forwarding URL that we will paste into your ‘Inbound’ webhook.

Status

The other webhook ‘status’ is optional and is used to receive message delivery reports.

Mine looks like this:

Screenshot of webhooks set up in Vonage API DashboardWebhooks

Complete the above steps, send the WhatsApp message from the sandbox, and it will be delivered to the inbound webhook.

Connect the Flask Server

After setting up a Flask server, you will need to pass a minimal Flask server code that will print incoming requests from the sandbox:

main.py:

import json
from flask import Flask, request, Response

app = Flask(\_\_name\_\_)

@app.route('/', methods=\['POST'])
def receive_message():

    req_data = json.loads(request.data)
    message_type = req_data\["message_type"]
    to_addr = req_data\["to"]
    from_addr = req_data\["from"]
    channel = req_data\["channel"]
    text = req_data\["text"] if req_data\["text"] != None else None
    logging.info(f"sender: {from_addr}, channel: {channel}, message: {text}") 
    status_code = Response(status=200)
    return status_code

app.run(host='0.0.0.0', port=8080)

2. Obtain an OpenAI API Key

The easiest way to connect to ChatGPT is by obtaining an OpenAI API Key. You can refer to the published OpenAI API Reference for details on how to talk to GPT models.

Once you’ve generated your OpenAI API key, add it to Python. Create a file called config.py and add the following:

\# vonage accounts

endpoint_vonage_message_sandbox = "https://messages-sandbox.nexmo.com/v0.1/messages"
endpoint_vonage_message_send    = "https://messages-sandbox.nexmo.com/v1/messages"
vonage_sandbox_number           = "xxxx"
vonage_authorization_header     = "Basic xxxx=="

\# openai accounts
openai_key                      = "sk-xxx"

This file will contain the credentials information for authentication and usage of API services. Copy and paste your OpenAI API key here.

3. Use WhatsApp to Send/Receive Messages

Next, we’ll create a connection between ChatGPT and WhatsApp to send and receive messages.

The Vonage Messaging API provides an end-point to connect and send WhatsApp messages to desired recipients. For example, below is a curl request that uses a Vonage endpoint to send a message to a WhatsApp user:

curl -X POST https://messages-sandbox.nexmo.com/v1/messages \

\-u 'API_KEY:API_SECRET' \
\-H 'Content-Type: application/json' \
\-H 'Accept: application/json' \
\-d '{
   "from": "14157386102",
   "to": "$TO_NUMBER",
   "message_type": "text",
   "text": "This is a WhatsApp Message sent from the Messages API",
   "channel": "whatsapp"
 }'

Verify that your API key is working using the curl command. Then, create a file called commands.py and add the following Python code to send and receive WhatsApp messages:

commands.py

import requests, json
from   requests.auth import HTTPBasicAuth
from   config import *
import openai
import logging

user_sessions = {}
logging.basicConfig(format='%(message)s', level=logging.INFO)

def help(req_data):
    msg = "Ask me anything..."
    logging.info(msg)
    return msg


def chatgpt_text(req_data):
    question = str(req_data['text']).upper().strip()
    destination_number = req_data['from']
    logging.info(f"question recieved: {question}")
    msg = ""
    if question.split()[0] == "IMAGE":
        imgurl = imagebot(req_data)
        logging.info(f"sending reply: {imgurl}")
        send_whatsapp_img(destination_number, imgurl, caption=question)
    elif question != "JOIN MARCH NUTTY":
        msg = chatbot(req_data)
        logging.info(f"sending reply: {msg}")
        send_whatsapp_msg(destination_number, msg)
    else:
        msg = "Welcome to ChatGPT powered by Vonage Messaging API.\n"
        msg = msg + "To get more information about using this service, type *help*.\n"
        msg = msg + "Since it is in beta version, please expect delay in recieving messages.\n"
        msg = msg + "We are also working to fix an issue which is duplicate message sending.\n"
        msg = msg + "You can now ask any question."
        logging.info(f"sending reply: {msg}")
        send_whatsapp_msg(destination_number, msg)


def no_text_field(req_data):
    logging.info("Invalid command.")
    pass


def hello_vonage_ai(req_data):
    recipient = req_data['from']['number']
    url = f"{endpoint_vonage_ai}/init"
    headers = {'X-Vgai-Key': vonage_ai_key}
    payload = '{"agent_id" : "' + vonage_ai_agent_id + '"}'
    response = requests.request("POST", url, headers=headers, data=payload)
    resp_data = json.loads(response.text)
    session_data = {recipient: resp_data['session_id']}
    user_sessions.update(session_data)
    url = f"{endpoint_vonage_ai}/step"
    headers = {'X-Vgai-Key': vonage_ai_key}
    payload = '{"session_id" : "' + user_sessions[recipient] + '"}'
    response = requests.request("POST", url, headers=headers, data=payload)
    resp_data = json.loads(response.text)
    msg = resp_data['flow_path'][1]['message']['text'] + "\n"
    msg = msg + resp_data['flow_path'][2]['message']['text']
    logging.info(f"recipient: {recipient} triggered Vonage AI Stock advisor")
    logging.info(f"{msg}")
    return msg


def get_advice_vonage_ai(req_data):
    recipient = req_data['from']['number']
    symbol = str(req_data['message']['content']['text']).upper().strip().split()[-1]
    url = f"{endpoint_vonage_ai}/step"
    headers = {'X-Vgai-Key': vonage_ai_key}
    payload = '{"session_id" : "' + user_sessions[recipient] + '",' \
                                                               '"user_input":"' + symbol + '"}'
    response = requests.request("POST", url, headers=headers, data=payload)
    resp_data = json.loads(response.text)
    msg = resp_data['flow_path'][1]['message']['text'] + "\n"
    msg = msg + json.loads(resp_data['flow_path'][2]['message']['text'])['advice']
    logging.info(f"{msg}")
    return msg

def send_msg(channel, recipient, msg):
    if channel == "whatsapp":
        send_whatsapp_msg(recipient, msg)
    elif channel == "viber_service_msg":
        send_viber_msg(recipient, msg)
    elif channel == "messenger":
        send_messenger_msg(recipient, msg)


def send_whatsapp_img(destination_number, imgurl, caption="image"):
    payload = json.dumps({
    "message_type": "image",
    "image": {
        "url": imgurl,
        "caption": caption
    },
    "to": destination_number,
    "from": vonage_sandbox_number,
    "channel": "whatsapp"
    })
    headers = {
    'Content-Type': 'application/json',
    'Accept': 'application/json',
    'Authorization': vonage_authorization_header
    }

    response = requests.request("POST", endpoint_vonage_message_sandbox, headers=headers, data=payload)
    return response.text


def send_whatsapp_msg(destination_number, msg):
    payload = json.dumps({
    "from": vonage_sandbox_number,
    "to": destination_number,
    "message_type": "text",
    "text": msg,
    "channel": "whatsapp"
    })
    headers = {
    'Content-Type': 'application/json',
    'Accept': 'application/json',
    'Authorization': vonage_authorization_header
    }

    response = requests.request("POST", endpoint_vonage_message_send, headers=headers, data=payload)
    return response.text


def send_messenger_msg(recipient, msg):
    payload = json.dumps({
        "from": {
            "type": "messenger",
            "id": "107083064136738"
        },
        "to": {
            "type": "messenger",
            "id": recipient
        },
        "message": {
            "content": {
                "type": "text",
                "text": msg
            }
        }
    })
    headers = {
        'Content-Type': 'application/json',
        'Accept': 'application/json',
        'Authorization': vonage_authorization_header
    }
    response = requests.request("POST", endpoint_vonage_message_sandbox, headers=headers, data=payload)
    logging.info(response.text)


def send_viber_msg(recipient, msg):
    payload = json.dumps({
        "from": {
            "type": "viber_service_msg",
            "id": "16273"
        },
        "to": {
            "type": "viber_service_msg",
            "number": recipient
        },
        "message": {
            "content": {
                "type": "text",
                "text": msg
            }
        }
    })
    headers = {
        'Content-Type': 'application/json',
        'Accept': 'application/json',
        'Authorization': vonage_authorization_header
    }
    response = requests.request("POST", endpoint_vonage_message_sandbox, headers=headers, data=payload)
    logging.info(response.text)


def chatbot(req_data):
    question = str(req_data['text']).upper().strip()
    recipient = req_data['from']
    openai.api_key = openai_key
    messages = [
    {"role": "system", "content": "You are a helpful and kind AI Assistant."},]
    if question:
        send_whatsapp_msg(recipient, "Please wait, communicating to chatgpt...")
        messages.append({"role": "user", "content": question})
        chat = openai.ChatCompletion.create(
            model="gpt-3.5-turbo", messages=messages
        )
        reply = chat.choices[0].message.content
        messages.append({"role": "assistant", "content": reply})
        logging.info(f"answer recieved: {reply}")
        return reply


def imagebot(req_data):
    question = str(req_data['text']).upper().strip()
    recipient = req_data['from']
    openai.api_key = openai_key
    response = ""
    image_url = ""
    send_whatsapp_msg(recipient, "Please wait, communicating to chatgpt...")
    try:
        response = openai.Image.create(
            prompt=question,
            n=1,
            size="1024x1024"
            )
        logging.info(f"answer recieved: {response}")
        image_url = response['data'][0]['url']
    except:
        image_url = "http://khan2a.com:8080/get_image?name=meme.jpg"
    return image_url

command_set = {'CHATGPT_TEXT': chatgpt_text,
               'no_text_field': no_text_field,
               'HELP': help,
               'HELLO': hello_vonage_ai,
               'SEND': get_advice_vonage_ai}

> **_NOTE:_** The line `elif question != "JOIN DOVE HALO":` is hardcoded. The string value should be the passphrase from your sandbox written in all caps.

4. Use Flask Server to Receive Incoming Requests

We have a Flask server that receives messages from the sandbox, forwards the question to ChatGPT, collects the answer, and sends it back to the WhatsApp user.

You can find the working code in my GitHub repository.

Complete Code Block

The following Python block contains all the code needed to successfully run a Flask server. We will go through each relevant line of code in the following sections:

main.py:

```python

import json, os, logging
from dateutil import tz
from config import *
from commands import *
from argparse import ArgumentParser
from flask import Flask, request, Response, send_file

app = Flask(\_\_name\_\_)
logging.basicConfig(format='%(message)s', level=logging.INFO)

@app.route('/wastatus', methods=\['GET', 'POST'])

def whatsapp_status():
   if request.is_json:
       logging.info(request.get_json())
   else:
       data = dict(request.form) or dict(request.args)
       logging.info(data)
   return ('', 204)

@app.route('/', methods=\['POST'])

def receive_message():
   message_type = ""
   to_addr = ""
   from_addr = ""
   channel = ""
   func = ""

   req_data = json.loads(request.data)
   message_type = req_data\["message_type"]
   to_addr = req_data\["to"]
   from_addr = req_data\["from"]
   channel = req_data\["channel"]
   text = req_data\["text"] if req_data\["text"] != None else None

   logging.info(f"sender: {from_addr}, channel: {channel}, message: {text}")

# facebook messenger
   if channel == "messenger":
       pass
  
   # viber message
   if channel == "viber_service":
       pass

   # WhatsApp
   elif channel == "whatsapp":
       func = "CHATGPT_TEXT" if message_type == "text" else func
       msg = command_set[func](req_data)
   status_code = Response(status=200)
   return status_code

@app.route('/get_image')
def get_image():
   filename = 'images/' + request.args.get('name')
   return send_file(filename, mimetype='image/png')

if __name__ == '__main__':
   parser = ArgumentParser()
   parser.add_argument('-p')
   args = parser.parse_args()
   p = args.p  
   port = int(os.environ.get('PORT', p))
   app.run(host='0.0.0.0', port=8080)

First we need to import the necessary libraries to run Flask server and process the HTTP requests. This can be done by using libraries like Flask and JSON.

import json, os, logging
from dateutil import tz
from config import *
from commands import *
from argparse import ArgumentParser
from flask import Flask, request, Response, send_file

Next, we set the logging mechanism and the parameters for the Flask server.

app = Flask(\_\_name\_\_)
logging.basicConfig(format='%(message)s', level=logging.INFO)

The main function that drives the workflow is the @app.route('/', methods=['POST']) function. This will parse the incoming HTTP requests and convert them into the variables message_type, from_addr, channel and text.

message_type = ""
    to_addr = ""
    from_addr = ""
    channel = ""
    func = ""

    req_data = json.loads(request.data)
    message_type = req_data["message_type"]
    to_addr = req_data["to"]
    from_addr = req_data["from"]
    channel = req_data["channel"]
    text = req_data["text"] if req_data["text"] != None else None
    logging.info(f"sender: {from_addr}, channel: {channel}, message: {text}")

Parsing through the incoming request, you need to check if the channel used is WhatsApp and then pass the request to a command named CHATGPT_TEXT.

if channel == "whatsapp":
        func = "CHATGPT_TEXT" if message_type == "text" else func
        msg = command_set[func](req_data)
 
    status_code = Response(status=200)

This last code block is a boilerplate code that will start the Flask server by providing the port argument.

if __name__ == '__main__':
    parser = ArgumentParser()
    parser.add_argument('-p')
    args = parser.parse_args()
    p = args.p   
    port = int(os.environ.get('PORT', p))
    app.run(host='0.0.0.0', port=port)

You still need to create commands.py that you imported using from commands import *, so here is the complete file. Below, we’ll go over the code line by line.

commands.py

import requests, json
from   requests.auth import HTTPBasicAuth
from   config import *
import openai
import logging

user_sessions = {}
logging.basicConfig(format='%(message)s', level=logging.INFO)

def help(req_data):
    msg = "Ask me anything..."
    logging.info(msg)
    return msg


def chatgpt_text(req_data):
    question = str(req_data['text']).upper().strip()
    destination_number = req_data['from']
    logging.info(f"question recieved: {question}")
    msg = ""
    if question.split()[0] == "IMAGE":
        imgurl = imagebot(req_data)
        logging.info(f"sending reply: {imgurl}")
        send_whatsapp_img(destination_number, imgurl, caption=question)
    elif question != "JOIN DOVE HALO":
        msg = chatbot(req_data)
        logging.info(f"sending reply: {msg}")
        send_whatsapp_msg(destination_number, msg)
    else:
        msg = "Welcome to ChatGPT powered by Vonage Messaging API.\n"
        msg = msg + "To get more information about using this service, type *help*.\n"
        msg = msg + "Since it is in beta version, please expect delay in recieving messages.\n"
        msg = msg + "We are also working to fix an issue which is duplicate message sending.\n"
        msg = msg + "You can now ask any question."
        logging.info(f"sending reply: {msg}")
        send_whatsapp_msg(destination_number, msg)


def send_whatsapp_msg(destination_number, msg):
    payload = json.dumps({
    "from": vonage_sandbox_number,
    "to": destination_number,
    "message_type": "text",
    "text": msg,
    "channel": "whatsapp"
    })
    headers = {
    'Content-Type': 'application/json',
    'Accept': 'application/json',
    'Authorization': vonage_authorization_header
    }

    response = requests.request("POST", endpoint_vonage_message_send, headers=headers, data=payload)
    return response.text

def chatbot(req_data):
    question = str(req_data['text']).upper().strip()
    recipient = req_data['from']
    openai.api_key = openai_key
    messages = [
    {"role": "system", "content": "You are a helpful and kind AI Assistant."},]
    if question:
        send_whatsapp_msg(recipient, "Please wait, communicating to chatgpt...")
        messages.append({"role": "user", "content": question})
        chat = openai.ChatCompletion.create(
            model="gpt-3.5-turbo", messages=messages
        )
        reply = chat.choices[0].message.content
        messages.append({"role": "assistant", "content": reply})
        logging.info(f"answer recieved: {reply}")
        return reply

command_set = {'CHATGPT_TEXT': chatgpt_text,
               'HELP': help}

In commands.py, you'll need to import the libraries for processing requests and logging. The libraries are requests, json, openai and logging.

```python
import requests, json
from requests.auth import HTTPBasicAuth
from config import *
import openai
import logging

user_sessions = {}
logging.basicConfig(format='%(message)s', level=logging.INFO)

The function called help() is actually a simple message "Ask me anything...". This will be triggered when a person sends the keyword ‘help’ from WhatsApp.

def help(req_data):
    msg = "Ask me anything..."
    logging.info(msg)
    return msg

The next function is chatgpt_text() which receives a question from a WhatsApp message and passes it to another function called chatbot(). This function sends the question to ChatGPT and waits for the reply. Once the query is answered by ChatGPT, it is transformed into a WhatsApp message.

def chatgpt_text(req_data):
    question = str(req_data['text']).upper().strip()
    destination_number = req_data['from']
    logging.info(f"question recieved: {question}")
    msg = ""
    if question.split()[0] == "IMAGE":
        imgurl = imagebot(req_data)
        logging.info(f"sending reply: {imgurl}")
        send_whatsapp_img(destination_number, imgurl, caption=question)
    elif question != "JOIN DOVE HALO":
        msg = chatbot(req_data)
        logging.info(f"sending reply: {msg}")
        send_whatsapp_msg(destination_number, msg)
    else:
        msg = "Welcome to ChatGPT powered by Vonage Messaging API.\n"
        msg = msg + "To get more information about using this service, type *help*.\n"
        msg = msg + "Since it is in beta version, please expect delay in receiving messages.\n"
        msg = msg + "We are also working to fix an issue which is duplicate message sending.\n"
        msg = msg + "You can now ask any question."
        logging.info(f"sending reply: {msg}")
        send_whatsapp_msg(destination_number, msg)

The chatbot() function is the main entity that interacts with ChatGPT. As described above, this function accepts a question and passes it to the OpenAI API endpoint. But before the question is passed, it needs to set the role and mode to AI assistant which is done by the openai.ChatCompletion.create() function.

def chatbot(req_data):
    question = str(req_data['text']).upper().strip()
    recipient = req_data['from']
    openai.api_key = openai_key
    messages = [
    {"role": "system", "content": "You are a helpful and kind AI Assistant."},]
    if question:
        send_whatsapp_msg(recipient, "Please wait, communicating to chatgpt...")
        messages.append({"role": "user", "content": question})
        chat = openai.ChatCompletion.create(
            model="gpt-3.5-turbo", messages=messages
        )
        reply = chat.choices[0].message.content
        messages.append({"role": "assistant", "content": reply})
        logging.info(f"answer recieved: {reply}")
        return reply

The send_whatsapp_msg() message transforms the text into JSON format which is required to send a message over WhatsApp.

def send_whatsapp_msg(destination_number, msg):
    payload = json.dumps({
    "from": vonage_sandbox_number,
    "to": destination_number,
    "message_type": "text",
    "text": msg,
    "channel": "whatsapp"
    })
    headers = {
    'Content-Type': 'application/json',
    'Accept': 'application/json',
    'Authorization': vonage_authorization_header
    }

    response = requests.request("POST", endpoint_vonage_message_send, headers=headers, data=payload)
    return response.text

Lastly, the mapping between the keywords and functions is defined as a dictionary.

command_set = {'CHATGPT_TEXT': chatgpt_text,
               'HELP': help,
                }

5. Test Your ChatGPT WhatsApp Integration

All that's left is to run these commands in your terminal and test the app.

chmod 666 main.py
export FLASK_ENV=development
export FLASK_APP=main.py
python3 main.py -p 5000

Screenshot of a WhatsApp conversation with a ChatGPT chatbot. The chatbot has generated an image of a cute puppy in a space suit.Screenshot of a WhatsApp conversation with a ChatGPT chatbot. The chatbot has generated an image of a cute puppy in a space suit.

Once you've run the commands listed above, your Flask application will be operational in development mode. The command chmod 666 main.py adjusts the permissions of the file for wider accessibility. The two export commands set up Flask in development mode and designate the main application file. By executing python3 main.py -p 5000, you're launching the server on port 5000. Upon successful setup, you should be able to access and interact with your ChatGPT-WhatsApp integration. Try sending some messages via WhatsApp and expect ChatGPT to respond accordingly.

Wrap Up

By following the steps in this tutorial, you’ve successfully created a ChatGPT and WhatsApp integration. At the same time, you’ve used this integration to create a functioning WhatsApp chatbot. From this exercise, you can see how easy it is to integrate generative AI into everyday messaging platforms. By applying the principles in this tutorial, you can harness the power of generative AI in WhatsApp Business., creating chatbots for customer service, sales, and more!

Have questions or feedback about this tutorial? Share your thoughts with us on Twitter or our Vonage Community Slack channel. You can also connect with me on Twitter. Good luck and happy coding!

Further Reading

  1. 10 Useful ChatGPT Prompts for Developers

  2. Integrate Phone Calls and WhatsApp With OpenAI

  3. Build a FAQ Answering Service with OpenAI

Atique Khan

Atique is a computer graduate and proficient Python developer with a passion for exploring new technologies. With a strong background in programming and system engineering, he holds over 10 years of experience in automation, testing, and integration. His interests span single-board computers, software-defined radios, and continuous experimentation with generative AI tools.

Ready to start building?

Experience seamless connectivity, real-time messaging, and crystal-clear voice and video calls-all at your fingertips.

Subscribe to Our Developer Newsletter

Subscribe to our monthly newsletter to receive our latest updates on tutorials, releases, and events. No spam.