Overview
On incoming events such as a new message, or an incoming call, the user often expects to receive a push notification, if the app is not active.
There are two types of push notifications that you can use:
- VoIP push (PushKit) - the better fit for applications that use Vonage In-App Voice functionality. (Jump to section)
- Regular push (UserNotifications) - the better fit for applications that use Vonage In-App Chat functionality. (Jump to section)
Create a push certificate
Apple Push Notifications service (APNs) uses certificate-based authentication to secure the connections between APNs and Vonage servers. So you will need to create a certificate and upload it to the Vonage Servers.
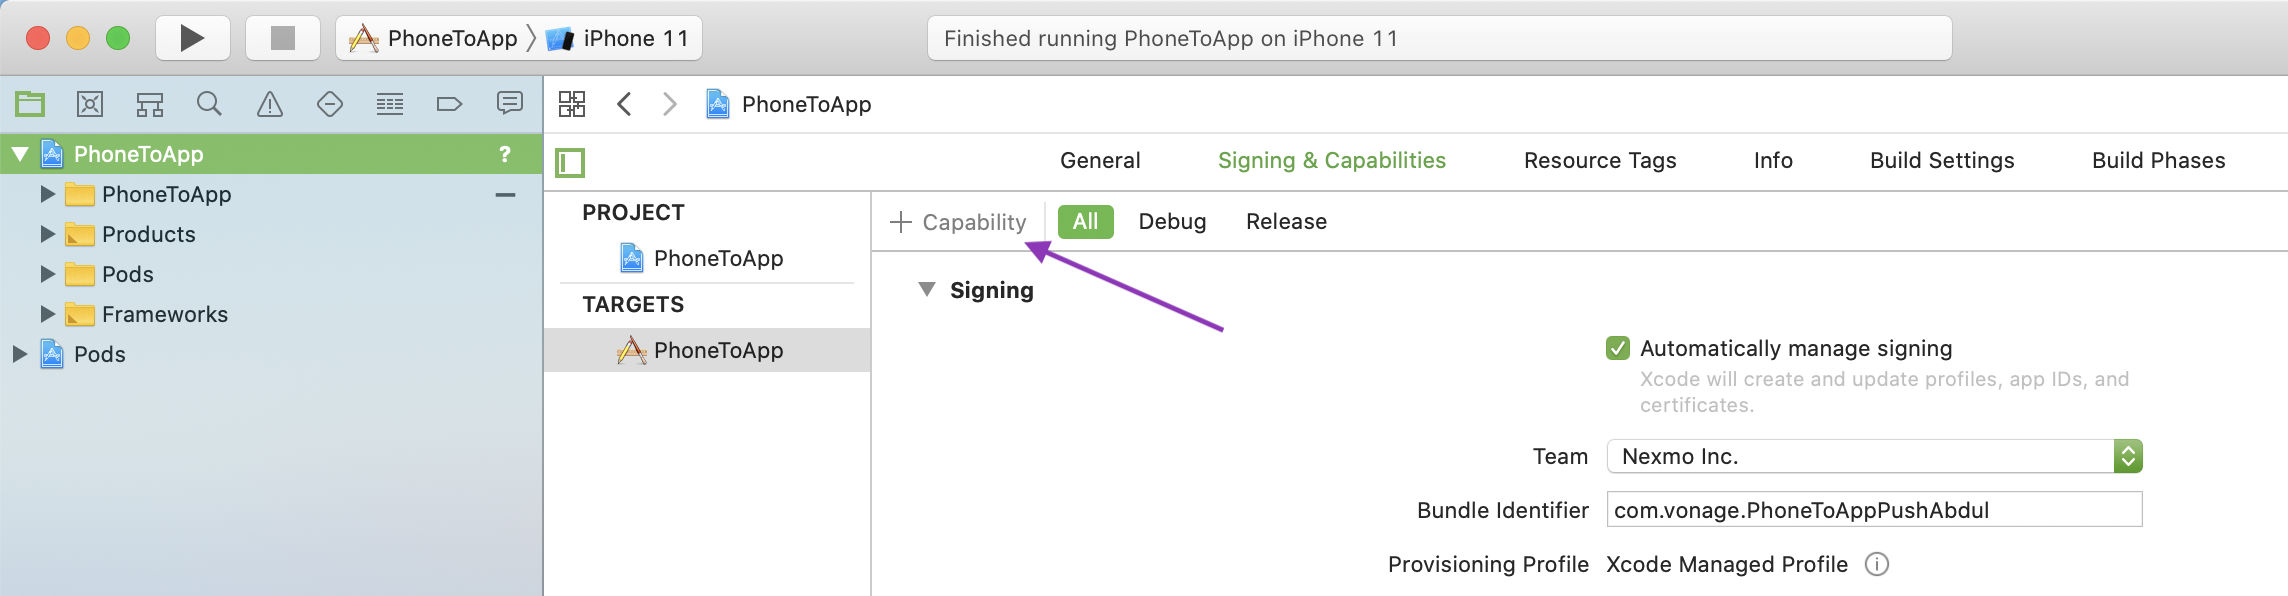
Adding a push notification capability
To use push notifications you are required to add the push notification capability to your Xcode project. To do this select your target and select Signing & Capabilities:

Then select add capability and add the Push Notifications capability:
If Xcode is automatically managing the signing of your app it will update the provisioning profile linked to your Bundle Identifier to include the capability.
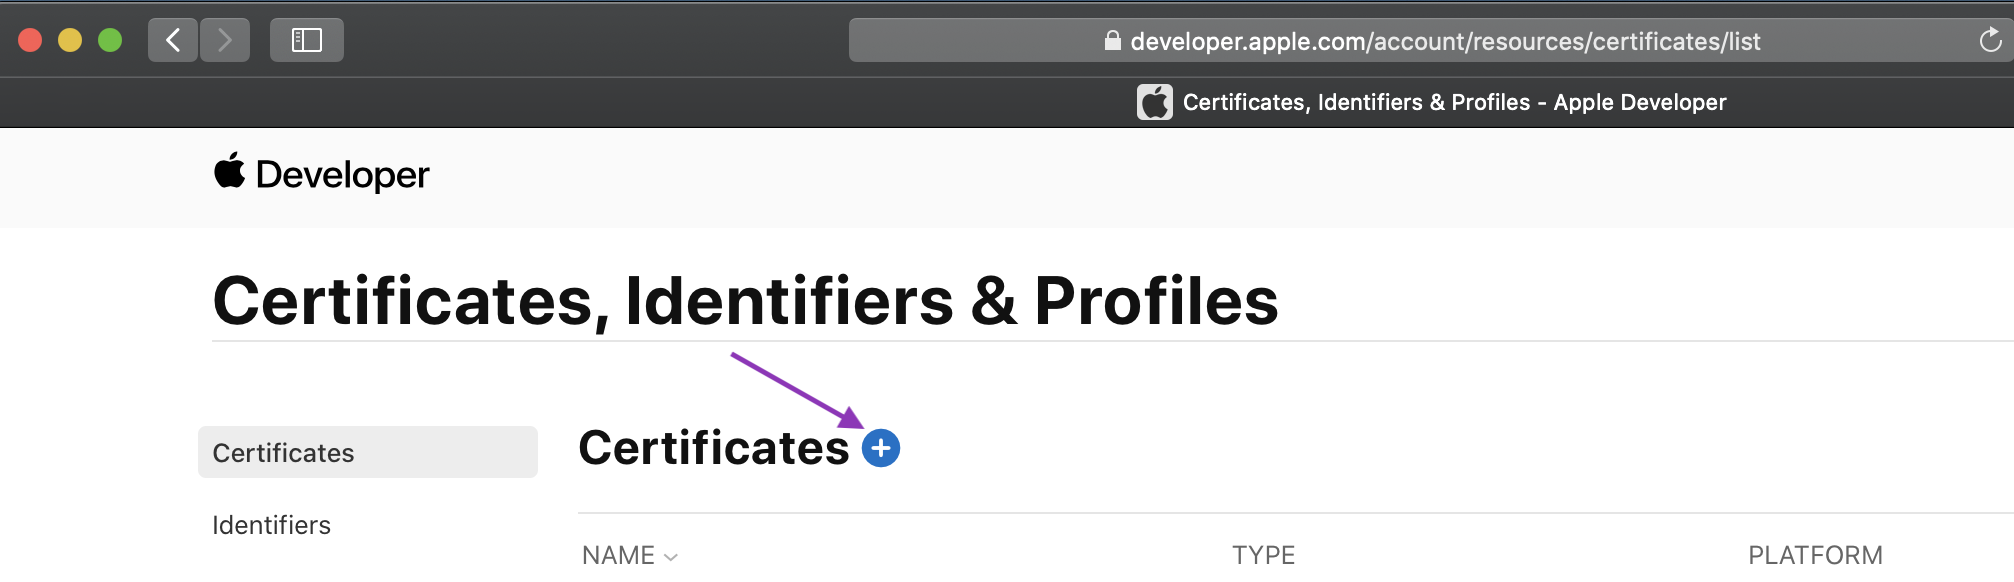
Generating a push certificate
To generate a push certificate you will need to log in to your Apple developer account and head to the Certificates, Identifiers & Profiles page and add a new certificate:
Choose an Apple Push Notification service SSL (Sandbox & Production) and continue.
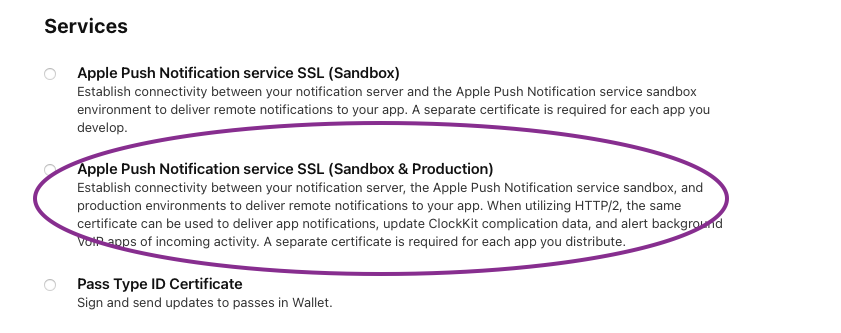
If the Apple Push Notification service option is not available to you, you will need to ask an admin for your Apple developer account to complete this step for you.
You will now need to choose the App ID for the app that you want to add push notifications to and continue. If your app is not listed you will have to create an App ID. Xcode can do this for you if it automatically if it manages your signing for you, otherwise you can create a new App ID on the Certificates, Identifiers & Profiles page under Identifiers. Make sure to select the push notifications capability when doing so.
You will be prompted to upload a Certificate Signing Request (CSR). You can follow the instructions on Apple's help website to create a CSR on your Mac. Once the CSR is uploaded you will be able to download the certificate. Double click the .cer file to install it in Keychain Access.
To get the push certificate in the format that is needed by the Vonage servers you will need to export it. Locate your Apple Push Notification service certificate in Keychain Access and right-click to export it. Name the export applecert and select .p12 as the format:

You can find more details about connecting to APNs in Apple's official documentation.
Upload your certificate
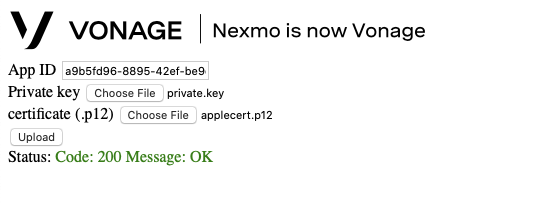
You upload your certificate to the Vonage servers by making a POST request. The iOS Push Certificate Uploading Tool, available on GitHub, does so with a web interface. Either of the following methods needs your Vonage Application ID. It can be obtained from the dashboard.
Using the Upload Tool
To use the tool you will need to run it locally or deploy it. You can follow the instructions in the GitHub project's README. You will also need the private key for your Vonage Application.
Once you have the tool running, enter your Vonage Application ID, private key file, and certificate file and click upload. The status of your upload will be shown on the page once it is complete:
Using the Terminal
In addition to your Vonage Application ID to upload using the terminal, you will also need a jwt_dev. Which is a jwt without a sub claim. More details on how to generate a JWT can be found in the setup guide.
Then run the following Curl command, replacing jwt_dev, applecert.p12, app_id with your values:
NOTE There is no validation at this endpoint. The 200 return code means that Vonage got the data and stored it but hasn't checked that values are valid.
Integrate VoIP push notifications in your application
VoIP push notifications are suitable for VoIP apps. Among other benefits, it allows you to receive notifications even when the app is terminated. After you have uploaded your certificate to Vonage, integrate VoIP push in your app by following these steps:
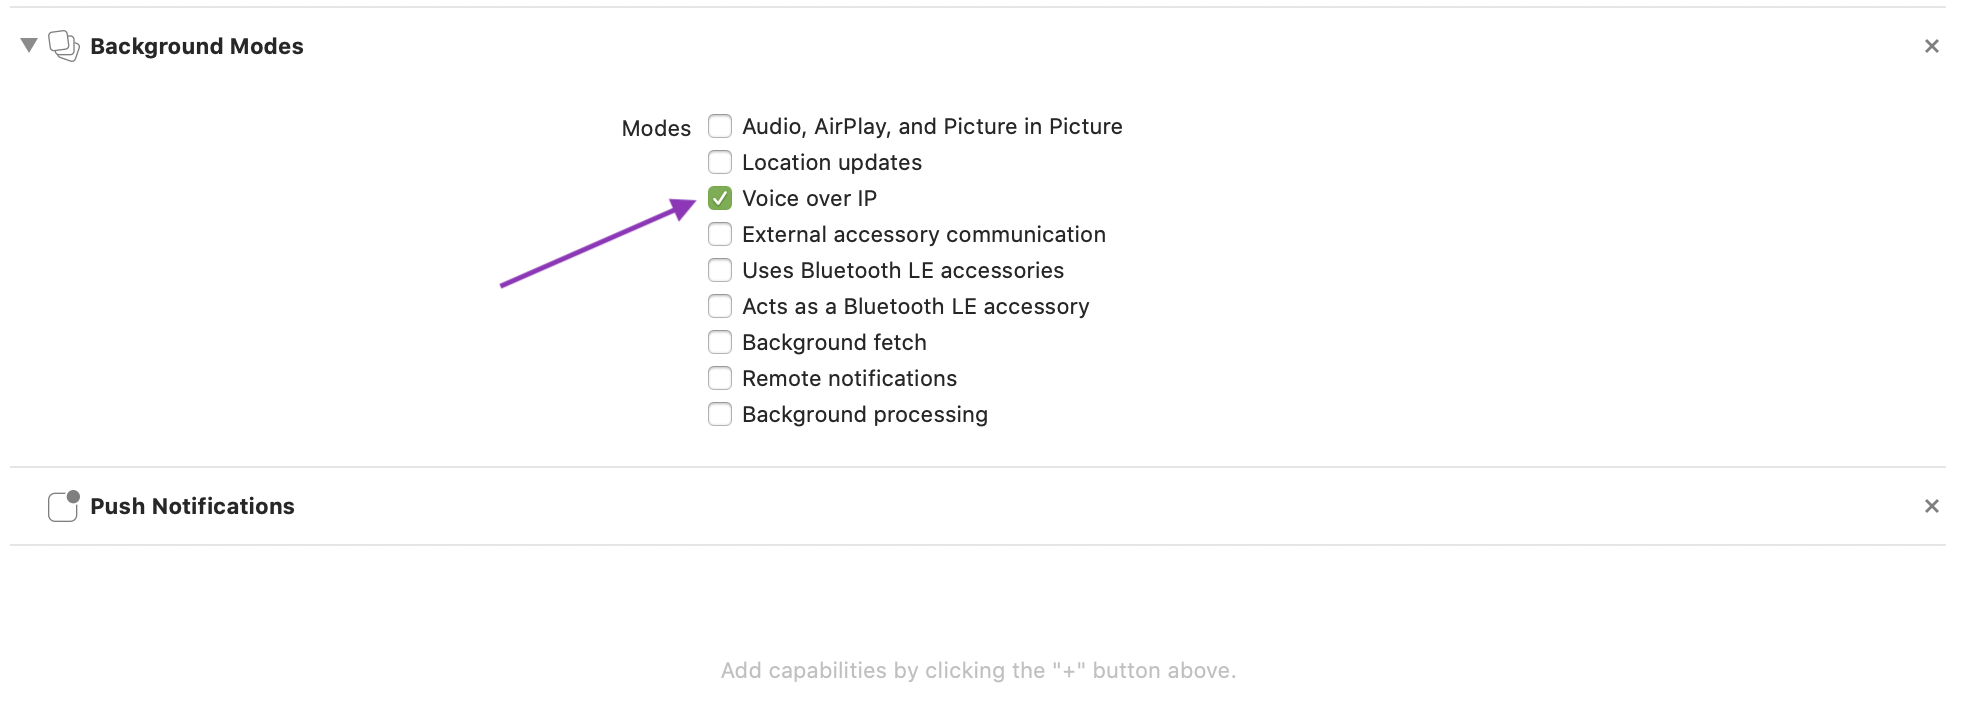
1. Enable VoIP Background Mode for your app
Similar to the process for adding the push notifications capability earlier, in Xcode, under your target, open Capabilities and select Background Modes. Once the capability is added tick the "Voice over IP" option:
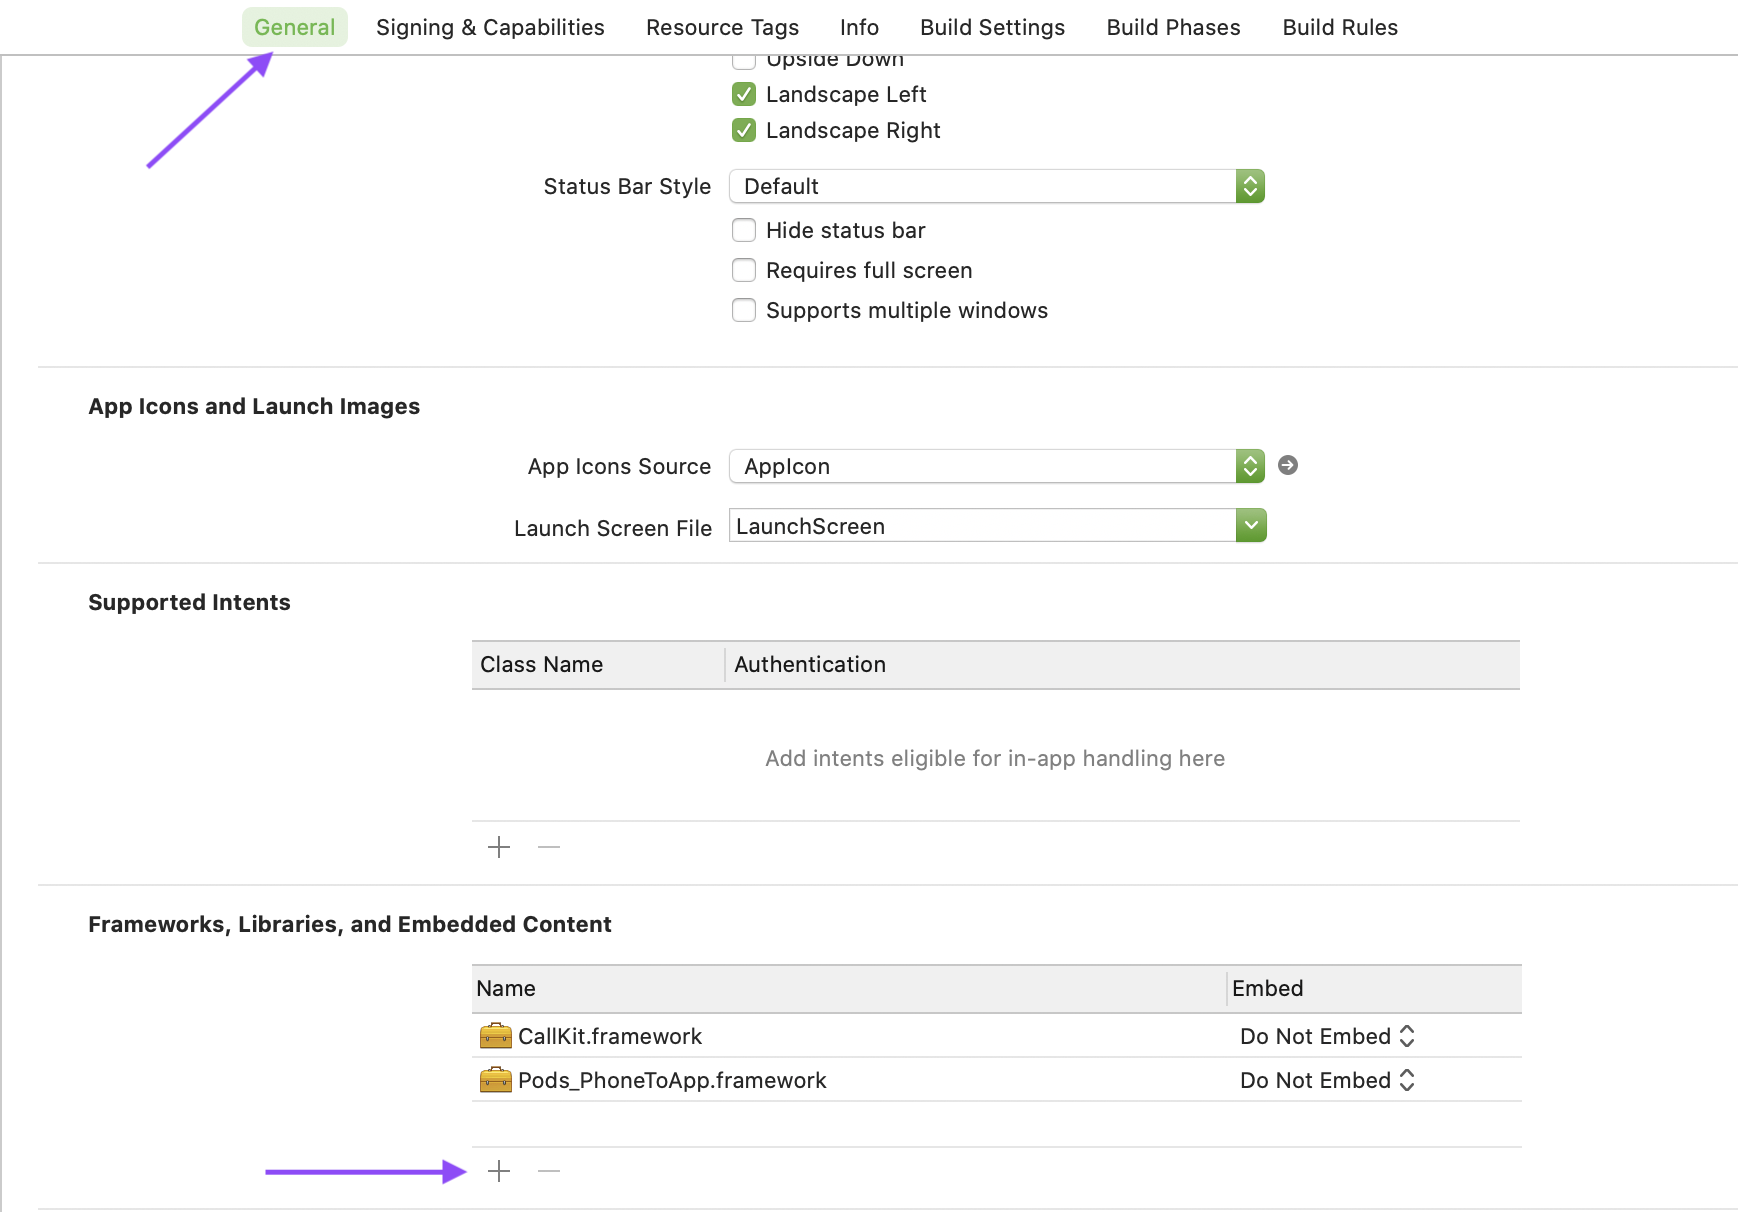
2. Link the CallKit Framework
When using VoIP push notifications, you have to use the CallKit framework. Link it to your project by adding it under Frameworks, Libraries, and Embedded Content under General:
3. Import PushKit, adopt PKPushRegistryDelegate, and sign up to VoIP notifications
Add a voipRegistry property:
let voipRegistry = PKPushRegistry(queue: nil)
and set it up:
func registerForVoIPPushes() {
    self.voipRegistry.delegate = self
    self.voipRegistry.desiredPushTypes = [PKPushType.voIP]
}
Add a voipRegistry property:
@property PKPushRegistry* voipRegistry;
and set it up:
- (void) registerForVoIPPushes {
    self.voipRegistry = [[PKPushRegistry alloc] initWithQueue:nil];
    self.voipRegistry.delegate = self;

    // Initiate registration.
    self.voipRegistry.desiredPushTypes = [NSSet setWithObject:PKPushTypeVoIP];
}
4. Enable VoIP push notifications through a logged in NXMClient
NXMClient.shared.enablePushNotifications(withPushKitToken: pushKitToken,
        userNotificationToken: nil, isSandbox: true) { (error) in
    // code
}
[NXMClient.shared enablePushNotificationsWithPushKitToken:pushKitToken
        userNotificationToken:userNotificationToken isSandbox:YES
        completionHandler:^(NSError * _Nullable error) {
    // code
}];
'isSandbox'isYES/truefor an app using the Apple sandbox push servers and NO/false for an app using the Apple production push servers.'pushKitToken'is the token received inpushRegistry(_:didUpdate:for:).
5. Implement the following delegate method and add the code to handle an incoming VoIP push notification
func pushRegistry(_ registry: PKPushRegistry, didReceiveIncomingPushWith
        payload: PKPushPayload, for type: PKPushType, completion: @escaping () -> Void) {
    if(NXMClient.shared.isNexmoPush(userInfo: payload.dictionaryPayload)) {
        guard let pushPayload = NXMClient.shared.processNexmoPushPayload(payload.dictionaryPayload) else {
            NSLog("Not a Nexmo push notification")
            return
        }
    }
}
- (void)pushRegistry:(PKPushRegistry *)registry didReceiveIncomingPushWithPayload:(PKPushPayload *)payload
        forType:(PKPushType)type withCompletionHandler:(void (^)(void))completion {
    if ([NXMClient.shared isNexmoPushWithUserInfo:payload.dictionaryPayload]) {
        NXMPushPayload *pushPayload = [NXMClient.shared processNexmoPushPayload:payload.dictionaryPayload];
        if (!pushPayload){
           NSLog(@"Not a nexmo push");
           return;
        };
    }
}
The pushPayload contains information about the incoming call that you can use to report the call with CallKit. You can view a sample of the JSON contained in the push payload.
For the SDK to enable push notifications and to process the push notifications properly NXMClient should be logged in. You can store both the push token and push payload and handle them when the client successfully connects. For an example of this, view the blog post on using push notifications with CallKit and its accompanying sample project.
Integrate regular push notifications in your application
Regular push notifications are suitable for messaging apps, to integrate them in your app, follow these steps:
1. Enable Remote Notifications for your app
Similar to the process for adding the push notifications capability earlier, in Xcode, under your target, open Capabilities and select Background Modes. Once the capability is added tick the "Remote Notifications" option:

2. Import UserNotifications and register for push notifications
Import UserNotifications:
import UserNotifications
Then request permissions and register for remote notifications:
@UIApplicationMain
class AppDelegate: UIResponder, UIApplicationDelegate {

    func application(_ application: UIApplication, didFinishLaunchingWithOptions launchOptions: [UIApplication.LaunchOptionsKey: Any]?) -> Bool {
        // Override point for customization after application launch.
        registerForPushNotificationsIfNeeded()
        return true
    }

    func registerForPushNotificationsIfNeeded() {
        UNUserNotificationCenter.current().requestAuthorization(options: [.alert, .sound, .badge]) { [weak self] granted, _ in
            print("Permission granted: \(granted)")
            if granted {
                self?.getNotificationSettings()
            }
        }
    }

    func getNotificationSettings() {
        UNUserNotificationCenter.current().getNotificationSettings { settings in
            print("Notification settings: \(settings)")
            guard settings.authorizationStatus == .authorized else { return }
            DispatchQueue.main.async {
                UIApplication.shared.registerForRemoteNotifications()
            }
        }
    }
 ...
}
Import UserNotifications:
#import <UserNotifications/UserNotifications.h>
Then request permissions and register for remote notifications:
@implementation AppDelegate


- (BOOL)application:(UIApplication *)application didFinishLaunchingWithOptions:(NSDictionary *)launchOptions {
    // Override point for customization after application launch.
    [self registerForPushNotificationsIfNeeded];
    return YES;


}

- (void)registerForPushNotificationsIfNeeded {
    UNAuthorizationOptions options = UNAuthorizationOptionAlert + UNAuthorizationOptionSound + UNAuthorizationOptionBadge;

    [UNUserNotificationCenter.currentNotificationCenter requestAuthorizationWithOptions:options completionHandler:^(BOOL granted, NSError * _Nullable error) {
        if (granted) {
            [self getNotificationSettings];
        }
    }];
}

- (void)getNotificationSettings {
    [UNUserNotificationCenter.currentNotificationCenter getNotificationSettingsWithCompletionHandler:^(UNNotificationSettings * _Nonnull settings) {
        if (settings.authorizationStatus == UNAuthorizationStatusAuthorized) {
            dispatch_async(dispatch_get_main_queue(), ^{
                [UIApplication.sharedApplication registerForRemoteNotifications];
            });
        }
    }];
}

...

@end
3. Enable push notifications through a logged in NXMClient
func application(_ application: UIApplication, didRegisterForRemoteNotificationsWithDeviceToken deviceToken: Data) {
    NXMClient.shared.enablePushNotifications(withPushKitToken: nil, userNotificationToken: deviceToken, isSandbox: true, completionHandler: nil)
}
- (void)application:(UIApplication *)application didRegisterForRemoteNotificationsWithDeviceToken:(NSData *)deviceToken {
    [NXMClient.shared enablePushNotificationsWithPushKitToken:nil userNotificationToken:deviceToken isSandbox:true completionHandler:nil];
}
4. Implement the following delegate method and add the code to handle an incoming push notification
func application(_ application: UIApplication, didReceiveRemoteNotification userInfo: [AnyHashable : Any], fetchCompletionHandler completionHandler: @escaping (UIBackgroundFetchResult) -> Void) {
    if NXMClient.shared.isNexmoPush(userInfo: userInfo) {
        if UIApplication.shared.applicationState != .active {
            // create and add notification
        } else {
            // show in app banner etc.
        }
        completionHandler(UIBackgroundFetchResult.newData)
    } else {
        completionHandler(UIBackgroundFetchResult.failed)
    }
}
- (void)application:(UIApplication *)application didReceiveRemoteNotification:(NSDictionary *)userInfo fetchCompletionHandler:(void (^)(UIBackgroundFetchResult))completionHandler {
    if ([NXMClient.shared isNexmoPushWithUserInfo:userInfo]) {
        if (UIApplication.sharedApplication.applicationState != UIApplicationStateActive) {
            // create and add notification
        } else {
            // show in app banner etc.
        }
        completionHandler(UIBackgroundFetchResultNewData);
    } else {
        completionHandler(UIBackgroundFetchResultFailed);
    }
}
The userInfo contains information about the incoming message that you can use to create a notification with UNUserNotificationCenter. You can view a sample of the JSON contained in the user info.
Configure Push Notification TTL
You can configure the time-to-live (TTL) for push notifications, this will stop stale push notifications being delivered to a device after they are no longer relevant. The default value is 120 seconds. To set the TTL, configure the NXMClient:
let config = NXMClientConfig()
// TTL value is in seconds, TTL ranges from 0 to 300.
config.pushNotificationTTL = 30
NXMClient.setConfiguration(config)
NXMClientConfig *config = [[NXMClientConfig alloc] init];
// TTL value is in seconds, TTL ranges from 0 to 300.
config.pushNotificationTTL = 30;
[NXMClient setConfiguration:config];
Changes to the NXMClient configuration must be done before the first call to NXMClient.shared.
Conclusion
In this guide you have seen how to set up push notifications. You can find the VoIP push sample project on GitHub and learn more about CallKit on developer.apple.com. More information on UserNotifications is also available on developer.apple.com