Overview
On incoming events such as a new message, or an incoming call, the user often expects to receive a push notification. If the app is not active (it is in the background), push notifications are the only way to notify app about new events.
This guide explains how to configure your Android app to receive push notifications from the Client SDK.
Connect Vonage to Firebase
To receive push notifications you need to connect Vonage with Firebase. To do so, you will need the following:
- Your Vonage Application ID
- Your Vonage Application's private key (upload tool method) or a Vonage admin JWT (terminal method)
- Your Firebase project ID
- Your Firebase server key
Get a Vonage application ID
Obtain your Vonage API Application id. You can access the existing applications in the dashboard. If you don't have an application already you can create a new application via Vonage CLI.
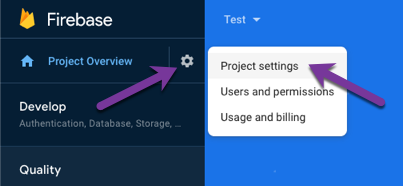
Get a Firebase Project ID
Get your Firebase project id from the Firebase console. Navigate to Firebase console -> Project settings -> General.

Get a Firebase Server Key
Get your Firebase Server Key from the Firebase console. Navigate to Firebase console -> Project settings -> Service accounts and generate a new private key.

Connect your Vonage Application to Firebase
You connect Vonage with your Firebase application by making a POST request. You can to this request using the Upload Tool or making a POST request directly.
Using the Upload Tool
The Android Push Certificate Uploading Tool, available on GitHub, allows you to upload with a user interface.
To use the tool you will need to run it locally or deploy it. You can follow the instructions in the GitHub project's README.
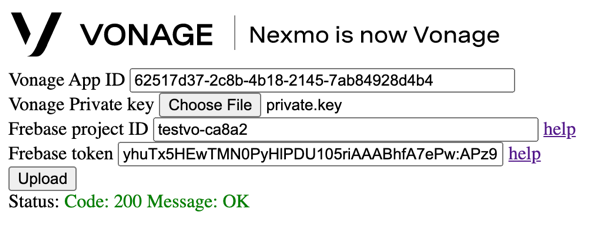
Once you have the tool running, enter your Vonage Application ID, private key file, Firebase project ID, and Firebase server key then click upload. The status of your upload will be shown on the page once it is complete:
Using the Terminal
To connect the Vonage backend push service with the Firebase application you need to make a single POST request. Before making request you will have to generate Vonage developer JWT (above upload tool generates this JWT under the hood).
NOTE JWTs are used to authenticate a user into the Client SDK.
To generate a Vonage admin JWT run the following command. Remember to replace the VONAGE_APP_ID with ID of your Vonage application:
REM A command with parameters
vonage jwt create ^
--app-id='00000000-0000-0000-0000-000000000000' ^
--private-key=./private.key

REM Will produce a token
eyJhbGciOiJSUzI1NiIsInR5cCI6IkpXVCJ9.eyJleHAiOjE3MzYyODE5NDYsImp0aSI6IjBmZjcwZDNmLTAzN2EtNGY4MC04ODZjLWI3MmM3MmQyMWNmMiIsImlhdCI6MTczNjI4MTA0NiwiYXBwbGljYXRpb25faWQiOiIwMDAwMDAwMC0wMDAwLTAwMDAtMDAwMC0wMDAwMDAwMDAwMDAifQ.gA7jClpqaZ2OoS0iri-zGCbda4jO7C0M8mka0EnSyjlds1EeY8fNoBEx3FTXHfkkzzrj0TskrWc_dcs1wuM8Kx55c5rLQ7taVpDAYopKSc_CeeOaad8S6aWnRkTUTNeduO4aIn-0CbyRTluBYsH1RBqYBQvobuQIDEwbFw8xBgx0UfREMMN6DAWknR57eiVXN9x_oD6CGQJ1yV3025nGboeMsP9YgX4Nwc-rE2r8c1ZGwCLO81x8i19Qil3Nwu5q1nzouyavQjIw00B_TZkushnI1ufdi_GNqk-h5q2HvGkg7Pj9bVkZHFdVTO8im03JYNyJmcV83vnpjOLuCFRzxQ
NOTE An admin JWT is a JWT without a sub claim. More details on how to generate a JWT can be found in the setup guide.
Fill VONAGE_APP_ID, VONAGE_JWT, FIREBASE_PROJECT_ID and FIREBASE_SERVER_KEY with previously obtained values and run the below command to send the request:
NOTE There is no validation at this endpoint. The 200 return code means that Vonage got the data and stored it but hasn't checked that values are valid.
If all the values are correct you should see 200 response code in the terminal.
Set up Firebase project for your Android application
In order to enable push notifications for your Android application, you need to configure your Android application.
Configure your Android project
Let's start with configuring your Android project with the required dependencies.
Add the Client SDK dependency
Add the Client SDK to your project.
Add Firebase Configuration to your App
Before we set up the push notification-specific configuration there are a few general steps you need to take to set up Firebase within your app.
NOTE that you can skip this step if your application is already using other Firebase products.
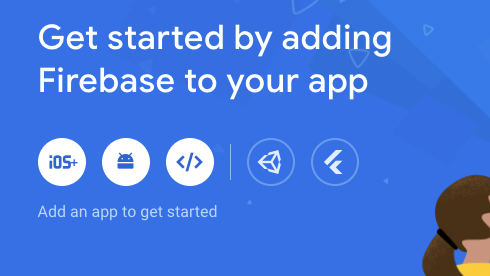
From your Firebase project click on the "add Android app" option:
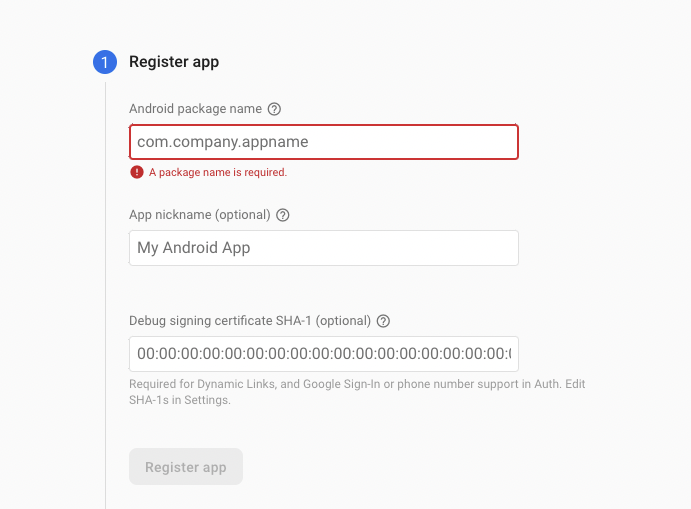
Fill in the displayed form to register your application with the Firebase project
You will then be presented with a "Download google-services.json" button, click this and download the file.
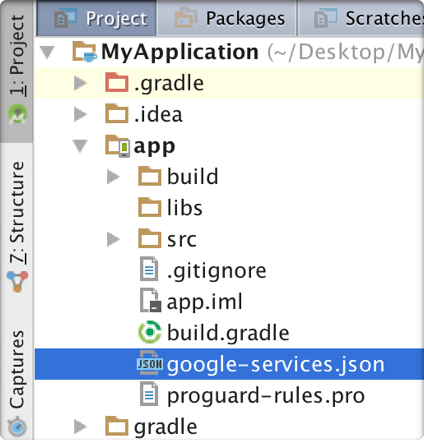
Now switch over to the Project view in Android Studio to see your project root directory.
Move the google-services.json file you downloaded into your Android app module root directory.
Finally, you need to add the Google services plugin, which will load the google-services.json file. Modify your project-level build.gradle file to include this:
buildscript {
    repositories {
	    // Check that you have the following line (if not, add it):
        google()
    }

    dependencies {
	    // Add this line
	    classpath("com.google.gms:google-services:4.3.10")
    }
}

allprojects {
    repositories {
		// Check that you have the following line (if not, add it):
        google()
    }
}
buildscript {
  repositories {
    // Check that you have the following line (if not, add it):
    google()  // Google's Maven repository

  }
  dependencies {
    // Add this line
    classpath 'com.google.gms:google-services:4.3.10'

  }
}

allprojects {
  repositories {
    // Check that you have the following line (if not, add it):
    google()  // Google's Maven repository

  }
}
And in your App-level build.gradle implement the base Firebase BoM
plugins {
    id("com.android.application")
    id("com.google.gms.google-services")
}

dependencies {
  // Import the Firebase BoM
  implementation platform('com.google.firebase:firebase-bom:30.1.0')
}
apply plugin: 'com.android.application'

// Add this line
apply plugin: 'com.google.gms.google-services'


dependencies {
  // Import the Firebase BoM
  implementation platform('com.google.firebase:firebase-bom:30.1.0')
}
Add Firebase Cloud Messaging dependency
In your IDE, in your app level build.gradle file (usually app/build.gradle), add the firebase-messaging dependency:
dependencies{
    implementation("com.google.firebase:firebase-messaging:21.0.1")
}
dependencies{
    implementation 'com.google.firebase:firebase-messaging:21.0.1'
}
NOTE: The latest version number can be found on the Firebase website.
Implement a custom service class to receive push notifications
If you do not have one already, create a class (service) that extends FirebaseMessagingService.
In order for Vonage to be able to send push notifications to a device, the Vonage server has to know the device's InstanceID.
In your class that extends FirebaseMessagingService, override onNewToken() method and update the NexmoClient by passing a new token:
class MyFirebaseMessagingService: FirebaseMessagingService() {

    // We can retrieve client instance only if it has been already initialized
    // NexmoClient.Builder().build(context)
    private val client = NexmoClient.get()

    override fun onNewToken(token: String) {
        super.onNewToken(token)

        client.enablePushNotifications(token, object: NexmoRequestListener<Void> {
            override fun onSuccess(p0: Void?) { }

            override fun onError(apiError: NexmoApiError) {}
        })
    }
}
public class MyFirebaseMessagingService extends FirebaseMessagingService {

    // We can retrieve client instance only if it has been already initialized
    // new NexmoClient.Builder().build(context)
    private NexmoClient client = NexmoClient.get();

    @Override
    public void onNewToken(@NonNull String token) {
        super.onNewToken(token);

        client.enablePushNotifications(token, new NexmoRequestListener<Void>() {
            @Override
            public void onSuccess(@Nullable Void p0) {}

            @Override
            public void onError(@NonNull NexmoApiError nexmoApiError) {}
        });
    }
}
Make sure your service is declared in your AndroidManifest.xml (typically app/src/main/AndroidManifest.xml) by adding service tag inside application tag:

<service android:name=".MyFirebaseMessagingService"
		 android:exported="false">
    <intent-filter>
        <action android:name="com.google.firebase.MESSAGING_EVENT" />
    </intent-filter>
</service>
Receive push notifications
Push notifications are received in your implementation of MyFirebaseMessagingService, on onMessageReceived() method. You can use NexmoClient.isNexmoPushNotification(message.data)) to determine if the message is sent from Vonage server.
Use processPushNotification(message.data, listener) to process the data received from Firebase Cloud Messaging (FCM) into a ready to use object:
class MyFirebaseMessagingService : FirebaseMessagingService() {

    // We can retrieve client instance only if it has been already initialized
    // in Application class or Activity:
    // NexmoClient.Builder().build(context)
    private val client = NexmoClient.get()

    override fun onNewToken(token: String) {
        super.onNewToken(token)
        //...
    }

    override fun onMessageReceived(remoteMessage: RemoteMessage) {
        // determine if the message is sent from Nexmo server
        if (NexmoClient.isNexmoPushNotification(remoteMessage.data)) {
            client.processNexmoPush(remoteMessage.data, object : NexmoPushEventListener {
                override fun onIncomingCall(call: NexmoCall?) {
                    Log.d("TAG", "FirebaseMessage:onIncomingCall() with: $call")
                }

                override fun onNewEvent(event: NexmoEvent?) {
                    Log.d("TAG", "FirebaseMessage:onNewEvent() with: $event")
                }

                override fun onError(apiError: NexmoApiError?) {
                    Log.d("TAG", "FirebaseMessage:onError() with: $apiError")
                }
            })
        }
    }
}
public class MyFirebaseMessagingService extends FirebaseMessagingService {

    // We can retrieve client instance only if it has been already initialized
    // in Application class or Activity:
    // new NexmoClient.Builder().build(context)
    private NexmoClient client = NexmoClient.get();

    @Override
    public void onNewToken(@NonNull String token) {
        super.onNewToken(token);

        //...
    }

    @Override
    public void onMessageReceived(@NonNull RemoteMessage remoteMessage) {
        super.onMessageReceived(remoteMessage);

        // determine if the message is sent from Nexmo server
        if (NexmoClient.isNexmoPushNotification(remoteMessage.getData())) {
            client.processNexmoPush(remoteMessage.getData(), new NexmoPushEventListener() {
                @Override
                public void onIncomingCall(NexmoCall call) {
                    Log.d("TAG", "FirebaseMessage:onIncomingCall() with: " + call);
                }

                @Override
                public void onNewEvent(NexmoEvent event) {
                    Log.d("TAG", "FirebaseMessage:onNewEvent() with: " + event);
                }

                @Override
                public void onError(NexmoApiError apiError) {
                    Log.d("TAG", "FirebaseMessage:onError() with: " + apiError);
                }
            });
        }
    }
}
NOTE: In order to process the push notification and apply any methods on the NexmoCall object (for example, answer, hangup, and so on), the NexmoClient has to be initialized and the user has to be logged in.
Configure Push Notification TTL
You can configure the time-to-live (TTL) for push notifications, this will stop stale push notifications being delivered to a device after they are no longer relevant. The default value is 120 seconds. To set the TTL, configure the NexmoClient:
// TTL value is in seconds, TTL ranges from 0 to 300.
val nexmoClient = NexmoClient.Builder()
    .pushNotificationTTL(30)
    .build(context)
// TTL value is in seconds, TTL ranges from 0 to 300.
NexmoClient nexmoClient = new NexmoClient.Builder()
    .pushNotificationTTL(30)
    .build(this);
Changes to the NexmoClient configuration must be done before the first call to NexmoClient().get().
Putting it all together
Now you can test your push notification setup by calling your app's user. The incoming call will trigger onIncomingCall callback as shown above. If you have registered an incoming call listener with NexmoClient.addIncomingCallListener elsewhere in your Android app, this listener will take precedence over onIncomingCallon the NexmoPushEventListener.
Conclusion
In this guide you have seen how to set up push notifications. You can also find a sample project that uses the ConnectionService API and push notifications to handle an incoming call using the Android system UI on GitHub.