Enable Audio in your Application
In this guide we'll cover adding audio events to the Conversation we have created in the conversation with events guide. We'll deal with sending and receiving media events to and from the conversation.
Concepts
This guide will introduce you to the following concepts:
- Audio Stream - The stream that the SDK gives you in your browser to listen to audio and send audio
- Audio Leg - A server side API term. Legs are a part of a conversation. When audio is enabled on a conversation, a leg is created
- Media Event - a
member:mediaevent that fires on a Conversation when the media state changes for a member
Before you begin
- Run through the previous guide
Update the JavaScript App
We will use the application we created for the third getting started guide. All the basic setup has been done in the previous guides and should be in place. We can now focus on updating the client-side application.
Add audio UI
First, we'll add the UI for the user to enable and disable audio, as well as an <audio> element that we'll use to play the Audio stream from the conversation. Let's add the UI at the top of the messages area.
And add the buttons and <audio> element in the class constructor
Add enable audio handler
We'll then update the setupUserEvents method to trigger conversation.media.enable() when the user clicks the Enable Audio button. The conversation.media.enable() returns a promise with a stream object, which we'll use as the source for our <audio> element. We'll then add a listener on the <audio> element to start playing as soon as the metadata has been loaded.
Note that enabling audio in a conversation establishes an audio leg for a member of the conversation. The audio is only streamed to other members of the conversation who have also enabled audio.
Add disable audio handler
Next, we'll add the ability for a user to disable the audio stream as well. In order to do this, we'll update the setupUserEvents method to trigger conversation.media.disable() when the user clicks the Disable Audio button.
Add member:media listener
With these first parts we're sending member:media events into the conversation. Now we're going to register a listener for them as well that updates the messageFeed. In order to do that, we'll add a listener for member:media events at the end of the setupConversationEvents method
If we want the conversation history to be updated, we need to add a case for member:media in the showConversationHistory switch:
Open the conversation in two browser windows
Now run index.html in two side-by-side browser windows, making sure to login with the user name jamie in one and with alice in the other. Enable audio on both and start talking. You'll also see events being logged in the browser console.
That's it! Your page should now look something like this.
Reference
Enable Audio in your Application
In this guide we'll cover adding audio events to the Conversation we have created in the creating a chat app tutorial guide. We'll deal with sending and receiving media events to and from the conversation.
Concepts
This guide will introduce you to the following concepts:
- Audio Leg - A server side API term. Legs are a part of a conversation. When audio is enabled on a conversation, a leg is created
- Media Event - a
NexmoMediaEventevent that fires on a Conversation when the media state changes for a member
Before you begin
Run through the creating a chat app tutorial. You will be building on top of this project.
Add audio permissions
Since enabling audio uses the device microphone, you will need to ask the user for permission.
Add new entry in the app/src/AndroidManifest.xml file (below last <uses-permission tag):
Request permission on application start
Request permissions inside the onCreate method of the MainActivity class:
Add audio UI
You will now need to add two buttons for the user to enable and disable audio. Open the app/src/main/res/layout/activity_main.xml file and add two new buttons (enableMediaButton and disableMediaButton) right below logoutButton button:
retrieve the buttons' reference by adding findViewById calls in the onCreate method:
Add click event listeners for the buttons, inside the onCreate method:
NOTE: When enabling audio in a conversation establishes an audio leg for a member of the conversation. The audio is only streamed to other members of the conversation who have also enabled audio.
Display audio events
When enabling media, NexmoMediaEvent events are sent to the conversation. To display these events you will need to add a NexmoMediaEventListener. Add the NexmoMediaEventListener below addMessageEventListener inside getConversation method:
Add support of the NexmoMediaEvent inside updateConversationView method by adding new branch to when statement:
Build and run
Press Cmd + R to build and run again. Once logged in you can enable or disable audio. To test it out you can run the app on two different devices.
Reference
Enable Audio in your Application
In this guide we'll cover adding audio events to the Conversation we have created in the creating a chat app tutorial guide. We'll deal with sending and receiving media events to and from the conversation.
Concepts
This guide will introduce you to the following concepts:
- Audio Leg - A server side API term. Legs are a part of a conversation. When audio is enabled on a conversation, a leg is created
- Media Event - a
NexmoMediaEventevent that fires on a Conversation when the media state changes for a member
Before you begin
Run through the creating a chat app tutorial. You will be building on top of this project.
Add audio permissions
Since enabling audio uses the device microphone, you will need to ask the user for permission.
Add new entry in the app/src/AndroidManifest.xml file (below last <uses-permission tag):
Request permission on application start
Request permissions inside the onCreate method of the MainActivity class:
Add audio UI
You will now need to add two buttons for the user to enable and disable audio. Open the app/src/main/res/layout/activity_main.xml file and add two new buttons (enableMediaButton and disableMediaButton) right below logoutButton button:
Now you need to make sure that these buttons are accessible in the fragment. Add two new properties in the ChatFragment class:
retrieve the buttons' reference by adding findViewById calls in the onCreate method:
Add click event listeners for the buttons, inside the onCreate method:
NOTE: When enabling audio in a conversation establishes an audio leg for a member of the conversation. The audio is only streamed to other members of the conversation who have also enabled audio.
Display audio events
When enabling media, NexmoMediaEvent events are sent to the conversation. To display these events you will need to add a NexmoMediaEventListener. Add the NexmoMediaEventListener below addMessageEventListener inside getConversation method:
Add support of the NexmoMediaEvent inside updateConversationView method by adding new branch to if-else statement:
Build and run
Press Cmd + R to build and run again. Once logged in you can enable or disable audio. To test it out you can run the app on two different devices.
Reference
Enable Audio in your Application
In this guide we'll cover adding audio events to the Conversation we have created in the creating a chat app tutorial guide. We'll deal with sending and receiving media events to and from the conversation.
Concepts
This guide will introduce you to the following concepts:
- Audio Leg - A server side API term. Legs are a part of a conversation. When audio is enabled on a conversation, a leg is created
- Media Event - a
NXMMediaEventevent that fires on a Conversation when the media state changes for a member
Before you begin
Run through the creating a chat app tutorial. You will be building on top of this project.
Add audio permissions
Since enabling audio uses the device microphone, you will need to ask the user for permission.
Info.plist
Every Xcode project contains an Info.plist file containing all the metadata required in each app or bundle - you will find the file inside the AppToAppChat group.
A new entry in the Info.plist file is required:
Hover your mouse over the last entry in the list and click the little
+button that appears.From the dropdown list, pick
Privacy - Microphone Usage Descriptionand addMicrophone access required in order to make and receive audio calls.for its value.
Request permission on application start
Open AppDelegate.swift and import the AVFoundation library right after where UIKit is included.
import UIKit
import AVFoundation
Next, call requestRecordPermission: inside application:didFinishLaunchingWithOptions:.
func application(_ application: UIApplication, didFinishLaunchingWithOptions launchOptions: [UIApplication.LaunchOptionsKey: Any]?) -> Bool {
    // Override point for customization after application launch.
    AVAudioSession.sharedInstance().requestRecordPermission { (granted:Bool) in
        NSLog("Allow microphone use. Response: %d", granted)
    }
    return true
}
Add audio UI
You will now need to add a button for the user to enable and disable audio. In the viewDidLoad function in the ChatViewController.swift class add a new bar button.
navigationItem.rightBarButtonItem = UIBarButtonItem(title: "Start Audio", style: .plain, target: self, action: #selector(self.toggleAudio))
Enable audio
Next would be to enable audio. Add a property to the ChatViewController class.
var audioEnabled = false
The bar button from the previous step calls a toggleAudio function when tapped so add the following function to the ChatViewController class.
@objc func toggleAudio() {
    if audioEnabled {
        conversation?.disableMedia()
        navigationItem.rightBarButtonItem?.title = "Start Audio"
        audioEnabled = false
    } else {
        conversation?.enableMedia()
        navigationItem.rightBarButtonItem?.title = "Stop Audio"
        audioEnabled = true
    }
}
Note that enabling audio in a conversation establishes an audio leg for a member of the conversation. The audio is only streamed to other members of the conversation who have also enabled audio.
Display audio events
When enabling media, NXMMediaEvent events are sent to the conversation. To display these you will need to add a function from the NXMConversationDelegate which will append the media events to events array for processing.
extension ChatViewController: NXMConversationDelegate {
  ...

  func conversation(_ conversation: NXMConversation, didReceive event: NXMMediaEvent) {
      self.events?.append(event)
  }
}
In the process events function you will need to add a clause for a NXMMediaEvent, which in turn calls showMediaEvent to display the audio events.
func processEvents() {
    DispatchQueue.main.async { [weak self] in
       ...
        self.events?.forEach { event in
            ...
            if let mediaEvent = event as? NXMMediaEvent {
                self.showMediaEvent(event: mediaEvent)
            }
        }
    }
}

func showMediaEvent(event: NXMMediaEvent) {
    if event.isEnabled {
        addConversationLine("\(event.embeddedInfo?.user.name ?? "A user") enabled audio")
    } else {
        addConversationLine("\(event.embeddedInfo?.user.name ?? "A user") disabled audio")
    }
}
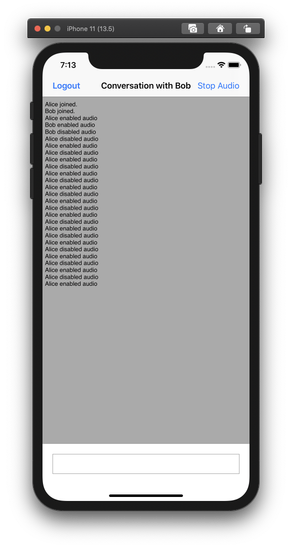
Build and run
Press Cmd + R to build and run again. Once logged in you can enable or disable audio. To test it out you can run the app on two different simulators/devices.
Reference
Enable Audio in your Application
In this guide we'll cover adding audio events to the Conversation we have created in the creating a chat app tutorial guide. We'll deal with sending and receiving media events to and from the conversation.
Concepts
This guide will introduce you to the following concepts:
- Audio Leg - A server side API term. Legs are a part of a conversation. When audio is enabled on a conversation, a leg is created
- Media Event - a
NXMMediaEventevent that fires on a Conversation when the media state changes for a member
Before you begin
Run through the creating a chat app tutorial. You will be building on top of this project.
Add audio permissions
Since enabling audio uses the device microphone, you will need to ask the user for permission.
Info.plist
Every Xcode project contains an Info.plist file containing all the metadata required in each app or bundle - you will find the file inside the AppToAppChat group.
A new entry in the Info.plist file is required:
Hover your mouse over the last entry in the list and click the little
+button that appears.From the dropdown list, pick
Privacy - Microphone Usage Descriptionand addMicrophone access required in order to make and receive audio calls.for its value.
Request permission on application start
Open AppDelegate.h and import the AVFoundation library right after where UIKit is included.
Next, call requestRecordPermission: inside application:didFinishLaunchingWithOptions: within AppDelegate.m.
Add audio UI
You will now need to add a button for the user to enable and disable audio. In the viewDidLoad function in the ChatViewController.m class add a new bar button.
Enable audio
Next would be to enable audio. Add a property to the ChatViewController interface.
The bar button from the previous step calls a toggleAudio function when tapped so add the following function to the ChatViewController class.
Note that enabling audio in a conversation establishes an audio leg for a member of the conversation. The audio is only streamed to other members of the conversation who have also enabled audio.
Display audio events
When enabling media, NXMMediaEvent events are sent to the conversation. To display these you will need to add a function from the NXMConversationDelegate which will append the media events to events array for processing.
In the process events function you will need to add a clause for a NXMMediaEvent, which in turn calls showMediaEvent to display the audio events.
Build and run
Press Cmd + R to build and run again. Once logged in you can enable or disable audio. To test it out you can run the app on two different simulators/devices.