
シェア:
Benjamin AronovはVonageの開発者支援者です。彼はRuby on Railsのバックグラウンドを持つ実績のあるコミュニティ・ビルダーです。Benjaminは故郷であるテルアビブのビーチを楽しんでいる。テルアビブを拠点に、世界最高のスタートアップの創設者たちと出会い、学ぶことができる。技術以外では、完璧なパン・オ・ショコラを求めて世界中を旅するのが好き。
5 Steps to Receive WhatsApp Messages With Ruby on Rails
所要時間:6 分
Sending messages is cool, but real conversations start when users write back.
Previously, you learned how to send WhatsApp messages with the Vonage Messages API. Now it’s time to make your app listen.
In this guide, you’ll learn how to receive inbound WhatsApp messages, capture interactive button replies, and display them in a real-time web interface built with Ruby on Rails. By the end, your app will be able to hold a two-way conversation just like a real chat.
>> TL;DR: Skip ahead and find the Ruby on Rails Quickstart on GitHub.
 Rails app receiving and displaying WhatsApp messages in real time within a web interface.
You'll need:
A Vonage API Account
Ruby and Rails are installed on your machine
This tutorial uses Rails 7+, but it works the same on Rails 8+
A verified WhatsApp Business Account (WABA)
Don’t have a WhatsApp Business Account yet? Start with our Sandbox Quickstart for WhatsApp to test with minimal setup.
The dotenv-rails gem for managing credentials
To complete this tutorial, you will need a Vonage API account. If you don’t have one already, you can sign up today and start building with free credit. Once you have an account, you can find your API Key and API Secret at the top of the Vonage API Dashboard.

If you already have the project from the "Send Messages" tutorial, you can skip to Step 2. Otherwise, create a new app and add the required gems:
rails new vonage-rails-whatsapp-receive
cd vonage-rails-whatsapp-receiveAdd dependencies:
bundle add vonage dotenv-railsThen create a model to store incoming messages with additional fields for message metadata:
rails g model WhatsappMessage to:string from:string text:text status:string message_uuid:string is_inbound:boolean message_type:string profile_name:string reply_data:textAnd run the migration it creates:
rails db:migrateYou’ll also need to create a new Vonage application and generate a private.key for it, then move it to the root of your application.
アプリケーションを作成するには アプリケーションの作成ページでアプリケーションの名前を定義します。

Webhooksを使用するAPIを使用する場合は、秘密鍵が必要です。Generate public and private key "をクリックすると、自動的にダウンロードが始まります。この鍵は紛失すると再ダウンロードできません。この鍵は紛失しても再ダウンロードできません。 private_<あなたのアプリID>.key.この鍵はAPIコールの認証に使用できます。 注意:アプリケーションを保存するまで、キーは機能しません。
必要な機能(Voice、Messages、RTCなど)を選択し、必要なWebhook(イベントURL、応答URL、受信メッセージURLなど)を提供します。これらはチュートリアルで説明します。
保存してデプロイするには、"Generate new application "をクリックして設定を確定します。これでアプリケーションはVonage APIで使用する準備が整いました。
Then create a .env file in root of your application and add the following with your Vonage info:
VONAGE_APPLICATION_ID=your_vonage_application_id
VONAGE_PRIVATE_KEY=./private.key
VONAGE_WHATSAPP_NUMBER=your_vonage_whatsapp_number
You might be wondering how a WhatsApp message gets from WhatsApp to your Rails application. Similar to SMS or phone calls, Vonage handles the interaction with the WhatsApp network. Then, it will forward that information to a webhook that you define in your Vonage application. In this tutorial, you’ll use ngrok to handle the incoming webhook to your Rails application.
Create a tunnel to your local Rails server via ngrok:
ngrok http 3000Be sure to add your ngrok URL as a config.host in your development.rb file. Use the environment variable VONAGE_SERVER_HOSTNAME to make it easier to update.
# config/environments/development.rb

Rails.application.configure do
  config.hosts << ENV['VONAGE_SERVER_HOSTNAME']
end
Now in your .env file, set your VONAGE_SERVER_HOSTNAME to your ngrok URL:
# .env
# ngrok URL, don't include the protocol (https://)
VONAGE_SERVER_HOSTNAME='your-ngrok-url.ngrok-free.app'
>> For more help, see how to get started and use ngrok in Rails.
To setup your webhooks, go to your Vonage Application in the Vonage Dashboard. Under the Messages capabilities, configure your ngrok URL with the following routes:
Inbound URL: https://yourdomain.com/inbound_whatsapp/inbound
Status URL: https://yourdomain.com/inbound_whatsapp/status
You’ve defined webhook URLs in your Vonage Application so that Vonage can forward incoming WhatsApp events to your Rails app. Now you’ll create the actual Rails routes that handle those events, plus one route to display the messages in your browser.
Add the following to your config/routes.rb file:
Rails.application.routes.draw do
  # Routes for inbound messages and status updates
  get  '/messages', to: 'inbound_whatsapp#index', as: :messages
  post '/inbound_whatsapp/inbound', to: 'inbound_whatsapp#inbound'
  post '/inbound_whatsapp/status',  to: 'inbound_whatsapp#status'
end
Why not use resources here?
For this tutorial, we’re using explicit get/post routes. This keeps the mapping between each URL and controller action very explicit for readers who may be newer to Rails routing. In a production app, you can absolutely switch to resourceful routing if you prefer a more idiomatic RESTful style.
The equivalent would be:
resources :inbound_whatsapp, only: [] do
  collection do
    post :inbound   # webhook for inbound messages
    post :status    # webhook for delivery/read events
  end
end
resources :messages, only: [:index]Here’s how they work:
GET /messages - Displays messages already stored in your database inside the web interface. You’ll open this page in your browser to view and refresh inbound WhatsApp messages.
POST /inbound_whatsapp/inbound - Receives inbound message data from Vonage whenever a user sends a text or button reply to your WhatsApp Business number.
POST /inbound_whatsapp/status - Receives delivery and read status updates for the messages your app has sent.
Together, these routes let Vonage deliver messages into your app (via POST) while giving you a simple way to display them in the browser (via GET).
Now, create a controller that will match a method where you will implement logic for each one of your routes (to handle incoming messages, message statuses, and display messages in the browser).
rails g controller InboundWhatsapp index inbound status
Before creating the logic to accept incoming messages, let’s first take a look at what those messages look like in the JSON payload.Here you can see an incoming text message. We’ll want to save all information except the context_status.
{
  "to": "12013508506",
  "from": "12013508505",
  "channel": "whatsapp",
  "message_uuid": "63af519b-4bd8-4800-8c8e-ab4c03f3549f",
  "timestamp": "2025-10-20T16:35:24Z",
  "message_type": "text",
  "text": "Good morning 🌞",
  "context_status": "none",
  "profile": {
    "name": "Benjamin"
  }
}
And here you can see when a user responds to a reply button message. Notice that we get a lot more information! In this demo we don’t use the context information, but it might be helpful to know what the user is responding to.
{

  "to": "12013508506",
  "from": "12013508505",
  "channel": "whatsapp",
  "message_uuid": "5b293f23-e693-48b4-8b23-6f60cac2ada2",
  "timestamp": "2025-10-20T16:38:13Z",
  "message_type": "reply",
  "reply": {
    "id": "slot-2",
    "title": "16:30"
  },
  "context_status": "available",
  "context": {
    "message_from": "12013508504",
    "message_uuid": "3ee53073-8cd6-45af-855b-b419ef0fc44d"
  },
  "profile": {
    "name": "Benjamin"
  }
}
Notice how:
Text messages have "message_type": "text" and the content in "text"
Button replies have "message_type": "reply" and the selection in "reply"
Both include the sender's profile name in "profile": {"name": "..."}
Now that you know what data Vonage will send you, you can handle it in the controller. Your controller will need a method for each route:
Inbound method to handle incoming requests to your /inbound webhook
Status method to handle incoming requests to your /status webhook
Index method to serve up all of your incoming messages in a nice UI
>> See the full InboundWhatsAppController to get the final code.
Note: In this demo we disable Rails’ CSRF protection only for the webhook actions. In a production app, you should secure these endpoints more robustly (for example with webhook signature validation or other authentication).
Logs and saves inbound messages to your database with full metadata
Handles both text and interactive button replies with different payload structures
Returns head :ok which returns a 200 response, signifying that we accepted and handled the incoming webhok successfully
 def inbound
    from = payload["from"]
    to = payload["to"]
    message_uuid = payload["message_uuid"]
    message_type = payload["message_type"]
    profile_name = payload.dig("profile", "name")

    # Parse message based on type
    if message_type == "reply"
      # Interactive button reply
      reply_id = payload.dig("reply", "id")
      reply_title = payload.dig("reply", "title")
      text = "Selected: #{reply_title}"
      reply_data = payload["reply"].to_json
    elsif message_type == "text"
      # Regular text message
      text = payload["text"]
      reply_data = nil
    else
      # Fallback for other message types
      text = payload["text"] || "Unsupported message type: #{message_type}"
      reply_data = nil
    end

    WhatsappMessage.create!(
      from: from,
      to: to,
      text: text,
      message_uuid: message_uuid,
      message_type: message_type,
      profile_name: profile_name,
      reply_data: reply_data,
      is_inbound: true
    )

    head :ok
  end
Updates message statuses (like delivered, read, or failed)
Returns head :ok which returns a 200 response, signifying that we accepted and handled the incoming webhok successfully
  def status
    payload = JSON.parse(request.body.read)
    Rails.logger.info("📡 Status update: #{payload}")

    message_uuid = payload.dig("message_uuid")
    status = payload.dig("status")

    if message_uuid && status
      message = WhatsappMessage.find_by(message_uuid: message_uuid)
      message&.update(status: status)
    end

    head :ok
  end
Provides an index action to display all messages in the browser
def index
    @messages = WhatsappMessage.where(is_inbound: true).order(created_at: :desc)
 end
Now let's create some beautiful views to display incoming messages.
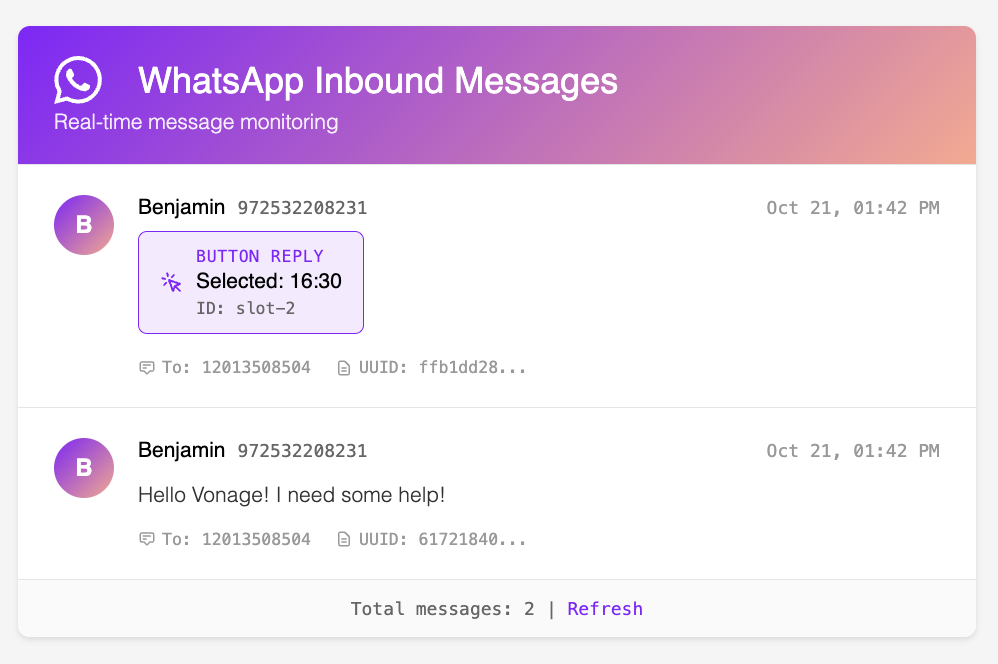 Rails app displaying inbound WhatsApp messages and button replies in real time.
The index view is what will be rendered when users go to the /messages route. This will hold the list of all messages. Copy/paste the code from app/views/inbound_whatsapp/index.html.erb.Most important to note is the message-list div, which iterates over each message and sends it to the messages partial to render.
    <!-- Messages List -->
    <div class="messages-list">
      <% if @messages.any? %>
        <% @messages.each do |message| %>
          <%= render partial: 'message', locals: { message: message } %>
        <% end %>
      <% else %>
        <div class="messages-empty">
          <h3>No messages yet</h3>
          <p>Waiting for inbound WhatsApp messages...</p>
        </div>
      <% end %>
    </div>
But what does each message look like? Here, you can use all the important data points we get from Vonage: who sent the message (name and number), when they sent the message, and what they sent (text or reply). Each message type should look different to make it obvious whether it was a text or reply button. So for the buttons, we wrap the selected option information in a purple box to look like a button.
Create the partial:
touch app/views/inbound_whatsapp/_message.html.erbThen you can copy/paste the app/views/inbound_whatsapp/_message.html.erb file. But here’s the general structure:
<div class="message-item">
  <div class="message-avatar"><%= message.profile_name.first %></div>
  <div class="message-body">
    <!-- Header with name, number, and timestamp -->
    <!-- Content block that conditionally renders text or reply -->
    <!-- Metadata block (To, UUID) -->
  </div>
</div>
Create the css file:
touch app/assets/stylesheets/inbound_whatsapp.cssAnd then add the styling from app/assets/stylesheets/inbound_whatsapp.css. I’ve used plain CSS with Vonage brand styling.
Start your Rails server:
rails sSend a WhatsApp message from your Rails app or Sandbox chat
Check your Rails logs - you should see:
📥 Inbound message: {"from"=>"18883451111", "text"=>"Hello from Vonage!", "message_type"=>"text", ...}Open your browser and navigate to http://localhost:3000/messages
Now you can see your messages with a beautiful Vonage theme
Delivery reports arrive at your /inbound_whatsapp/status endpoint.
To verify they're working, check your Rails logs:
🛰 Status update: {"message_uuid"=>"abc123", "status"=>"delivered"}These logs confirm your webhook setup is complete and status updates are being received.
Now you’ve got a Rails app that can receive and display real WhatsApp messages. Pretty cool, right? What started as a simple webhook setup now gives your app the ability to listen, respond, and visualize real conversations in real time.
Now that you can both send and receive messages, your Rails app is ready to take the next step. Try adding auto-refresh using Turbo Streams or ActionCable so new messages appear instantly without a page reload. You could even start threading messages by conversation or experiment with richer message types like rich media, contacts, or locations.
If you’d like to see what others are building or share what you’ve made, join us on the Vonage Developer Community Slack or follow @VonageDev on X for updates, examples, and more tutorials.