
シェア:
Benjamin AronovはVonageの開発者支援者です。彼はRuby on Railsのバックグラウンドを持つ実績のあるコミュニティ・ビルダーです。Benjaminは故郷であるテルアビブのビーチを楽しんでいる。テルアビブを拠点に、世界最高のスタートアップの創設者たちと出会い、学ぶことができる。技術以外では、完璧なパン・オ・ショコラを求めて世界中を旅するのが好き。
Ruby on RailsでWhatsAppメッセージを送信する方法
所要時間:1 分
WhatsAppは世界で最も人気のあるメッセージングプラットフォームの1つで、20億人以上のユーザーがいます。
このチュートリアルでは、Ruby on Rails アプリケーションから WhatsApp メッセージを送信する方法について説明します。 Vonage Messages API を使用します。.ボーナスとして、ユーザーがより簡単かつ直感的に返信できるよう、インタラクティブな返信ボタンの追加方法についても学びます。
TL;DR:完全な GitHub の Rails WhatsApp クイックスタート
 A Ruby on Rails app sending a WhatsApp message through the Vonage Messages API.
始める前に以下のものが必要だ:
RubyとRailsがマシンにインストールされている
このチュートリアルではRails 7+を使用していますが、Rails 8+でも同じように動作します。
WhatsAppビジネスアカウント(WABA)
WhatsApp ビジネスアカウントをお持ちでない場合まずは サンドボックスクイックスタートをお試しください。
その 認証情報を管理するための認証情報を管理するためのgem
Vonage APIアカウント
To complete this tutorial, you will need a Vonage API account. If you don’t have one already, you can sign up today and start building with free credit. Once you have an account, you can find your API Key and API Secret at the top of the Vonage API Dashboard.

まず新しいRailsアプリを作成します:
rails new vonage-rails-whatsapp
cd vonage-rails-whatsapp依存関係を追加します。 Vonage Ruby SDKと dotenv を追加します:
bundle add vonage dotenv-rails
送信者、受信者、配送状況など、各メッセージの詳細を保存するモデルを作成します。異なるメッセージタイプを適切に扱い、送信者情報を保存するために、フィールドを追加しましょう:
メッセージタイプ:text"、"reply"、その他のメッセージタイプを区別する。
プロフィール名:送信者の WhatsApp 表示名を保存
返信データ:インタラクティブなボタン返信用の完全なJSONデータを保存する
rails g model WhatsappMessage to:string from:string text:text status:string message_uuid:string is_inbound:boolean message_type:string profile_name:string reply_data:textそしてマイグレーションを実行する:
rails db:migrate
コントローラを使用して、メッセージの送信とフォームの表示を処理します。
rails g controller OutboundWhatsapp new create次に で定義する。:
Rails.application.routes.draw do
  get  '/outbound_whatsapp/new', to: 'outbound_whatsapp#new', as: :new_outbound_whatsapp
  post '/outbound_whatsapp',     to: 'outbound_whatsapp#create', as: :outbound_whatsapp

  # Bonus route for interactive messages
  post '/outbound_whatsapp/interactive', to: 'outbound_whatsapp#interactive', as: :interactive_whatsapp
end
なぜここのリソースを使わないのか?
このチュートリアルでは、明示的なget/postルートを使用します。これにより、Railsルーティングに慣れていない読者のために、各URLとコントローラのアクション間のマッピングを非常に明示的に保つことができます。本番アプリでは、絶対に リソースフルルーティングと コレクションルートに切り替えることができます。
これに相当するのは
resources :outbound_whatsapp, only: [:new, :create] do
  collection do
    post :interactive
  end
end
アプリケーションを作成するには アプリケーションの作成ページでアプリケーションの名前を定義します。

Webhooksを使用するAPIを使用する場合は、秘密鍵が必要です。Generate public and private key "をクリックすると、自動的にダウンロードが始まります。この鍵は紛失すると再ダウンロードできません。この鍵は紛失しても再ダウンロードできません。 private_<あなたのアプリID>.key.この鍵はAPIコールの認証に使用できます。 注意:アプリケーションを保存するまで、キーは機能しません。
必要な機能(Voice、Messages、RTCなど)を選択し、必要なWebhook(イベントURL、応答URL、受信メッセージURLなど)を提供します。これらはチュートリアルで説明します。
保存してデプロイするには、"Generate new application "をクリックして設定を確定します。これでアプリケーションはVonage APIで使用する準備が整いました。
メッセージを送信する前に、Vonage Messages APIアプリケーションが必要です。
Vonage Dashboardにログインします。
新しいアプリケーションを作成し、メッセージ機能を有効にする。
プレースホルダーのウェブフックURLを追加する:
インバウンド: https://example.com/inbound
ステータス: https://example.com/status
公開鍵と秘密鍵の生成をクリックする
ダウンロードした ファイルをルートファイルをルート (vonage-rails-whatsapp)に移動してください。
アプリケーションIDを控えておいてください。
保存をクリック
WhatsApp番号のリンクは「外部アカウントのリンク」タブで行います。
これで認証とメッセージ送信の準備が整いました。
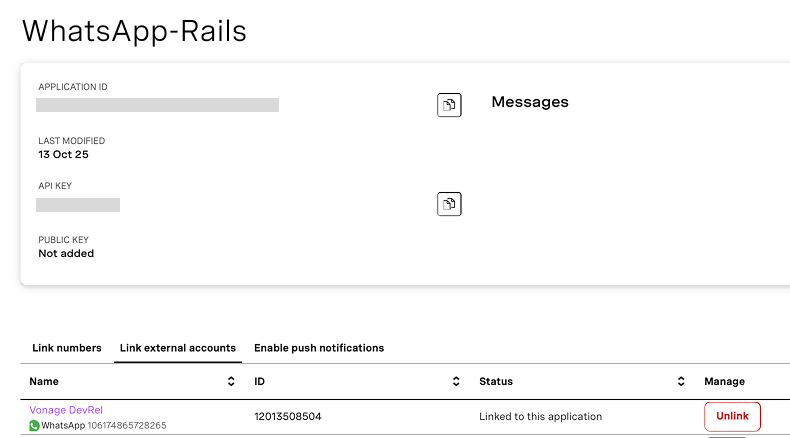 Viewing the WhatsApp-Rails application in the Vonage dashboard with an active WhatsApp number linked.
認証情報を .envファイルに安全に保存します:
touch .env次に .envファイルを開き、認証情報を更新する:
VONAGE_APPLICATION_ID=your_application_id
VONAGE_PRIVATE_KEY=./private.key
VONAGE_WHATSAPP_NUMBER=14157386102
>>より詳しいヘルプは Rubyで環境変数を使う
すべてをRailsに組み込む前に、舞台裏で何が起こっているのかを理解しよう。その Vonage Ruby SDKを使えば、WhatsApp に使う Messages API を含む複数の Vonage API にアクセスするための単一のクライアントが提供されます。
Rubyクライアントは、アプリケーションの認証情報で初期化されます。 .envファイルから取得します。
vonage = Vonage::Client.new(
  application_id: ENV["VONAGE_APPLICATION_ID"],
  private_key: ENV["VONAGE_PRIVATE_KEY"]
)
>> 注意 プロダクショングレードのプロジェクトでは、Vonage認証情報を安全に保存するために Rails暗号化クレデンシャル
初期化すると、このクライアントを使用して、サポートされているメッセージタイプ (SMS、WhatsApp、Messenger、Viber) を messaging.sendメソッドを使って送信できます。
WhatsAppのテキストメッセージの送信をRubyで簡単に説明します:
response = vonage.messaging.send(
  to: "14155551234",
  from: ENV["VONAGE_WHATSAPP_NUMBER"],
  channel: "whatsapp",
  message_type: "text",
  text: "Hey, it's your friends from Vonage!"
)

puts response.inspectメッセージの送信に成功すると、Vonage は 202ステータスコードと一意の メッセージID.
Vonageクライアントが単体でどのように動作するかを理解したところで、Railsアプリケーションに接続してみましょう。
このロジックを にロジックを追加します。にロジックを追加します。
開く app/controllers/outbound_whatsapp_controller.rbを開く。を開き、その内容を次のように置き換える(対話型メッセージはとりあえず無視する):
class OutboundWhatsappController < ApplicationController
  def new
    @whatsapp_message = WhatsappMessage.new
  end

  def create
    @whatsapp_message = WhatsappMessage.new(safe_params)

    if @whatsapp_message.save
      deliver(@whatsapp_message)
      redirect_to :new_outbound_whatsapp, notice: 'WhatsApp message sent!'
    else
      flash[:alert] = 'Something went wrong'
      render :new
    end
  end

  private

  def safe_params
    params.require(:whatsapp_message).permit(:to, :text)
  end

  def deliver(whatsapp_message)
    vonage = Vonage::Client.new(
      application_id: ENV["VONAGE_APPLICATION_ID"],
      private_key: ENV["VONAGE_PRIVATE_KEY"]
    )

    response = vonage.messaging.send(
      message_type: "text",
      text: whatsapp_message.text,
      to: whatsapp_message.to,
      from: ENV['VONAGE_WHATSAPP_NUMBER'],
      channel: "whatsapp"
    )

    if response.http_response.code == "202"
      whatsapp_message.update(
        message_uuid: response.entity.attributes[:message_uuid]
      )
    end
  end
end
店内 デリバリーメソッドの中で、プロセスは4つの重要なステップに従います。まず、新しいVonageクライアントを初期化する。次にWhatsAppテキストメッセージを送信します。 messaging.sendを呼び出す。このクイックスタートでは、環境変数VONAGE_WHATSAPP_NUMBERで設定した1つのWhatsApp番号から送信します。しかし、もっと高度なアプリでは からフィールドを公開し、ユーザーにどの番号から送信するかを選択させることもできる。
リクエストが行われると、メソッドはAPIレスポンスをチェックする。サーバーが HTTP 202ステータス・コードが返された場合、メッセージの配信が正常に受け入れられたことを意味します。最後に、このメソッドは一意の message_uuidを保存します。
では、次のように作成する。 app/views/outbound_whatsapp/new.html.erbを作成する。を作成する(インタラクティブなメッセージは無視する):
<h1>Send a WhatsApp Message</h1>

<%= form_with model: @whatsapp_message, url: outbound_whatsapp_path, local: true do |f| %>
  <div>
    <%= f.label :to, "To (Recipient WhatsApp Number)" %><br>
    <%= f.text_field :to, placeholder: "e.g. 14155551234" %>
  </div>

  <div>
    <%= f.label :text, "Message" %><br>
    <%= f.text_area :text, rows: 4, placeholder: "Type your message..." %>
  </div>

  <%= f.submit "Send Message", class: "btn btn-primary" %>
<% end %>
Railsサーバを起動します:
rails s次に http://localhost:3000/outbound_whatsapp/new.
以下のようなフォームからWhatsAppメッセージを送信できるはずです:
 A Rails form for sending WhatsApp messages using the Vonage Messages API.
では、次のようにメッセージを送って、より魅力的なものにしましょう。 iインタラクティブな返信ボタンを送りましょう。これらのメッセージは、ユーザーが入力する代わりにいくつかのオプションの1つをタップすることで、アプリをよりチャットボットのように感じさせます。
 A Ruby on Rails app sending an interactive WhatsApp message with reply buttons using the Vonage Messages API.
既存の OutboundWhatsappControllerに次の新しいメソッドを追加します:
 def interactive
    unless params[:to].present?
      redirect_to :new_outbound_whatsapp, alert: "Recipient number is required!"
      return
    end

    vonage = Vonage::Client.new(
      application_id: ENV["VONAGE_APPLICATION_ID"],
      private_key: ENV["VONAGE_PRIVATE_KEY"]
    )

    interactive_message = {
      from: ENV["VONAGE_WHATSAPP_NUMBER"],
      to: params[:to],
      channel: "whatsapp",
      message_type: "custom",
      custom: {
        type: "interactive",
        interactive: {
          type: "button",
          header: {
            type: "text",
            text: "Delivery time"
          },
          body: {
            text: "Which time would you like us to deliver your order at?"
          },
          footer: {
            text: "Please allow 15 minutes either side of your chosen time."
          },
          action: {
            buttons: [
              {
                type: "reply",
                reply: { id: "slot-1", title: "15:00" }
              },
              {
                type: "reply",
                reply: { id: "slot-2", title: "16:30" }
              },
              {
                type: "reply",
                reply: { id: "slot-3", title: "17:15" }
              }
            ]
          }
        }
      }
    }

    response = vonage.messaging.send(**interactive_message)
    Rails.logger.info("📤 Sent interactive message to #{params[:to]}: #{response.inspect}")

    redirect_to :new_outbound_whatsapp, notice: "Interactive message sent to #{params[:to]}!"
  end
更新 app/views/outbound_whatsapp/new.html.erbをインクルードする:
<hr>
<h3>Try an Interactive Message</h3>
<p>Send a sample interactive WhatsApp message with reply buttons.</p>

<%= form_with url: interactive_whatsapp_path, method: :post, local: true do |f| %>
  <div>
    <%= f.label :to, "To (Recipient WhatsApp Number)" %><br>
    <%= f.text_field :to, placeholder: "e.g. 14155551234", required: true %>
  </div>

  <%= f.submit "Send Interactive Message", class: "btn btn-secondary" %>
<% end %>
ブラウザをリロードして、受信者の電話番号を追加し、「インタラクティブ・メッセージを送信」をクリックします。
WhatsAppメッセージが届き、Railsサーバーで確認できるようになります:
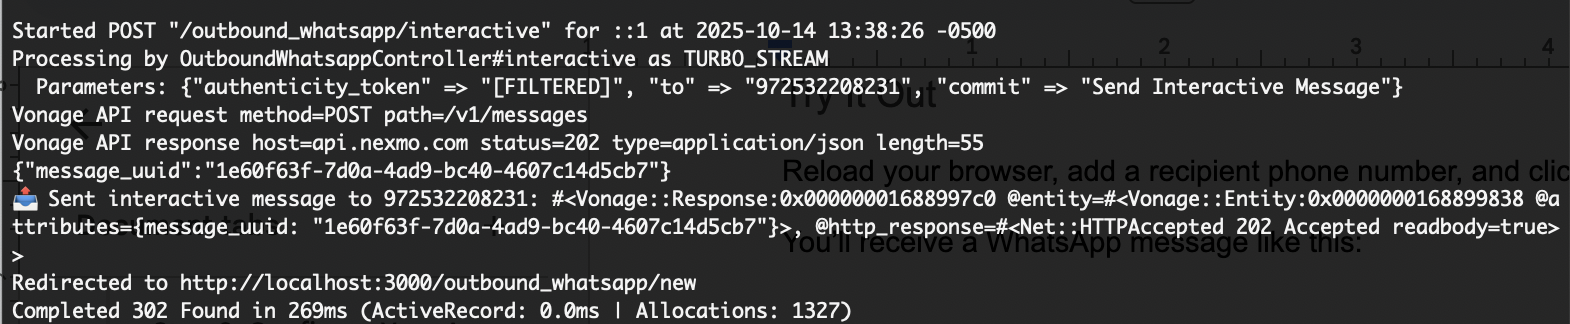 Terminal output confirming successful delivery of an interactive WhatsApp message using the Vonage Messages API in a Ruby on Rails app.しかし、そのメッセージはどうなったのだろうか?開かれたのか?読まれたのか?ユーザーはどのオプションを選択したのか?私たちには知る術がありません。私たちがユーザーからのアクションをどのように処理しているか知るには、このまま読み進めてください。
現在のアプリは不完全です。着信メッセージ、メッセージのステータス、ユーザーの選択を伝えるメッセージのペイロードを扱っていません。
次のチュートリアルでは RailsでWhatsAppメッセージを受信する方法でWhatsAppメッセージを受信する方法」では、より動的なアプリケーションを構築できるようになるこれらのトピックをすべて取り上げます。
これで Vonage Messages API を使って WhatsApp テキストメッセージとインタラクティブ返信ボタンメッセージを送信する Ruby on Rails アプリが完成しました。
あなたはその方法を学んだ:
Vonage WhatsAppアプリケーションの設定
Railsからテキストメッセージを送信する
より豊かな会話のためのインタラクティブなボタンの追加
他にどんなRailsトピックに興味がありますか?RCS(Rich Communications Services)はもうプレイしましたか?試す RCSサジェストリプライの送信これはWhatsAppの返信のようなものですが、デフォルトのメッセージングアプリの中にあります。
ご質問やアイデアがおありですか?私たちと一緒に VonageコミュニティSlackに参加するか X (旧 Twitter) でをフォローしてください。