Delivery Receipts
You can verify that a message you sent using the Vonage SMS API reached your customer by requesting a delivery receipt from the carrier.
NOTE: Not all networks and countries support delivery receipts. You can check our knowledge base for some further information on what you might receive if your network does not support delivery receipts. For detailed information on delivery receipts see our documentation.
To access the delivery receipt, you need to:
- Create a webhook endpoint using one of the code examples shown below
- Configure the webhook endpoint in your Vonage Dashboard
NOTE: After you send a message there may be a delay before you receive the delivery receipt.
Prerequisites
Add the following to build.gradle:
implementation 'com.vonage:server-sdk-kotlin:2.1.1'
implementation 'io.ktor:ktor-server-netty'
implementation 'io.ktor:ktor-serialization-jackson'Run your code
We can use the application plugin for Gradle to simplify the running of our application. Update your build.gradle with the following:
apply plugin: 'application'
mainClassName = project.hasProperty('main') ? project.getProperty('main') : ''
Run the following gradle command to execute your application, replacing com.vonage.quickstart.kt.sms with the package containing ReceiveSmsDlr:
Prerequisites
Add the following to build.gradle:
implementation 'com.vonage:server-sdk:9.3.1'
implementation 'com.sparkjava:spark-core:2.9.4'
Write the code
Add the following to the main method of the ReceiveDlr file:
port(3000);

get("/webhooks/delivery-receipt", (req, res) -> {
    for (String param : req.queryParams()) {
        System.out.printf("%s: %s\n", param, req.queryParams(param));
    }
    res.status(204);
    return "";
});

post("/webhooks/delivery-receipt", (req, res) -> {
    // The body will be form-encoded or a JSON object:
    if (req.contentType().startsWith("application/x-www-form-urlencoded")) {
        for (String param : req.queryParams()) {
            System.out.printf("%s: %s\n", param, req.queryParams(param));
        }
    } else {
        System.out.println(req.body());
    }

    res.status(204);
    return "";
});Run your code
We can use the application plugin for Gradle to simplify the running of our application. Update your build.gradle with the following:
apply plugin: 'application'
mainClassName = project.hasProperty('main') ? project.getProperty('main') : ''
Run the following gradle command to execute your application, replacing com.vonage.quickstart.sms with the package containing ReceiveDlr:
Prerequisites
Create a file named SmsController.cs and add the following code:
Prerequisites
Create a file named index.php and add the following code:
Add the following to index.php:
Run your code
Save this file to your machine and run it:
Prerequisites
Write the code
Add the following to delivery-receipts.py:
from pprint import pprint

from fastapi import FastAPI, Request

app = FastAPI()


@app.post('/webhooks/delivery-receipt')
async def get_delivery_receipt(request: Request):
    data = await request.json()
pprint(data)Run your code
Save this file to your machine and run it:
Prerequisites
Create a file named delivery_receipt.rb and add the following code:
Run your code
Save this file to your machine and run it:
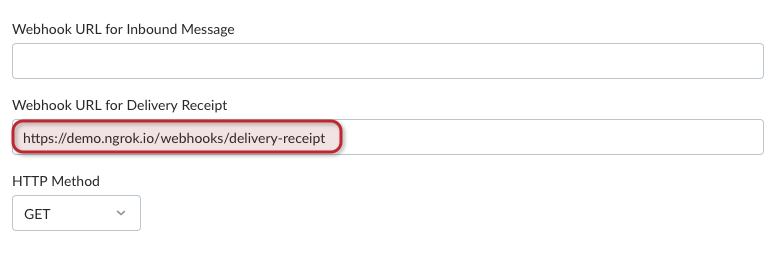
Configure the webhook endpoint in your Vonage Dashboard
So that Vonage knows how to access your webhook, you must configure it in your Vonage account.
In the code snippets, the webhook is located at /webhooks/delivery-receipt. If you are using Ngrok, the webhook you need to configure in your Vonage Dashboard API Settings page is of the form https://demo.ngrok.io/webhooks/delivery-receipt. Replace demo with the subdomain provided by Ngrok and enter your endpoint in the field labeled Webhook URL for Delivery Receipts:
Try it out
Send a message to a mobile number and, if the network supports it, you will receive a delivery receipt in the following format:
NOTE: After you send a message there may be a delay before you receive the delivery receipt.