Webhooks
Webhooks are an extension of an API, but instead of your code requesting data from our API platform, Vonage sends the data to you. The data arrives in a web request to your application. A webhook may be the result of an earlier API call (this type of webhook is also called a "callback"), such as an asynchronous request to the Number Insight API. Webhooks are also used to notify your application of events such as an incoming call or message.
Since the Vonage servers need to be able to send data to your application via webhooks, you need to set up a webserver to receive the incoming HTTP requests. You also need to specify the URL of each webhook on your webserver so that data can be sent to each one.
Webhooks workflow
With webhooks, it's important that the URL to send the webhooks to is configured. When there is data available, Vonage sends the webhook to your application as an HTTP request. Your application should respond with an HTTP success code to indicate that it successfully received the data.
The process looks something like this:
Webhooks provide a convenient mechanism for Vonage to send information to your application for events such as an incoming call or message, or a change in call status. They can also be used to send follow-up information such as a delivery receipt which may become available some time after the request it relates to.
Which APIs support webhooks?
Information resulting from requests to supported Vonage APIs are sent in an HTTP request to your webhook endpoint on an HTTP server. To configure your webhook endpoint, please visit the Vonage dashboard.
Vonage sends and retrieves the following information using webhooks:
| API Name | Webhooks usage |
|---|---|
| SMS API | Sends the delivery status of your message and receives inbound SMS. |
| Voice API | Retrieves the Call Control Objects you use to control the call from one webhook endpoint, and sends information about the call status to another. View the Webhook Reference for more details. |
| Number Insight Advanced Async API | Receives complete information about a phone number. |
| Client SDK / Conversation API | Real-time Communication (RTC) events are sent to the RTC event webhook. |
| Messages and Dispatch APIs | Supports both inbound message and message status webhooks. |
| Verify API | Receives updates on your verification requests. |
Setting webhook endpoints
Webhooks are used to deliver incoming messages and delivery receipts.
Incoming messages
To set up the webhook used for incoming messages, go to the Your Numbers section of the Vonage Dashboard. Click 'edit' for the virtual number and set the Callback URL.
You can also use the Vonage CLI to set the incoming messages endpoint for an individual number.
Delivery Receipts
See the Delivery Receipts guide in the SMS documentation.
The Number Insight Advanced API allows you to have the results of a number lookup sent synchronously or asynchronously.
Set the callback argument to a webhook URL to receive the lookup asynchronously.
See Number Insight Advanced Async for more details.
For Voice API requests, webhooks can be set at an application level, when creating a call, or in the actions in an NCCO.
Application-level webhooks
Vonage numbers that are linked to Vonage applications will use the answer_url to retrieve an NCCO, and the event_url to send call status information to you. The fallback_answer_url can optionally be configured. This is used when answer_url is offline or returning an HTTP error code. It is also used when an event is expected to deliver an NCCO on event_url, but event_url is offline or returning an HTTP Status code.
You can set these using the Application API, in the dashboard or using the Vonage CLI tool.
Number-level webhooks
You can set a status webhook for each number you purchase. This will be used to send events to you regarding each number.
These can be set up in the Numbers section of the Dashboard, via the Vonage CLI or via the Update a Number API call (specifically, the voiceStatusCallback property).
On creating an outbound call
When making a new outbound call, you need to set the answer_url in the call to a URL containing an NCCO. Vonage's servers will retrieve the NCCO from this endpoint and follow its instructions in handling the outbound call.
Answer URL payload
The payload for the answer_url is:
| Parameter | Description |
|---|---|
to | The number being called |
from | The number making the call |
conversation_uuid | The UUID of the conversation |
uuid | The UUID of the leg |
Example URL:
Inside an NCCO
Inside an NCCO, the following action types take a webhook URL for use when that action is executed:
- record.eventUrl - set the webhook endpoint that receives information about the recording for a Call or Conversation
- conversation.eventUrl - set the URL to the webhook endpoint Vonage calls asynchronously when a conversation changes state for this conversation action
- connect.eventUrl - set the URL to the webhook endpoint Vonage calls asynchronously when a conversation changes state for this connect action
- input.eventUrl - set the URL to the webhook endpoint Vonage sends the digits pressed by the callee
- stream.streamUrl - set an array of URLs pointing to the webhook endpoints hosting the audio file to stream to the Call or Conversation
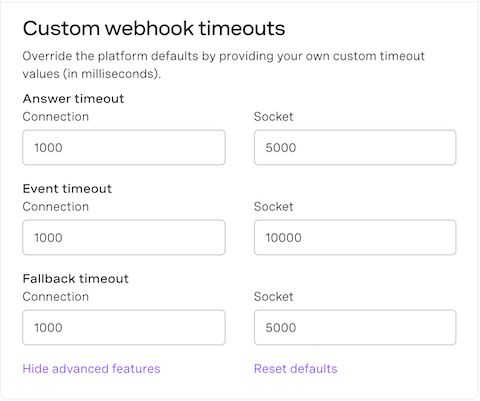
Webhook Timeouts
If the answer, event or fallback URL is unreachable for a certain amount of time, or the response time exceeds a certain limit, Vonage will retry the request once. Platform default connection and reading timeouts are as follows:
| Webhook Type | Connect Timeout | Socket Timeout |
|---|---|---|
| Answer | 1 second | 5 seconds |
| Event | 1 second | 10 seconds |
| Fallback | 1 second | 5 seconds |
These defaults can be overridden via an Application API call or in the Dashboard by selecting the application, then clicking the Edit button and scrolling to the Capabilities / Voice section:
Further information on these timeouts can be found in the webhook timeouts section of the Application API overview documentation.
An Application can receive RTC events via the RTC webhook.
You set the URL of the RTC event webhook when you create the application using your language of choice.
More information on creating an application with RTC capabilities can also be found in the Application API documentation.
There are two webhooks supported by the Messages and Dispatch APIs, the Message Status webhook and the Inbound Message webhook. Message status is inbound on the Message Status webhook and the Message itself is received on the Inbound Message webhook. Setting these webhooks is described in detail in the topic Configuring webhooks for Messages and Dispatch APIs.
Verify sends event and summary callbacks for updates on your verification requests. If you choose Silent Authentication or WhatsApp Codeless as one of your authentication channels, you will need to receive callbacks to successfully complete the request.
The URL the callbacks will be sent to can be configured in your application settings on the developer dashboard. See the API reference for example callbacks.
Receiving webhooks
To interact with Vonage webhooks:
- Create a Vonage account.
- Write scripts to handle the information sent or requested by Vonage. Your server must respond with a success status code (any status code between 200 OK and 205 Reset Content) to inbound messages from Vonage. Anything other than a
2xxcode will cause the Vonage servers to re-attempt callback delivery. - Publish your scripts by deploying to a server (for local development, try Ngrok).
- Configure a webhook endpoint in the API you would like to use.
- Take an action (such as sending an SMS) that will trigger that webhook.
Information about your request is then sent to your webhook endpoint.
Decoding signed webhooks
Webhook signing is enabled by default for the Messages, Dispatch, Verify, and Voice APIs. They provide a method for your application to verify a request is coming from Vonage and its payload has not been tampered with during transit. When receiving a request, the incoming webhook will include a JWT token in the authorization header which is signed with your signature secret.
NOTE: For previously created Voice applications, Signed Webhooks is off by default. To turn it on manually, go to the application settings in the Dashboard, click "Show advanced features" link in the Voice capability section and then turn on the Use signed webhooks check:
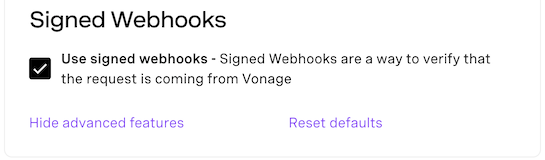
You can also turn it off for new application by this check (not recommended, use in exceptional cases only).
Validating signed webhooks provides a number of security benefits, including:
- The ability to verify a request originates from Vonage
- Ensuring that the message has not been tampered with while in transit
- Defending against interception and later replay
Validating signed webhooks
There are two parts to validating signed webhooks:
- Verifying the request
- Verifying the payload (optional)
Verifying the request
Webhooks will include a JWT in the Authorization header. Use the API key included in the JWT claims to identify which of your signature secrets has been used to sign the request. The secret used to sign the request corresponds to the signature secret associated with the api_key included in the JWT claims. You can identify your signature secret on the Dashboard. It's recommended that signature secrets be no less than 32 bits to ensure their security.
NOTE: The signature method drop down does not affect the method used for signing Messages API webhooks, SHA-256 is always used.
Verify the payload has not been tampered with in transit
Once you have verified the authenticity of the request, you may optionally verify the request payload has not been tampered with by comparing a SHA-256 hash of the payload to the payload_hash field found in the JWT claims. If they do not match, then the payload has been tampered with during transit. You only need to verify the payload if you are using HTTP rather than HTTPS, as Transport Layer Security (TLS) prevents MITM attacks.
NOTE: In the rare case of an internal error, it is possible that the callback service will send an unsigned callback. By returning an HTTP 5xx response, a retry will be triggered giving the system time to resolve the error and sign future callbacks.
The code example below shows how to verify a webhook signature. It is recommended you use HTTPS protocol as it ensures that the request and response are encrypted on both the client and server ends.
| Key | Description |
|---|---|
VONAGE_API_KEY | Your Vonage API key (see it on your dashboard). |
VONAGE_SIGNATURE_SECRET | The secret used to sign the request corresponds to the signature secret associated with the |
Prerequisites
Run your code
Save this file to your machine and run it:
Prerequisites
Create a file named verify-signed-webhooks.php and add the following code:
Run your code
Save this file to your machine and run it:
Prerequisites
Run your code
Save this file to your machine and run it:
Sample Signed JWT
Signed JWT Header
The contents of the signed JWT header are described in the following table:
| Header | Value |
|---|---|
alg | HS256 |
typ | JWT |
Signed JWT Payload
The contents of the signed JWT payload are described in the following table, using the values included in the sample signed JWT shown previously:
| Field | Example Value | Description |
|---|---|---|
iat | 1587494962 | The time at which the JWT was issued. Unix timestamp in SECONDS. |
jti | c5ba8f24-1a14-4c10-bfdf-3fbe8ce511b5 | A unique ID for the JWT. |
iss | Vonage | The issuer of the JWT. This will always be 'Vonage'. |
payload_hash | d6c0e74b5857df20e3b7e51b30c0c2a40ec73a77879b6f074ddc7a2317dd031b | A SHA-256 hash of the request payload. Can be compared to the request payload to ensure it has not been tampered with during transit. |
api_key | a1b2c3d | The API key associated with the account that made the original request. |
application_id | aaaaaaaa-bbbb-cccc-dddd-0123456789ab | (Optional) The id of the application that made the original request if an application was used. |
Testing webhooks locally
In order to test the correct functioning of webhooks on your locally running application, you will need to create a secure tunnel between Vonage and your application. You can do this with a secure tunnel application such as Ngrok. See the Testing with Ngrok topic for more information.
Configuring your firewall
If you restrict inbound traffic (including delivery receipts), you need to add the Vonage IP addresses to your firewall's list of approved IP addresses. You can find more information how to do this in our knowledge base:
Tips for debugging webhooks
Start small - Publish the smallest possible script that you can think of to respond when the webhook is received and perhaps print some debug information. This makes sure that the URL is what you think it is, and that you can see the output or logs of the application.
Code defensively - Inspect that data values exist and contain what you expected before you go ahead and use them. Depending on your setup, you could be open to receiving unexpected data so always bear this in mind.
Look at examples - Vonage provides examples implemented with several technology stacks in an attempt to support as many developers as possible. For example code using webhooks see the following:
You can also check the code snippets section of the documentation for the API you are using.
See also
- More information on webhook types and application capabilities can be found in the Application documentation.