Share:
Michael Crump works at Vonage on the Developer Experiences team and is a coder, YouTuber, and frequent speaker of various .NET and cloud/communication development topics. He’s passionate about helping developers understand the benefits of each in a no-nonsense way.
Using WhatsApp Product Messages with the Vonage Messages API
Time to read: 11 minutes
The Vonage Messages API integrates with SMS, MMS, and popular social chat apps—so you can communicate with your customers on whichever channel they love most. That, paired with rich features and instant results, makes for one engaging, cost-effective chat experience.
Recently, we've made some enhancements to the WhatsApp communication platform by adding support for WhatsApp Product Messages. They allow a business to showcase products and services, and customers can browse and add products to a cart without leaving the WhatsApp conversation.
In this tutorial, we'll go step-by-step through setting up WhatsApp Product Messages with the Vonage Messages API.
Before you begin, make sure you have the following accounts activated and tools installed:
A Vonage Developer Account - If you don't have one, you can create one, and we'll give you free credit to play around with our APIs.
A Meta Commerce Account - You will need the proper permissions to add a product catalog to it.
ngrok - A free account is required. This tool enables developers to expose a local development server to the Internet.
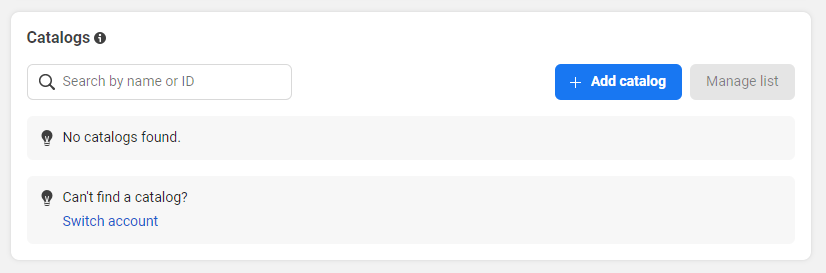
To get our products in front of customers, we need a place to store the metadata, including the title, category, price, etc., and an image. Meta lets you keep all this information on their servers with the Meta Commerce Manager page.
Go ahead and create an account if you haven't already and navigate to the Meta Commerce Manager page and click on Add catalog.
 add-catalog.png
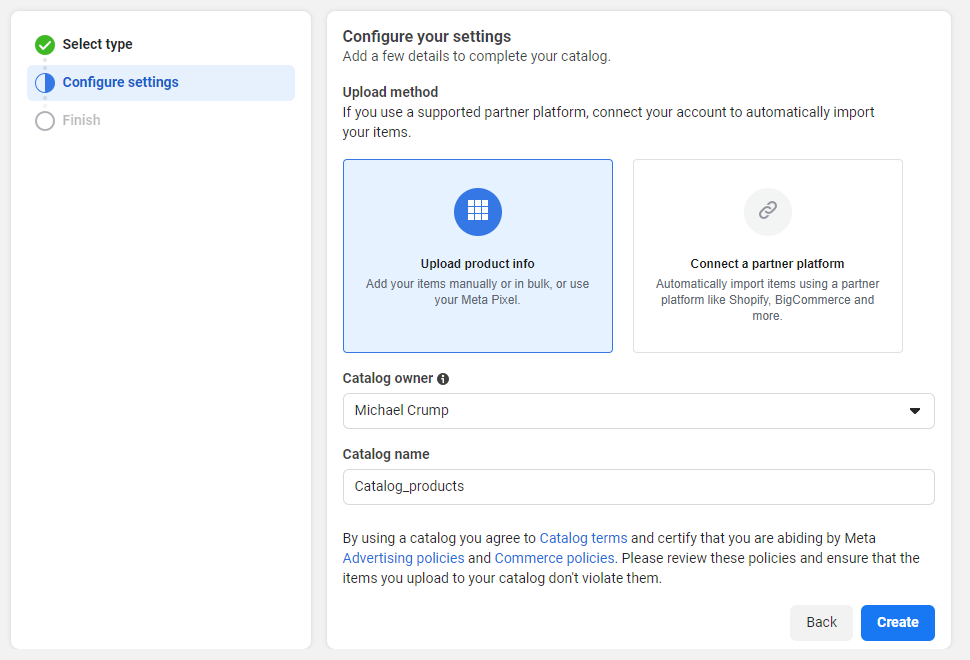
You'll need to specify your Catalog Type. Select E-commerce and press Next.
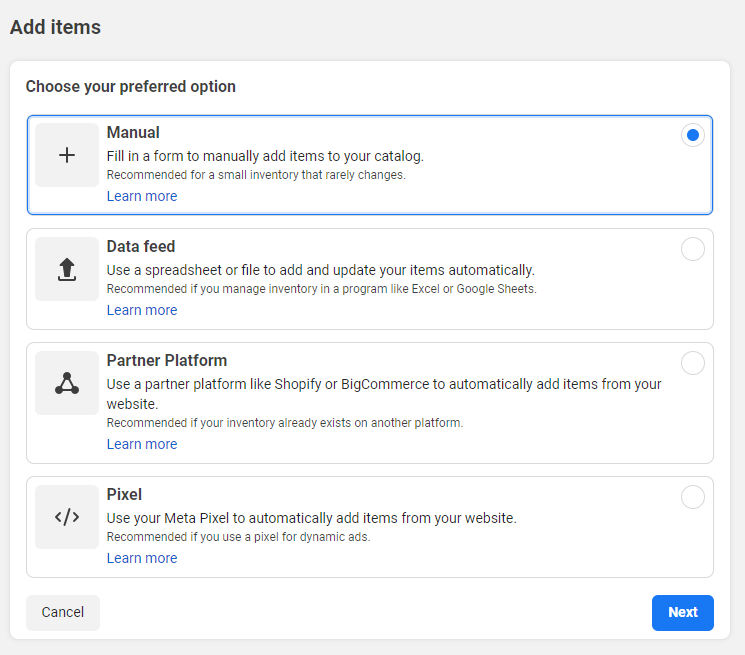
Next, we have two options to upload our product data. We can select to add our product manually or use a partner platform. We'll choose Upload product info, leave the other items as they are, and press Create.
 configure-settings.png
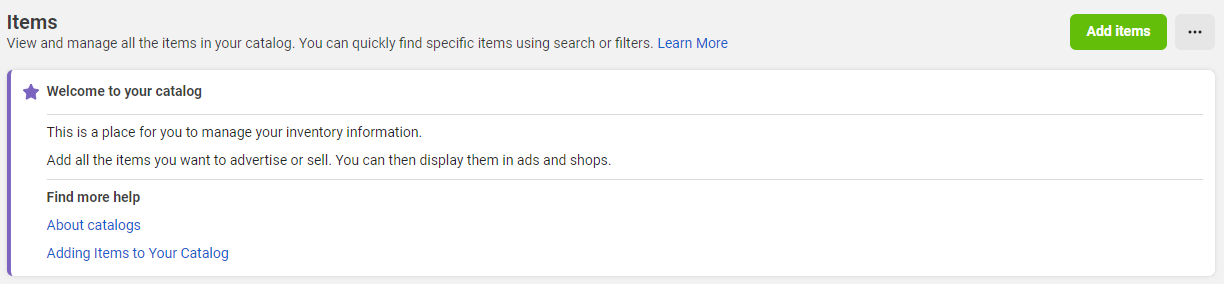
You'll now have a new catalog, and if you click on Items, you'll see that you don't have any. Let's upload a couple of items by pressing the Add items button.
 add-items.png
We'll add items by manually uploading them to our catalog.
Select Manual, then Next to continue.
 add-items-manually.png
Here we'll need to supply information for the following fields: Title, Description, Price, Website Link, Price, Sales price, Facebook Product Category, Condition, Availability and Status. You'll also need an image of the product. Go ahead and add a couple of items.
 before-add-items.png
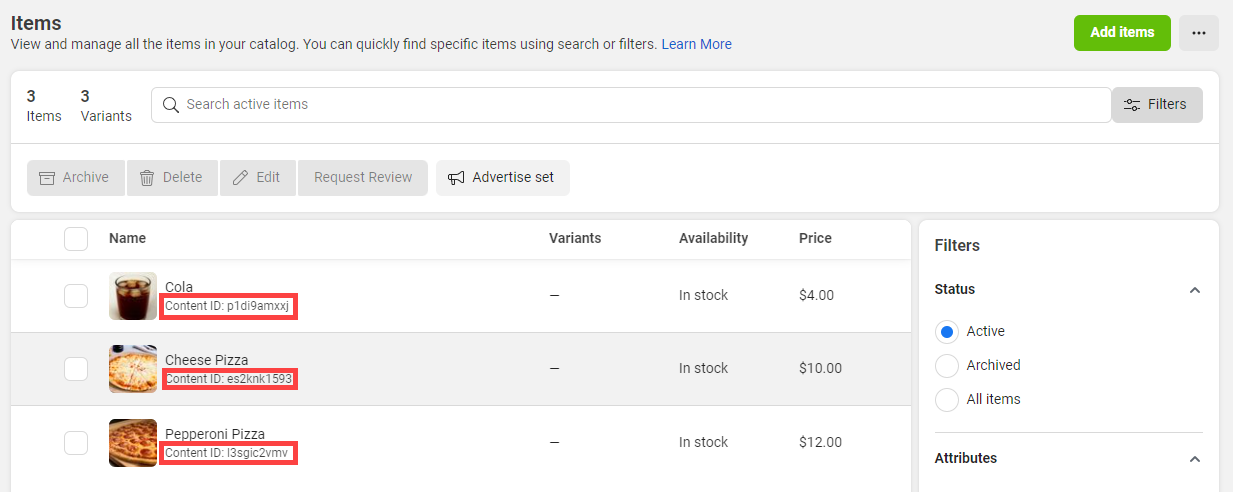
In my instance, I am creating a Pizza shop, so I added a couple of pizzas and a drink, as shown below.
 after-add-items.png
Before proceeding, please ensure that all items are showing without errors.
Copy the Content ID of your items (from the previous screenshot), as we'll need those later. We will also need the catalog_id, which you can find on the Catalog page.
Note that Vonage documentation refers to the Content ID as product_retailer_id.
If you would like further details about catalogs, please consult the Meta Documentation.
To include product items in Product Messages sent from a number associated with your WhatsApp Business Account (WABA), the Catalog containing those items must be linked to your WABA.
There are primarily two ways of linking your WhatsApp Business Account to your Catalog.
Owned Account - is created through the embedded sign-up process (via the Vonage Dashboard).
Managed Account - is created for you by a partner business such as Vonage. To connect a Catalog to a Managed Account, you must assign the partner business (such as Vonage) to the Catalog.
We'll use an Owned Account for this example, but documentation on Connecting a Managed Account is located here.
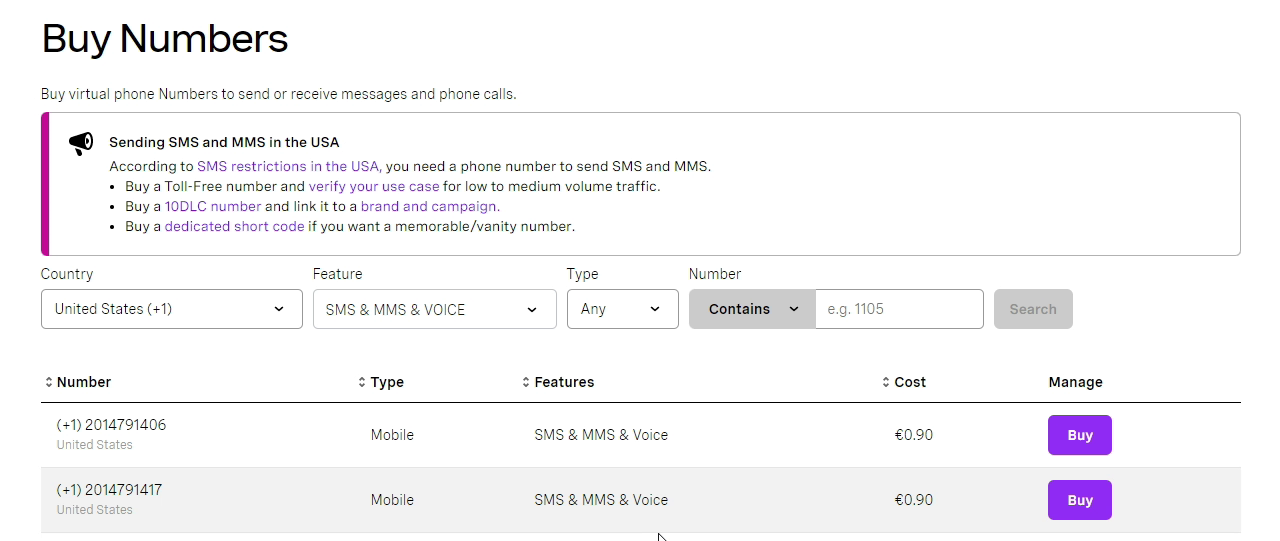
Before we set up an Owned Account, we'll need to buy a virtual phone number that we can use for our Pizza business.
To purchase one, log into the Vonage Dashboard, go to Numbers > Buy Numbers, and search for one that meets your needs.
 buy-numbers.png
You'll want to note the number you purchased, as we'll use it in the next portion of the setup.
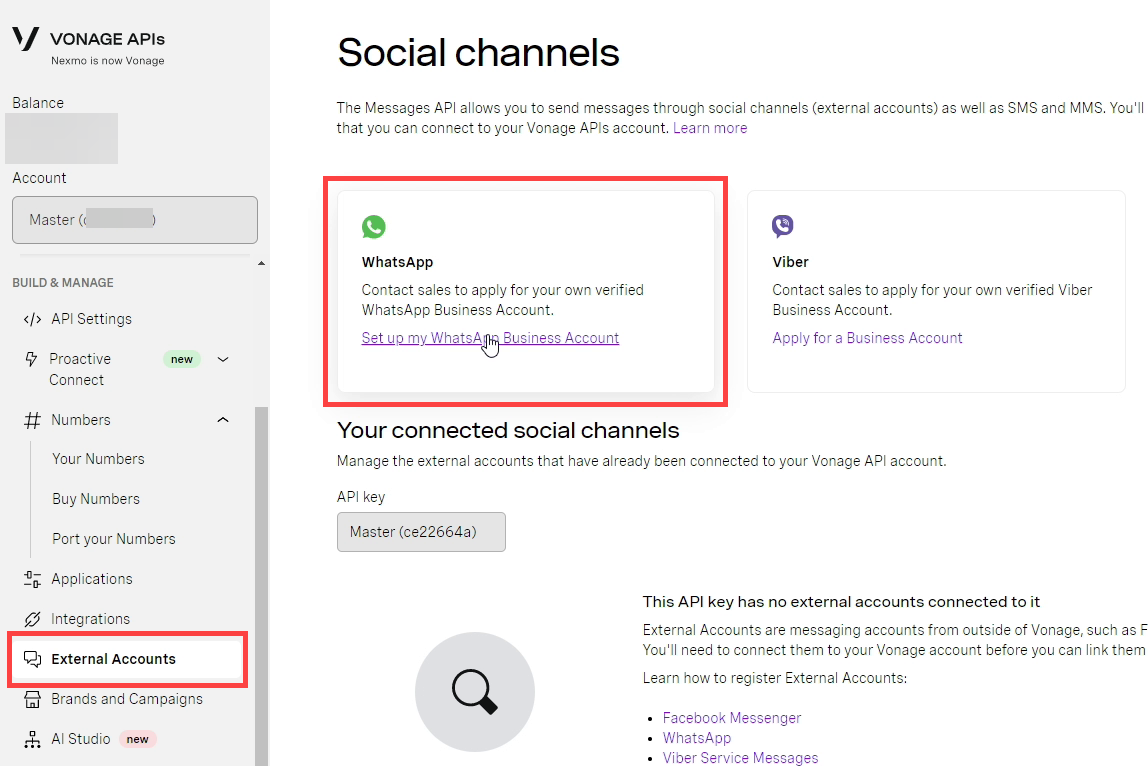
Log into the Vonage Dashboard, go to External Account and click on the WhatsApp Social Channel to begin.
 whatsapp-social-channels.png
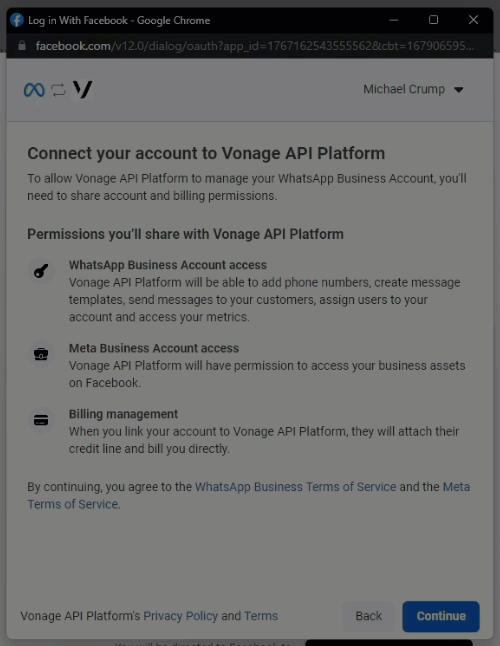
You'll see a setup screen and press Continue with Meta, as shown below.
 whatsapp-vonage-setup.png
Next, you must complete your Meta Business Account and associate your WhatsApp Business Account and Profile.
 setupprocess.gif
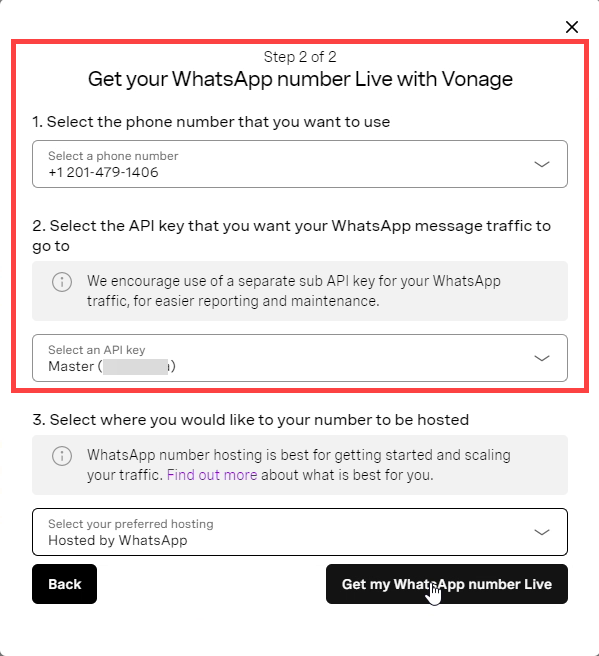
Once complete, you'll see a popup that provides a few helpful tips on how to get unrestricted use of your WhatsApp Number, so press Next. You'll need to select the phone number you want to use and the API Key that WhatsApp message traffic will go to. You can leave the preferred hosting to WhatsApp. Press Get my WhatsApp number Live to continue.
 associate-number-with-vonage.png
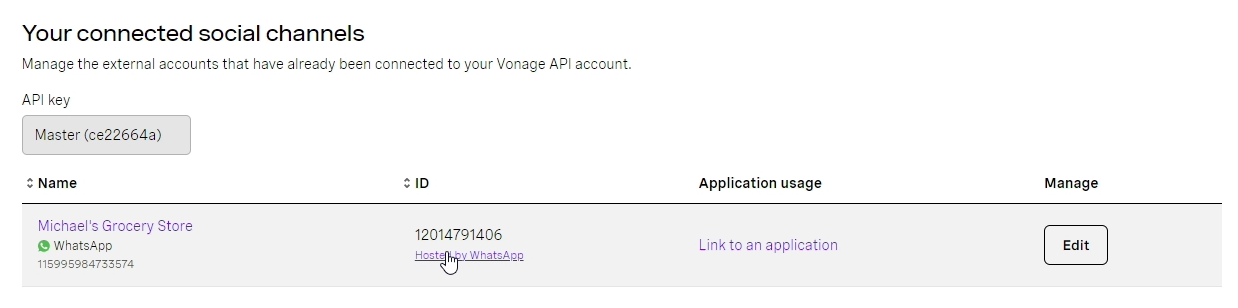
You should see your connected WhatsApp account on the External Accounts screen in the Vonage Dashboard.
 connected-wa-account.png
Head over to your Meta Commerce Account and navigate to Business Settings, WhatsApp Accounts, then WhatsApp Manager, as shown below.
 wa-accounts.png
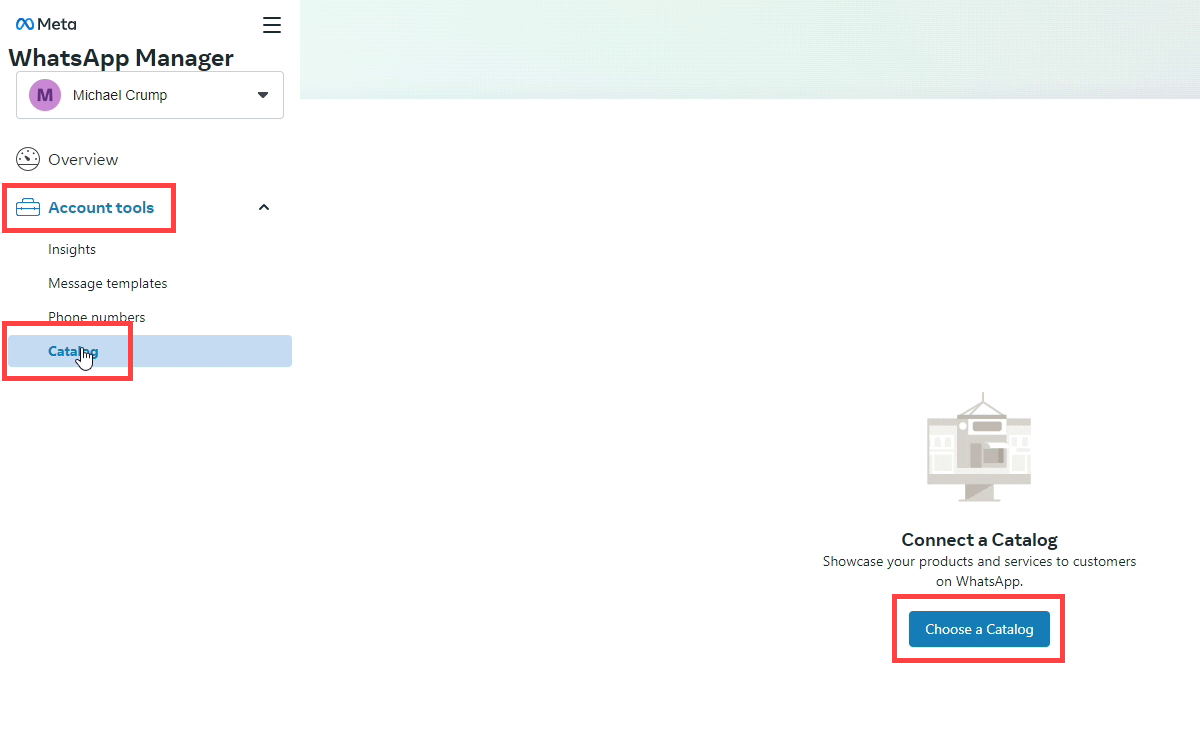
Go to Account tools, Catalog, then Choose a Catalog
 wa-manager.png
You'll now have the option to connect a catalog. Go ahead and select the one that we created earlier, called Catalog_products.
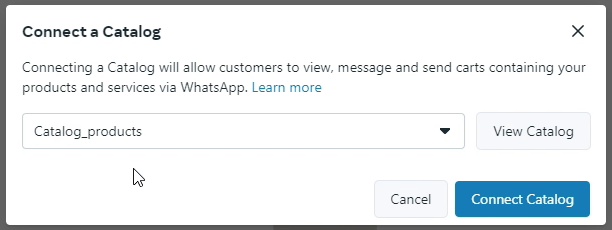 connect-catalog.png
Head to your Meta Business Settings, click on Data Sources, then Catalogs, and input Vonage as a partner using a Business ID. The ID is 2290848174274168. Contact Vonage Support, who will arrange to approve the partner request and connect the Catalog.
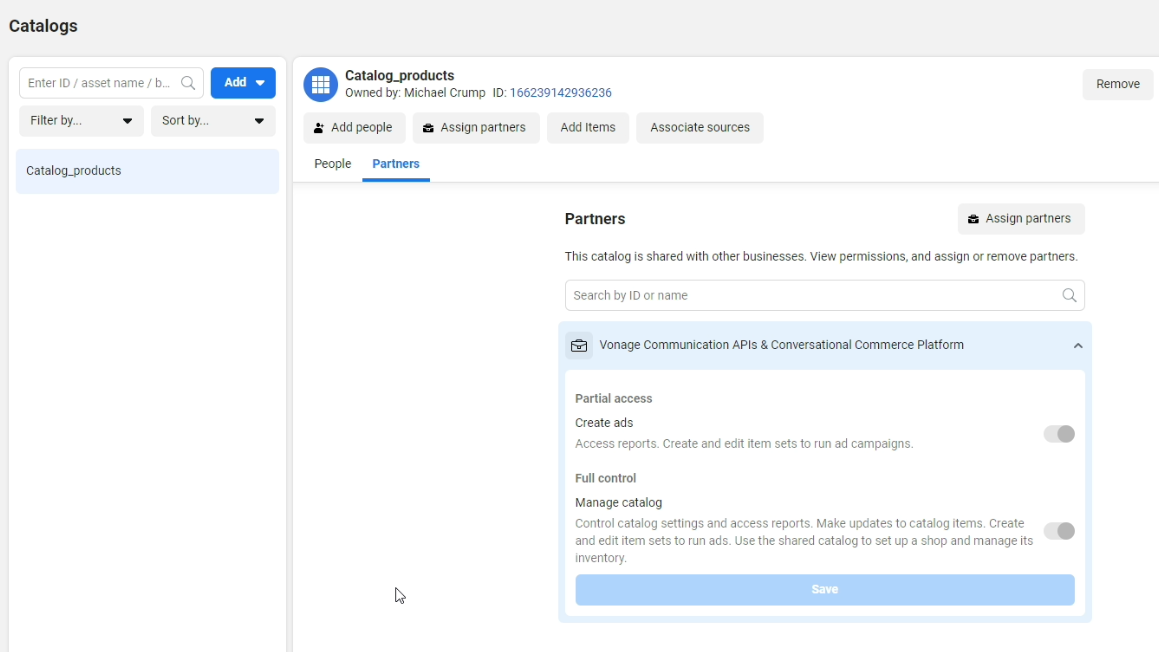 partners.png
To interact with the Messages API, we'll need to create a Vonage API application to authenticate our requests. Think of applications more like containers and metadata to group all your data on the Vonage platform. We'll create one using the Vonage API Dashboard.
Provide a name (such as "WhatsAppProductMessage") and click on Generate public and private key. You'll be asked to save a keyfile to disk—the private key. It's usually a good idea to keep it in your project folder, as you'll need it later. We'll use the private key to generate a JSON Web Token (JWT) later.
Applications work on a public/private key system, so when you create an application, a public key is generated and kept with Vonage. A private key is generated, not kept with Vonage, and returned to you via the application creation.
Next, you need to enable the Messages capability and provide an Inbound URL and a Status URL. This is typically where you'd want to use something like ngrok to forward port 4040. You can do this from a terminal or command prompt by entering ngrok http 4040. You'll now have a forwarding address that you can input in both the Inbound and Status URLs.
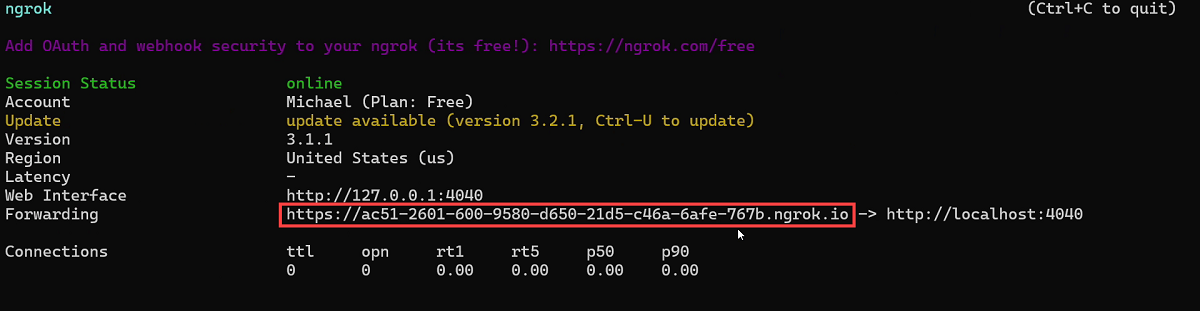 ngrok-running.png
When a message reaches the Messages API, the data about it is sent to the Inbound URL. When you send a message using the API, the data about the message status gets sent to the Status URL.
Finally, once it is created, go to Link social channels, select the WhatsApp number created earlier, and press Link.
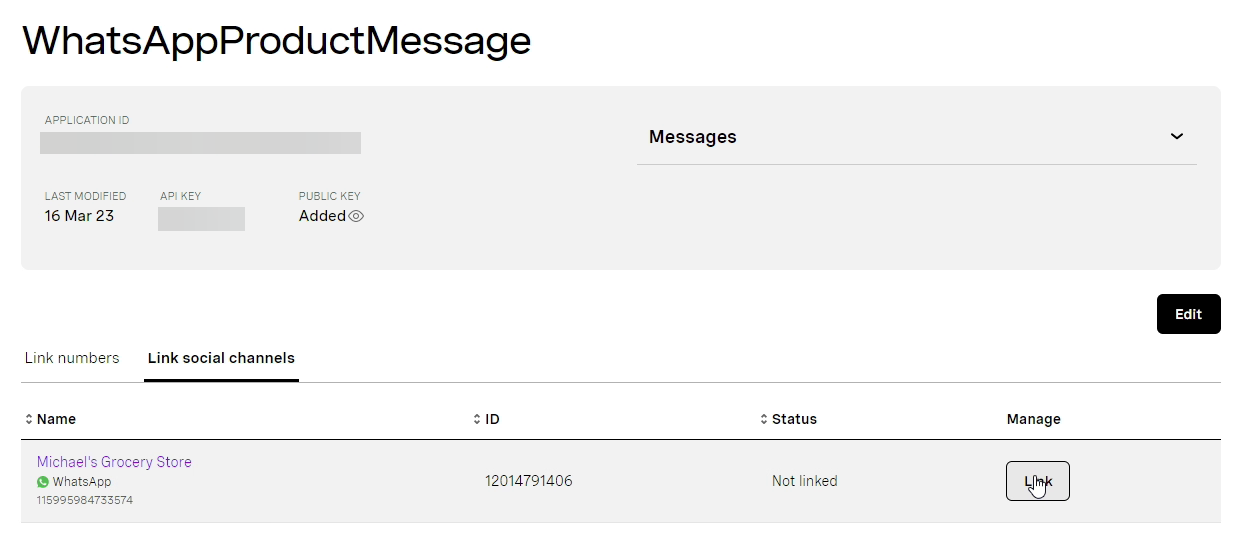 link-wa-account.png
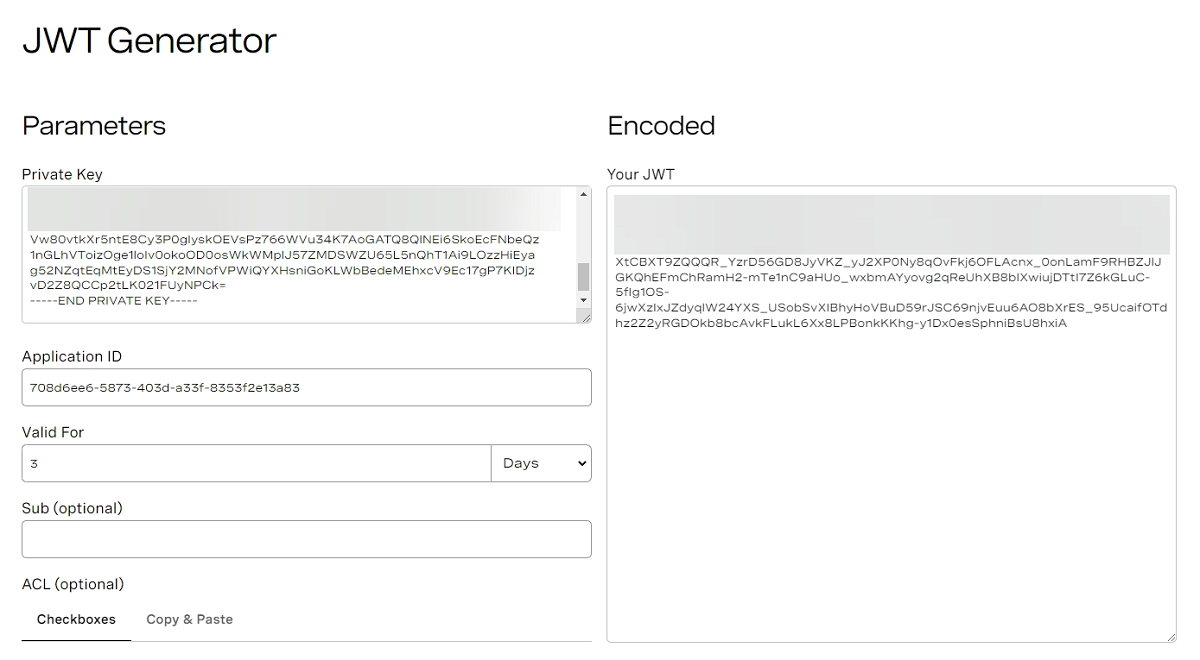
JSON Web Token (JWT) defines a compact and self-contained way for securely transmitting information between parties as a JSON object. This information can be verified and trusted because it is digitally signed. For security measures, it is recommended to use a JWT Token when working with the Messages API and other Vonage products.
We have created a site where you can create a token with just a few steps. Click here and add your Private Key as well as your Application ID. Then you'll need to specify how long the token will be good for. Select three days, and your JWT token is available. Copy that to a safe place for now. It is also worth noting that Vonage has several Server SDKs that can create JWTs for our products.
 jwt-generator.png
Keep in mind that a Product Message cannot be used to initiate a WhatsApp conversation. It can only be sent as part of an existing conversation that has been started either by the customer messaging the business or the business sending a Template Message to the customer. In this example, we'll send a template message to the customer using WhatsApp Manager. Once logged in, select Account Tools, then Message Template.
 wa-message-templates.png
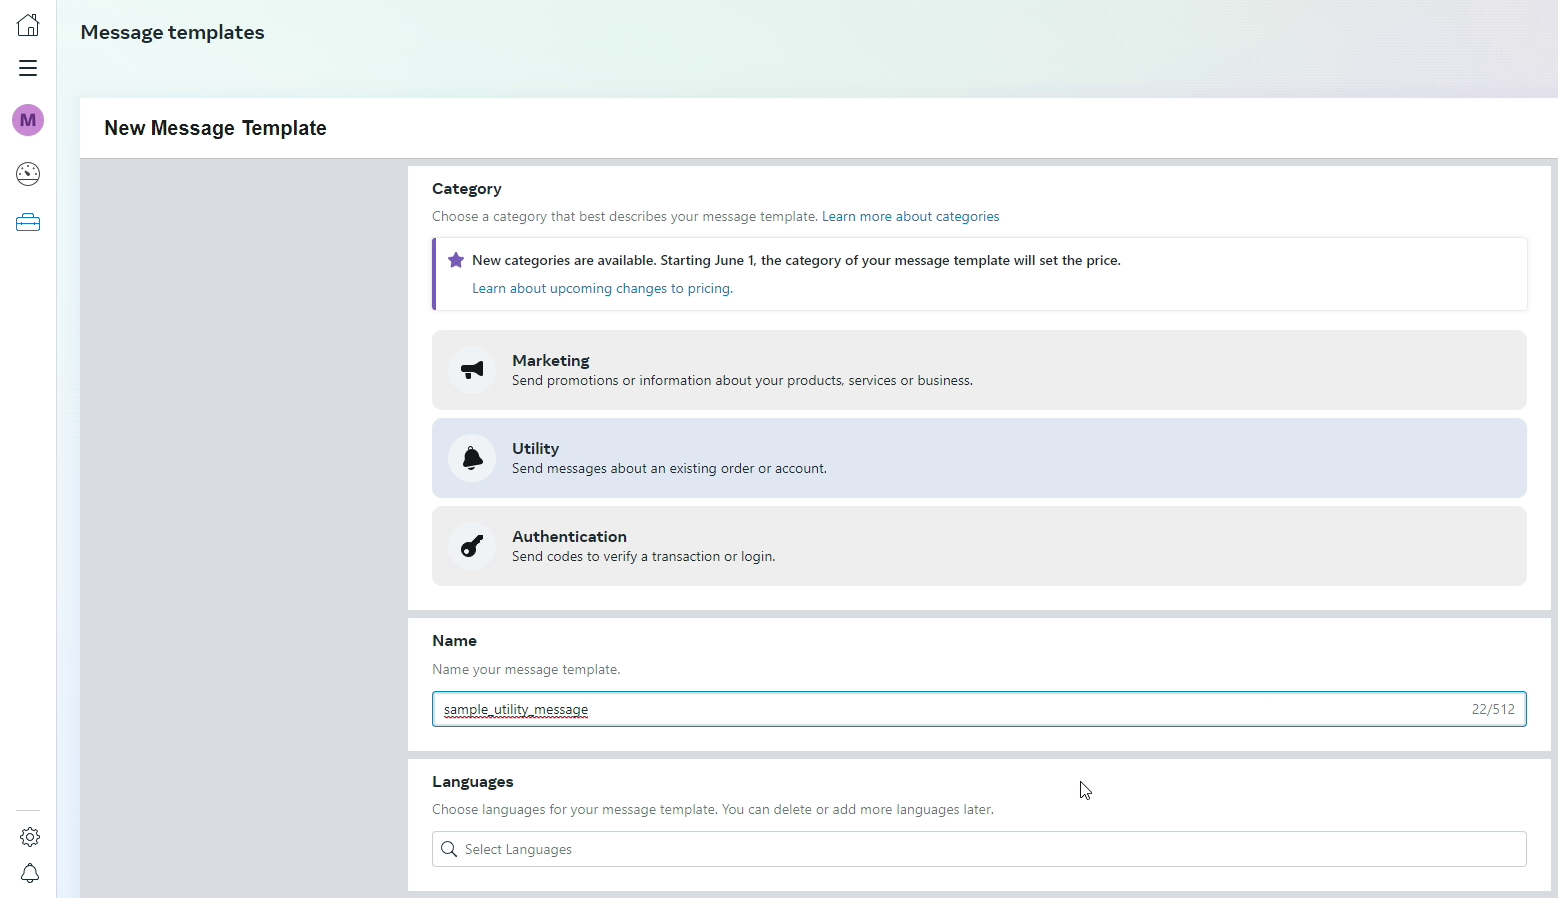
Select Create Message Template. Under Category, select Utility. Give it the name of sample_utility_message and choose your language of choice. Once complete, press Continue.
 utility-message.png
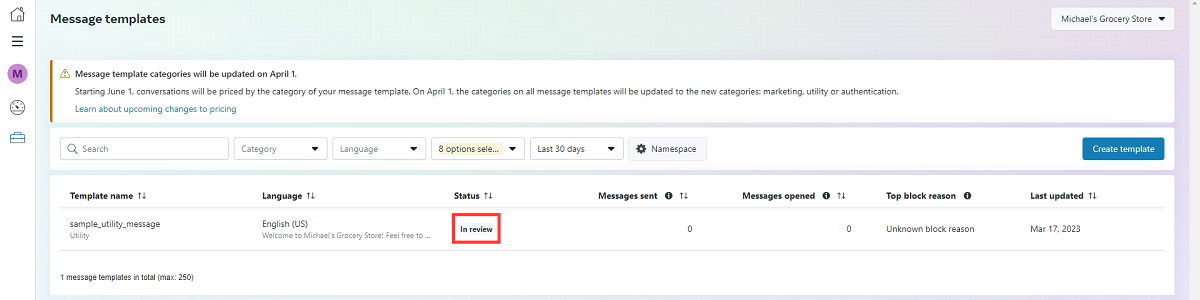
Provide a Body text such as "Welcome to Michael's Grocery Store! Feel free to browse." Now hit the Submit button. You'll see the following screen; it takes some time before Meta approves it. (It took almost 10 hours to get approved when writing this article.)
 message-template-status.png
Once your Message Template has been approved, save the three scripts below to test the application by making only the following changes.
Replace ADD_YOUR_JWT_TOKEN with the one created in the previous step.
Replace ADD_YOUR_VONAGE_NUMBER with the Vonage Number that you bought earlier.
Replace ADD_YOUR_DESTINATION_NUMBER with a number that you can reach.
template.sh - Run this after your message template was approved by Meta.
single.sh - Run this after you have received and interacted with the message. You should also add the catalog_id and product_retailer_id to show a single message.
multiple.sh - Run this anytime after the initial template has been received. You should also add the catalog_id and product_retailer_id to show multiple messages.
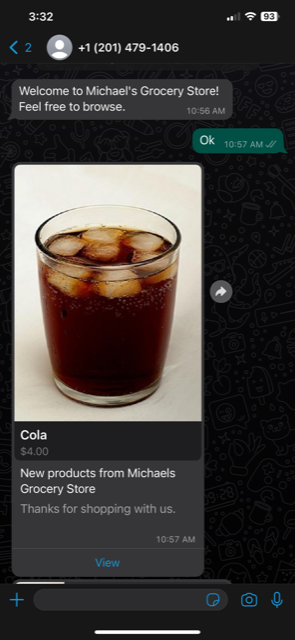
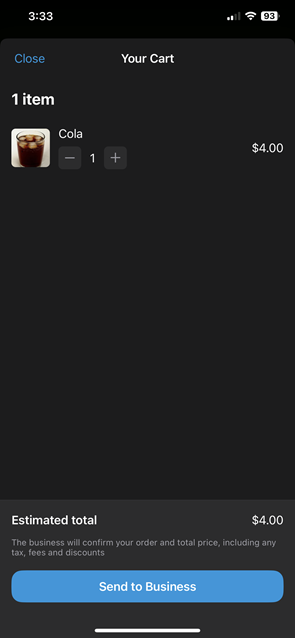
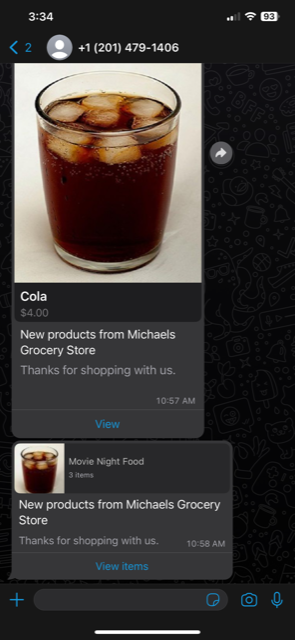
After you send the template.sh and the single.sh, you'll see a conversation initiated by the business showing only the Cola.
 iphone1.png
Clicking on View, you will have the option to Add to Cart or Message Business. We'll add the Cola to the cart and we can now send this order request back to the business.
 iphone2.png
For multiple products, run the multiple.sh script and you'll see the following. We can also add multiple items to the cart as shown below.
 iphone3.png
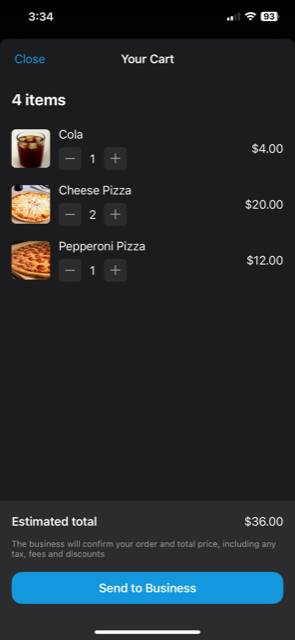 iphone4.png
Now that you have seen how to use WhatsApp Product Message, it is time to create your own! You could extend this project by using a payment processor to automatically accept payment without any user intervention. Also, don't forget to refer to the WhatsApp Product Messages page for more information.
If you have questions or feedback, join us on the Vonage Developer Slack or send me a Tweet on Twitter, and I will get back to you. Thanks again for reading, and I will catch you on the next one!
Share:
Michael Crump works at Vonage on the Developer Experiences team and is a coder, YouTuber, and frequent speaker of various .NET and cloud/communication development topics. He’s passionate about helping developers understand the benefits of each in a no-nonsense way.