Share:
Karl is a Developer Advocate for Vonage, focused on maintaining our Ruby server SDKs and improving the developer experience for our community. He loves learning, making stuff, sharing knowledge, and anything generally web-tech related.
Secure Your Inbound Media Files With the Vonage Messages API
Time to read: 2 minutes
Vonage’s Message API enables two-way conversations across a number of different messaging channels. Many of these channels support sending and receiving media files, such as images, audio, and video.
This multi-media messaging is extremely useful for a wide variety of situations. Examples might include a customer needing to send a business a video of a faulty product malfunctioning or images of the damage caused in transit to a delivery.
Inbound messages are received via an Inbound Message Webhook. In order to receive inbound messages, you first need to set up this webhook. This can be done in the Vonage Dashboard, via the following steps:
Create a Vonage Application (if you haven’t already done so)
Within that application:
Enable it for the Messages API
Set the Inbound URL to whichever URL you wish to receive your inbound messages
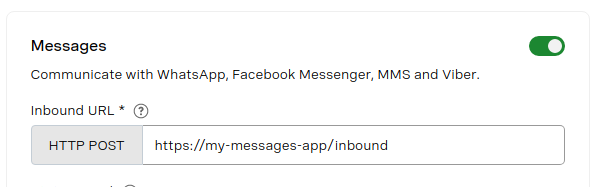 Vonage Dashboard Messages Application Inbound URL setting
Inbound messages include a JSON payload containing details of the message. For messages of type text, this will include the text of the message itself, for example:
{
   "channel": "messenger",
   "message_uuid": "aaaaaaaa-bbbb-cccc-dddd-0123456789ab",
   "to": "9876543210",
   "from": "0123456789",
   "timestamp": "2023-01-01T14:00:00.000Z",
   "message_type": "text",
   "text": "Hey there!"
}For messages where the type is some sort of media, such as image or video, that media is stored on Vonage’s media servers, and the message includes a unique url to access the media file, for example:
{
   "channel": "messenger",
   "message_uuid": "aaaaaaaa-bbbb-cccc-dddd-0123456789ab",
   "to": "9876543210",
   "from": "0123456789",
   "timestamp": "2023-01-01T14:00:00.000Z",
   "message_type": "image",
   "image": {
      "url": "https://api-us.nexmo.com/v3/media/1b456509-974c-458b-aafa-45fc48a4d976"
   }
}
The media is stored for only 48 hours, and you must issue a GET request to the specific URL provided in the inbound message payload to access the media file. For example:
GET /v3/media/1b456509-974c-458b-aafa-45fc48a4d976
Host: api-us.nexmo.comThe fact that you need the specific URL and that it expires after a set time provides a certain degree of inbuilt security. There may, however, be some minor risks associated with this level of security; for example, brute force could reveal the URL, and anyone possessing the URL could access the media file without needing additional credentials.
Increased security may be desirable for specific use cases, such as a customer-care situation requiring the customer to send sensitive information in the image or video form. This is where the Messages API Secure Inbound Media feature can help!
To enable the feature, in the Vonage Dashboard, edit the Application where you set the Inbound URL for the webhook, and toggle the Enhanced Inbound Media Security switch to the ‘on’ position.
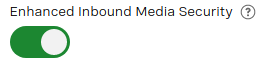 Vonage Dashboard Messages Application Enhanced Inbound Media Toggle
With the feature enabled, inbound message webhooks will still contain a URL to access the media. Still, now the GET request to access the media must include an Authorization header with a scheme of Bearer and the credentials being a JSON Web Token (JWT). The JWT must be generated using the Application ID and Private Key from the Vonage Application where you set the Inbound webhook URL. For example:
GET /v3/media/1b456509-974c-458b-aafa-45fc48a4d976
Host: api-us.nexmo.com
Authorization: Bearer eyJ0eXAiOiJKV1Qi...With the feature enabled, making a GET request to the media URL without a correctly set Authorization header will result in a 401 Unauthorized response.
You can generate a JWT via our online tool or by using the Vonage CLI. In the context of a server application, you can use one of our Server SDKs to generate the JWT as part of your overall application workflow. Below is an example of generating a JWT using the Ruby Server SDK.
require 'vonage'

jwt = Vonage::JWT.generate(
 application_id: ENV['VONAGE_APPLICATION_ID'],
 private_key: ENV['VONAGE_PRIVATE_KEY_PATH']
)(The example assumes that 'VONAGE_APPLICATION_ID' and 'VONAGE_PRIVATE_KEY_PATH' are set as environment variables in the Ruby application).
Is Secure Inbound Media useful for your app or use case? Then why not get started now with Vonage APIs? Check out the documentation. If you have questions or feedback, join us on the Vonage Developer Slack, and we will get back to you.