
Share:
Benjamin Aronov is a developer advocate at Vonage. He is a proven community builder with a background in Ruby on Rails. Benjamin enjoys the beaches of Tel Aviv which he calls home. His Tel Aviv base allows him to meet and learn from some of the world's best startup founders. Outside of tech, Benjamin loves traveling the world in search of the perfect pain au chocolat.
Receive an RCS Message Status with Ruby on Rails
Time to read: 3 minutes
Previously, we learned how to send Rich Communication Services (RCS) Suggested Reply messages using Ruby on Rails. However, just sending the message isn’t so great if you don’t know what happened on the other end. Thankfully, with the Messages API and RCS Message Statuses, we get that plus a lot more.
This tutorial will extend the previous article and show you how to integrate RCS message statuses in a Ruby on Rails application using Vonage webhooks.
TL;DR Skip ahead and find all the Quickstart code on GitHub.
The Vonage Messages API provides the Message Status Webhook, which allows you to hook directly into the current status of a message that you have sent. Each time the status of the message is updated, the webhook is triggered.
This means you can know if your message has been submitted, delivered, rejected, undeliverable, or read.
 Diagram explaining RCS Message Status, showing how messages travel from an application through Vonage and carriers to the user, with delivery status callbacks.
How to Publicly Expose Our Ruby on Rails App with ngrok
Vonage will need to send our message statuses to an endpoint. Our Ruby on Rails application is running in development on port 3000, so we can access it locally at localhost:3000. However, that only works on our computer!You can use ngrok to safely expose your local server publicly over HTTP. So now, in a separate tab from your Rails server, open an ngrok tunnel on port 3000.
ngrok http 3000Be sure to add your ngrok URL as the VONAGE_SERVER_HOSTNAME in your .env file.
# .env

# ngrok URL, don't include the protocol (https://)
VONAGE_SERVER_HOSTNAME=''And then (re)start your Rails server. For more help, see how to get started and use ngrok in Rails.
Once ngrok is running, we’ll edit our Vonage application (from the previous article) in the dashboard to add the ngrok URL in our webhooks and link it to our RCS Agent.
First, link your RCS Agent by clicking the “Link external accounts” tab:
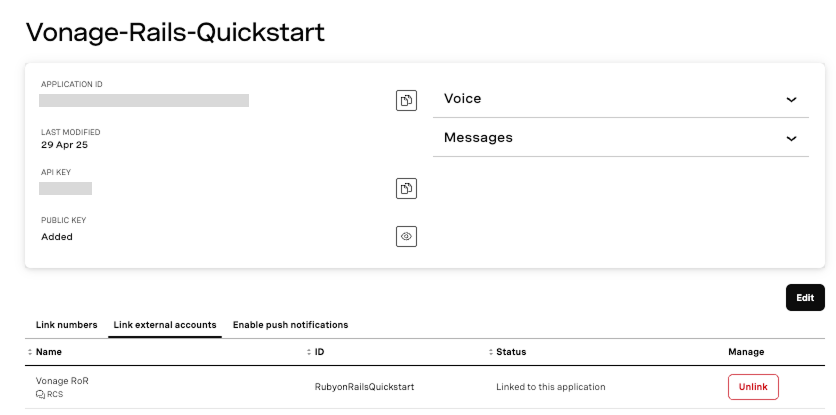 Dashboard view showing the Vonage-Rails-Quickstart application linked to the Vonage RoR RCS external account, with voice and message capabilities enabled.
Then edit the application and in the Status URL field, add your ngrok URL followed by /rcs_message_status.
 Vonage Messages API webhook settings showing an invalid Inbound URL error.
Once you hit save, ngrok will now forward requests made to the /rcs_message_status endpoint to your Rails application! But there’s one small problem: our Rails application doesn’t have that endpoint.
Now that Vonage is forwarding statuses to the /rcs_message_status, let’s update our application and create a route to handle it.
# config/routes.rb
Rails.application.routes.draw do
	...previous routes...


 # For RcsMessageStatus controller, create
post '/rcs_message_status', to: 'rcs_message_status#create', as: :rcs_message_statusBut what’s going to happen there? Our application is going to accept the Message Status and parse it for the relevant information. You can see what a typical Message Status looks like:
{
   "message_uuid": "aaaaaaaa-bbbb-4ccc-8ddd-0123456789ab",
   "to": "447700900000",
   "from": "Vonage",
   "timestamp": "2025-02-03T12:14:25Z",
   "status": "read",
   "client_ref": "abc123",
   "channel": "rcs",
   "destination": {
      "network_code": "12345"
   }
}The most important field is the status because it tells you whether your message was delivered and, if not, what went wrong. See more information about Message Status webhooks.
We’re going to create some logic to update our RCS status based on the received message statuses. Let’s generate a new controller in the command line to handle this.
rails g controller RcsMessageStatus createOur controller has a single, simple create method. First, the method parses our message status and extracts the message_uuid; it uses this foreign ID to find the RCS in our local database. It then updates the status for this RCS to the current status we received in the Message Status.
# app/controllers/rcs_message_status_controller.rb

class RcsMessageStatusController < ApplicationController
  skip_before_action :verify_authenticity_token

  def create
   RcsMessage.where(message_uuid: params[:rcs_message_status][:message_uuid])
       .update_all(status: params[:rcs_message_status][:status]) if params[:rcs_message_status][:message_uuid]

    # Return an empty HTTP 200 status
    head :ok
  end
end
You can now send an RCS (per the previous article) and watch your Rails server to see that the webhook is called, forwarded, and ActiveRecord updates the database! Notice how the /rcs_message_status endpoint is hit 3 times. Our message status is updated to submitted, then delivered, and finally read.
 Console log output showing RCS message status updates (submitted, delivered, read) handled by a Ruby on Rails application using the Vonage Messages API.
You did it! You learned how to expose your Ruby on Rails application to listen for a message status webhook via ngrok, updating your database in the process! We’ll complete the loop on our user journey in the next article by allowing our user to select one of the suggested replies we sent and then handle it in our Rails application.
If you have any questions or suggestions for more Ruby content, send us a message over on the Community Slack. You can also stay in the loop on our developer content and events on X, formerly known as Twitter.
Share:
Benjamin Aronov is a developer advocate at Vonage. He is a proven community builder with a background in Ruby on Rails. Benjamin enjoys the beaches of Tel Aviv which he calls home. His Tel Aviv base allows him to meet and learn from some of the world's best startup founders. Outside of tech, Benjamin loves traveling the world in search of the perfect pain au chocolat.