
Share:
A trained actor with a dissertation on standup comedy, I came into PHP development via the meetup scene. You can find me speaking and writing on tech, or playing/buying odd records from my vinyl collection.
Play an Audio File Into a Voice Call With PHP
Time to read: 9 minutes
Every time I phone my local leisure centre to book a swimming session, I’m greeted with an announcement of the latest news: the centre is closed for two hours next Monday, the timetable for the family swim has changed, etc. In this article, I’ll show you an example of how they do this with Vonage’s Voice API and a PHP backend written in the Slim Framework to play audio into an ongoing phone call.
Firstly, we need a new Slim application. I’m going to make this as absolutely vanilla as possible - no big boilerplates, no automatic templating. We’re going to have one endpoint that will trigger an outbound call, and one incoming endpoint to read the webhook generated when the end user picks up a call.
Create a directory that will contain our code, and then use Composer to generate a new project:
composer initYou can skip all interactive questions by hitting return, which will use defaults. When asked if you want to add packages interactively, make sure you refuse; this is so I can show the commands in this article to pull in the framework.
Composer will generate its configuration file composer.json, and a dependency folder, vendor. The default settings will also create the directory that will house your code, src.
In the command line, we’ll need to pull the Slim framework in and a PSR-7 interface for the request/response classes. The final command will pull in the Vonage PHP SDK, which handles all the heavy lifting to make API requests for you. Lastly, our Vonage Client is configured with environment variables, so we’ll need the de facto library to handle that.
composer require slim/slim
composer require slim/psr7
composer require vonage/client
composer require vlucas/phpdotenvNow that we have Slim and our other required dependencies, we can start writing the application. The Vonage PHP SDK requires an Application ID and a Private Key, both of which you get when creating a new application instance on the Vonage Dashboard. Alternatively, you can do this using the Vonage CLI, which is the route we’re going to take.
Install the Vonage CLI globally using the following command:
npm install @vonage/cli -gThen, configure the CLI with your Vonage API key and secret, which you will find in the Developer Dashboard:
Vonage auth set –api-key=’VONAGE_API_KEY –api-secret=’VONAGE_API_SECRET’Replace the VONAGE_API_KEY and VONAGE_API_SECRET with your details to authenticate the CLI.
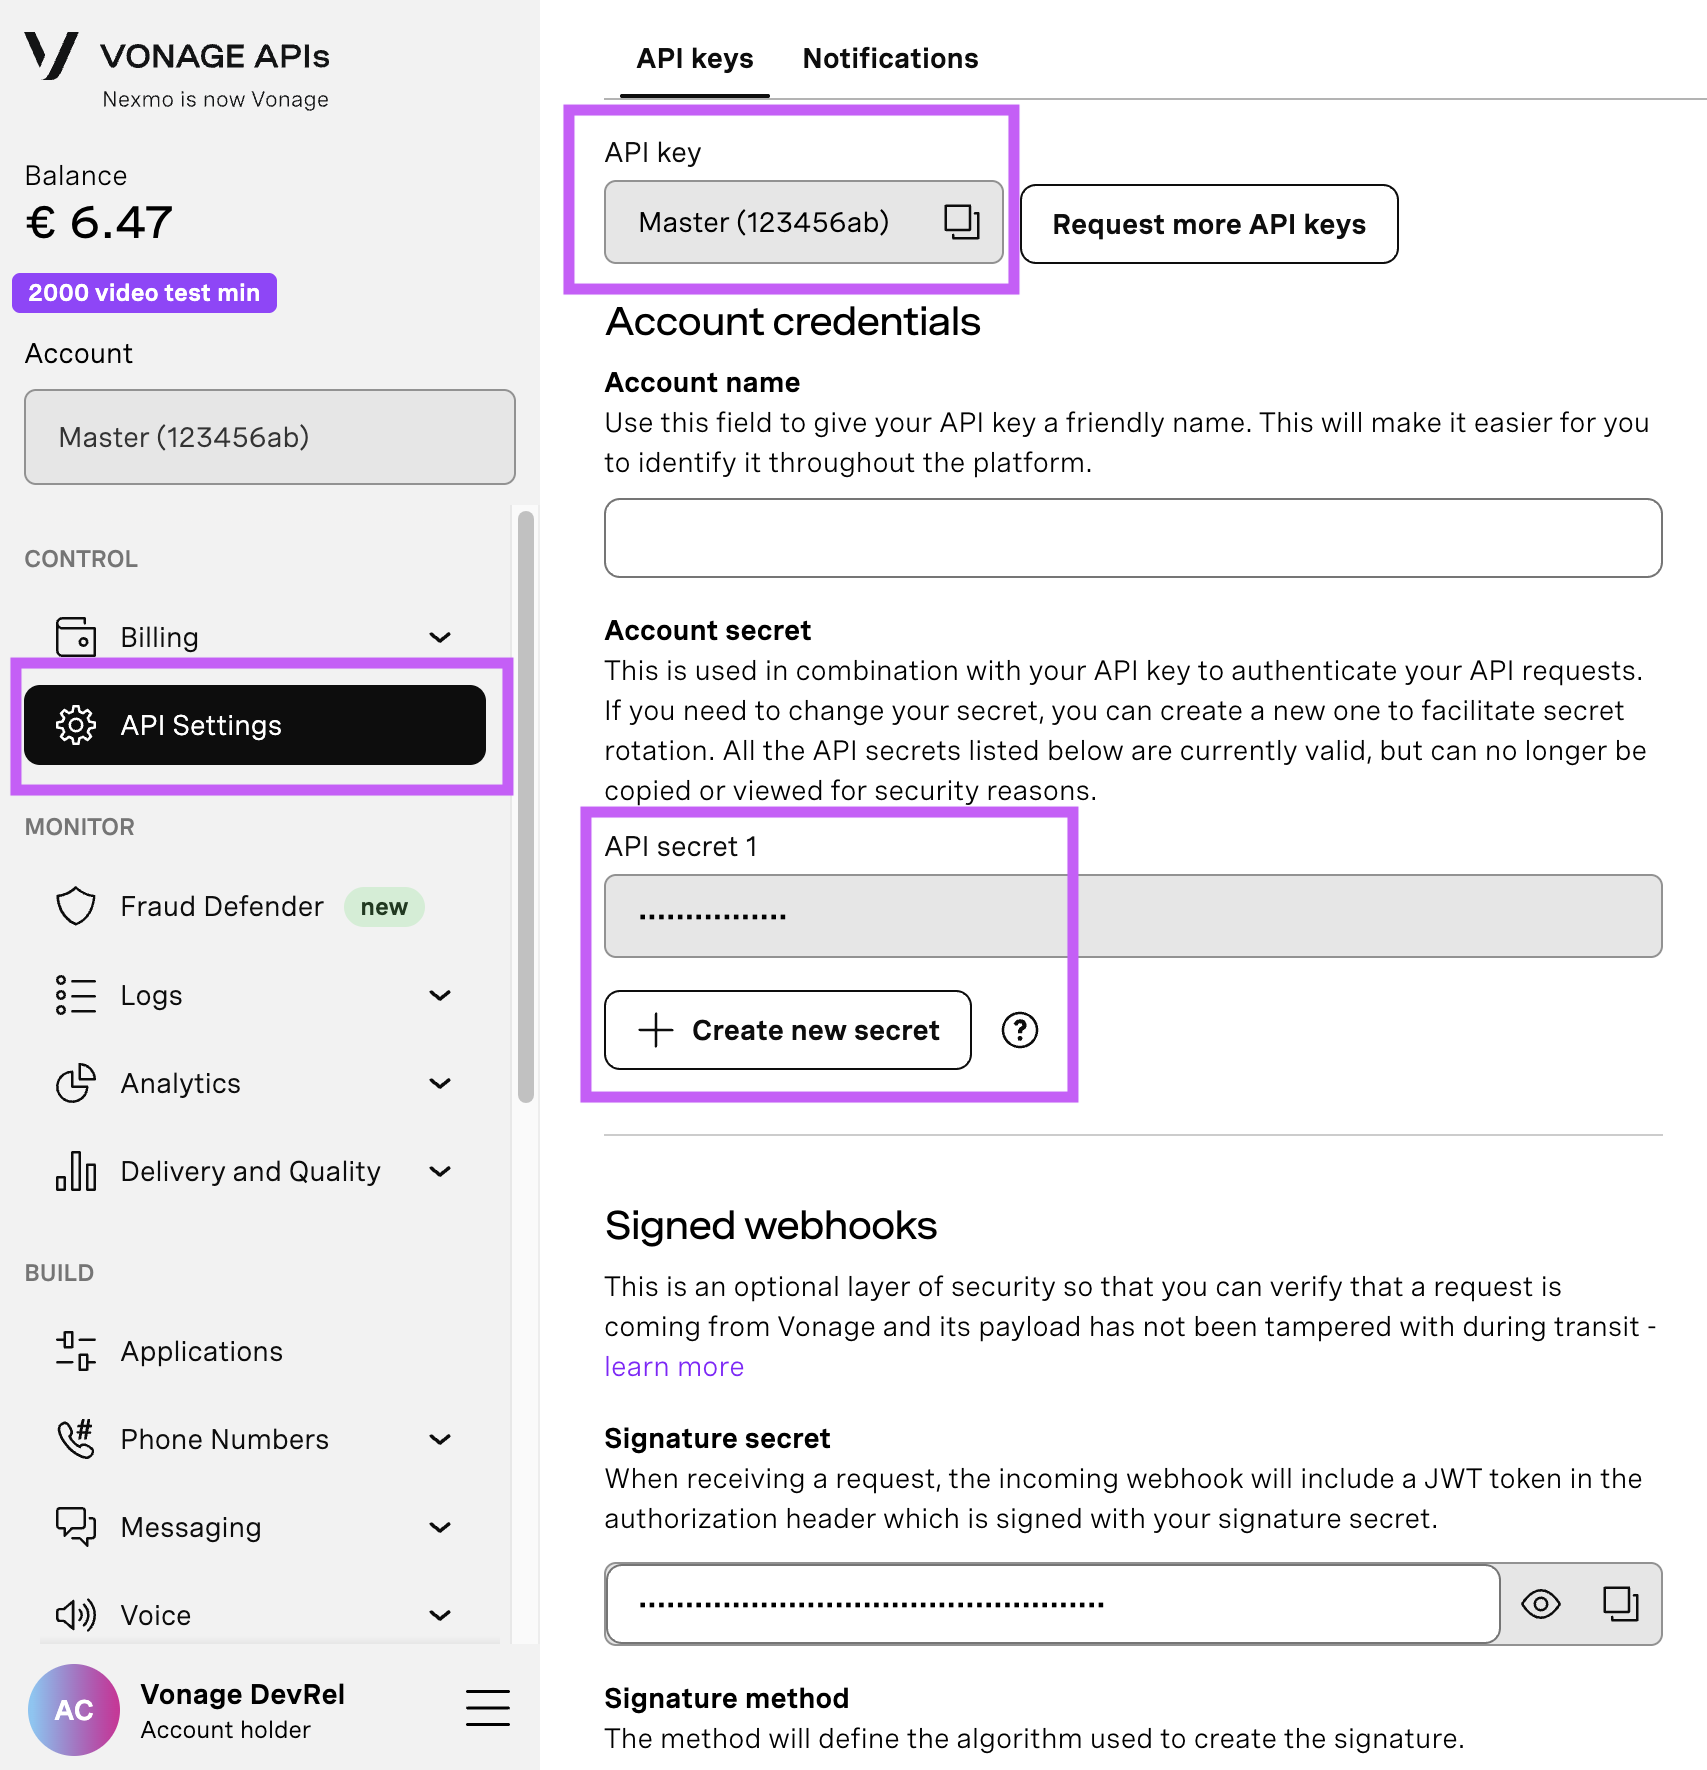
Open your API Settings Page to access your Vonage API Key and Secret, both of which are displayed as shown in the screenshot below. The API Key is located at the top of the page, and to access your API Secret, please refer to the “Account secret” subsection.
Note: In case you cannot remember your previously created API Secret, click on “+ Create new secret” and save it securely.
You can validate your authentication to make sure everything is working using the following command:
vonage auth checkIf you have installed the CLI in your local project rather than globally, you can add an extra flag to check:
Vonage auth check --localTo buy a virtual phone number, go to your API dashboard and follow the steps shown below.
 Purchase a phone number
Go to your API dashboard
Navigate to BUILD & MANAGE > Numbers > Buy Numbers.
Choose the attributes needed and then click Search
Click the Buy button next to the number you want and validate your purchase
To confirm you have purchased the virtual number, go to the left-hand navigation menu, under BUILD & MANAGE, click Numbers, then Your Numbers
To use the Voice API, you must create a Voice API application. This is not the same thing as the web application you are building. It is merely a container for the configuration and security information you need to connect to Vonage's APIs.
vonage apps create "Play audio app" --private-key-file=~/private.keyYou will receive the following (example, dummy) data to note down:
Name: play audio app
Application ID: 7a319bf9-49e7-413d-914b-402fe8e68XXX
Improve AI: Off
Private/Public Key: Set
You’ll notice that we have given the command the argument of private-key-file. This will download your private key for you once the command has executed: locate this key file (in the command, I have used the UNIX-like ~/ location, which is the home folder; you’ll want to set it to something like C:\Users\YOUR-USER-NAME if you are using Powershell in Windows) and place the file in the root directory of your project.
We have not set the application to use the Voice API yet, so run the following command to add the Voice capability:
vonage apps capabilities update [VONAGE_APPLICATION_ID] --voice-answer-url=https://example.com/answer --voice-event-url=https://example.com/event-statusYou will notice that we are setting the voice-answer-url and the voice-event-url at the application level here. These are placeholders for now, and you do not need to change these values. The reason here is that the code used to make the call will dynamically create these during the HTTP calls that are made.
Because you should never put secrets into your codebase, create a new file in the root of your project named .env. Populate the variables with the corresponding information, the TO_NUMBER being the number that the dialler calls. We’ll get onto the BASE_URL later. The VONAGE_PRIVATE_KEY_PATH can be left as is in the example below, and the VONAGE_NUMBER should be a purchased Vonage Virtual Number that has been purchased in the Dashboard.
In the src directory, create a new file, index.php, and add the following code:
<?php

use Psr\Http\Message\ResponseInterface as Response;
use Psr\Http\Message\ServerRequestInterface as Request;
use Slim\Factory\AppFactory;
use Vonage\Client\Credentials\Keypair;
use Vonage\Voice\Endpoint\Phone;
use Vonage\Voice\OutboundCall;
use Vonage\Voice\Webhook;

require DIR . '/../vendor/autoload.php';

$dotenv = Dotenv\Dotenv::createImmutable(__DIR__ . '/../');
$dotenv->load();

$app = AppFactory::create();

$app->get('/dial', function (Request $request, Response $response, array $args) {
   $privateKeyPath = realpath(__DIR__ . '/../' . $_ENV['VONAGE_APPLICATION_PRIVATE_KEY_PATH']);
   $credentials = new Keypair(
       file_get_contents($privateKeyPath),
       $_ENV['VONAGE_APPLICATION_ID']
   );

   $client = new \Vonage\Client($credentials);

   $call = new OutboundCall(
       new Phone($_ENV['TO_NUMBER']),
       new Phone($_ENV['VONAGE_NUMBER'])
   );

   $call
       ->setAnswerWebhook(
           new Webhook($_ENV['BASE_URL'] . '/webhooks/answer', 'POST')
       )
       ->setEventWebhook(
           new Webhook($_ENV['BASE_URL'] . '/webhooks/event', 'POST')
       )
   ;

   $client->voice()->createOutboundCall($call);
   $response->getBody()->write('Outbound Call Started');
   return $response;
});

$app->post('/webhooks/answer', function (Request $request, Response $response, array $args) {
   $builder = new Vonage\Voice\NCCO\NCCO();
   $builder->addAction(new \Vonage\Voice\NCCO\Action\Talk('Here is some soothing music for you'));
   $builder->addAction(new \Vonage\Voice\NCCO\Action\Stream($_ENV['BASE_URL'] . '/music.mp3'));

   $response->getBody()->write(json_encode($builder->jsonSerialize()));

   return $response->withHeader('Content-Type', 'application/json');

});

$app->post('/webhooks/event', function (Request $request, Response $response, array $args) {
   var_dump($request->getParsedBody());
});

$app->run();There’s a lot going on here, so let’s break it down.
$dotenv = Dotenv\Dotenv::createImmutable(__DIR__ . '/../');
$dotenv->load();This code loads the contents of the .env file into the PHP superglobal $_ENV array to set up our Vonage Client. $app = AppFactory::create() creates a new Slim application instance, so we can then set up our endpoints.
Our outbound dialer is defined as an HTTP GET route, /dial. So, the code below will execute when hitting this. It’s here that we set up the Vonage Client using our credentials, which can be accessed from the $_ENV object:
$privateKeyPath = realpath(__DIR__ . '/../' . $_ENV['VONAGE_APPLICATION_PRIVATE_KEY_PATH']);
$credentials = new Keypair(
   file_get_contents($privateKeyPath),
   $_ENV['VONAGE_APPLICATION_ID']
);

$client = new \Vonage\Client($credentials);There are multiple ways you can use credentials in Vonage in multiple ways. Still, the important thing to note is that the Keypair credentials object takes the string of your Vonage Application’s private key file and the Application ID. What the PHP SDK does that is quite handy is that, at runtime, your JWT is created and added to the header automatically for you. This is important for the application because while you can use Basic Authentication with some Vonage APIs, incoming Webhook Configuration will only work with a JWT for security reasons.
It is possible for a Vonage Application to be configured within the Dashboard to always hit the same Answer URL and the same Event URL for ongoing application updates. However, as you can see from the code used, you can also dynamically set these webhook endpoints. This would be useful when you have instances of several different workflows and are tracking the progress of individual calls. For example, you can add a database table that can then do CRUD-style operations with a UUID in the URL path. This gives you the flexibility to handle multiple queries at once, if you use something like Route Model Binding with Laravel Octane. Our Slim code is a bit simpler for readability:
$call = new OutboundCall(
   new Phone($_ENV['TO_NUMBER']),
   new Phone($_ENV['VONAGE_NUMBER'])
);

$call
   ->setAnswerWebhook(
       new Webhook($_ENV['BASE_URL'] . '/webhooks/answer', 'POST')
   )
   ->setEventWebhook(
       new Webhook($_ENV['BASE_URL'] . '/webhooks/event', 'POST')
   );

$client->voice()->createOutboundCall($call);

$response->getBody()->write('Outbound Call Started');

return $response;The Webhook path is configured by using the environment variable BASE_URL. Now we have the outbound call path, we’ll need to define what that BASE_URL is.
You’ll need to serve the application locally first. To make things as simple as possible, we’ll use the built-in server in PHP. Navigate to the src directory and then fire it up:
php -S localhost:8080Our Webhooks are POST requests coming directly from Vonage. So, without exposing our application to the Internet, there’s no way Vonage can get to our localhost application. The most commonly used tool to expose it would be Ngrok, which you can find installation instructions here. If you want to keep it strictly PHP, you can use Beyond Code’s Expose, which leverages the power of an event loop provided by ReactPHP. The important action is to run one of these tools and note down the URL you get back. From there, you paste it into the BASE_URL in the .env file and hey presto! A way of consuming incoming data.
Our last part of the execution code takes that data, announces that sound is coming, and then plays the sound.
$app->post('/webhooks/answer', function (Request $request, Response $response, array $args) {
   $builder = new Vonage\Voice\NCCO\NCCO();
   $builder->addAction(new \Vonage\Voice\NCCO\Action\Talk('Here is some soothing music for you'));
   $builder->addAction(new \Vonage\Voice\NCCO\Action\Stream($_ENV['BASE_URL'] . '/audio.mp3'));

   $response->getBody()->write(json_encode($builder->jsonSerialize()));

   return $response->withHeader('Content-Type', 'application/json');
});This code is essentially building out a JSON to respond to Vonage with, which will then process the instructions. These are done using unique Vonage NCCO Objects, and the good news is that the PHP SDK has a builder to make this easy! We have two actions: firstly, a Talk action to trigger when the call is answered, and then a Stream action for the audio. You’ll notice that there is a URL here that uses the BASE_URL and then a file named audio.mp3. This is a placeholder - so to get it to work, place any file named audio.mp3 in the src directly, and that will be what is played into the call. Vonage can do this because the audio file lives in the same directory that will be exposed by the built-in web server.
You’re all set: navigate to your URL for /dial and enjoy whatever you pick for your audio file, be it relaxing elevator jazz or, if you really don’t like your end-users, some modern dubstep.
In this post, you learned how to play audio into an existing call and about the NCCO actions that govern the call flow. Feel free to experiment by substituting different audio files and NCCO actions. The following resources might help:
Have a question or want to share what you're building?
Subscribe to the Developer Newsletter
Follow us on X (formerly Twitter) for updates
Watch tutorials on our YouTube channel
Connect with us on the Vonage Developer page on LinkedIn
Stay connected and keep up with the latest developer news, tips, and events.