
Share:
Diana is a developer advocate at Vonage. She likes eating fresh oysters.
How to Schedule an SMS Using Vonage and Appwrite Messaging
Appwrite, a popular open-source backend server (alternative to Firebase), received numerous requests from their community for a messaging feature. In response, they introduced Appwrite Messaging, a product that enables developers to send emails, SMS, and push notifications within their Appwrite projects. Some of you may have learned about this feature on Day 0 of their release week. Some of you may have learned about it from me when I prematurely tweeted about being a guest on their livestream. (Sorry, Eldad!)
Developers can now set up a full-functioning messaging service using Vonage as one of their providers. This includes scheduling SMS messages, particularly useful for sending timely reminders or updates. I'm going to show you how!
After you create a Vonage account, navigate to your Vonage API Dashboard.
On the main page of your dashboard, you should see your API key and secret. Save these numbers in a note so you can easily access them later. 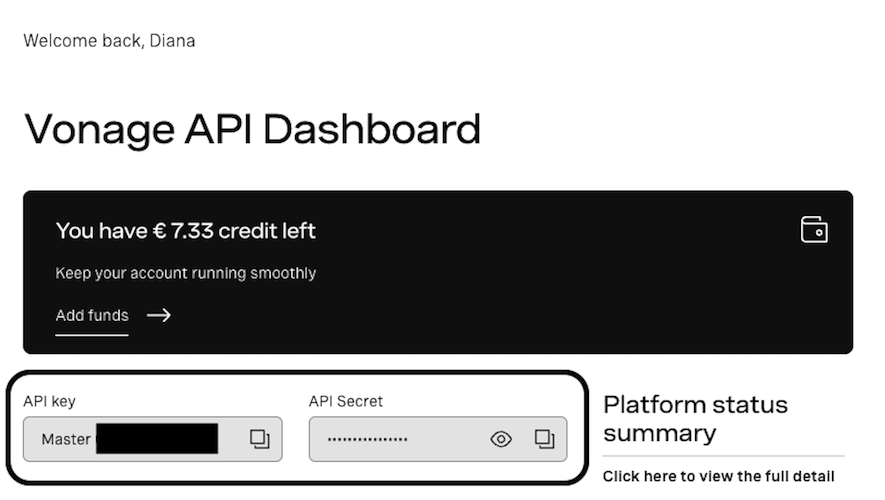 API Key and Secret
On the left-hand menu, find 'BUILD & MANAGE' > 'Numbers' > 'Buy Numbers'. Purchase a number that includes the SMS feature and Mobile type. If you are in the U.S., check out my blog, "What You Need to Know about 10DLC," to complete the requirements for a 10DLC number. Your application won't work without doing so. Save this phone number on the same note; we'll use it later.
 Buy Number
The cool thing about the messaging feature is that you will be executing it entirely on the Appwrite console.
If you haven't done so already, make sure you have Appwrite installed by running:
npm install appwriteOnce Appwrite is installed, go to your Appwrite Cloud console and create an organization. For this project, you can choose the Starter plan.
Within your organization, go to the 'Projects' tab and click 'Create Project'.
Buy NumberGive your Project a name like "Schedule SMS" and hit 'Next'.
 Name Your ProjectSelect the available region closest to you and click 'Create'. Currently, only Frankfurt is listed, and that's all right for now.
 RegionNow that your project is created, under the 'Getting started' section, select 'Web' to add it as a platform.
 Add PlatformComplete the hostname registration.
 Hostname registrationOnce you finish that, go to your console and click on the project you just created.
Go to 'Auth' on the left-hand side and select 'Create user'. For testing purposes, I suggest you fill it out with your information.
When entering the phone number, it must start with a '+' and can have a maximum of fifteen digits.
 Create userNow, verify the user by clicking 'Verify account'. The status should then change to green and say verified {TYPE}.
Go back to 'Messaging' then to the 'Topics' tab and click 'Create topic'.
 Create TopicGive your topic a name like "Friends" and hit 'Create'.
 Name your topicAdd Subscriber
Now go to your topics and click on the topic you just created (In my case, 'Friends'). Click 'Add subscriber'.
 Add subscriber pageYou should see the user you created earlier. Click on their name to add them as subscribers. They'll be listed under your subscriber list—one for SMS and one for Email.
 List subscribers
Now go back to the main 'Messaging' view by clicking 'Messaging' on the left (again), and go to the 'Providers' tab. Create a provider with the SMS feature. Give your provider a name and select Vonage then hit 'Next'.
On the settings page, enter your Vonage API key and Vonage API secret. For the sender number, enter the phone number you purchased on the Vonage dashboard. The values of these fields should already be in the note you created at the beginning of this tutorial.
When entering the phone number, it must start with a '+' and can have a maximum of fifteen digits.
Now go back to the main 'Messaging' view by clicking 'Messaging' on the left (again). Make sure you're on the 'Messages' tab, click 'Create message', and choose the SMS option.
 Messaging tabWrite the text for the message you want to send, then hit 'Next'.
 Write a messageOn the Targets page, click 'Select topics' and choose the target you just created previously. You should see them listed under your 'Target'. Click 'Next'.
 Select friends topicHere on the Schedule page, you can decide when you want your message sent. You can either send it now or schedule a specific date and time down to the second.
 Send SMSHit 'Send' and you should receive the message on the exact date and time you scheduled it. Woo!
 Received SMS
And just like that, you sent a scheduled SMS directly from the Appwrite Cloud Console using Vonage as a provider! As both a Vonage employee and Appwrite Hero, I was absolutely thrilled to show both communities how to use this feature. If you end up building a project with these products, I'd love to hear about it! You can tag me on X, formally known as Twitter. Feel free to follow my team and join our Vonage developer community Slack. Thanks for reading, and I'll catch you in the next one!