Share:
Abdul is a Developer Advocate for Vonage. He has a background working in consumer products as an iOS Engineer. In his spare time, he enjoys biking, listening to music and mentoring those who are just beginning their journey in tech
How to Make Phone Calls Using iOS and React Native
Time to read: 11 minutes
This tutorial will show you how to use the Vonage Client SDK to build a React Native iOS app with the functionality to call a phone number.
Xcode 12, to build and run the app on an iOS simulator.
A GitHub account.
Cocoapods to install the Vonage Client SDK for iOS.
Our Command Line Interface, which you can install with
npm install -g @vonage/cli.Homebrew to install the React Native dependencies.
To build and run a React Native app, first, you need to install two dependencies, Node and Watchman. You can do so using Homebrew by running the following in your terminal:
If you already have Node installed, ensure it is Node 12 or newer. You can find more information about getting your environment set up in the React Native documentation.
You can clone the project to your local machine by running the following command in your terminal:
Then, in your Terminal, change directory into the new folder with the following command:
Now that the project has been cloned, you can install the project dependencies. You can install the React Native specific dependencies by running npm install. This command will install the dependencies listed in the package.json file. A dependency you should note is react-native-permissions, an open-source project that provides a unified way to request permissions on both iOS and Android. You can inspect the iOS dependencies by looking at the Podfile.
To create the application, we will be using our command-line interface. If you have not set up the CLI yet, do so by running the command vonage config:set --apiKey=API_KEY --apiSecret=API_SECRET in your terminal, where the API key and secret are the API key and secret found on your account’s settings page.
We will need a Vonage Number for the application, you can buy one using the Vonage CLI. The following command searches for an available number in the US. Specify an alternate two-character country code to search for a number in another country.
vonage numbers:search USOnce you have found a number, use this command to buy it:
vonage numbers:buy $NUMBER US
When an inbound call is received, Vonage makes a request to a publicly accessible URL of your choice - we call this the answer_url. You need to create a webhook server that is capable of receiving this request and returning an NCCO containing a connect action that will forward the call to the PSTN phone number. You do this by extracting the destination number from the to query parameter and returning it in your response.
Create a new folder:
mkdir vonageapp

cd vonageappInstall the dependencies:
npm init -y

npm install express localtunnel --saveCreate a file called server.js containing the following code:
'use strict';

const subdomain = 'SUBDOMAIN';
const vonageNumber = 'NUMBER';

const express = require('express');
const app = express();
app.use(express.json());

app.get('/voice/answer', (req, res) => {
  console.log('NCCO request:');
  console.log(`  - callee: ${req.query.to}`);
  console.log('---');
  res.json([
    {
      "action": "talk",
      "text": "Please wait while we connect you."
    },
    {
      "action": "connect",
      "from": vonageNumber,
      "endpoint": [
        { "type": "phone", "number": req.query.to }
      ]
    }
  ]);
});

app.all('/voice/event', (req, res) => {
  console.log('EVENT:');
  console.dir(req.body);
  console.log('---');
  res.sendStatus(200);
});

if(vonageNumber == "NUMBER") {
  console.log('\n\t🚨🚨🚨 Please change the NUMBER value');
  return false;
}

if(subdomain == "SUBDOMAIN") {
  console.log('\n\t🚨🚨🚨 Please change the SUBDOMAIN value');
  return false;
}
app.listen(3000);

const localtunnel = require('localtunnel');
(async () => {
  const tunnel = await localtunnel({
      subdomain: subdomain,
      port: 3000
    });
  console.log(`App available at: ${tunnel.url}`);
})();
Make sure to replace NUMBER with your Vonage number (in E.164 format), as well as SUBDOMAIN with an actual value. The SUBDOMAIN value used will become part of the URLs you will set as webhooks in the next step. Then start the server:
node server.jsThe terminal will print your server URL, for example:
App available at: https://SUBDOMAIN.loca.lt
Next, you will create a Vonage Application by copying and pasting the command below into the terminal. Make sure to change the values of --voice_answer_url and --voice_event_url arguments, by replacing SUBDOMAIN with the actual value used in the previous step:
A file named vonage_app.json is created in your project directory and contains the newly created Vonage Application ID and the private key. A private key file named vonage_tutorial.key is also created.
Finally, link the number you purchased earlier to your Vonage application:
vonage apps:link APPLICATION_ID --number=YOUR_VONAGE_NUMBER
The Client SDK uses JWTs for authentication. The JWT identifies the user name, the associated application ID, and the permissions granted to the user. It is signed using your private key to prove that it is a valid token. Create a user for your application, you can do so in your Terminal by running the following command: vonage apps:users:create Alice to create a user called Alice. Then create a JWT for the Alice user by running the following command replacing APP_ID with your application ID from earlier:
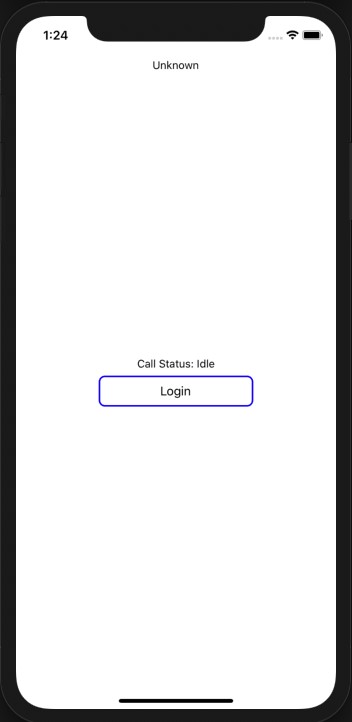
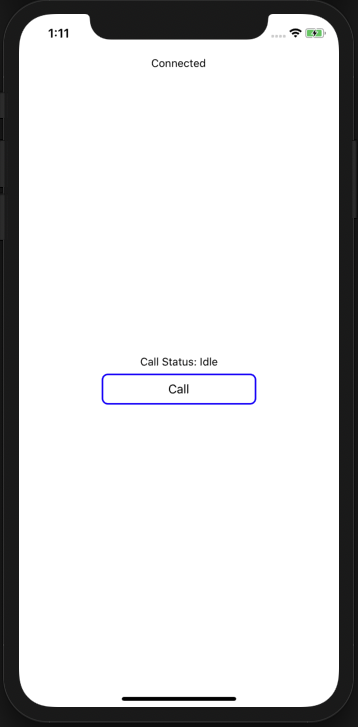
With all the dependencies installed, you can now run the project. First start Metro with npx react-native start. With that running, open a new terminal window in the same directory and run npx react-native run-ios. This command will build and run the iOS project in an iOS simulator. When the app loads, you will be prompted to allow microphone permissions and then be shown the app. It consists of a label showing the connection status, a label to show the call status and an action button.
If you open the App.tsx folder you can take a look at how this is built in the render function:
render() {
    return (
      <SafeAreaView>
        <View style={styles.status}>
          <Text>
            {this.state.status}
          </Text>

          <View style={styles.container}>
            <Text style={styles.callState}>
              Call Status: {this.state.callState}
            </Text>
            <Pressable
              style={styles.button}
              onPress={this.state.callAction}>
              <Text style={styles.buttonText}>{this.state.button}</Text>
            </Pressable>
          </View>
        </View>
      </SafeAreaView>
    );
}
If you have used React before, this syntax will be familiar to you. A Text component is used for the labels, a Pressable component for the button, along with the styling CSS at the top. All three components make use of state. State data is parameters for components that will change over time. The state is initialized at the top of the App class in the constructor with default information. You can paste the JWT you created in the previous step and save the file (CMD + S). The simulator will reload, and now when you press the login button, the Client SDK will connect. You now will be able to place a phone call.
As mentioned earlier, the project uses the react-native-permissions library to make working with permissions across platforms easier. In the componentDidMount function you can see the extent of the code required in JavaScript to request permissions:
if (Platform.OS === 'ios') {
  request(PERMISSIONS.IOS.MICROPHONE);
} else if (Platform.OS === 'android') {
  requestMultiple([PERMISSIONS.ANDROID.RECORD_AUDIO, PERMISSIONS.ANDROID.READ_PHONE_STATE]);
}Along with installing the accompanying iOS code required in the Podfile, the usage description also needs to be added to the info.plist file.
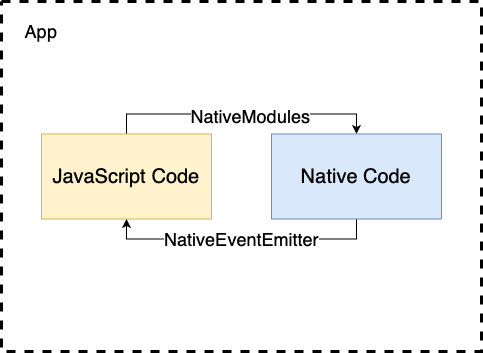
The Client SDK is a native dependency, so there needs to be a way to communicate between the JavaScript code on App.tsx and the native iOS code. There are two ways of doing this depending on the direction of the information. NativeModules expose native classes to JavaScript to allow you to execute native code. The NativeEventEmitter API allows native code to send signals to JavaScript code. Look at the componentDidMount function in the App class. You can see that the JavaScript code is listening for two different signals, onStatusChange and onCallStateChange, which will update the UI and action that the button performs.
eventEmitter.addListener('onStatusChange', (data) => {
...
});

eventEmitter.addListener('onCallStateChange', (data) => {
...
});
If you open the ios directory of the project, you will see a class called EventEmitter (ios/RNAppToPhone/EventEmitter.m). The EventEmitter class exports the supported events and has two functions that send signals to the JavaScript code.
- (NSArray<NSString *> *)supportedEvents {
  return @[@"onStatusChange", @"onCallStateChange"];
}

- (void)sendStatusEventWith:(nonnull NSString *)status {
  if (_hasListeners) {
    [self sendEventWithName:@"onStatusChange" body:@{ @"status": status }];
  }
}

- (void)sendCallStateEventWith:(nonnull NSString *)state {
  if (_hasListeners) {
    [self sendEventWithName:@"onCallStateChange" body:@{ @"state": state }];
  }
}
These functions are called from the ClientManager class (ios/RNAppToPhone/ClientManager.m). The ClientManager class is a wrapper around the Client SDK. Both classes feature the RCT_EXPORT_MODULE macro, which exports and registers the native module classes with React Native allowing them to be used as NativeModules. ClientManager.m makes use of an additional macro, RCT_EXPORT_METHOD. This macro allows for the method to be called from JavaScript. For example, here is the login function that you would have used earlier:
RCT_EXPORT_METHOD(login:(NSString *)jwt) {
  [ClientManager.shared.client createSession:jwt
                                    callback:^(NSError * _Nullable error, NSString * _Nullable sessionId) {
    if (error != nil) {
      [ClientManager.shared.eventEmitter sendStatusEventWith:@"Error"];
      return;
    } else {
      [ClientManager.shared.eventEmitter sendStatusEventWith:@"Connected"];
    }
  }];
}This is how it would be called in JavaScript:
ClientManager.login("ALICE_JWT")
In this tutorial, we've learned how to build an iOS app with the React Native framework. We've also added functionality to make a phone call to a physical phone number. You can find the complete project on GitHub, and the Android version of this blog on learn.vonage.com.
Below are a few other tutorials or documentation referencing the Client SDK:
As always, if you have any questions, advice or ideas you’d like to share with the community, please feel free to jump on our Community Slack workspace. I'd love to hear how you've gotten on with this tutorial and how your project works.