Share:
Diana is a developer advocate at Vonage. She likes eating fresh oysters.
How to Build a Role-Playing Game with Vonage AI Studio and Notion
Time to read: 6 minutes
When I was younger, some of my playtime was filled with hand-me-down video games – absolute gems in their own right, but ones that I admittedly spent a little too much time with, often earning a scolding or two. I enjoyed a variety of games, from social simulations and platform games to first-person shooters to my personal favorite, role-playing games (RPG). Unbeknownst to my younger self, each hour spent in these fantasy worlds was subtly honing my problem-solving skills and creativity. Fast forward, and those very gaming adventures laid the groundwork for this blog.
Last year, Larian Studios published Baldur's Gate 3, an RPG based on the tabletop game Dungeon & Dragons. Think of an RPG as diving into a book where, instead of just reading the story, you get to be the main character. You'll navigate through adventures, make decisions, interact with other characters, and shape the story's outcome based on your choices. It's a chance to experience a narrative in a hands-on way, where the world reacts to what you decide.
I played the game myself and was thoroughly impressed by how unique yet engaging each player's experience was since it followed a "choose your own adventure" style. I then felt compelled to recreate a simpler version of an RPG using Vonage AI Studio and Messages API - Vonage's Gate!
Here is how we will create a storytelling experience where players decide their character's fate. Now, channel your main character energy, and let's get building!
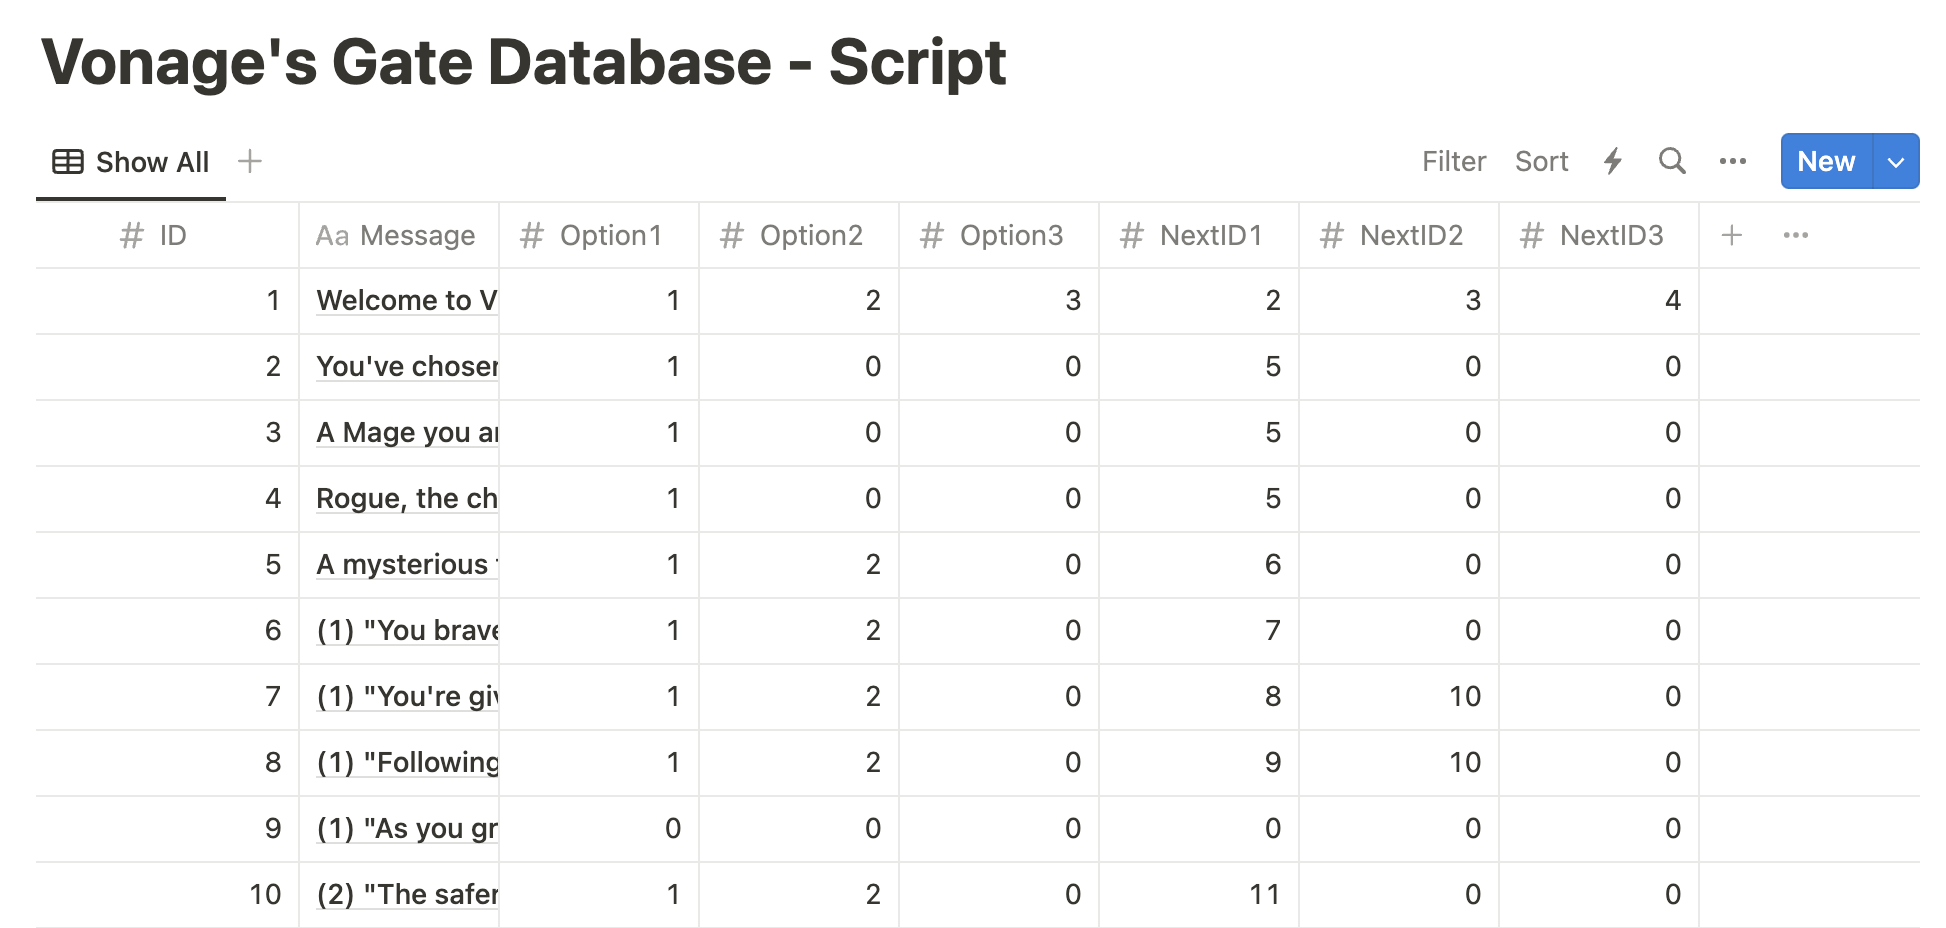
As best practice, we will store all the values used in the gameplay in a database - for this sample, we'll be using Notion!
It is a user-friendly choice, doesn't require advanced database knowledge, and is super handy because changes show up instantly - perfect for keeping our content fresh and responsive. Although it's less scalable than traditional databases, it can handle everything we need for this app. The best part is that it easily integrates with Vonage AI Studio and other low-code platforms, making our lives a whole lot easier!
Create your spreadsheet
Go to Notion. Click the (+) button to add a page. On the new page under DATABASE, click 'Table'. Create the following columns:
ID (type: number) - the ID of the message is sent over MMS
Message (type: title) - the actual text sent
Option1 (type: number) - the response a player sends when choosing option 1
Option2 (type: number) - the response a player sends when choosing option 2
Option3 (type: number) - the response a player sends when choosing option 3
NextID1 (type: number) - the ID of the next message the player receives after choosing option 1
NextID2 (type: number) - the ID of the next message the player receives after choosing option 2
NextID3 (type: number) - the ID of the next message the player receives after choosing option 3
You can customize the storyline however you would like. In my story, the player ends up with the artifact. Texts sent to the player are triggered by their responses to the previous message.
Character Creation
Initial message: Send a brief introduction and a simple choice for character creation.
In my database, you can see that ID 1 shows the initial message: "Welcome to Vonage's Gate! Choose a class: (1) Warrior, (2) Mage, or (3) Rogue."
Character confirmation: Once they reply with a choice, send a confirmation with a brief character description.
Game progression
Immediately after character confirmation, present the first simple scenario that requires a decision. When the player makes a choice, respond with a brief outcome and another decision point. Continue with a series of simple decision points that keep the story moving without requiring complex interactions. For this demo, we will have players respond with single-character messages. After a few rounds of decisions, we can conclude the demo with a simple ending.
 Database Setup
Now comes the fun part! With Vonage AI Studio's easy-to-use interface, you can design your chatbot's conversational flow. It's a drag-and-drop setup, meaning you don't need coding skills to get going. You can add different dialog nodes and define responses.
Our flow should look like this:
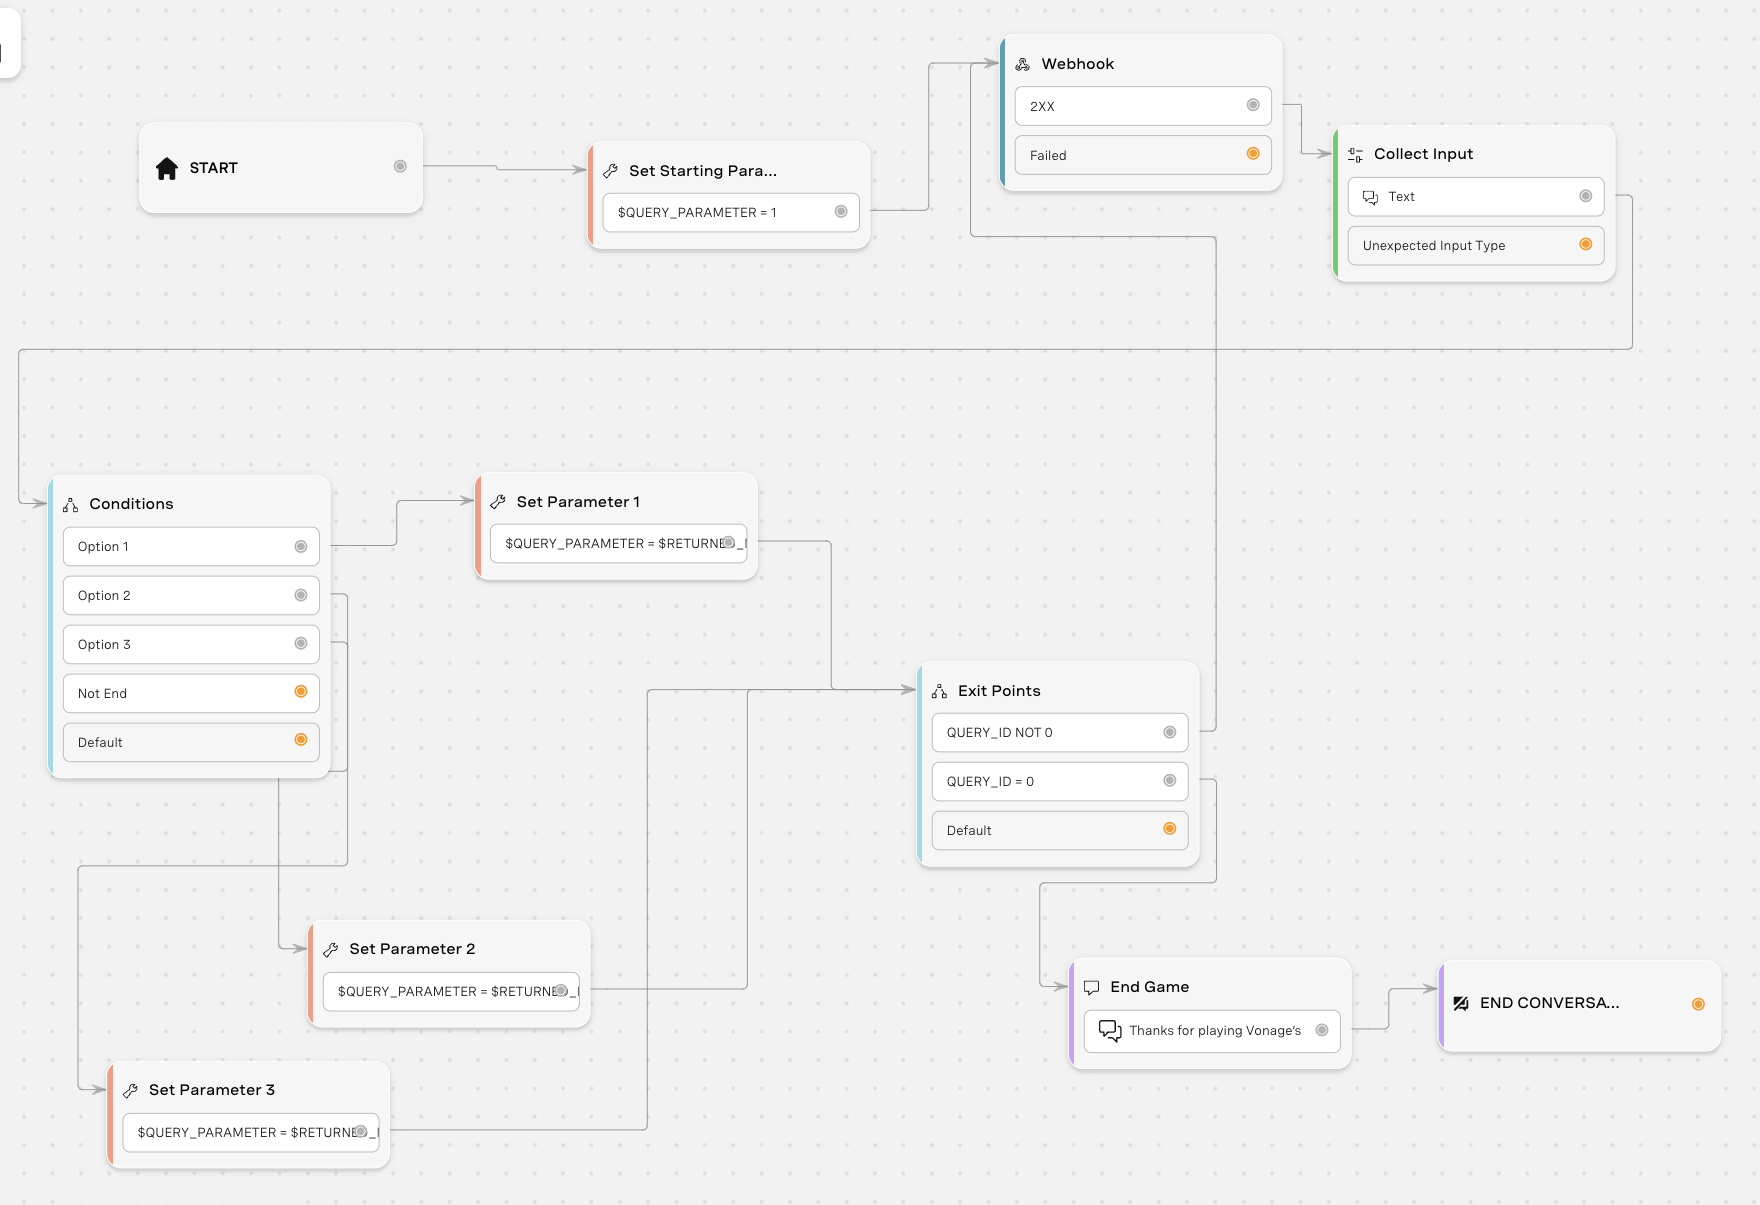 Conversation Flow
First, set up Vonage AI Studio.
Next, we will be make nodes and properties to connect to each other for the conversation flow. You can also download the zip file of this sample and Import Agent on Vonage AI Studio. If you would like to build this from scratch, here are the nodes we will need to create and which nodes and properties we need to connect them to:
Properties > Parameters
Property name: Set Start Parameter
Create a parameter called QUERY_PARAMETER and set it to 1 since our first ID starts at 1.
Connection(s): START (left) and $QUERY_PARAMATER = 1 to Webhook
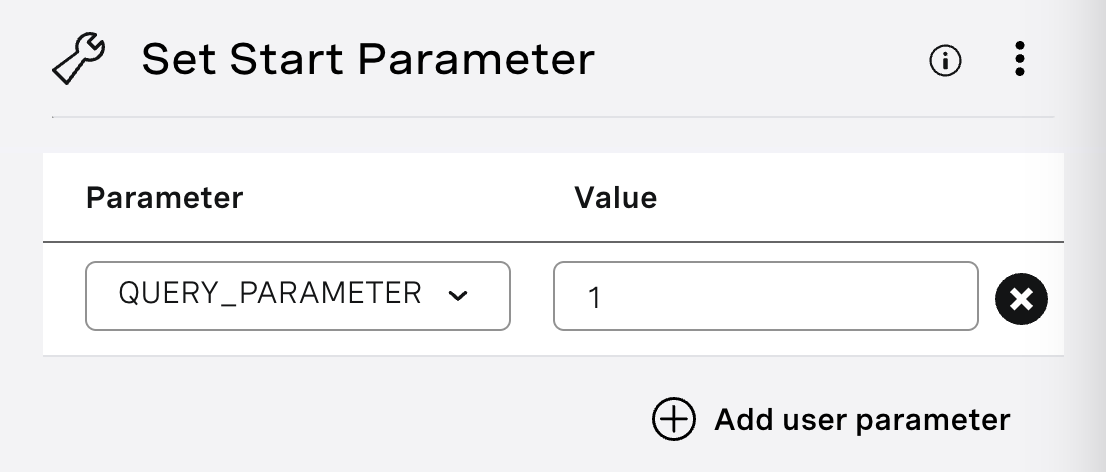 Set Start Parameter
NODES > Integrations > Webhook
Node name: Webhook
Method: POST Request URL: https://api.notion.com/v1/databases/<databaseid>/query
To find a database ID, navigate to the database URL in your Notion workspace. The ID is the string of characters in the URL that is between the slash following the workspace name (if applicable) and the question mark. The ID is a 32-character alphanumeric string.
Headers (HTTP Header : Value)
Authorization : Bearer $NOTION_ACCESS_TOKEN
Notion-Version : 2022-06-28
To find your $NOTION_ACCESS_TOKEN, go through the Authorization process for an internal integration on Notion.
Body
Put the following text in the body:
{
 "filter": {
  "property": "ID",
  "unique_id": {
   "equals": $QUERY_PARAMETER
  }
 }
}Response Mapping
Response type: JSON Object path
After filling out the above information in our webhook node, make sure the webhook is working by clicking the 'Test request' button in the top right. Under Response, you'll see that it returns all the data from our Notion table. Using the response, define the object path and map it to a parameter. If you need help, check out my blog that [dives deeper into response mapping](LINK TO MY BLOG).
Connection(s): 2xx to Collect Input
![The image displays a section of a user interface titled "Response Mapping" for a software application, likely related to API or database interaction. It shows a configuration setup for handling JSON responses, with mappings from object paths in the JSON structure to named parameters. For example, "results[0].properties.Message.title[0].plain_text" is mapped to the parameter "$RETURNED_MESSAGE," and similar mappings are made for "Option1," "Option2," "Option3," "NextID1," "NextID2," and "NextID3," each pointing to their respective returned parameters. This setup is used to extract specific pieces of data from a JSON response and assign them to variables within the application The image shows a graphical user interface for mapping JSON response data to specific parameters within a software application. It lists various JSON object paths such as "results[0].properties.Message.title[0].plain_text" and corresponding parameters like "$RETURNED_MESSAGE". The mapping is designed to translate the structured JSON data into variables that the application can use in its operations.](https://s3.amazonaws.com/a.storyblok.com/f/270183/203701/1dc90d45ac/response-mapping.png) Response Mapping
Response Mapping
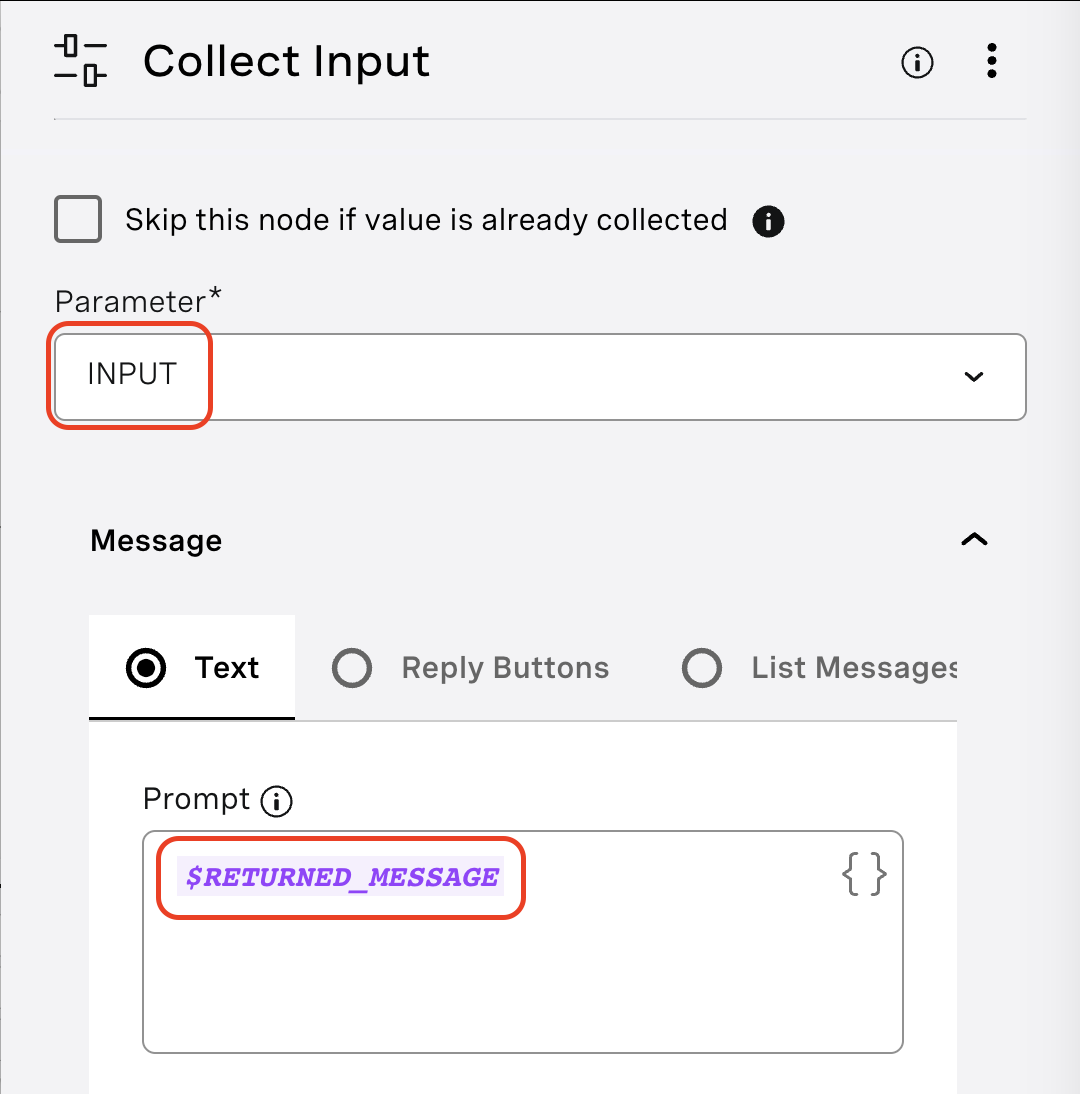
NODES > Conversation > Collect Input
Node name: Collect Input
Parameter: INPUT
Text Prompt: $RETURNED_MESSAGE (you made need to type this out instead of copy & pasting this text)
Expected input: Text
Connection(s): Text to Conditions
 Collect Input
Nodes > Conversation > Conditions
Node name: Conditions
Condition Name(s):
Option 1
* Parameter: INPUT * Operation: Is equal to * Value: $RETURNED_OPTION1CopyOption 2
* Parameter: INPUT * Operation: Is equal to * Value: $RETURNED_OPTION2CopyOption 3
* Parameter: INPUT * Operation: Is equal to * Value: $RETURNED_OPTION3CopyNot End
* Parameter: RETURNED_ID
* Operation: Is equal to
* Value: 9

	_or_

* Parameter: RETURNED_ID
* Operation: Is not equal to
* Value: 11

	_or_

* Parameter: RETURNED_ID
* Operation: Is not equal to
* Value: 12

	_or_

* Parameter: RETURNED_ID
* Operation: Is not equal to
* Value: 15

	_or_

* Parameter: RETURNED_ID
* Operation: Is not equal to
* Value: 16

	_or_

* Parameter: RETURNED_ID
* Operation: Is not equal to
* Value: 18

	_or_

* Parameter: RETURNED_ID
* Operation: Is not equal to
* Value: 19
Copy
Connection(s):
- Option 1 to Set Parameter 1
- Option 2 to Set Parameter 2
- Option 3 to Set Parameter 3
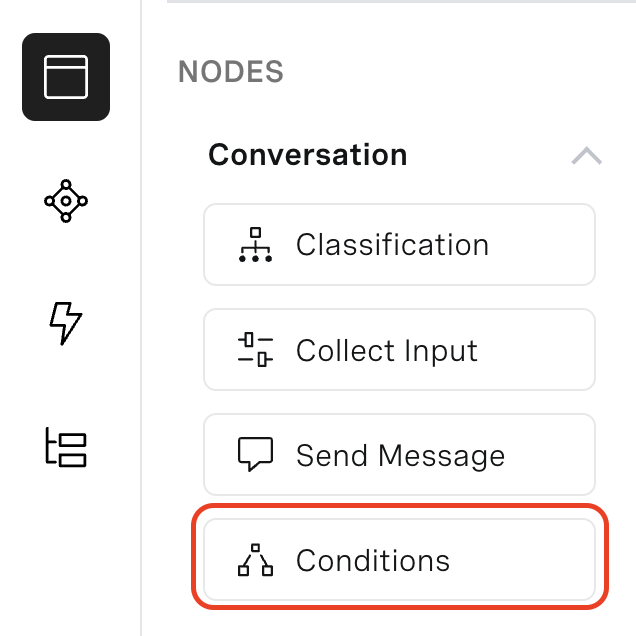 Conditions
Properties > Parameters
Property name: Set Parameter 1
Parameter: QUERY_PARAMETER
Value: $RETURNED_NEXT_ID1
Connection(s): $QUERY_PARAMETER to Exit Points
Depending on which option the player chooses, this property will point to the ID of the next message the player should receive after texting "1".
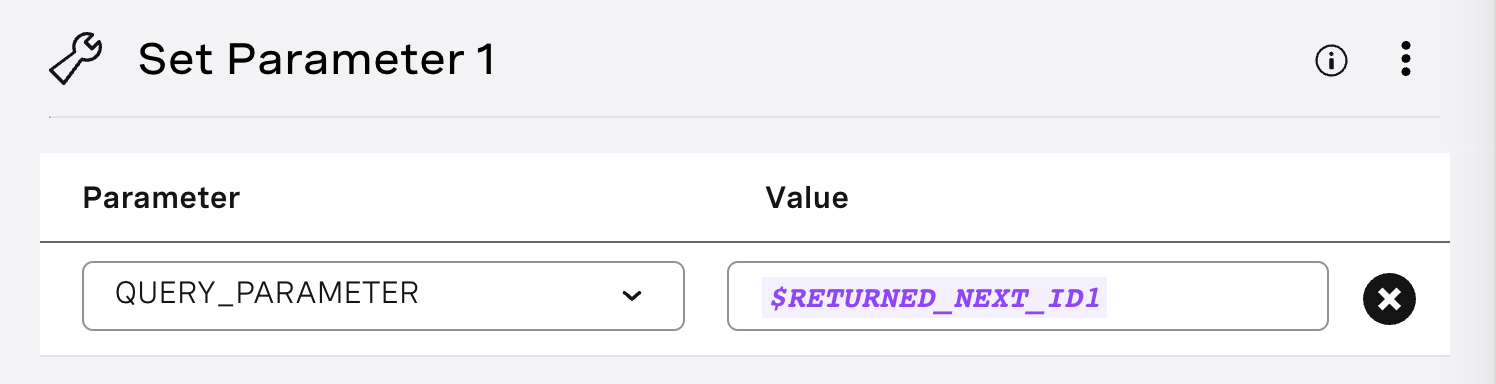 Set Parameter 1
Properties > Parameters
Property name: Set Parameter 2
Parameter: QUERY_PARAMETER
Value: $RETURNED_NEXT_ID2
Connection(s): $QUERY_PARAMTER to Exit Points
Depending on which option the player chooses, this property will point to the ID of the next message the player should receive after texting "2".
Properties > Parameters
Property name: Set Parameter 3
Parameter: QUERY_PARAMETER
Value: $RETURNED_NEXT_ID3
Connection(s): $QUERY_PARAMTER to Exit Points
Depending on which option the player chooses, this property will point to the ID of the next message the player should receive after texting "3".
Nodes > Conversation > Conditions
Node name: Exit Points
Condition Name(s):
QUERY_ID NOT 0
*Parameter: QUERY_PARAMETER* Operation: Is not equal to *Value: 0* Connection(s): $QUERY_ID NOT 0 to WebhookCopyQUERY_ID = 0
*Parameter: QUERY_PARAMETER*
	 Operation: Is equal to
	 *Value: 0*
	 Connection(s): $QUERY_ID = 0 to End Game
Copy
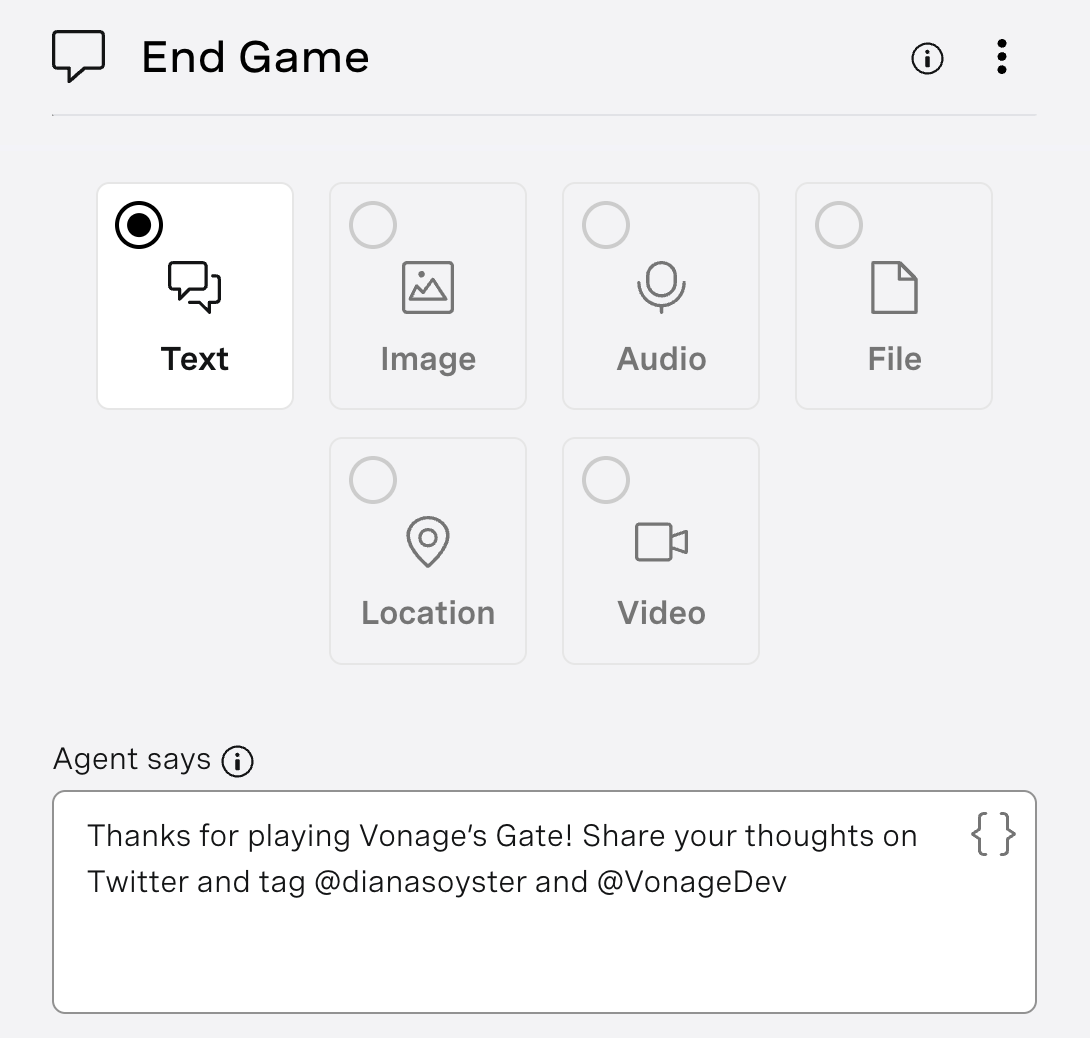
Nodes > Conversation > Send Message
Node name: End Game
Text: Thanks for playing Vonage’s Gate! Share your thoughts on Twitter and tag @dianasoyster and @VonageDev
Connection(s): Thanks for playing to END CONVERSATION
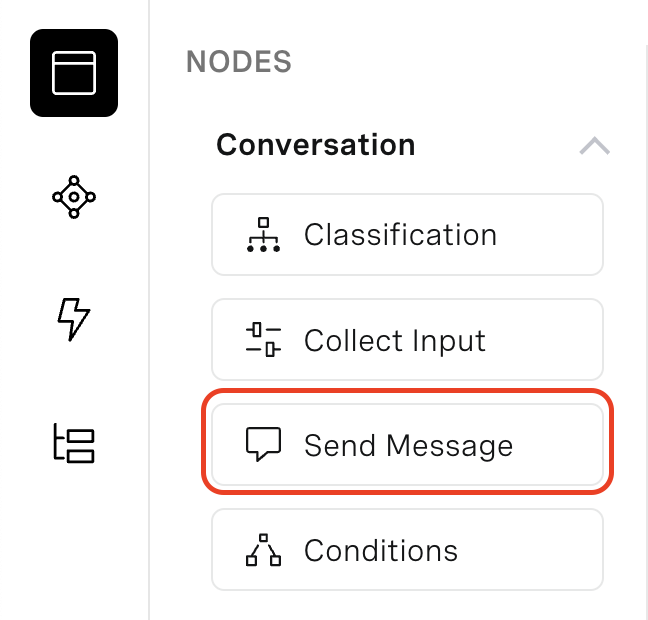 Send Message
This node is sent after the player reaches the end of their adventure. This means all values in the table are 0 and they send "1" to continue as prompted.
 End Game
Nodes > Actions > End Conversation
Node name: End Conversation
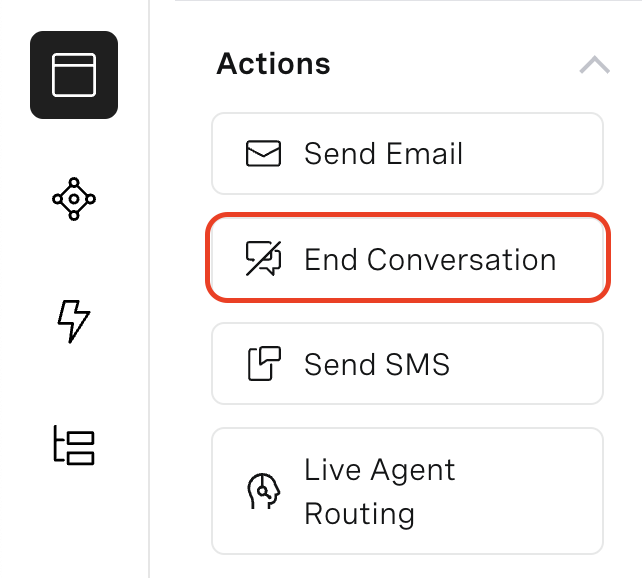 End Conversation
Technically, you don't need this node, but out of good practice, we should include it.
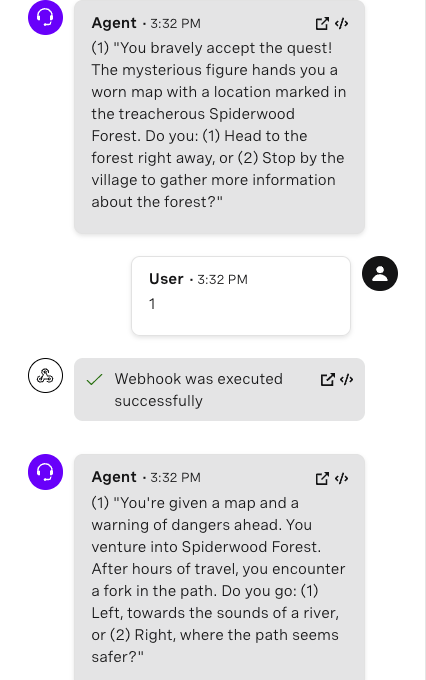
On the top right hand corner of Vonage AI Studio, there is a black Tester button. Click that to play the game.
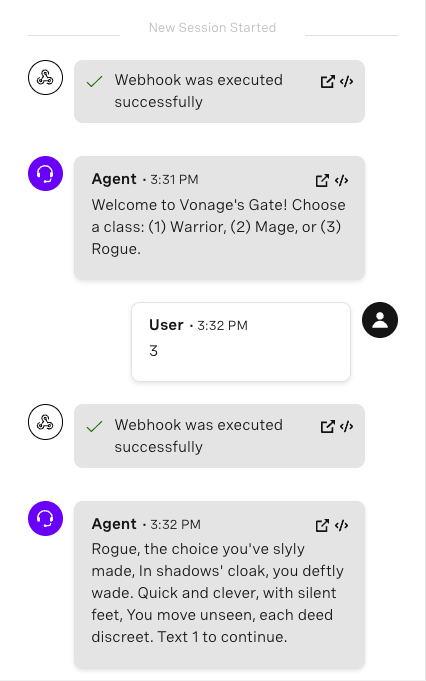 Testing the Agent in AI Studio - Part 1
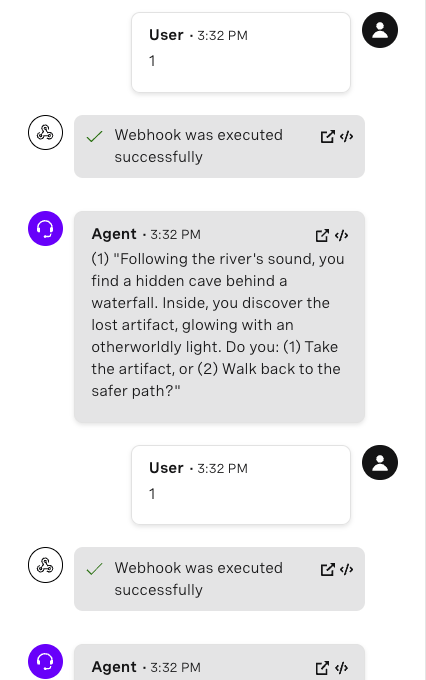
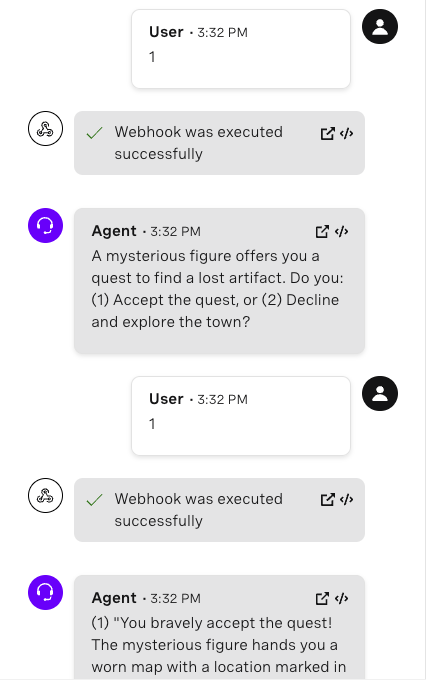 Testing the Agent in AI Studio - Part 2
 Testing the Agent in AI Studio - Part 3
 Testing the Agent in AI Studio - Part 4
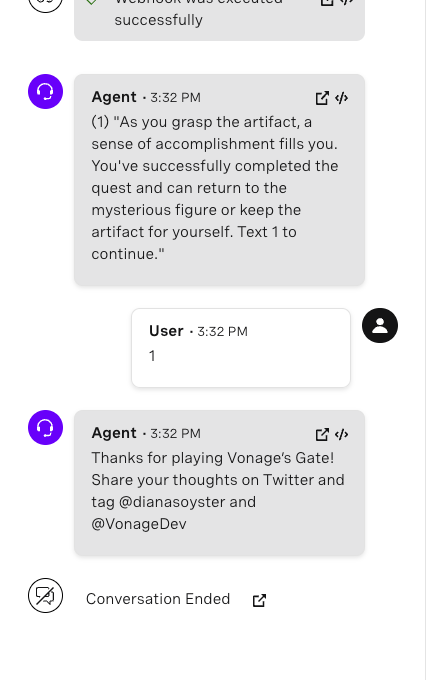 Testing the Agent in AI Studio - Part 5
As quoted from Baldur's Gate 3, "You can’t compromise with evil. It always profits in the end." In this tutorial, we learned how to use best practices when storing data so you won't have to deal with "evil" tech debt in case you need to make changes to your texts in the future. We also learned to integrate a database with Vonage AI Studio and Messages API. If you'd like the data for this example, feel free to join our "class" of developers on Slack and follow us on X, formerly known as Twitter. If you build a similar application, please share it and tag me - I'd love to hear about your adventure!