Share:
Zach is a former member of the Vonage Team. He was a Sr Android Developer Advocate at Vonage
Getting started with Flutter 3 and Vonage APIs
With the release of Flutter 3.0 (which includes a range of stability and performance improvements) now is a great time to take a look at how you can use communication APIs to improve your user experience and enhance your cross-platform applications.
Thanks to Flutter's ability to use native platform SDKs we can seamlessly use the Vonage Android and iOS SDKs within our Flutter applications. Let's take a look at how we can create a simple Flutter application that's able to make a voice phone call to a physical phone. By the end of this guide, you will have a good understanding of how to use the Vonage SDK to make a voice call and how you can use native Android and iOS SDKs in your Flutter application.
For this guide, we will create a basic app from scratch but you could just as quickly build the below into your application.
The full source code for this project can be found on GitHub.
Before we get into the code there are a few things we need to do to set up the Vonage API and make use of it.
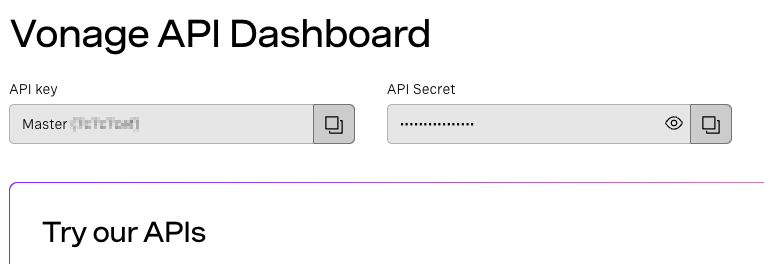
Start by signing up for a free Vonage Developer account. This can be done via the Dashboard, once signed up you will find your account API key and API secret. Take a note of these for future steps.
The Vonage CLI allows you to carry out many operations on the command line. Examples include creating applications, purchasing numbers, and linking a number to an application all of which we will be doing today.
To install the CLI with NPM run:
Set up the Vonage CLI to use your Vonage API Key and API Secret. You can get these from the settings page in the Dashboard.
Run the following command in a terminal, while replacing API_KEY and API_SECRET with your own:
Next, we need a Vonage number that the application can use, this is the phone number that will show on the phone that we call from the application.
You can purchase a number using the Vonage CLI. The following command purchases an available number in the US. Specify an alternate two-character country code to purchase a number in another country.
vonage numbers:search US
vonage numbers:buy 15555555555 US
When an inbound call is received, Vonage makes a request to a publicly accessible URL of your choice - we call this the answer_url. You need to create a webhook server that is capable of receiving this request and returning an NCCO containing a connect action that will forward the call to the PSTN phone number. You do this by extracting the destination number from the to query parameter and returning it in your response.
On the command line create a new folder that will contain your webserver
mkdir app-to-phone-flutter
cd app-to-phone-flutterInside the folder, initialize a new Node.js project by running this command:
npm init -yNext, install the required dependencies:
npm install express localtunnel --saveInside your project folder, create a file named server.js and add the code as shown below - please make sure to replace NUMBER with your Vonage number (in E.164 format), as well as SUBDOMAIN with an actual value. The value used will become part of the URLs you will set as webhooks in the next step.
'use strict';

const subdomain = 'SUBDOMAIN';
const vonageNumber = 'NUMBER';

const express = require('express')
const app = express();
app.use(express.json());

app.get('/voice/answer', (req, res) => {
  console.log('NCCO request:');
  console.log(`  - callee: ${req.query.to}`);
  console.log('---');
  res.json([
    {
      "action": "talk",
      "text": "Please wait while we connect you."
    },
    {
      "action": "connect",
      "from": vonageNumber,
      "endpoint": [
        { "type": "phone", "number": req.query.to }
      ]
    }
  ]);
});

app.all('/voice/event', (req, res) => {
  console.log('EVENT:');
  console.dir(req.body);
  console.log('---');
  res.sendStatus(200);
});

app.listen(3000);

const localtunnel = require('localtunnel');
(async () => {
  const tunnel = await localtunnel({
      subdomain: subdomain,
      port: 3000
    });
  console.log(`App available at: ${tunnel.url}`);
})();
You can now start the server by running, in the terminal, the following command:
node server.jsA notice will be displayed telling you the server is now available:
App available at: https://SUBDOMAIN.loca.lt
In this step, you will create a Vonage Application capable of in-app voice communication use cases.
Open a new terminal and, if required, navigate to your project directory.
Create a Vonage application by copying and pasting the command below into the terminal. Make sure to change the values of --voice_answer_url and --voice_event_url arguments, by replacing SUBDOMAIN with the actual value used in the previous step:
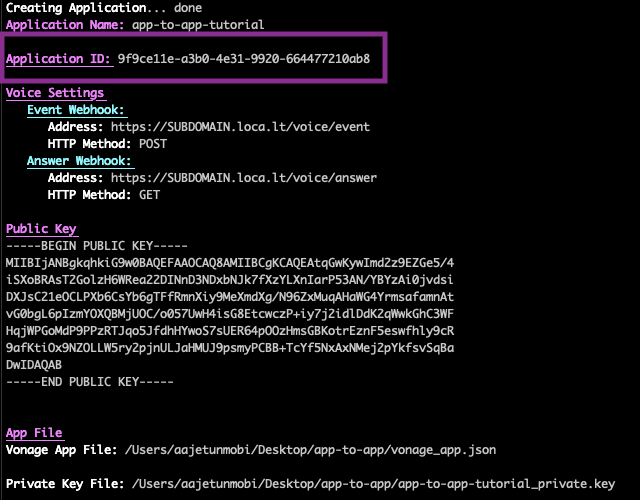
vonage apps:create "App to Phone Tutorial" --voice_answer_url=https://SUBDOMAIN.loca.lt/voice/answer --voice_event_url=https://SUBDOMAIN.loca.lt/voice/eventA file named vonage_app.json is created/updated in your project directory and contains the newly created Vonage Application ID and the private key. A private key file named app_to_phone_tutorial.key is also created.
Make a note of the Application ID that is echoed in your terminal when your application is created:
Once you have a suitable number you can link it with your Vonage application. Replace YOUR_VONAGE_NUMBER with your newly bought number, replace APPLICATION_ID with your application id and run this command:
vonage apps:link APPLICATION_ID --number=YOUR_VONAGE_NUMBER
Users are a key concept when working with the Vonage Client SDKs. When a user authenticates with the Client SDK, the credentials provided identify them as a specific user. Each authenticated user will typically correspond to a single user in your user's database.
To create a user named Alice, run the following command using the Vonage CLI:
vonage apps:users:create "Alice"This will return a user ID similar to the following:
User ID: USR-aaaaaaaa-bbbb-cccc-dddd-0123456789ab
The Client SDK uses JWTs for authentication. The JWT identifies the user name, the associated application ID and the permissions granted to the user. It is signed using your private key to prove that it is a valid token.
Run the following commands, remember to replace the APPLICATION_ID variable with the ID of your application and PRIVATE_KEY with the name of your private key file.
You are generating a JWT using the Vonage CLI by running the following command but remember to replace the APP_ID variable with your own value:
vonage jwt --app_id=APPLICATION_ID --subject=Alice --key_file=./PRIVATE_KEY --acl='{"paths":{"/*/users/**":{},"/*/conversations/**":{},"/*/sessions/**":{},"/*/devices/**":{},"/*/image/**":{},"/*/media/**":{},"/*/push/**":{},"/*/knocking/**":{},"/*/legs/**":{}}}'The above commands set the expiry of the JWT to one day from now, which is the maximum.

We now have everything we need to use the Vonage Voice API within a flutter application. Let's now get the application itself set up.
If you haven't already, start by downloading and installing Flutter and its dependencies. You can do this by following the Install Guide. Once you have Flutter setup correctly the next thing you will need to do is configure your IDE, how to do this will depend on the IDE you wish to use but the Set up an editor guide will help you with this.
For this guide, we will be using Android Studio.
Once your IDE is set up follow the test drive guide to set up a basic Flutter application with support for both Android and iOS. We will be using this base app as the start of this project, but of course, if you already have a Flutter project you want to use you can do this as well.
With the project now set up we can install the Vonage client SDK. Currently, the Client SDK is not available as a Flutter package, so we will have to use the Android native Client SDK and the iOS native Client SDK Communicate between Android/iOS and Flutter will use MethodChannel - this way, Flutter will call Android/iOS methods, Android/iOS will call Flutter methods.
To install the Android SDK start by increasing the memory allocation for the JVM by editing the org.gradle.jvmargs property in your gradle.properties file. We recommend this be set to at least 4GB:
org.gradle.jvmargs=-Xmx4096m -Dfile.encoding=UTF-8Next, open your app-level build.gradle file which can be found at android/app/build.gradle and implement the Vonage SDK like so:
dependencies {
    implementation "org.jetbrains.kotlin:kotlin-stdlib-jdk7:$kotlin_version"
    implementation "com.vonage:client-sdk-voice:1.0.3"
}Finally, make sure your minSdkVersion is set to at least 23:
defaultConfig {
        applicationId "com.vonage.tutorial.voice.app_to_phone"
        minSdkVersion 23
        targetSdkVersion flutter.targetSdkVersion
        versionCode flutterVersionCode.toInteger()
        versionName flutterVersionName
}The Android SDK is now set up and ready to be used for the Android build of the flutter application.
To install the iOS SDK start with generating the PodFile by opening a command line in the root of your Flutter project and then running the commands below:
cd ios/
pod initThis will generate the PodFile, open this file and add the below pod:
pod 'VonageClientSDKVoice', '~> 1.0.3'
Make sure to also set the platform to at least ios 10
platform :ios, '10.0'Your complete file should look something like this:
platform :ios, '10.0'

target 'Runner' do
  use_frameworks!

  pod 'VonageClientSDKVoice', '~> 1.0.3'
end
Next from the command line, again in the iOS directory run:
pod updateThis will download and install the Vonage SDK and its dependencies.
Finally to link this to your Flutter project, from the root directory of your project run the below Flutter command. This will trigger an iOS build and generate the files needed to make use of the SDK.
flutter build iosOnce complete and successfully built your SDK is set up and ready to be used.
By the nature of Flutter, the code can easily be broken down into three areas, the Flutter code which is written in Dart, the native Android code which is written in Kotlin and the native iOS code which is written in Swift.
Let's start with the flutter specific code, replace the content of lib/main.dart with the below code:
import 'package:flutter/foundation.dart';
import 'package:flutter/material.dart';
import 'package:flutter/services.dart';
import 'package:permission_handler/permission_handler.dart';

void main() => runApp(const MyApp());

class MyApp extends StatelessWidget {
  const MyApp({Key? key}) : super(key: key);

  @override
  Widget build(BuildContext context) {
    return const MaterialApp(
      title: 'Flutter Demo',
      home: CallWidget(title: 'app-to-phone-flutter'),
    );
  }
}

class CallWidget extends StatefulWidget {
  const CallWidget({Key key = const Key("any_key"), required this.title}) : super(key: key);
  final String title;

  @override
  _CallWidgetState createState() => _CallWidgetState();
}

class _CallWidgetState extends State<CallWidget> {
  SdkState _sdkState = SdkState.LOGGED_OUT;
  static const platformMethodChannel = MethodChannel('com.vonage');

  _CallWidgetState() {
    platformMethodChannel.setMethodCallHandler(methodCallHandler);
  }

  Future<dynamic> methodCallHandler(MethodCall methodCall) async {
    switch (methodCall.method) {
      case 'updateState':
        {
          setState(() {
            var arguments = 'SdkState.${methodCall.arguments}';
            _sdkState = SdkState.values.firstWhere((v) {return v.toString() == arguments;}
            );
          });
        }
        break;
      default:
        throw MissingPluginException('notImplemented');
    }
  }

  Future<void> _loginUser() async {
    String token = "ALICE_TOKEN";

    try {
      await platformMethodChannel
          .invokeMethod('loginUser', <String, dynamic>{'token': token});
    } on PlatformException catch (e) {
      if (kDebugMode) {
        print(e);
      }
    }
  }

  Future<void> _makeCall() async {
    try {
      await requestPermissions();

      await platformMethodChannel.invokeMethod('makeCall');
    } on PlatformException catch (e) {
      if (kDebugMode) {
        print(e);
      }
    }
  }

  Future<void> requestPermissions() async {
    await [ Permission.microphone] .request();
  }

  Future<void> _endCall() async {
    try {
      await platformMethodChannel.invokeMethod('endCall');
    } on PlatformException catch (e) {
      if (kDebugMode) {
        print(e);
      }
    }
  }

  @override
  Widget build(BuildContext context) {
    return Scaffold(
      appBar: AppBar(
        title: Text(widget.title),
      ),
      body: Center(
        child: Column(
          mainAxisAlignment: MainAxisAlignment.center,
          children: <Widget>[
            const SizedBox(height: 64),
            _updateView()
          ],
        ),
      ),
    );
  }

  Widget _updateView() {
    if (_sdkState == SdkState.LOGGED_OUT) {
      return ElevatedButton(
          onPressed: () { _loginUser(); },
          child: const Text("LOGIN AS ALICE")
      );
    } else if (_sdkState == SdkState.WAIT) {
      return const Center(
        child: CircularProgressIndicator(),
      );
    } else if (_sdkState == SdkState.LOGGED_IN) {
      return ElevatedButton(
          onPressed: () { _makeCall(); },
          child: const Text("MAKE PHONE CALL")
      );
    } else if (_sdkState == SdkState.ON_CALL) {
      return ElevatedButton(
          onPressed: () { _endCall(); },
          child: const Text("END CALL")
      );
    } else {
      return const Center(
          child: Text("ERROR")
      );
    }
  }
}

enum SdkState {
  LOGGED_OUT,
  LOGGED_IN,
  WAIT,
  ON_CALL,
  ERROR
}
This is the complete class needed to build the app's UI and trigger the platform-specific methods which we will write in a moment. Let's break down what's going on in each of the methods in this class.
Starting with the imports at the top of this class, we have the normal flutter imports but we are also using the permission handler package. This is used to manage requesting permissions on iOS and Android for us. Make sure you have installed this by running the command:
flutter pub add permission_handlerAt the root of your flutter project.
Next, we build the app, for this demo we have a very simple app with just one widget element which we have called CallWidget
void main() => runApp(const MyApp());

class MyApp extends StatelessWidget {
  const MyApp({Key? key}) : super(key: key);

  @override
  Widget build(BuildContext context) {
    return const MaterialApp(
      title: 'Flutter Demo',
      home: CallWidget(title: 'app-to-phone-flutter'),
    );
  }
}
This CallWidget extends the StatefulWidget taking the title and initialising the CallWidgetState.
class CallWidget extends StatefulWidget {
  const CallWidget({Key key = const Key("any_key"), required this.title}) : super(key: key);
  final String title;

  @override
  _CallWidgetState createState() => _CallWidgetState();
}
The CallWidgetState will manage the UI elements, the current state of the app and all communication back to the native platform code.
class _CallWidgetState extends State<CallWidget> {
  SdkState _sdkState = SdkState.LOGGED_OUT;
  static const platformMethodChannel = MethodChannel('com.vonage');

  _CallWidgetState() {
    platformMethodChannel.setMethodCallHandler(methodCallHandler);
  }

  Future<dynamic> methodCallHandler(MethodCall methodCall) async {
    switch (methodCall.method) {
      case 'updateState':
        {
          setState(() {
            var arguments = 'SdkState.${methodCall.arguments}';
            _sdkState = SdkState.values.firstWhere((v) {return v.toString() == arguments;}
            );
          });
        }
        break;
      default:
        throw MissingPluginException('notImplemented');
    }
  }
Here we set the starting state of the app as SdkState.LOGGED_OUT, we create the MethodChannel which will handle all communication between Flutter and native code. Then we go on to set the methodCallHandler in which the state is set to whatever state has been passed back up to Flutter from the native code.
The UI is then built up using the build method, which simply created a Box that is of height 64. We will update this element depending on the app's state to display different information.
  @override
  Widget build(BuildContext context) {
    return Scaffold(
      appBar: AppBar(
        title: Text(widget.title),
      ),
      body: Center(
        child: Column(
          mainAxisAlignment: MainAxisAlignment.center,
          children: <Widget>[
            const SizedBox(height: 64),
            _updateView()
          ],
        ),
      ),
    );
  }
Next, the _updateView method is used to change what is currently displayed in the box based on the current state of the app. This state model allows for a clean UI only showing the user what they need to see at any given time in the app life cycle.
Widget _updateView() {
    if (_sdkState == SdkState.LOGGED_OUT) {
      return ElevatedButton(
          onPressed: () { _loginUser(); },
          child: const Text("LOGIN AS ALICE")
      );
    } else if (_sdkState == SdkState.WAIT) {
      return const Center(
        child: CircularProgressIndicator(),
      );
    } else if (_sdkState == SdkState.LOGGED_IN) {
      return ElevatedButton(
          onPressed: () { _makeCall(); },
          child: const Text("MAKE PHONE CALL")
      );
    } else if (_sdkState == SdkState.ON_CALL) {
      return ElevatedButton(
          onPressed: () { _endCall(); },
          child: const Text("END CALL")
      );
    } else {
      return const Center(
          child: Text("ERROR")
      );
    }
}The _loginUser and _endCall methods are very similar in that all we are doing here is invoking the loginUser/endCall methods in the native code. This is how we trigger the native code when the user presses a button on the UI. Within the _loginUser we have a variable token this should be the JWT value you generated earlier using the Vonage CLI
Future<void> _loginUser() async {
    String token = "ALICE_TOKEN";

    try {
      await platformMethodChannel
          .invokeMethod('loginUser', <String, dynamic>{'token': token});
    } on PlatformException catch (e) {
      if (kDebugMode) {
        print(e);
      }
    }
  }

  Future<void> _endCall() async {
    try {
      await platformMethodChannel.invokeMethod('endCall');
    } on PlatformException catch (e) {
      if (kDebugMode) {
        print(e);
      }
    }
  }
The _makeCall method also involved a method on the native code, calling the makeCall method. However, before it does that we use the requestPermissions method to request the required run time permissions from the user. In this case that is just the microphone/audio recording.
Future<void> _makeCall() async {
    try {
      await requestPermissions();

      await platformMethodChannel.invokeMethod('makeCall');
    } on PlatformException catch (e) {
      if (kDebugMode) {
        print(e);
      }
    }
  }

  Future<void> requestPermissions() async {
    await [ Permission.microphone] .request();
  }
And finally, we have a enum which holds the different states that the SDK and the app can be in.
enum SdkState {
  LOGGED_OUT,
  LOGGED_IN,
  WAIT,
  ON_CALL,
  ERROR
}
Next, let's take a look at the Android-specific code for this application. First, we need to set up the permissions that the app will need from the Android system. In your AndroidManifest.xml which is located at android/app/src/main/AndroidManifest.xml add the below permissions:
    <uses-permission android:name="android.permission.INTERNET" />
    <uses-permission android:name="android.permission.ACCESS_NETWORK_STATE" />
    <uses-permission android:name="android.permission.ACCESS_WIFI_STATE" />
    <uses-permission android:name="android.permission.CHANGE_WIFI_STATE" />
    <uses-permission android:name="android.permission.MODIFY_AUDIO_SETTINGS" />
    <uses-permission android:name="android.permission.RECORD_AUDIO" />
Next let's open the MainActivity.kt file which can be located at android/app/src/main/kotlin/PACKAGE_NAME/MainActivity.kt
The complete content for this file is as follows:
import android.annotation.SuppressLint
import android.os.Handler
import android.os.Looper
import androidx.annotation.NonNull
import com.vonage.android_core.VGClientConfig
import com.vonage.clientcore.core.api.ClientConfigRegion
import com.vonage.voice.api.CallId
import com.vonage.voice.api.VoiceClient
import io.flutter.embedding.android.FlutterActivity
import io.flutter.embedding.engine.FlutterEngine
import io.flutter.plugin.common.MethodChannel

class MainActivity : FlutterActivity() {
    private lateinit var client: VoiceClient
    private var onGoingCallID: CallId? = null

    override fun configureFlutterEngine(@NonNull flutterEngine: FlutterEngine) {
        super.configureFlutterEngine(flutterEngine)

        initClient()
        addFlutterChannelListener()
    }

    private fun initClient() {
        client = VoiceClient(this)
        client.setConfig(VGClientConfig(ClientConfigRegion.US))

        client.setSessionErrorListener {
            notifyFlutter(SdkState.ERROR)
        }

        client.setReconnectingListener {
            notifyFlutter(SdkState.WAIT)
        }
    }

    private fun addFlutterChannelListener() {
        flutterEngine?.dartExecutor?.binaryMessenger?.let {
            MethodChannel(it, "com.vonage").setMethodCallHandler { call, result ->

                when (call.method) {
                    "loginUser" -> {
                        val token = requireNotNull(call.argument<String>("token"))
                        loginUser(token)
                        result.success("")
                    }
                    "makeCall" -> {
                        makeCall()
                        result.success("")
                    }
                    "endCall" -> {
                        endCall()
                        result.success("")
                    }
                    else -> {
                        result.notImplemented()
                    }
                }
            }
        }
    }

    private fun loginUser(token: String) {
        client.createSession(token) { err, sessionId ->
            when(err) {
                null -> notifyFlutter(SdkState.LOGGED_IN)
                else -> notifyFlutter(SdkState.ERROR) // handle error

            }

        }
    }

    @SuppressLint("MissingPermission")
    private fun makeCall() {
        notifyFlutter(SdkState.WAIT)

        client.serverCall(mapOf("to" to "PHONE_NUMBER")) {
                err, outboundCall ->
            when {
                err != null -> {
                    notifyFlutter(SdkState.ERROR)
                } else -> {
                    onGoingCallID = outboundCall
                    notifyFlutter(SdkState.ON_CALL)
                }
            }
        }
    }

    private fun endCall() {
        notifyFlutter(SdkState.WAIT)

        onGoingCallID?.let {
            client.hangup(it) {
                    err ->
                when {
                    err != null -> {
                        notifyFlutter(SdkState.ERROR)
                    } else -> {
                        notifyFlutter(SdkState.LOGGED_IN)
                        onGoingCallID = null
                    }
                }
            }
        }
    }

    private fun notifyFlutter(state: SdkState) {
        Handler(Looper.getMainLooper()).post {
            flutterEngine?.dartExecutor?.binaryMessenger?.let {
                MethodChannel(it, "com.vonage")
                    .invokeMethod("updateState", state.toString())
            }
        }
    }
}

enum class SdkState {
    LOGGED_OUT,
    LOGGED_IN,
    WAIT,
    ON_CALL,
    ERROR
}
Let's break this down and take a look at what's going on.
The first thing you will notice is that we are extending the class FlutterActivity this is a Flutter provided Activity class that handles a lot of the additional lifecycle and Flutter magic that makes it possible to run native code.
Next up we have two variables that we will be using:
private lateinit var client: VoiceClient
private var onGoingCallID: CallId? = nullThe VoiceClient is the object responsible for all of the SDK interactions, making a phone call, hanging up etc. The onGoingCallID will be used to keep track of the current phone call while one is happening.
Next we override the configureFlutterEngine method, this lets us run code when the app is being created by the Flutter engine. Here we use this to run two methods, one to add a channel listener and another to set up the NexmoClient.
override fun configureFlutterEngine(@NonNull flutterEngine: FlutterEngine) {
        super.configureFlutterEngine(flutterEngine)

        initClient()
        addFlutterChannelListener()
}Initialising the VoiceClient is straightforward we simply pass in the current context of the app. Then we create an ErrorListener and a ‘ReconnectingListener’ which will give us the current status of the client, these status maps to values we need to send back to Flutter. So using a when statement we can send the values as required.
private fun initClient() {
        client = VoiceClient(this)
        client.setConfig(VGClientConfig(ClientConfigRegion.US))

        client.setSessionErrorListener {
            notifyFlutter(SdkState.ERROR)
        }

        client.setReconnectingListener {
            notifyFlutter(SdkState.WAIT)
        }
}The addFlutterChannelListener adds a listener that will watch for any method calls from Flutter. As you can see these relate to the three methods we have in Flutter, this allows us to map these calls to specific methods within the native code.
    private fun addFlutterChannelListener() {
        flutterEngine?.dartExecutor?.binaryMessenger?.let {
            MethodChannel(it, "com.vonage").setMethodCallHandler { call, result ->

                when (call.method) {
                    "loginUser" -> {
                        val token = requireNotNull(call.argument<String>("token"))
                        loginUser(token)
                        result.success("")
                    }
                    "makeCall" -> {
                        makeCall()
                        result.success("")
                    }
                    "endCall" -> {
                        endCall()
                        result.success("")
                    }
                    else -> {
                        result.notImplemented()
                    }
                }
            }
        }
    }
The loginUser method is called when Flutter sends the loginUser method call, this passes in the JWT token we set and then triggers the login method on the client.
private fun loginUser(token: String) {
        client.createSession(token) { err, sessionId ->
            when(err) {
                null -> notifyFlutter(SdkState.LOGGED_IN)
                else -> notifyFlutter(SdkState.ERROR) // handle error
            }
        }
    }
The makeCall method is called when Flutter sends the makeCall method call, this starts a phone call to the specified phone number "PHONE_NUMBER" you should replace this with an actual phone number that you wish to call. Again, here we pass back the state to Flutter depending on if the call is successful and starts or if there is some kind of error.
    private fun makeCall() {
        notifyFlutter(SdkState.WAIT)

        client.serverCall(mapOf("to" to "PHONE_NUMBER")) {
                err, outboundCall ->
            when {
                err != null -> {
                    notifyFlutter(SdkState.ERROR)
                } else -> {
                    onGoingCallID = outboundCall
                    notifyFlutter(SdkState.ON_CALL)
                }
            }
        }
    }
The endCall method is called when Flutter sends the endCall method call, this ends the current phone call (if there is one).
    private fun endCall() {
        notifyFlutter(SdkState.WAIT)

        onGoingCallID?.let {
            client.hangup(it) {
                    err ->
                when {
                    err != null -> {
                        notifyFlutter(SdkState.ERROR)
                    } else -> {
                        notifyFlutter(SdkState.LOGGED_IN)
                        onGoingCallID = null
                    }
                }
            }
        }
    }
Finally, we have the nofityFlutter method, this is where we use the Flutter magic to send back the current state of the application so Flutter can update the UI. Using this we are able to involve the Flutter updateState method and pass the current state as a variable.
private fun notifyFlutter(state: SdkState) {
        Handler(Looper.getMainLooper()).post {
            flutterEngine?.dartExecutor?.binaryMessenger?.let {
                MethodChannel(it, "com.vonage")
                    .invokeMethod("updateState", state.toString())
            }
        }
}And that's all the native code we need! At this point, we have a functioning Flutter application that we could build for Android and be able to make a phone call from the app to a physical phone. But before we test the app let's take a look at how we can do the same for iOS.
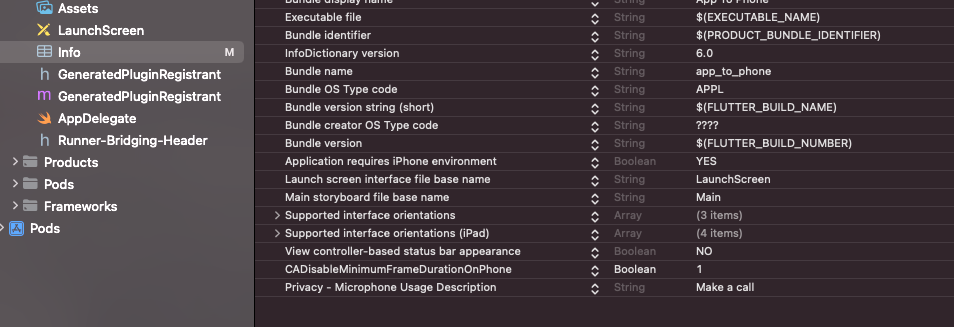
First, we need to set up the audio permissions within iOS, we already have the package in Flutter setup to request them so all we need to do is open the ios/Runner/info.plist file and add Privacy - Microphone Usage Description key with the value of "Make a call"
Next, open the file ios/Runner/AppDelegate this is where we will include the code to interface between flutter and the SDK much in the same way we have already done for Android. The complete code looks like this:
import UIKit
import Flutter
import VonageClientSDKVoice

@UIApplicationMain
@objc class AppDelegate: FlutterAppDelegate {
    enum SdkState: String {
        case loggedOut = "LOGGED_OUT"
        case loggedIn = "LOGGED_IN"
        case wait = "WAIT"
        case onCall = "ON_CALL"
        case error = "ERROR"
    }

    var vonageChannel: FlutterMethodChannel?
    var client: VGVoiceClient? = nil
    var callID: String?

    override func application(
        _ application: UIApplication,
        didFinishLaunchingWithOptions launchOptions: [UIApplication.LaunchOptionsKey: Any]?
    ) -> Bool {
        initClient()
        addFlutterChannelListener()

        GeneratedPluginRegistrant.register(with: self)
        return super.application(application, didFinishLaunchingWithOptions: launchOptions)
    }

    func initClient() {
        client = VGVoiceClient()
        let config = VGClientConfig(region: .US)
        client.setConfig(config)
    }

    func addFlutterChannelListener() {
        let controller = window?.rootViewController as! FlutterViewController

        vonageChannel = FlutterMethodChannel(name: "com.vonage",
                                             binaryMessenger: controller.binaryMessenger)
        vonageChannel?.setMethodCallHandler({ [weak self]
            (call: FlutterMethodCall, result: @escaping FlutterResult) -> Void in
            guard let self = self else { return }

            switch(call.method) {
            case "loginUser":
                if let arguments = call.arguments as? [String: String],
                   let token = arguments["token"] {
                    self.loginUser(token: token)
                }
                result("")
            case "makeCall":
                self.makeCall()
                result("")
            case "endCall":
                self.endCall()
                result("")
            default:
                result(FlutterMethodNotImplemented)
            }
        })
    }

    func loginUser(token: String) {
        client?.createSession(token, sessionId: nil) { error, sessionId in
            if (error != nil) {
                self.notifyFlutter(state: .error)
            } else {
                self.notifyFlutter(state: .loggedIn)
            }
        }
    }

    func makeCall() {
        client.serverCall(["to": "PHONE_NUMBER"]) { error, callId in
                    DispatchQueue.main.async { [weak self] in
                        guard let self else { return }
                        if error == nil {
                            self.callID = callId
                            self.notifyFlutter(state: .onCall)
                        } else {
                            self.notifyFlutter(state: .error)
                        }
                    }
                }
    }

    func endCall() {
        client.hangup(callID) { error in
                    DispatchQueue.main.async { [weak self] in
                        guard let self else { return }
                        if (error != nil) {
                            self.notifyFlutter(state: .error)
                        } else {
                            self.callID = nil
                            self.notifyFlutter(state: .loggedIn)
                        }
                    }
                }
    }

    func notifyFlutter(state: SdkState) {
        vonageChannel?.invokeMethod("updateState", arguments: state.rawValue)
    }
}
This is all the code you will need to also be able to build for iOS, now that we have all the code in place let's build the app and test it out!
With everything now in place we can build and run the application, we will build the Android version and run it in the Android emulation.
NOTE make sure you have set the JWT in the Flutter code and the PHONE_NUMBER in the native code. Also, make sure your web server is still running.
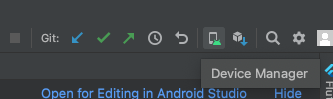
Start the Android emulator so that flutter can attach to it, below is where you can do this in Android studio
Once this is running you can select this device as the target for the Flutter build and press the green arrow to build and run the Flutter app (with Android native code).

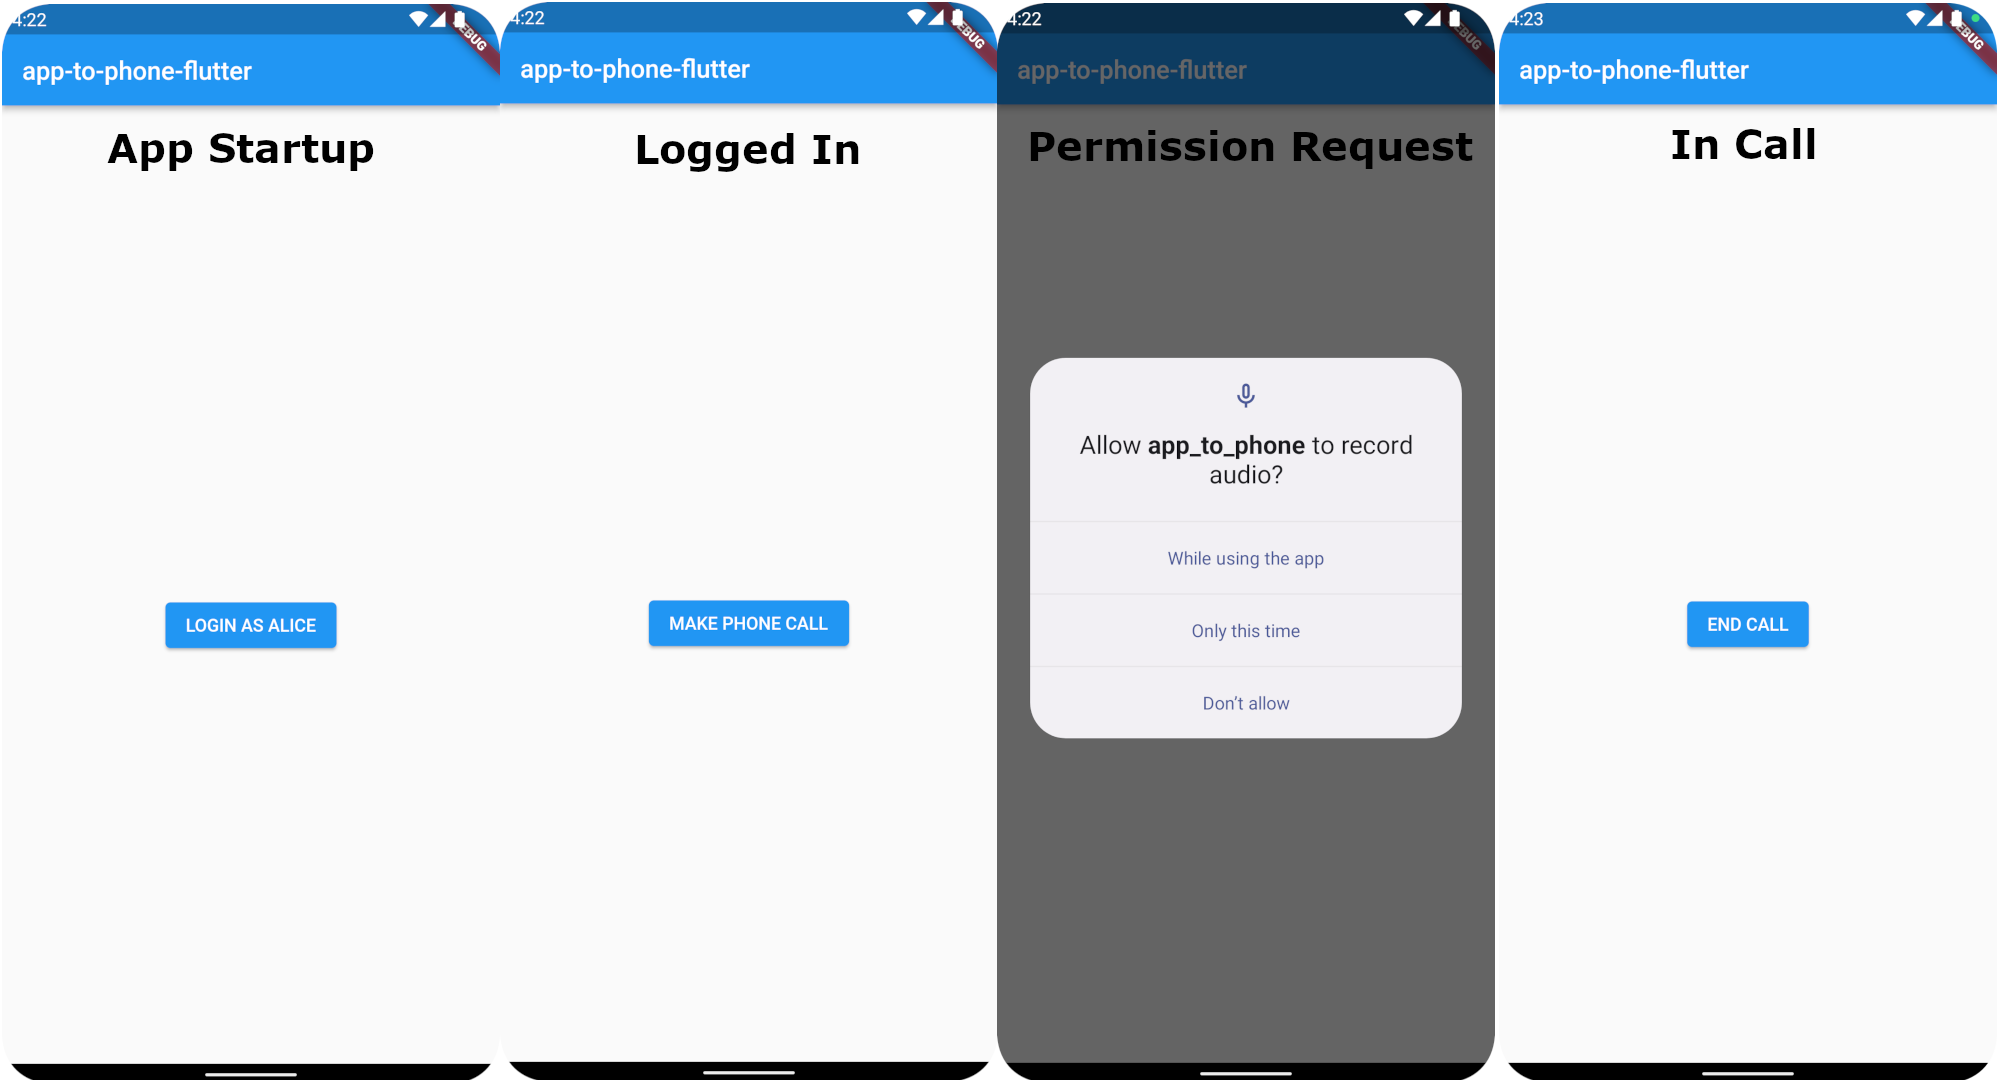
Once the application has build and installed you will be presented with the below left screen. Clicking the Login as Alice button will take you to the next screen. From here you can press the Make phone call button which will (on the first run) prompt you to allow the audio permissions. After this the phone call will start and the phone number you entered will be called connecting the audio session.
Once you wish to finish the call you can do so by pressing the end call button.
And that's a wrap! You now have your fully functional app to phone call written in Flutter with support for both Android and iOS. But of course, this is not the end! With your knowledge of how to use Android and iOS SDKs take a look at the other example projects which will help you build other communication features into your Flutter application. If you want more detail make sure to check out the developer portal which has all the documentation and sample code you could ever need!