Share:
Benjamin Aronov is a developer advocate at Vonage. He is a proven community builder with a background in Ruby on Rails. Benjamin enjoys the beaches of Tel Aviv which he calls home. His Tel Aviv base allows him to meet and learn from some of the world's best startup founders. Outside of tech, Benjamin loves traveling the world in search of the perfect pain au chocolat.
AI Studio Advanced: Triggering a Real Time Alert From Airtable
Time to read: 4 minutes
AI Studio’s Conversational AI agents help improve customer experience by creating self-service interactions for your users. Building agents that respond to user requests is super fast with a drag-and-drop platform. And with a little creativity, you can do a lot more!
In this previous post, I showed how you can connect AI Studio with a database and create a full application capable of storing any data you want. But in that article, our application was only responding to users, so your customers must trigger the conversation. What if you want to initiate the conversation? For instance, maybe you want to send an emergency alert or a timely promotional notification. AI Studio can do this too, with Outbound Events.
In this post, we’ll show how we can use another low-code tool, Postman, to trigger a real-time alert with data from your Airtable database to AI Studio.
Yalla let’s go!
Vonage Account - To use AI Studio you'll need a Vonage Developer Account. Details to get started are just below.
Airtable Account - Sign up here. We'll be using Airtable as our backend database.
Postman Account - Sign up here. We'll be using Postman to send requests in the advanced section of this tutorial.
In this post, we’ll show how to trigger an Outbound SMS session. The logic is the same for WhatsApp, except you need to have a WhatsApp business account to configure a Whatsapp template message.
Follow these instructions to set up your agent. It should have the following configuration:
Type: SMS
Template: Start From Scratch
Event: Outbound
we'll start with one Send Message Node. It should have some sort of welcome message like, “Hey! What's Up $currentName? It's AI Studio.”. And you’ll need to add $currentNameas a custom parameter.
Alternatively, you can download and import this starter agent. Learn how here.
Make a copy of this Airtable Base.
You’ll need to add some test phone numbers in the PHONE_NUMBER column. I suggest you pass in your own number for both Big Bird and Kermit to confirm that Postman is iterating through your database correctly. Be sure to include a country code and area code, but no + in front of the country code.
We’re going to be using Postman to trigger our SMS being sent.
First, we’ll need to create a workspace on Postman. A workspace allows you to create a collection, with which we can save pieces of information to variables. These Postman variables allow us to pass data from our first GET request to our second POST request.
To retrieve our contacts, we’ll need to send a GET request to our Airtable DB and pass through our Access Token in the headers for authentication.
You can read about generating a GET request in Airtable here. Your request will look like this, with your baseId instead of the {baseId} placeholder:
[https://api.airtable.com/v0/{baseId}/Customers](https://api.airtable.com/v0/%7BbaseId%7D/Customers)
You also will need to provide your Personal Access Token for authentication. You can learn how to generate and use your Personal Access Token here. Make sure to give it scopes: data.records:read and data.records:write. This token can only be seen once, so you should save it somewhere safe that you can copy/paste it later.
Your Postman should look something like this:
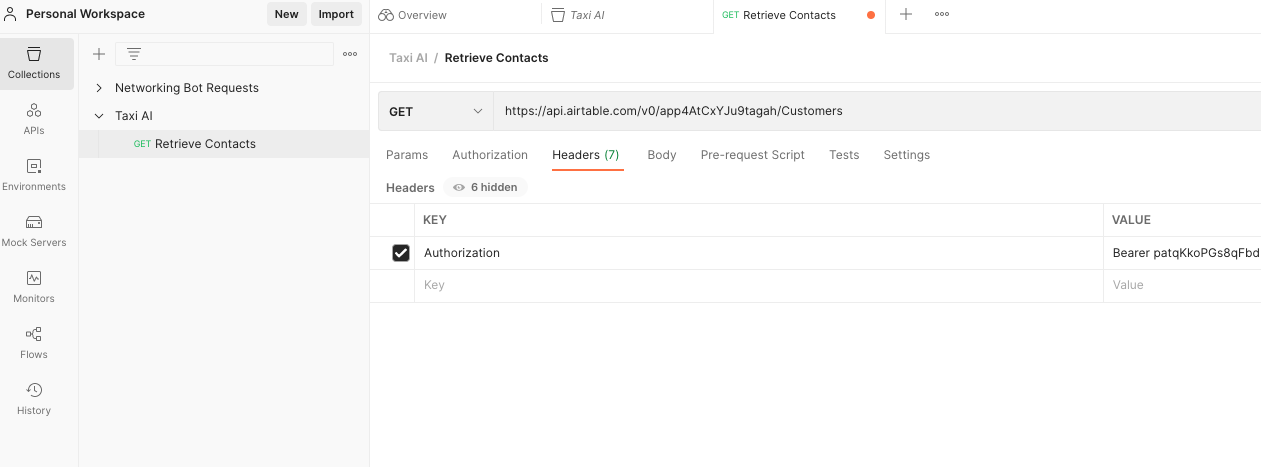 postman-retrieve-contacts-example.png
Once you hit send, you should get a response with all the customers in your table. Now we can add the bit of Postman logic to store our customers in variables.
Under the Tests tab, here we’ll add a bit of Javascript:
var jsonData = JSON.parse(responseBody);
var bodyData = jsonData.records;
pm.variables.set("retrievedRecords", bodyData);This will now let us access our GET response data under the key “retrievedRecords”. You can see this by adding the line console.log(pm.variables); below and opening the console. There you should see retrievedRecords key:
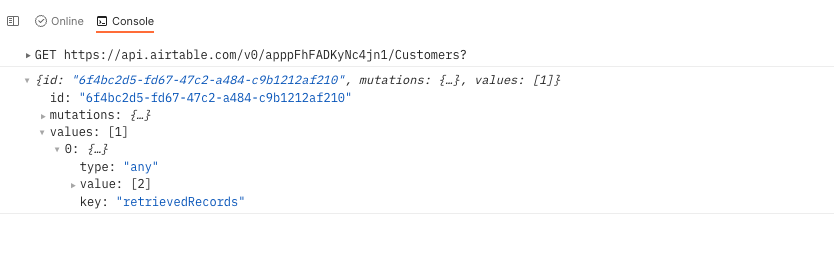 postman-console-inspector
Now we can use the information stored in our pm.variables to iterate and then send a POST request to AI Studio for each contact.
First, we’ll add a new request to our collection. Let’s call it “Trigger Promotional Message” and here we’ll want to change it to a POST request. But where do we want to send our request?
The cool thing is that all outbound agents are triggered by the same endpoint. You just need to pass your X-Vgai-Key and the proper parameters. Read about it here.
You can find theX-Vgai-Key on the top right of your canvas. Click on the "user" icon, and then "Generate API Key".
So with our X-Vgai-Key added in the headers, we need to provide the proper parameters to AI Studio. In the body, we’ll pass the following raw JS. Make sure to pass it through as JSON, not Text.
{
  "to": {{currentNumber}},
  "agent_id": "641c0ef9056e5bc7635cddf4",
  "channel": "sms",
  "session_parameters": [
    {
      "name": "currentName",
      "value": {{currentName}}
    }
  ]
}But how will we get the currentName and currentNumber to pass in our POST request? We’ll need to make use of Postman’s pre-request script to iterate through our retrievedRecords and access each contact’s information to make a POST request. Like so:
const records = pm.variables.get('retrievedRecords');
pm.variables.set('currentRecord', records.shift());

const currentRecord = pm.variables.get('currentRecord');
pm.variables.set('currentName',  JSON.stringify(currentRecord.fields.NAME));
pm.variables.set('currentNumber',  JSON.stringify(currentRecord.fields.PHONE_NUMBER));

const currentName = pm.variables.get("currentName");
const currentNumber = pm.variables.get("currentNumber");

if (records.length > 0){
   postman.setNextRequest('Trigger Promotional Message');

} else {
  postman.setNextRequest(null);
}
And now if we run our collection, then we should receive a text message to each test number we’ve added in our Airtable database. Success!
You’ve now used AI Studio, Airtable, and Postman to create a full application capable of storing and sending data over SMS with just a click of the mouse. You can extend this application in many ways. Firstly, build out your full user flow in AI Studio. Secondly, add all the information you want to store in Airtable. You can use an Inbound agent in AI Studio to collect all the pieces of information from your customer when they first reach out to you. And lastly, you can use Postman’s Collection Runner to setup scheduled runs to send out messages at predetermined times.
And it’s all capable with Low Code! How cool is that?
If you liked this tutorial or hated it, please let me know! Find me on Twitter or the Vonage Community Slack (we even have a channel for AI Studio). I’m really interested to see what you’re building with Low Code!
Share:
Benjamin Aronov is a developer advocate at Vonage. He is a proven community builder with a background in Ruby on Rails. Benjamin enjoys the beaches of Tel Aviv which he calls home. His Tel Aviv base allows him to meet and learn from some of the world's best startup founders. Outside of tech, Benjamin loves traveling the world in search of the perfect pain au chocolat.