シェア:
Benjamin AronovはVonageの開発者支援者です。彼はRuby on Railsのバックグラウンドを持つ実績のあるコミュニティ・ビルダーです。Benjaminは故郷であるテルアビブのビーチを楽しんでいる。テルアビブを拠点に、世界最高のスタートアップの創設者たちと出会い、学ぶことができる。技術以外では、完璧なパン・オ・ショコラを求めて世界中を旅するのが好き。
Send and Receive WhatsApp Messages With Python, FastAPI, and Vonage
Want to build a WhatsApp bot using Python? Need to send and receive WhatsApp messages programmatically? This tutorial shows you how to create a real-time messaging service using Python, FastAPI, and the Vonage Messages API.
With a WhatsApp chatbot as your foundation, you’ll be able to automate support, reminders, and marketing flows, like sending confirmations, handling customer inquiries, or triggering follow-ups.
We’ll use the Vonage Python SDK to connect a WhatsApp number within a FastAPI server that receives and replies to messages in real time.
>> TL;DR See the complete project on GitHub
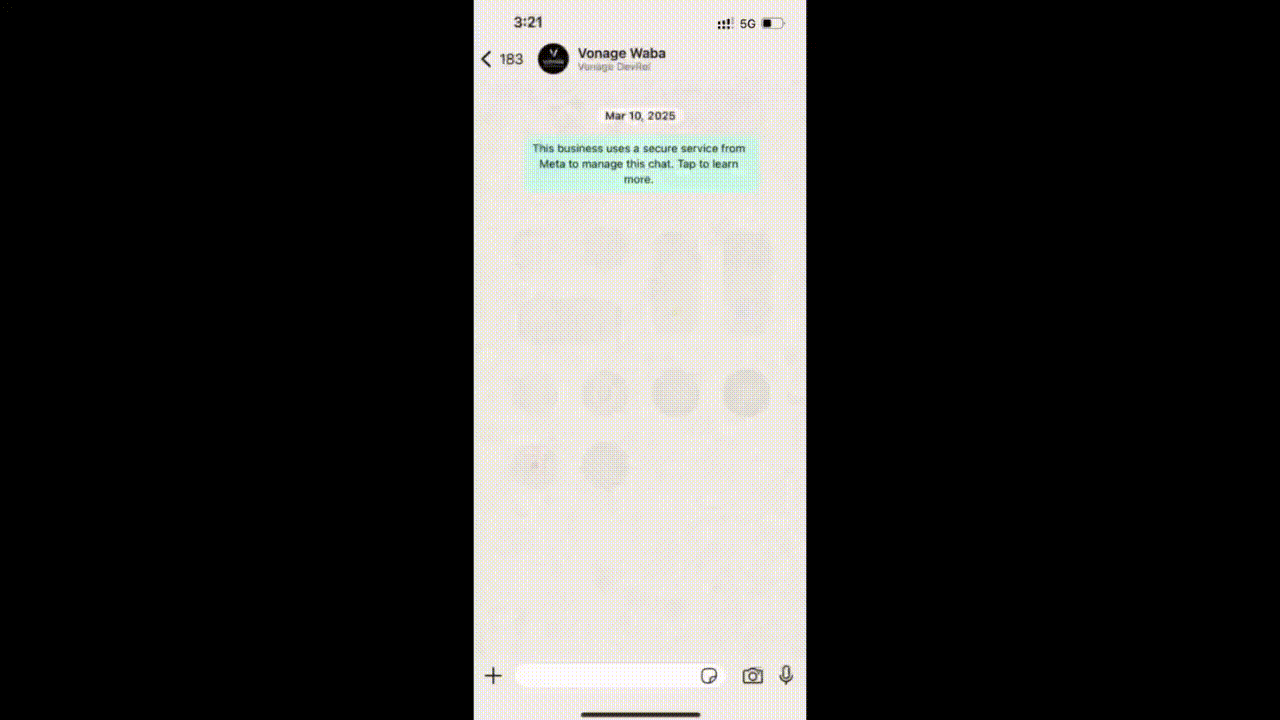 WhatsApp chat showing an automated reply from a Python FastAPI app using the Vonage Messages API
To follow this tutorial, you'll need:
A verified WhatsApp Business Account (WABA)
Don’t have a WhatsApp Business Account yet? Start with our Sandbox Quickstart for WhatsApp to test with minimal setup.
ngrok installed for exposing your local server
A Vonage API Account
Your FastAPI application will be relatively simple, with a single file. But before creating it, we’ll start by creating a Vonage app to be ready with all the necessary configurations.
Create your Vonage application in the Vonage Dashboard. Give the app a name and turn on the Messages capability. For now, we’ll use placeholder endpoints, which we’ll replace in the next section (Expose Your Local FastAPI Server).
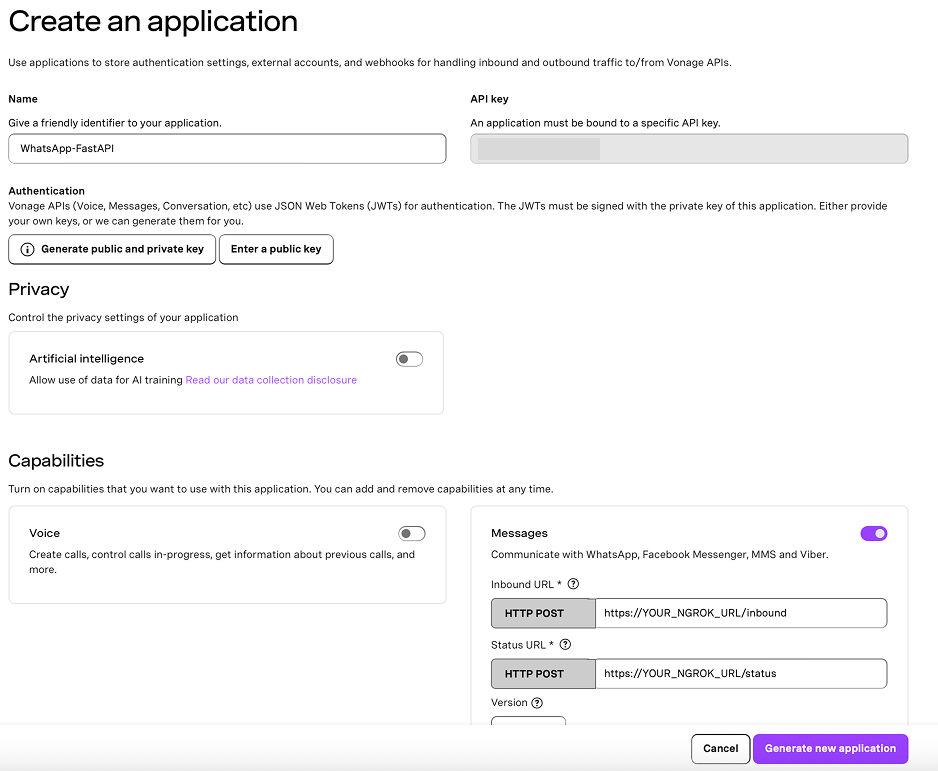 Setting up a Vonage Messages API application for WhatsApp using FastAPI and ngrok.In your Vonage application settings:
Set the Inbound URL to https://YOUR_NGROK_URL/inbound.
Set the Status URL to https://YOUR_NGROK_URL/status.
Generate a public and private key by clicking the button. Ensure to move your private.key file to the project root directory (whatsapp-fastapi) in the next section.
Save the changes.
Then link your WABA by clicking the “Link external accounts” tab:
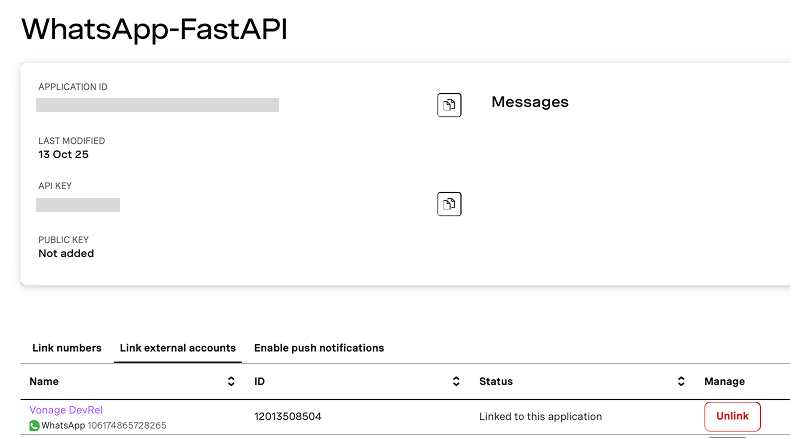 Viewing the WhatsApp-FastAPI application in the Vonage dashboard with an active WhatsApp number linked.
To receive webhooks, your application will rely on ngrok to expose your local server.
In a second terminal tab:
ngrok http 3000Copy the NGROK_URL that looks something like:
https://abc123.ngrok.ioGo back to your Vonage application and update the webhook URLs to replace YOUR_NGROK_URL with your actual ngrok URLs. For example:
Inbound URL: https://abc123.ngrok.io/inbound
Status URL: https://abc123.ngrok.io/status
Click Save to finalize the setup.
>> Learn more about testing with ngrok.
Create your project folder:
mkdir whatsapp-fastapi
cd whatsapp-fastapi
touch main.py .envThen, create and activate a virtual environment so you can install the required Python packages:
python3 -m venv venv
source venv/bin/activate
pip install fastapi uvicorn python-dotenv vonagefastapi: A modern, high-performance web framework for building APIs quickly with async support and automatic documentation.
vonage: The official Vonage Python SDK, used to send and receive WhatsApp messages through the Vonage Messages API.
uvicorn: A lightning-fast ASGI server used to run your FastAPI app in development or production.
python-dotenv: Loads environment variables securely from a .env file so you don’t hardcode credentials in your codebase.
In your .env file, add the following (replace with your actual credentials). This file keeps your credentials secure and out of your source code.
VONAGE_APPLICATION_ID=your_application_id
VONAGE_PRIVATE_KEY=./private.key
VONAGE_WHATSAPP_NUMBER=your_vonage_virtual_number
VONAGE_APPLICATION_ID: Your Vonage application ID, found in the API dashboard.
VONAGE_PRIVATE: Your private key file. Ensure to move your downloaded private.key file to the project root directory (whatsapp-fastapi).
VONAGE_WHATSAPP_NUMBER: Your Vonage virtual phone number associated with your WABA.
Phone numbers should be in international format without any + or 00. For example, a US number would be 15552345678
>> Learn more about Python Environment Variables.
Now let’s set the stage for sending and receiving WhatsApp messages by wiring up your FastAPI application and initializing the Vonage client.
Your main.py will serve as the entry point for your FastAPI app.
# main.py
import os
import logging
import json
from dotenv import load_dotenv
from fastapi import FastAPI, Request, Response
from vonage import Auth, Vonage
from vonage_messages import WhatsappTextWe start by importing the necessary libraries:
os and dotenv help us load sensitive credentials from our .env file.
fastapi, Request, and Response are used to define API routes and handle incoming HTTP requests.
vonage and vonage_messages give us access to the Vonage Messages API, specifically WhatsApp.
load_dotenv()Here we load your .env file so you can securely access your application ID, private key path, and WhatsApp number without hardcoding them.
logging.basicConfig(level=logging.INFO)This enables basic logging to help you debug and monitor incoming messages and events in your terminal as they happen.
auth = Auth(
    application_id=os.getenv("VONAGE_APPLICATION_ID"),
    private_key=os.getenv("VONAGE_PRIVATE_KEY"),
)
vonage_client = Vonage(auth)This is where we initialize the Vonage client using the new SDK. You pass in your application_id and the path to your private key file to authenticate your API requests. The Vonage() instance will allow you to send WhatsApp messages using the Messages API.
app = FastAPI()This creates the FastAPI application instance. You'll use this to define your webhook endpoints and run your development server.
WHATSAPP_NUMBER = os.getenv("VONAGE_WHATSAPP_NUMBER")Finally, we store your WhatsApp sender number in a variable so it’s easy to reuse when sending outbound messages later.
To build a working WhatsApp bot, you need two webhook endpoints:
One to receive incoming messages from WhatsApp users
One to track message status updates (e.g., delivered, read, failed)
You can see the working main.py file on GitHub.
Create an /inbound endpoint that listens for incoming WhatsApp messages. When someone sends a message to your Vonage WhatsApp number, Vonage makes a POST request to this URL with a JSON payload describing the message.
Here’s how to handle it:
@app.post("/inbound")
async def receive_whatsapp_message(request: Request):
    try:
        data = await request.json()
    except Exception:
        raw = await request.body()
        try:
            data = json.loads(raw)
        except:
            data = {}
This block tries to parse the incoming request as JSON. If it fails (sometimes the body is just raw bytes), it falls back to decoding and loading it manually.
logging.info(f"🔍 Full inbound payload: {json.dumps(data, indent=2)}")
For debugging and transparency, we log the entire payload to the console. This is helpful during development to understand what fields are available and how the data is structured.
    sender = data.get("from")
message = data.get("text")Here we extract two key fields:
from: the user's phone number who sent the WhatsApp message
text: the actual message content
Now that you’ve received the message, let’s send a response. In this example, the bot just reverses the user's message and sends it back; a fun and simple way to demonstrate two-way messaging.
  if sender and message:
        reversed_text = message[::-1]
        reply = WhatsappText(
            from_=WHATSAPP_NUMBER,
            to=sender,
            text=f"Here's your message in reverse: {reversed_text}",
        )
        response = vonage_client.messages.send(reply)
logging.info(f"📤 Sent reply: {response}")Here’s what’s happening:
We check that both the sender number and message are present.
We reverse the message string using Python slice syntax [::-1].
We construct a WhatsappText message using the Vonage SDK. This creates the proper JSON payload under the hood.
Finally, we send the message with vonage_client.messages.send(reply), and log the response.
return Response(status_code=200)
This tells Vonage that the webhook request was successfully received. Always return a 200 OK response to acknowledge webhook delivery.
You can also listen for message status events by implementing a /status endpoint. This receives delivery confirmations and read receipts, which can help you debug or analyze message flow.
@app.post("/status")
async def message_status_update(request: Request):
    data = await request.json()
    logging.info(f"📬 Status update: {data}")
return Response(status_code=204)When you send a WhatsApp message, Vonage will call this endpoint later with status updates such as:
delivered: the user’s device received the message
read: the user opened the message
failed: delivery failed (e.g., invalid number)
In your terminal, start your server:
uvicorn main:app --reload --port 3000Now:
Send a WhatsApp message to your Vonage WABA number
Your FastAPI app will:
Log the incoming message
Send a reversed reply using the Vonage Messages API
You’ll see the reply in your WhatsApp chat
>> You can see the status of your message updated in the FastAPI server (your terminal).
Sometimes, you want to send a message programmatically, not just in response to a webhook. Here’s a simple script you can run. First, create a new send_message.py file:
touch send_message.pyThis script looks largely the same as before. But instead of sending a hardcoded message, we’ll prompt the user via the command line to enter a phone number and a message to send.
# send_message.py
import os
from dotenv import load_dotenv
from vonage import Auth, Vonage
from vonage_messages import WhatsappText

load_dotenv()

auth = Auth(
    application_id=os.getenv("VONAGE_APPLICATION_ID"),
    private_key=os.getenv("VONAGE_PRIVATE_KEY"),
)

vonage_client = Vonage(auth)

# Ask the user for phone number and message text
recipient = input("Enter recipient phone number (e.g., 14155551234): ").strip()
message = input("Enter a message to send: ").strip()

msg = WhatsappText(
    from_=os.getenv("VONAGE_WHATSAPP_NUMBER"),
    to=recipient,
    text=message,
)

response = vonage_client.messages.send(msg)
print(response)To run it:
source venv/bin/activate && python3 send_message.pyAnd then you will see:
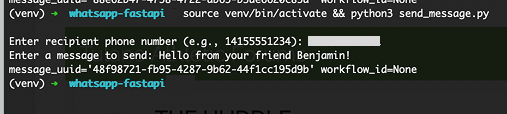 Sending a WhatsApp message using the Python CLI with FastAPI and the Vonage SDK.
You've now built a working WhatsApp bot in Python using FastAPI and the Vonage Messages API. This is a great starting point for real-time support, automation, or chatbots!
If you’re eager to keep building and learning, check out these related tutorials:
Connect WhatsApp to ChatGPT in Python: use OpenAI to build smart, conversational bots
Try RCS Messaging in Python: RCS is like WhatsApp, but natively in your phone's messaging app
ご質問がある場合、またはあなたが作っているものを共有したい場合は、こちらをクリックしてください。
登録する 開発者ニュースレター
フォローする X(旧ツイッター)最新情報
チュートリアルを見る YouTubeチャンネル
LinkedInの LinkedIn の Vonage デベロッパーページ
最新の開発者向けニュース、ヒント、イベント情報をお届けします。