Overview
On events such as an incoming call, the user often expects to receive a push notification if the app is not active. You can also integrate push notifications with ConnectionService to show calls incoming with the system UI. This guide explains how to configure your Android app to receive push notifications from the Client SDK.
Connect Vonage to Firebase
To receive push notifications you need to connect Vonage with Firebase. To do so, you will need the following:
- Your Firebase Project ID
- Your Firebase Service Account key
Get a Vonage Application ID
Obtain your Vonage API Application id. You can access the existing applications in the dashboard. If you don't have an application already you can create a new application via Vonage CLI.
Get a Firebase Project ID
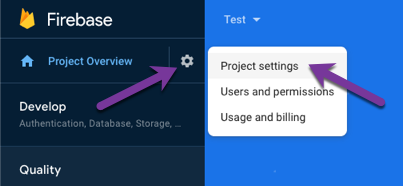
Get your Firebase project id from the Firebase console. Navigate to Firebase console -> Project settings -> General.

Get a Firebase Service Account Key
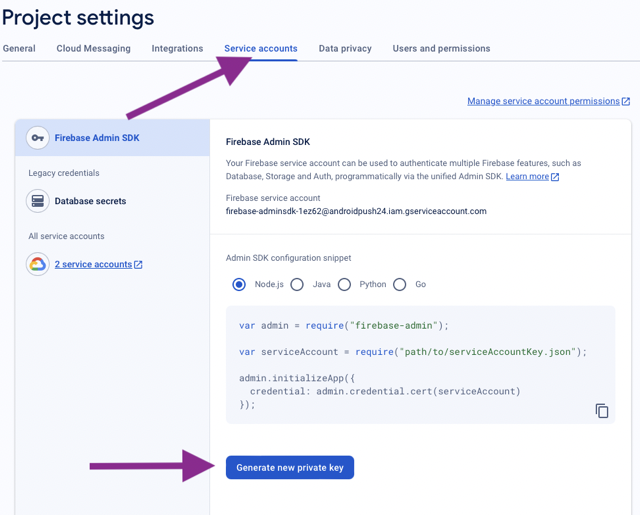
Get your Firebase Server Key from the Firebase console. Navigate to Firebase console -> Project settings -> Service accounts and generate a new private key.
Connect your Vonage Application to Firebase
You upload your credentials to Vonage using the API Dashboard. Open your application on the dashboard, then open the "Enable push notifications" tab:
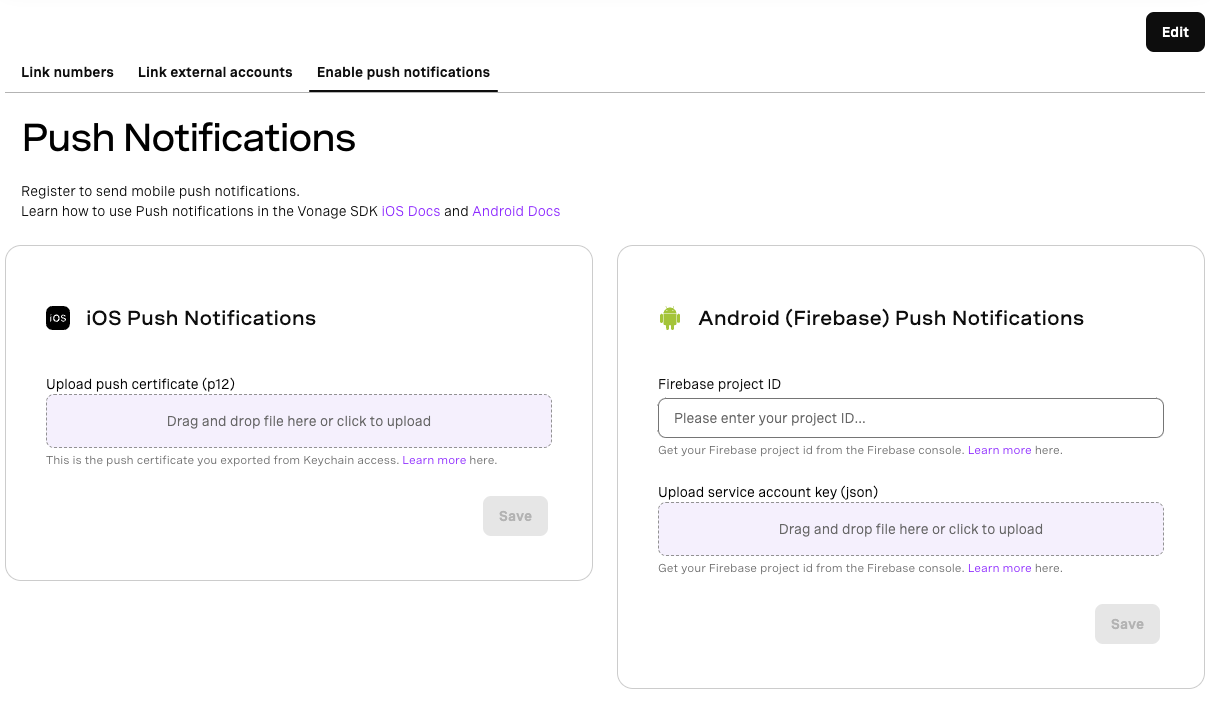
Enter your Firebase Project ID and upload your Service Account Key from the previous step.
Using the Terminal
You can also connect the Vonage backend push service with the Firebase application using the terminal. You will need your Vonage Application ID and need to generate a Vonage admin JWT.
# A command with parameters
vonage jwt create `
--app-id='00000000-0000-0000-0000-000000000000' `
--private-key=./private.key

# Will produce a token
eyJhbGciOiJSUzI1NiIsInR5cCI6IkpXVCJ9.eyJleHAiOjE3MzYyODE5NDYsImp0aSI6IjBmZjcwZDNmLTAzN2EtNGY4MC04ODZjLWI3MmM3MmQyMWNmMiIsImlhdCI6MTczNjI4MTA0NiwiYXBwbGljYXRpb25faWQiOiIwMDAwMDAwMC0wMDAwLTAwMDAtMDAwMC0wMDAwMDAwMDAwMDAifQ.gA7jClpqaZ2OoS0iri-zGCbda4jO7C0M8mka0EnSyjlds1EeY8fNoBEx3FTXHfkkzzrj0TskrWc_dcs1wuM8Kx55c5rLQ7taVpDAYopKSc_CeeOaad8S6aWnRkTUTNeduO4aIn-0CbyRTluBYsH1RBqYBQvobuQIDEwbFw8xBgx0UfREMMN6DAWknR57eiVXN9x_oD6CGQJ1yV3025nGboeMsP9YgX4Nwc-rE2r8c1ZGwCLO81x8i19Qil3Nwu5q1nzouyavQjIw00B_TZkushnI1ufdi_GNqk-h5q2HvGkg7Pj9bVkZHFdVTO8im03JYNyJmcV83vnpjOLuCFRzxQ
REM A command with parameters
vonage jwt create ^
--app-id='00000000-0000-0000-0000-000000000000' ^
--private-key=./private.key

REM Will produce a token
eyJhbGciOiJSUzI1NiIsInR5cCI6IkpXVCJ9.eyJleHAiOjE3MzYyODE5NDYsImp0aSI6IjBmZjcwZDNmLTAzN2EtNGY4MC04ODZjLWI3MmM3MmQyMWNmMiIsImlhdCI6MTczNjI4MTA0NiwiYXBwbGljYXRpb25faWQiOiIwMDAwMDAwMC0wMDAwLTAwMDAtMDAwMC0wMDAwMDAwMDAwMDAifQ.gA7jClpqaZ2OoS0iri-zGCbda4jO7C0M8mka0EnSyjlds1EeY8fNoBEx3FTXHfkkzzrj0TskrWc_dcs1wuM8Kx55c5rLQ7taVpDAYopKSc_CeeOaad8S6aWnRkTUTNeduO4aIn-0CbyRTluBYsH1RBqYBQvobuQIDEwbFw8xBgx0UfREMMN6DAWknR57eiVXN9x_oD6CGQJ1yV3025nGboeMsP9YgX4Nwc-rE2r8c1ZGwCLO81x8i19Qil3Nwu5q1nzouyavQjIw00B_TZkushnI1ufdi_GNqk-h5q2HvGkg7Pj9bVkZHFdVTO8im03JYNyJmcV83vnpjOLuCFRzxQ
NOTE An admin JWT is a JWT without a sub claim. More details on how to generate a JWT can be found in the authentication guide.
Fill VONAGE_APP_ID, VONAGE_JWT, FIREBASE_PROJECT_ID, and FIREBASE_SERVICE_ACCOUNT with previously obtained
values and run the below command to send the request. Your FIREBASE_SERVICE_ACCOUNT should be the private key from
Firebase, as a string with special characters escaped:
VONAGE_APP_ID=
VONAGE_JWT=
FIREBASE_PROJECT_ID=
FIREBASE_SERVICE_ACCOUNT=

curl -v -X PUT \
   -H "Authorization: Bearer $VONAGE_JWT" \
   -H "Content-Type: application/json" \
   -d "{\"token\":\"$FIREBASE_SERVICE_ACCOUNT\", \"projectId\":\"$FIREBASE_PROJECT_ID\"}" \
   https://api.nexmo.com/v1/applications/$VONAGE_APP_ID/push_tokens/android
If you are updating an existing token, delete the existing token first by making a DELETE request to the same
endpoint with the same authentication.
NOTE There is no validation at this endpoint. The 200 return code means that Vonage got the data and stored it
but hasn't checked that values are valid.
Set up Firebase Project for your Android Application
In order to enable push notifications for your Android application, you need to configure your Android application.
Configure your Android Project
Let's start with configuring your Android project with the required dependencies.
Add the Client SDK Dependency
Add the Client SDK to your project.
Add Firebase Configuration to your Application
Before we set up the push notification-specific configuration there are a few general steps you need to take to set up Firebase within your app.
NOTE that you can skip this step if your application is already using other Firebase products.
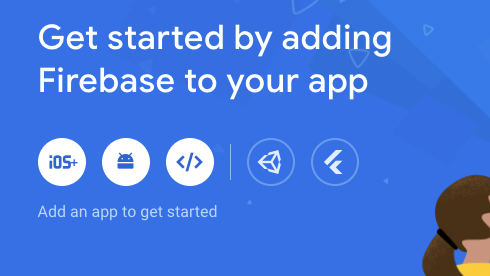
From your Firebase project click on the "add Android app" option:
Fill in the displayed form to register your application with the Firebase project
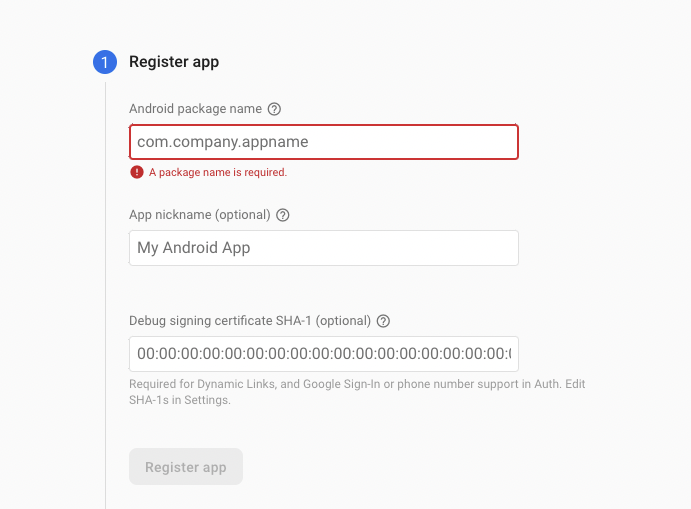
You will then be presented with a "Download google-services.json" button, click this and download the file.
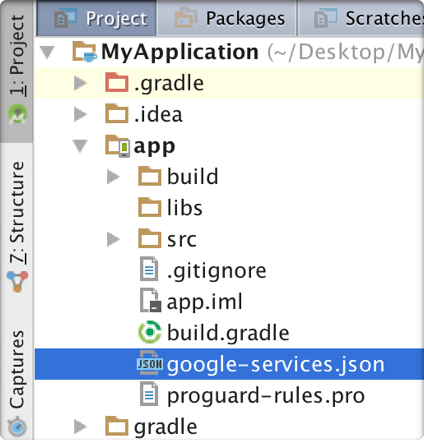
Now switch over to the Project view in Android Studio to see your project root directory.
Move the google-services.json file you downloaded into your Android app module root directory.
Finally, you need to add the Google services plugin, which will load the google-services.json file. Modify your
project-level build.gradle file to include this:
buildscript {
    repositories {
	    // Check that you have the following line (if not, add it):
        google()
    }

    dependencies {
	    // Add this line
	    classpath("com.google.gms:google-services:4.3.10")
    }
}

allprojects {
    repositories {
		// Check that you have the following line (if not, add it):
        google()
    }
}
buildscript {
  repositories {
    // Check that you have the following line (if not, add it):
    google()  // Google's Maven repository

  }
  dependencies {
    // Add this line
    classpath 'com.google.gms:google-services:4.3.10'

  }
}

allprojects {
  repositories {
    // Check that you have the following line (if not, add it):
    google()  // Google's Maven repository

  }
}
And in your App-level build.gradle implement the base Firebase BoM
plugins {
    id("com.android.application")
    id("com.google.gms.google-services")
}

dependencies {
  // Import the Firebase BoM
  implementation platform('com.google.firebase:firebase-bom:30.1.0')
}
apply plugin: 'com.android.application'

// Add this line
apply plugin: 'com.google.gms.google-services'


dependencies {
  // Import the Firebase BoM
  implementation platform('com.google.firebase:firebase-bom:30.1.0')
}
Add the Firebase Cloud Messaging Dependency
In your IDE, in your app level build.gradle file (usually app/build.gradle), add the firebase-messaging dependency:
dependencies{
    implementation("com.google.firebase:firebase-messaging:21.0.1")
}
dependencies{
    implementation 'com.google.firebase:firebase-messaging:21.0.1'
}
NOTE: The latest version number can be found on the Firebase website.
Register Push Token
In order to receive the push, you need to register the user's push token to Vonage's backend by
using registerDevicePushToken()
val token = "token"
client.createSession(token, null) { error, response ->
    when {
        error != null -> { println("there was an error: ${error}") }
        else -> {
            val pushToken: String? = context?.getSharedPreferences("_", com.google.firebase.messaging.FirebaseMessagingService.MODE_PRIVATE)?.getString("fb", "empty");
            if (pushToken != null){
                client.registerDevicePushToken(pushToken) { err, deviceId ->
                    if (err != null) {
                        println("there was an error: $err")
                    } else {
                        println("registered device push token successfully - device id: $deviceId")
                    }
                }
            }
        }
    }
}
registerDevicePushToken() will return a unique device id for the users device. Users can register multiple device.
The device id can be used to later unregister the users device from receiving future push notifications.
client.unregisterDevicePushToken("Device_ID") { error ->
    if (error == null) {
        // device id deleted
    }
}
Implement a Firebase Receiver Service
To receive firebase messages you need to implement firebase messaging service. You will also need to also check if the
message received is a vonage message and if so what type using the getPushNotificationType() helper method. If it is
an INCOMING_CALL we process appropriately, by using our helper methods processPushInvite().
class FirebaseMessagingService: FirebaseMessagingService() {
    val invite: CallId?

    @RequiresApi(Build.VERSION_CODES.O)
    override fun onNewToken(token: String) {
        super.onNewToken(token)
        println("PUSH TOKEN:  $token")
        getSharedPreferences("_", MODE_PRIVATE).edit().putString("fb", token).apply();
    }

    override fun onMessageReceived(remoteMessage: RemoteMessage) {
        val dataString = remoteMessage.data.toString()
        val type: PushType = VoiceClient.getPushNotificationType(dataString)
        when (type) {
            INCOMING_CALL -> {
                this.invite = App.client.processPushCallInvite(dataString)
            }
            else -> {}
        }
   }
   //...
}
Answer an Incoming Call
If processPushCallInvite succeeds, you will get an incoming call invite to your application from the SDK. To answer
the received invite from the firebase push notification:
val call: CallId?
invite?.let {
    client.answer(it) {
        err ->
        when {
            err != null -> {
                print("error answering call")
            }
            else -> {
                call = it
                print("call answered: $voiceCall")
            }
        }
    }
}
Reject an Incoming Call
To reject the received invite from the firebase push notification:
invite?.let {
    client.reject(it) { err ->
        when {
            err != null -> {
                print("error rejecting call")
            }
            else -> {
                print("call rejected")
            }
        }
    }
}
Conclusion
In this guide you have seen how to set up push notifications.
Voice:
- You can integrate ConnectionService in your application which will allow for calls to integrate with the system UI.
- View the ConnectionService sample project on GitHub.