Building the chat interface
To be able to chat, you will need to create a new View Controller for the chat interface. From the Xcode menu, select File > New > File.... Choose a Cocoa Touch Class, name it ChatViewController with a subclass of UIViewController and language of Objective-C.

This will create a new file called ChatViewController.m, at the top import NexmoClient and User.
#import "ChatViewController.h"
#import "User.h"
#import <NexmoClient/NexmoClient.h>
The chat interface will need:
- A
UITextViewto show the chat messages - A
UITextFieldto type messages into
Open ChatViewController.m and add it programmatically.
@implementation ChatViewController

- (void)viewDidLoad {
    [super viewDidLoad];

    self.view.backgroundColor = UIColor.systemBackgroundColor;

    self.conversationTextView = [[UITextView alloc] initWithFrame:CGRectZero];
    self.conversationTextView.text = @"";
    self.conversationTextView.backgroundColor = UIColor.lightGrayColor;
    [self.conversationTextView setUserInteractionEnabled:NO];
    self.conversationTextView.translatesAutoresizingMaskIntoConstraints = NO;
    [self.view addSubview:self.conversationTextView];

    self.inputField = [[UITextField alloc] initWithFrame:CGRectZero];
    self.inputField.delegate = self;
    self.inputField.returnKeyType = UIReturnKeySend;
    self.inputField.layer.borderWidth = 1.0;
    self.inputField.layer.borderColor = UIColor.lightGrayColor.CGColor;
    self.inputField.translatesAutoresizingMaskIntoConstraints = false;
    [self.view addSubview:self.inputField];

    [NSLayoutConstraint activateConstraints:@[
        [self.conversationTextView.topAnchor constraintEqualToAnchor:self.view.safeAreaLayoutGuide.topAnchor],
        [self.conversationTextView.leadingAnchor constraintEqualToAnchor:self.view.leadingAnchor],
        [self.conversationTextView.trailingAnchor constraintEqualToAnchor:self.view.trailingAnchor],
        [self.conversationTextView.bottomAnchor constraintEqualToAnchor:self.inputField.topAnchor constant:-20.0],

        [self.inputField.leadingAnchor constraintEqualToAnchor:self.view.leadingAnchor constant:20.0],
        [self.inputField.trailingAnchor constraintEqualToAnchor:self.view.trailingAnchor constant:-20.0],
        [self.inputField.heightAnchor constraintEqualToConstant:40.0],
        [self.inputField.bottomAnchor constraintEqualToAnchor:self.view.layoutMarginsGuide.bottomAnchor constant:-20.0]
    ]];
}

- (void)viewWillAppear:(BOOL)animated {
    [NSNotificationCenter.defaultCenter addObserver:self selector:@selector(keyboardWasShown:) name:UIKeyboardDidShowNotification object:nil];
}

- (void)keyboardWasShown:(NSNotification *)notification {

    NSDictionary *keyboardInfo = notification.userInfo;

    if (keyboardInfo) {
        CGSize kbSize = [keyboardInfo[UIKeyboardFrameEndUserInfoKey] CGRectValue].size;
        self.view.layoutMargins = UIEdgeInsetsMake(0, 0, kbSize.height - 20.0, 0);
    }
}

@end
In the viewWillAppear function an observer is added to the keyboardDidShowNotification which calls the keyboardWasShown. The keyboardWasShown function adjusts the layout margins of the view which moves the input field. This stops the inputField being blocked by the keyboard when typing.
The UITextField delegate
You will need to conform to the UITextFieldDelegate to know when the user has finished typing to move the input field to its original position.
@interface ChatViewController () <NXMClientDelegate>

...

@end
At the end of the ChatViewController class add the textFieldDidEndEditing delegate function.
@implementation ChatViewController

...

- (void)textFieldDidEndEditing:(UITextField *)textField {
    self.view.layoutMargins = UIEdgeInsetsZero;
}

@end
Presenting the ChatViewController
Now that the chat interface is built you will need to present the view controller from the log in screen you built earlier. You will need information about the logged in user to be passed between the two view controllers, within ChatViewController.h import the User class at the top of the file.
#import <UIKit/UIKit.h>
#import "User.h"
Add an initializer to the interface.
@interface ChatViewController : UIViewController

-(instancetype)initWithUser:(User *)user;

@end
Then in ChatViewController.m, add a user and client property to the interface.
@interface ChatViewController () <UITextFieldDelegate>
...
@property User *user;
@property NXMClient *client;
@end
Implement the initializer:
@implementation ChatViewController

- (instancetype)initWithUser:(User *)user {
    if (self = [super init])
    {
        _user = user;
        _client = NXMClient.shared;
    }
    return self;
}

...
@end
This defines a custom initializer for the class which has a User.type as its parameter, which then gets stored in the local user property. Now that you have the user information, use the navigation bar to show who the user will be chatting with, in viewDidLoad add the following.
self.navigationItem.leftBarButtonItem = [[UIBarButtonItem alloc] initWithTitle:@"Logout" style:UIBarButtonItemStyleDone target:self action:@selector(logout)];
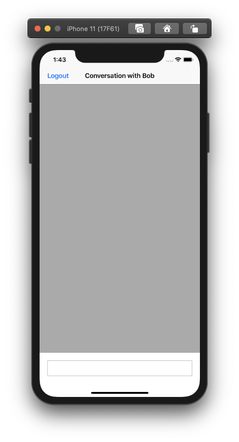
self.title = [NSString stringWithFormat:@"Conversation with %@", self.user.chatPartnerName];
This will also creates a logout button in the navigation bar, add the logout function to the end of ChatViewController.m.
@implementation ChatViewController
    ...
- (void)logout {
    [self.client logout];
    [self dismissViewControllerAnimated:YES completion:nil];
}
@end
Now you are ready to present the chat interface along with the user information. To do this you will need to edit the didChangeConnectionStatus function in the ViewController.m file.
- (void)client:(NXMClient *)client didChangeConnectionStatus:(NXMConnectionStatus)status reason:(NXMConnectionStatusReason)reason {
    switch (status) {
        case NXMConnectionStatusConnected: {
            [self setStatusLabelText:@"Connected"];
            UINavigationController *navigationController = [[UINavigationController alloc] initWithRootViewController:[[ChatViewController alloc] initWithUser:self.user]];
            navigationController.modalPresentationStyle = UIModalPresentationOverFullScreen;
            [self presentViewController:navigationController animated:YES completion:nil];
            break;
        }
        case NXMConnectionStatusConnecting:
            [self setStatusLabelText:@"Connecting"];
            break;
        case NXMConnectionStatusDisconnected:
            [self setStatusLabelText:@"Disconnected"];
            break;
    }
}
Then import ChatViewController at the top of the file.
...
#import "ChatViewController.h"
If the user connects successfully a ChatViewController will be presented with the user data needed.
Build and Run
Run the project again (Cmd + R) to launch it in the simulator. If you log in with one of the users you will see the chat interface
Creating an iOS chat app
Create a iOS application that enables users to message each other