Share:
Hamza is a Software Engineer based in Chicago. He works with Webrtc.ventures, a leading company in providing WebRTC solutions. He also works as a Full Stack Developer at Vonage helping out with the Video Platform to better serve its customer’s needs. As a proud introvert, he likes to spend his free time playing with his cats.
Voice Transcription with Symbl.ai and the Vonage Video API
Time to read: 3 minutes
Voice transcription, speech-to-text, and live closed captioning are in popular demand in today’s world where video/audio meetings are a primary form of communication. Symbl.ai excels at conversational intelligence. Today, we will be building live closed captioning into our SimplyDoc Telehealth Starter Kit using Symbl.ai’s streaming and insights API. Our video and audio will be powered by Vonage’s Video API. Let’s begin.
We get the audio track by calling the OT.initPublisher() method. This returns a Publisher object. We can call .getAudioSource() on this object to receive a MediaStreamTrack object.
Now this MediaStream object has the publisher audio track that we need to send to Symbl.ai. We’re going to be using the Web Audio API to manipulate the audio track in a form that we can send to Symbl.ai via WebSockets. For the Web Audio API to work, we need a MediaStream object. There is an API that can allow us to use the MediaStreamTrack object directly, but at the time of writing this, it's only available on Firefox.
const audioTrack = publisher.getAudioSource()
const stream = new MediaStream();
stream.addTrack(audioTrack);Now we have the stream object that we can use with the Web Audio API to create an Audio Buffer to send to Symb.ai.
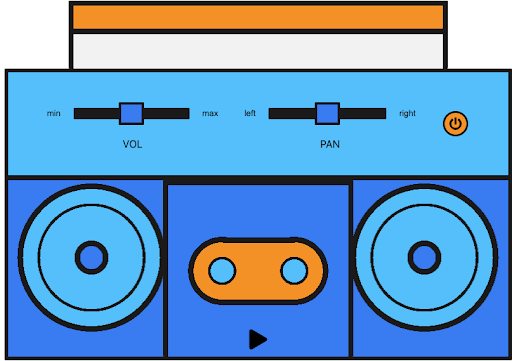
Firstly, it’s important to understand the Web Audio API a little since we’ll be using that to process our audio on the frontend. Think of the Web Audio API as a boombox where we declare every single component. First, we declare the AudioContext object, which is like the outer chassis of the boombox.
const AudioContext = window.AudioContext;
const context = new AudioContext();Now that we have declared our audio context, we are ready to give it a source. Think of the source as the cassette or CD that goes into the boombox.
const source = context.createMediaStreamSource(stream);
const processor = context.createScriptProcessor(1024, 1, 1);
const gainNode = context.createGain();In these three lines of code, we first declare our source node, then we declare our ScriptProcessorNode, and finally our `gainNode`. None of these three nodes do anything right now because we haven’t connected them together. The `gainNode` is like the volume knob on the boombox and the processor node is like the magnetic reader or needle that reads data off of the cassette or CD.
Now let’s connect them together.
source.connect(gainNode);
gainNode.connect(processor);
processor.connect(context.destination);Here, we connect the source to the `gainNode.` We can use the `gainNode` to increase or decrease the volume of the source. So if let’s say, a person’s microphone is too low we can increase the value of the gain to mitigate.
gainNode.gain.value = 2;This is not necessary for this tutorial as we’re assuming everyone has a decent enough microphone.
Then we connect the output of the `gainNode` to the processor node. The processor node takes in three arguments: the buffer size, number of input channels, and number of output channels respectively. We chose 1024 as the buffer size because it’s on the lower end of the sample-frame spectrum (256, 512, 1024, 2048, 4096, 8192, 16384). This means we’ll get better latency/performance at the cost of extremely accurate audio. If you feel like Symbl.ai is missing words in your audio, then increasing this might help. Note that it will result in the onaudioprocess event getting called more often, which might slow down your machine.
Speaking of onaudioprocess, this is the event that will be fired whenever the processor node has an audio buffer ready for the size specified. Symbl.ai likes to prepare the buffer to send like so:
processor.onaudioprocess = (e) => {
    // convert to 16-bit payload
    const inputData = e.inputBuffer.getChannelData(0) || new Float32Array(this.bufferSize);
    const targetBuffer = new Int16Array(inputData.length);
    for (let index = inputData.length; index > 0; index--) {
        targetBuffer[index] = 32767 * Math.min(1, inputData[index]);
    }
    // Send audio stream to websocket.
    if (ws.readyState === WebSocket.OPEN) {
      ws.send(targetBuffer.buffer);
    }
  };
};
We will talk about how we send the buffer using WebSockets later in this article.
Lastly, we feed the processor node back to the destination. The destination is like the speakers of the boombox.
Here’s a diagram for what we’ve built so far using the Web Audio API.
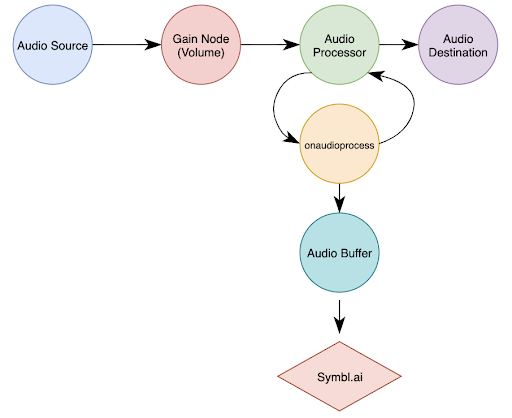
And with that, our boombox is ready to go!
Now, let’s create a WebSocket connection with Symbl.ai so we can send the audio buffer that we have prepared in the previous steps and receive Symbl.ai insights.
const accessToken = accessToken;
const uniqueMeetingId = btoa("user@example.com");
const symblEndpoint = `wss://api.symbl.ai/v1/realtime/insights/${uniqueMeetingId}?access_token=${accessToken}`;To generate the Access Token, please follow this guide.
The unique meeting ID could be any unique hash or string. This is just an example of creating a unique encrypted string from an email. Now, let’s declare our listeners.
// Fired when a message is received from the WebSocket server
ws.onmessage = (event) => {
  // You can find the conversationId in event.message.data.conversationId;
  const data = JSON.parse(event.data);
  if (data.type === 'message' && data.message.hasOwnProperty('data')) {
    console.log('conversationId', data.message.data.conversationId);
  }
  if (data.type === 'message_response') {
    for (let message of data.messages) {
      console.log('Transcript (more accurate): ', message.payload.content);
    }
  }
  if (data.type === 'topic_response') {
    for (let topic of data.topics) {
      console.log('Topic detected: ', topic.phrases)
    }
  }
  if (data.type === 'insight_response') {
    for (let insight of data.insights) {
      console.log('Insight detected: ', insight.payload.content);
    }
  }
  if (data.type === 'message' && data.message.hasOwnProperty('punctuated')) {
    console.log('Live transcript (less accurate): ', data.message.punctuated.transcript)
  }
  console.log(`Response type: ${data.type}. Object: `, data);
};
// Fired when the WebSocket closes unexpectedly due to an error or lost connection
ws.onerror  = (err) => {
  console.error(err);
};
// Fired when the WebSocket connection has been closed
ws.onclose = (event) => {
  console.info('Connection to websocket closed');
};
We chose to use the data.message.punctuated.transcript key which delivers live transcription. This comes with the cost of some accuracy, but you can decide how to use the data. When the WebSocket connection opens, we need to send a message to Symbl.ai describing our meeting and the speakers involved. This helps create an after-call transcript for us, as well as other things like speaker diarization.
// Fired when the connection succeeds.
ws.onopen = (event) => {
  ws.send(JSON.stringify({
    type: 'start_request',
    meetingTitle: 'Websockets How-to', // Conversation name
    insightTypes: ['question', 'action_item'], // Will enable insight generation
    config: {
      confidenceThreshold: 0.5,
      languageCode: 'en-US',
      speechRecognition: {
        encoding: 'LINEAR16',
        sampleRateHertz: 44100,
      }
    },
    speaker: {
      userId: 'example@symbl.ai',
      name: 'Example Sample',
    }
  }));
};
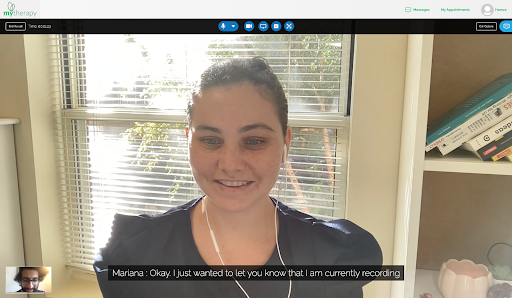
And with that, the core of our Speech to Text demo is complete! With some UI work, this is what a call with speech transcription looks like:
Share:
Hamza is a Software Engineer based in Chicago. He works with Webrtc.ventures, a leading company in providing WebRTC solutions. He also works as a Full Stack Developer at Vonage helping out with the Video Platform to better serve its customer’s needs. As a proud introvert, he likes to spend his free time playing with his cats.