Share:
Aaron was a developer advocate at Nexmo. A seasoned software engineer and wannabe digital artist Aaron is frequently found creating things with code, or electronics; sometimes both. You can customarily tell when he's working on something new by the smell of burning components in the air.
Automatically Classify Call Recordings using NLP
Time to read: 3 minutes
Nexmo's Voice API makes it simple to record inbound and outbound telephone calls. However, locating every call where people are discussing a particular topic, such as "Computer Science", could become very time consuming if you have to listen to every audio file each time.
In this tutorial, we'll show you how you can use Natural Language Processing, via Google Cloud Services, to automatically classify the content of each recording so that you can quickly identify voice calls which were about specific topics.
All the code for this tutorial is available on GitHub. It uses pipenv to manage dependencies and requires Python 3.6.4. You can create a virtual environment and install the dependencies by running:
pipenv installWe're going to be using the Nexmo Voice API, specifically the record action. Before continuing with this tutorial, you should read through our voice building blocks as well as some of our previous tutorials on creating Voice Applications.
We use two Google Cloud Services APIs in the tutorial as well; Cloud Speech-to-Text and Cloud Natural Language. You should create a new Google Cloud Platform (GCP) project and ensure that you enable Speech-to-Text and Natural Language.
Remember to download your GCP project credentials and store them somewhere your script can access them. I added mine to the root of the project and named them google_private.json.
There's a .env.example file in the root of the project. This example file outlines the different environmental variables the application is expecting. Copy this file and rename it to .env. Any values set within this file are automatically loaded into your environment when you run:
pipenv shellRecording our Call
Hopefully, by now you should be familiar with NCCOs. Our first Flask route is going to serve our NCCO file, instructing the Nexmo Voice API to record any calls to our Virtual Number:
@app.route("/", methods=["GET"])
def ncco():
    logger.info(f"New call received from {request.args['from']}")
    return jsonify(
        [
            {"action": "talk", "text": "Record your message after the beep"},
            {
                "action": "record",
                "eventUrl": [f"{os.environ['BASE_URL']}/recordings"],
                "format": "wav",
                "endOnKey": "*",
                "beepStart": True,
            },
        ]
)There are two main things to note in the above code:
The
event_urlpoints at our local Flask server. The handler for this route is discussed later in the tutorial.The recording format is set to
wav, by default Nexmo provides recordings as MP3 files. However, the Google Speech-to-Text service supports WAV, so we need to set the format of our recording to match.
Whenever a call completes the Nexmo Voice API sends a POST request to our event_url. I've extracted most of the heavy lifting from the Flask view handler and moved it into a series of background tasks using Huey:
pipeline = download_recording_task.then(transcribe_audio).then(classify_transcription)
huey.enqueue(pipeline)
The get_recording method on the Nexmo Python client is new, so if you've installed the Python client before you'll likely need to upgrade:
@huey.task()
def download_recording(recording_url, recording_uuid):
    logger.info(f"Download recording {recording_uuid}")

    recording = nexmo_client.get_recording(recording_url)
    recordingfile = f"./recordings/{recording_uuid}.wav"
    os.makedirs(os.path.dirname(recordingfile), exist_ok=True)

    with open(recordingfile, "wb") as f:
        f.write(recording)

return {"recording_uuid": recording_uuid}After you retrieve the WAV file from Nexmo, the application saves it into the recordings directory. The download_recording function returns the recording_uuid within a dictionary as Huey passes any return values into the next function in the pipeline as keyword arguments.
Before we can do any Natural Language Processing of the content of our audio file we need to convert it to text:
@huey.task()
def transcribe_audio(*args, recording_uuid):
    # Instantiates a client
    client = speech.SpeechClient()

    # The name of the audio file to transcribe
    file_name = f"./recordings/{recording_uuid}.wav"

    # Loads the audio into memory
    with io.open(file_name, "rb") as audio_file:
        content = audio_file.read()
        audio = speech_types.RecognitionAudio(content=content)

    config = speech_types.RecognitionConfig(
        encoding=speech_enums.RecognitionConfig.AudioEncoding.LINEAR16,
        sample_rate_hertz=16000,
        language_code="en-US",
    )

    # Detects speech in the audio file
    logger.info(f"Sending file {recording_uuid} for transcribing")
    response = client.recognize(config, audio)

    return {
        "transcription_text": response.results[0].alternatives[0].transcript,
        "recording_uuid": recording_uuid,
}You can read more about the Google Cloud Speech-to-Text API on their website. Now that the audio file is converted to text the next function in the pipeline is triggered.
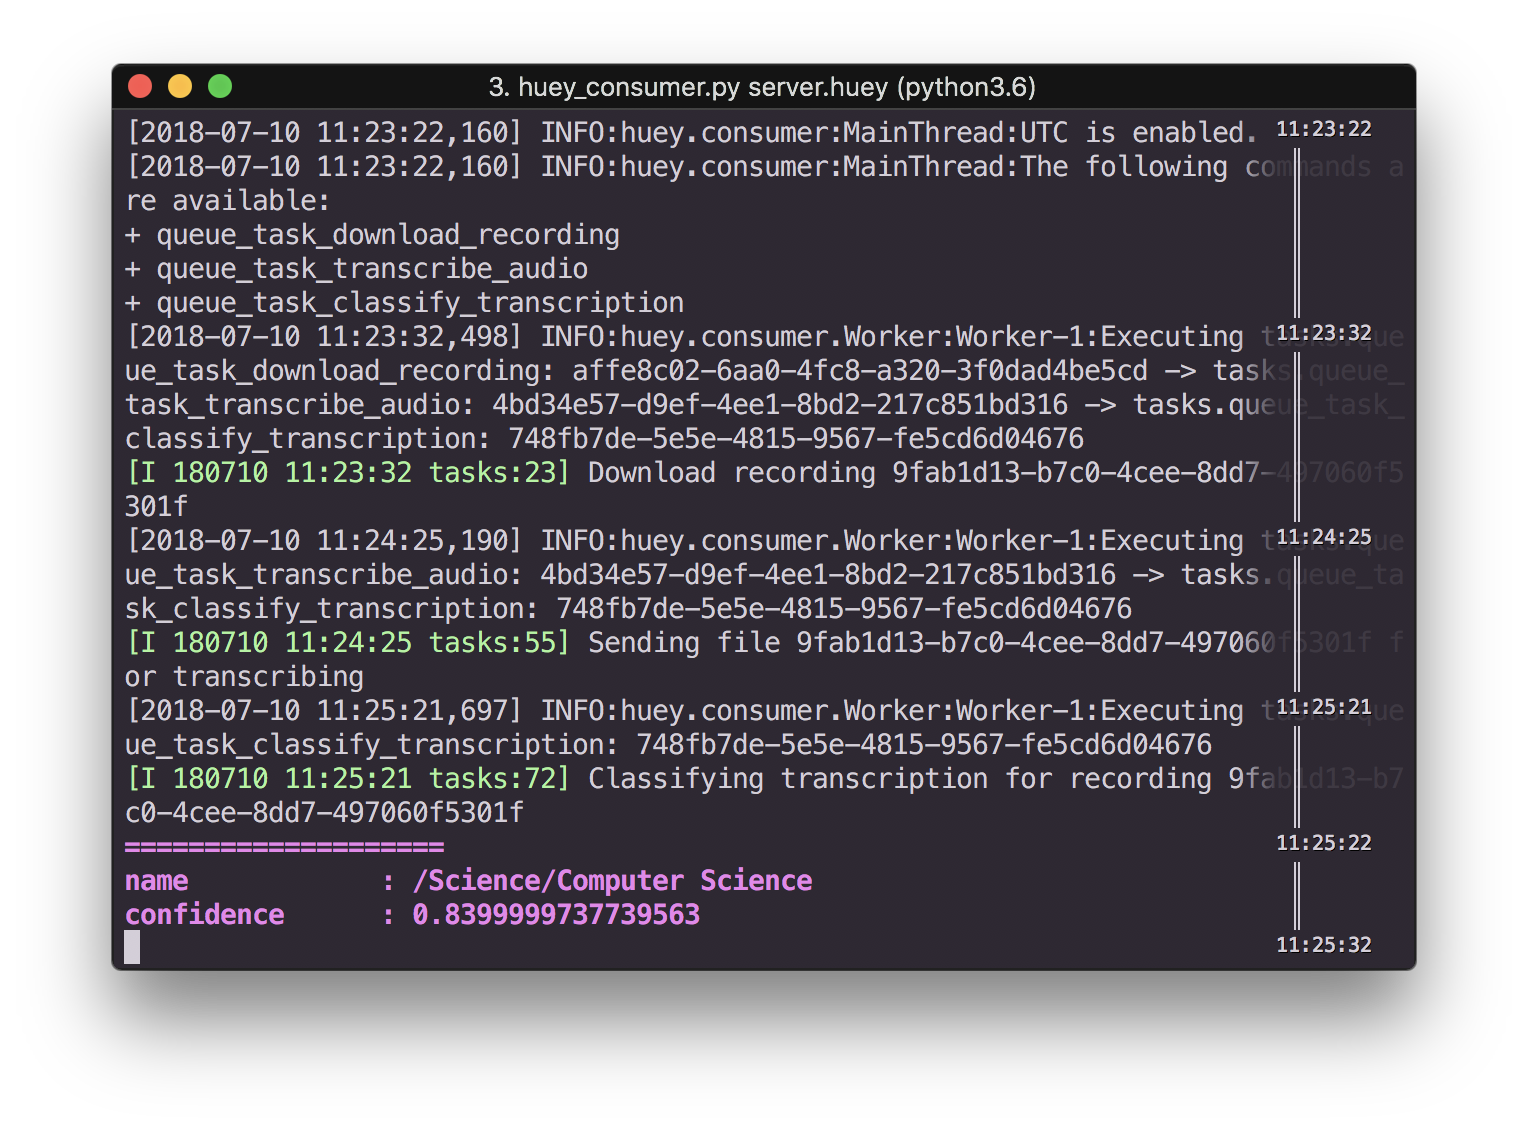 Screenshot of terminal showing audio classification
The application makes one final API call, this time to the Google Cloud Language service:
@huey.task()
def classify_transcription(transcription_text, recording_uuid):
    client = language.LanguageServiceClient()

    document = language_types.Document(
        content=transcription_text, type=language_enums.Document.Type.PLAIN_TEXT
    )

    logger.info(f"Classifying transcription for recording {recording_uuid}")
    categories = client.classify_text(document).categories

    for category in categories:
        print(colorful.bold_violet("=" * 20))
        print(colorful.bold_violet("{:<16}: {}".format("name", category.name)))
        print(
            colorful.bold_violet("{:<16}: {}".format("confidence", category.confidence))
        )

    return True
This API can do a lot more than merely classify text; it can provide insights on the sentiment of the text provided, or break the text down into a series of sentences and tokens using Syntactic Analysis. Read their documentation for more details.
Hopefully, our tutorial has given you some idea of what is possible by combining the Nexmo Voice API with Google Cloud. If you'd like more information on other exciting things you can achieve with the Nexmo Voice API these other tutorials will be of interest:
Share:
Aaron was a developer advocate at Nexmo. A seasoned software engineer and wannabe digital artist Aaron is frequently found creating things with code, or electronics; sometimes both. You can customarily tell when he's working on something new by the smell of burning components in the air.