Share:
Steve is a former member of the Vonage Team. He was a .NET Developer Advocate @Vonage, a full-stack polyglottic Software Engineer, AI/ML
Translate a Phone Call with Blazor, SignalR, and Azure
Machine Learning models enable us to do all sorts of neat things. For example, real-time speech translation. In this tutorial, we will learn how to translate a call received on a Vonage Number. We'll then translate the caller's speech and send all of the translated text to our frontend. Using a .NET Core hosted Blazor WebAssembly App, and SignalR will make this process incredibly seamless.
You'll need an Azure Speech Resource - you can create one following the steps here. Pull the region and key value from the
Keys and Endpointtab on your resource.The latest .NET Core SDK installed
Visual Studio or Visual Studio Code. I will be using Visual Studio 2019 for this demo
Our CLI. If you don't have it, you can install it with
npm install @vonage/cli -gngrok for testing. You only need the free tier.
If you have all the prereqs setup, already you can skip this tutorial and jump straight to the code. The app is on GitHub
We are going to be using ngrok to expose our locally running ASP.NET Core application to the internet. After you've installed ngrok, doing so will be as easy as running the command ngrok http 5000 in your console. That will produce something that looks like this:
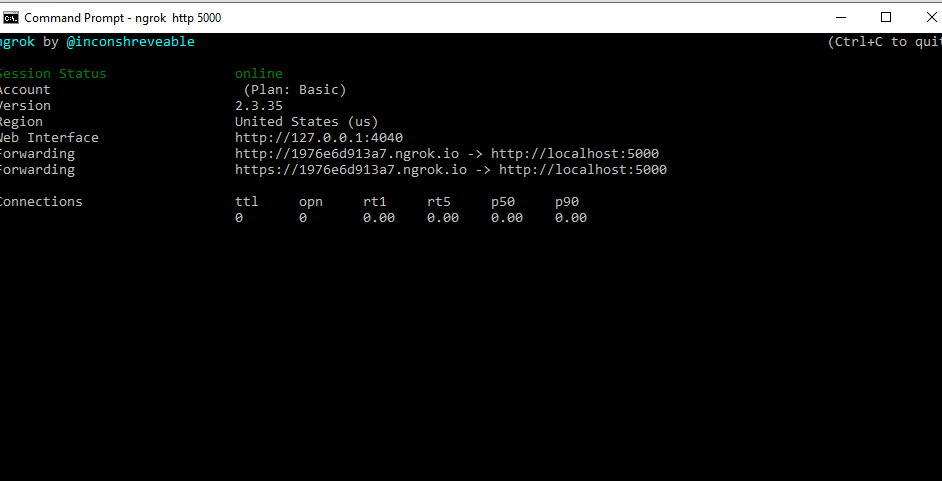 Example of Ngrok running in the terminal
NOTE - this tutorial uses Kestrel for local debugging. If you'd like to use IIS Express instead, please see our explainer - on using ngrok with IIS Express.
The critical thing to take note of here is the forwarding URL - in my case, that URL is http://1976e6d913a7.ngrok.io. When you receive a call on your Vonage Number, Vonage will send your application what's called a WebHook, which is just an HTTP GET request, asking for something called a Nexmo Call Control Object (NCCO). Our application will be listening on /webhooks/answer so the whole URL I will need will be http://1976e6d913a7.ngrok.io/webhooks/answer.
If you've not set up our CLI yet, do so by running the command vonage config:set --apiKey=API_KEY --apiSecret=API_SECRET where the API Key and Secret are the API key and secret found on your account's settings page
Now that your CLI is setup, we will purchase a number, create a Vonage Application, and link the number to that application, which will tell Vonage to forward to your app.
To buy a number, use the following command (substituting your Country ID for US)
Type confirm to complete the operation; it will output a number that you purchased.
Next, we're going to create an application. The create application command will take two URLs, the answer URL - which will be the number Vonage will send incoming calls to, and the event URL, which will be the URL that Vonage sends events that arise from one of your numbers. Remember to substitute 1976e6d913a7 with whatever the random hash for your ngrok URL is:
This operation will respond with an application ID and a private key. Save both of these values. We will only be using the app ID in this tutorial, but you use the private key to authorize your application requests.
Next, we need to link our newly purchased number to our application. Linking our number will tell Vonage to send any calls received on that number to our application's webhook URL. To do this, we will need the application ID that we just received from the create app request - which will look like e7a25242-77a1-42cd-a32e-09febcb375f4, and the phone number we just purchased, and we'll run a command that looks like this:
Now that we have ourselves set up and configured, we now have to build our app. Go to your typical source directory in the terminal and run the following command:
This command will scaffold a Blazor WebAssembly application for you. We are not going to configure SSL, which will make it easier to work with ngrok.
It's going to create three csproj files,
VonageDotnetTranslator.Client - this is where the WebAssembly is defined - it's going to be the frontend for our application.
VonageDotnetTranslator.Server - This will be the .NET core hosted server for our application. This project is where the bulk of what we need to do will happen.
VonageDotnetTranslator.Shared - This is the shared data between the client and the server.
We are going to be using the following NuGet packages for this sample:
Vonage
Microsoft.aspnetcore.signalr.core
Microsoft.CognitiveServices.Speech
Microsoft.aspnetcore.signalr.client
To install these, first navigate to VonageDotnetTranslator\Server in your terminal and run the following commands:
Then, navigate over to VonageDotnetTranslator\Client in your terminal and run:
This command will install all the packages you are going to need. Now open up the VonageDotnetTranslator.sln file in Visual Studio.
We will create a model of data shared between our Client and Server. For this, we're just going to use a single class, which we'll call Translation. This class will contain a unique identifier for the call that we are translating, the text of a given translation event, the language spoken, and the language translated. Create a file Translation.cs in the shared project and add the following to it:
public class Translation
 {
     public string UUID { get; set; }
     public string Text { get; set; }
     public string LanguageSpoken { get; set; }
     public string LanguageTranslated { get; set; }
 }
We are going to be receiving translation events in our frontend using a SignalR connection. To communicate through to our frontend from our backend, we are going to use a Hub connection. To use this, we need to define a Hub in our server. Just add a Hubs folder to our server project, then add a class called TranslationHub, make that a public class, and have it inherit from Microsoft.AspNetCore.SignalR.Hubs. We don't need any other logic for this class.
The most complex class in this project is going to be our translator. Which we are going to call the TranslationEngine. Let's start by creating a file TranslationEngine.cs in our VonageDotnetTranslator.Server project. The TranslationEngine is going to be handling some underlying system resources. Consequentially, the TranslationEngine will implement the IDisposable interface to allow us to clean it up after it's finished easily. The Class definition should look like this:
public class TranslationEngine : IDisposable
We are going to add several constants to this class to get us started. These constants are going to be various metadata about the audio stream we are going to be handling. We are going to be adding a SAMPLES_PER_SECOND at 16000, a BITS_PER_SAMPLE at 16, a NUMBER_OF_CHANNELS at 1, and a BUFFER_SIZE at 640 (or 320 * 2).
const int SAMPLES_PER_SECOND = 16000;
const int BITS_PER_SAMPLE = 16;
const int NUMBER_OF_CHANNELS = 1;
const int BUFFER_SIZE = 320 * 2;
The TranslationEngine class has a fair number of moving parts. We will need to define a bunch of private fields. Most of these fields handle the configuration of the translator and speech synthesizer. We have a couple that will handle the meta-data for the translation engine. We'll also have a concurrent queue where we will queue up audio to write back into our call. Regardless the fields will look like this:
private ConcurrentQueue<byte[]> _audioToWrite = new ConcurrentQueue<byte[]>(); // queue to managed synthesized audio
private readonly IConfiguration _config; //Where Azure Subscription Keys will be stored
private readonly IHubContext<TranslationHub> _hub; // Hub connection we'll use to talk to frontend
private string _uuid; // Unique ID of the call being translated
private string _languageSpoken; // The language being spoken on the call
private string _languageTranslated; // The language being translated to

private SpeechTranslationConfig _translationConfig; // the configuration for the speech translator
private SpeechConfig _speechConfig; // configuration for the speech synthesizer
private PushAudioInputStream _inputStream = AudioInputStream.CreatePushStream(AudioStreamFormat.GetWaveFormatPCM(SAMPLES_PER_SECOND, BITS_PER_SAMPLE, NUMBER_OF_CHANNELS)); //Stream for handling audio input to the translator
private AudioConfig _audioInput; //configuration for the translation audio
private TranslationRecognizer _recognizer; // The translator
private SpeechSynthesizer _synthesizer; // The syntheziser, which will turn translated text into audio
private AudioOutputStream _audioOutputStream; // Output stream from the synthezier
private AudioConfig _outputConfig; // output configuration for the speech syntheizer
It requires a bunch of imports, here are the imports I'm using in this class:
using Microsoft.AspNetCore.Http;
using Microsoft.AspNetCore.SignalR;
using Microsoft.CognitiveServices.Speech;
using Microsoft.CognitiveServices.Speech.Audio;
using Microsoft.CognitiveServices.Speech.Translation;
using Microsoft.Extensions.Configuration;
using Newtonsoft.Json;
using VonageDotnetTranslator.Server.Hubs;
using VonageDotnetTranslator.Shared;
using System;
using System.Collections.Concurrent;
using System.Diagnostics;
using System.Net.WebSockets;
using System.Threading;
using System.Threading.Tasks;
We are going to have a single constructor for this class. It's going to be getting two dependency injection type items from the middleware. An IConfiguration object, this is where we will store the Azure Credentials from our Cognitive Services resource and an IHubContext object, which we will be using to communicate with our frontend. We will assign these to the appropriate class fields, and then we will also construct some configurations and streams for our audio.
public TranslationEngine(IConfiguration config, IHubContext<TranslationHub> hub)
{
   _hub = hub;
   _config = config;
   _translationConfig = SpeechTranslationConfig.FromSubscription(
       _config["SUBSCRIPTION_KEY"], _config["REGION"]);
   _speechConfig = SpeechTranslationConfig.FromSubscription(
       _config["SUBSCRIPTION_KEY"], _config["REGION"]);
   _audioInput = AudioConfig.FromStreamInput(_inputStream);
   _audioOutputStream = AudioOutputStream.CreatePullStream();
   _outputConfig = AudioConfig.FromStreamOutput(_audioOutputStream);
}
We will now need to add an event to handle translation recognition events. Whenever our translator translates a part of speech, it will fire this event. We'll pull the translation out of the recognition event. Then it is fed through our SpeechSynthesizer to pull out audio to playback to our user over the call. We will then build a Translation object from the translated text and send that to all of our Clients listening to the hub. Finally, we will enqueue the synthesized audio into the queue we created earlier.
private void RecognizerRecognized(object sender, TranslationRecognitionEventArgs e)
{
   var translationLanguage = _languageTranslated.Split("-")[0];
   var translation = e.Result.Translations[translationLanguage].ToString();
   Trace.WriteLine("Recognized: " + translation);
   var ttsAudio = _synthesizer.SpeakTextAsync(translation).Result.AudioData;
   var translationResult = new Translation
   {
       LanguageSpoken = _languageSpoken,
       LanguageTranslated = _languageTranslated,
       Text = translation,
       UUID = _uuid
   };
   _hub.Clients.All.SendAsync("receiveTranslation", translationResult);
   _audioToWrite.Enqueue(ttsAudio);
}
When we receive a call, we are going to startup our translator and synthesizer. We will register our RecognizerRecognized event with the translator and let everything startup continuously. Since we are using an input stream to feed audio into our translator, this will continually push out translation events after a particular time has elapsed, or the translator detects a break in speech.
private async Task StartSpeechTranslationEngine(string recognitionLanguage, string targetLanguage)
{
   _translationConfig.SpeechRecognitionLanguage = recognitionLanguage;
   _translationConfig.AddTargetLanguage(targetLanguage);
   _speechConfig.SpeechRecognitionLanguage = targetLanguage;
   _speechConfig.SpeechSynthesisLanguage = targetLanguage;
   _synthesizer = new SpeechSynthesizer(_speechConfig, _outputConfig);
   _recognizer = new TranslationRecognizer(_translationConfig, _audioInput);
   _recognizer.Recognized += RecognizerRecognized;
   await _recognizer.StartContinuousRecognitionAsync();
}
We will need a method to stop the translation engine. This method will deregister our RecognizerRecognized event from the _recognizer and call the StopContinuousRecognitionAsync on the recognizer close it out. This method can take several seconds to close down, which is why we do it asynchronously.
private async Task StopTranscriptionEngine()
{
   if (_recognizer != null)
   {
       _recognizer.Recognized -= RecognizerRecognized;
       await _recognizer.StopContinuousRecognitionAsync();
   }
}
We will be receiving audio from our calls on a WebSocket, which means we will continually be reading audio off the WebSocket. Then, whenever we get translations, we will be taking the synthesized audio from our SpeechSynthesizer and writing it back over the WebSocket so that the caller can hear the translation. This process will happen in one main loop that continues to read messages off the WebSocket until we see a close status.
Notably, the first message we receive from the WebSocket will be UTF-8 encoded JSON corresponding to the Headers that we will later pass back to the Vonage Voice API when we ask it to make the WebSocket for us. That Headers will contain a Translation object that we defined in our shared project, so we will deserialize the JSON into a Translation object and use the metadata from that to spin up our TranslationEngine.
public async Task ReceiveAudioOnWebSocket(HttpContext context, WebSocket webSocket)
{
   var buffer = new byte[BUFFER_SIZE];

   try
   {
       WebSocketReceiveResult result = await webSocket.ReceiveAsync(new ArraySegment<byte>(buffer), CancellationToken.None);
       var config = JsonConvert.DeserializeObject<Translation>(System.Text.Encoding.Default.GetString(buffer));
       _uuid = config.UUID;
       await StartSpeechTranslationEngine(config.LanguageSpoken,
           config.LanguageTranslated);
       _languageSpoken = config.LanguageSpoken;
       _languageTranslated = config.LanguageTranslated;
       while (!result.CloseStatus.HasValue)
       {

           byte[] audio;
           while (_audioToWrite.TryDequeue(out audio))
           {
               const int bufferSize = 640;
               for (var i = 0; i + bufferSize < audio.Length; i += bufferSize)
               {
                   var audioToSend = audio[i..(i + bufferSize)];
                   var endOfMessage = audio.Length > (bufferSize + i);
                   await webSocket.SendAsync(new ArraySegment<byte>(audioToSend, 0, bufferSize), WebSocketMessageType.Binary, endOfMessage, CancellationToken.None);
               }
           }

           result = await webSocket.ReceiveAsync(new ArraySegment<byte>(buffer), CancellationToken.None);

           _inputStream.Write(buffer);
       }
       await webSocket.CloseAsync(result.CloseStatus.Value, result.CloseStatusDescription, CancellationToken.None);
   }
   catch (Exception e)
   {
       Trace.WriteLine(e.ToString());
   }
   finally
   {
       await StopTranscriptionEngine();
   }
}
Finally, we will be good memory citizens and dispose of all the unmanaged resources we accessed during our translation when this object is destroyed.
public void Dispose()
{
   _inputStream.Dispose();
   _audioInput.Dispose();
   _recognizer.Dispose();
   _synthesizer.Dispose();
   _audioOutputStream.Dispose();
}
It's all downhill from here. For now, we will add an empty API controller called VoiceController to our Controllers folder. Here, we are going to add a single route called Answer. The endpoint will be /webhooks/answer. This method will be a GET request called when your Vonage API number receives a call. It will create a Nexmo Call Control Object (NCCO) telling Vonage to build a WebSocket to our server. As we noted earlier, we will pass a Translation object through the Headers of this object, which will tell us on the other side how to handle the translation. We'll take this NCCO and return it's JSON to Vonage to tell it how to handle the request.
[Route("/webhooks/answer")]
[HttpGet]
public ActionResult Answer()
{
   var host = Request.Host.ToString();
   var webSocketAction = new ConnectAction()
   {
       Endpoint = new[]
       {
           new WebsocketEndpoint()
           {
               Uri = $"ws://{host}/ws",
               ContentType="audio/l16;rate=16000",
               Headers = new Translation
               {
                   UUID = Request.Query["uuid"].ToString(),
                   LanguageSpoken = "en-US",
                   LanguageTranslated = "es-MX"
               }
           }
       }
   };
   var ncco = new Ncco(webSocketAction);
   return Ok(ncco.ToString());
}
Now that we have a controller, the final thing to do in the Server portion of our app is to configure the app's middleware. Open Startup.cs.
Inside the ConfigureServices method add a call to add SignalR:
services.AddSignalR();
Next, we will have to make some significant modifications to the app.UseEndpoints call in the Configure method. First, we will define a route to our hub at /TranslationHub that our clients will be able to use:
endpoints.MapHub<Hubs.TranslationHub>("/TranslationHub");
Next, we will set up the WebSocket options to handle the appropriately sized messages from Vonage based on the 16khz linear PCM encoding we are using:
var webSocketOptions = new WebSocketOptions()
{
  KeepAliveInterval = TimeSpan.FromSeconds(120),
  ReceiveBufferSize = 640
};

app.UseWebSockets(webSocketOptions);Finally, we will define a direct route to our WebSockets in the app.UseEndpoints delegate. This route will pull the HubContext for our TranslationHub, upgrade the WebSocket, and startup our Translation engine with the hub, configuration, WebSocket, and httpContext that it needs to get going.
endpoints.Map("/ws", async (context) => {
if (context.WebSockets.IsWebSocketRequest)
{
   var hub = (IHubContext<TranslationHub>)app.ApplicationServices.GetService(typeof(IHubContext<TranslationHub>));
   WebSocket webSocket = await context.WebSockets.AcceptWebSocketAsync();
   using (var engine = new TranslationEngine(Configuration, hub))
   {
       await engine.ReceiveAudioOnWebSocket(context, webSocket);
   }
}
else
{
   context.Response.StatusCode = 400;
}
});
The last thing we are going to need to do is to build out our frontend. Ironically this is the easy part of this exercise in the VonageDotnetTranslator.Client project add a new Razor Component to the Pages folder called TranslationComponent.razor. This file is where we are going to define our frontend logic.
We are going to pull in the dependencies that we need to work with this translation component. These dependencies will include the SignalR Client, the Shared Project we've been using, as well as injecting a NavigationManager (to help with routing), and finally implementing IDisposable:
@using Microsoft.AspNetCore.SignalR.Client
@using VonageDotnetTranslator.Shared
@inject NavigationManager NavigationManager
@implements IDisposable
Next, in the @code block, we will define a dictionary to hold all the translations that we will get from our server in, and we will have a HubConnection. In OnInitializedAsync, we will build our HubConnection, pointing it back to our /TranslationHub route defined in the middleware. Then whenever the receiveTranslation event fires (this is the event we are sending when a translation happens), we will update our Translation dictionary. If the UUID for the call is already in the dictionary, we will concatenate the translation text to the current translation's text. Otherwise, we'll add a new translation object. Then we will start up the Hub Connection and add a couple of extra methods to manage the connection and clean up when done.
@code {
    private Dictionary<string, Translation> _translations = new Dictionary<string, Translation>();
    private HubConnection _hubConnection;
    protected override async Task OnInitializedAsync()
    {
        _hubConnection = new HubConnectionBuilder()
            .WithUrl(NavigationManager.ToAbsoluteUri("/TranslationHub"))
            .Build();
        _hubConnection.On<Translation>("receiveTranslation", (translation) =>
        {
            if (_translations.ContainsKey(translation.UUID))
            {
                _translations[translation.UUID].Text += translation.Text;
            }
            else
            {
                _translations.Add(translation.UUID, translation);
            }
            StateHasChanged();
        });
        await _hubConnection.StartAsync();
    }
    public bool IsConnected => _hubConnection.State == HubConnectionState.Connected;

    public void Dispose()
    {
        _ = _hubConnection.DisposeAsync();
    }
}
Next, we'll add a Table that will contain all of our translations. That table will have headers corresponding to the Translation object's properties, and we will populate it directly from our _translations collection.
<h3>Translation</h3>
<table class="table">
    <thead>
        <tr>
            <th>Uuid</th>
            <th>Language Spoken</th>
            <th>Language Translated To</th>
            <th>Text</th>
        </tr>
    </thead>
    <tbody>
        @foreach (var translation in _translations.Values)
        {
            <tr>
                <td>@translation.UUID</td>
                <td>@translation.LanguageSpoken</td>
                <td>@translation.LanguageTranslated</td>
                <td>@translation.Text</td>
            </tr>
        }
    </tbody>
</table>
The final thing to do is add the TranslationComponent to the index.razor file. To do this, open Index.razor, remove its contents, other than the @page directive, and add:
The last thing to do is add the two Azure Configuration items to the VonageDotnetTranslation.Server/appsettings.json file. Add two fields to the base object, SUBSCRIPTION_KEY and REGION, and set them to your subscription key and region.
That's all you need to do to build your speech translator! Now all that's left to do is test it outrun the app from the VonageDotnetTranslation/Server directory with dotnet run or use f5 or the play button.
Note - If you are using IIS Express, you will need to consult our guide for using ngrok with IIS Express
In our VoiceController we've set the translation language to Spanish, and the spoken language to US English - you can change this easily - see the supported languages docs for which languages Azure supports.
The WebSockets enable all sorts of powerful use cases when combined with the Azure Cognitive Services. In addition to translations, you can also do regular transcription or even sentiment analysis! The Vonage APIs enable all sorts of highly flexible and relatively easy to build integrations with PSTN and VoIP.
The source for this demo is in GitHub