Share:
Maria is a passionate maker currently working as IoT Developer focused on System Integration & Hardware Development. Also, she is an organizer of IoT Medellin - a tech community that brings together IoT enthusiasts to share knowledge in LATAM.
Track Device Data in Real-time with Vonage Messages API and Ubidots
Time to read: 11 minutes
I consider the Internet of Things (IoT) a superhero: mostly invisible, yet it makes our life better at work, socially, and personally. Superheroes have the tremendous power to be there for you wherever you need them, whether it's in cities, hospitals, educational institutions, manufacturing plants, farms, or any place you can have in mind. Sounds a lot like the Internet of Things, don't you think?
Let's put ourselves in Natalia's shoes. Natalia works in the agricultural sector using Pig Vision, an intelligent camera that integrates artificial intelligence and neural networks. With this device, she can get real-time metrics about the weighing process on the farms without stressing the pigs. What if Natalia needs to access the data but does not have internet access at that precise moment? Here's where the Vonage Messages API comes in—what if Natalia requests the data she needs via SMS?
Nowadays, there are many messaging services and visualization platforms that make technology more accessible to everyone; we do not need to be expert engineers to create innovative solutions. In addition, these services allow you to deploy complete solutions in a matter of hours. Taking Natalia's use case as a reference, as well as all the data-based needs that can exist across industries, I thought it would be great to have a system capable of performing real-time monitoring of device data independent of internet access.
In this tutorial, I'm going to share detailed steps to build this system using the Vonage Messages API as a messaging service and Ubidots as an IoT Platform. As a starting point, let's understand the architecture to be implemented:
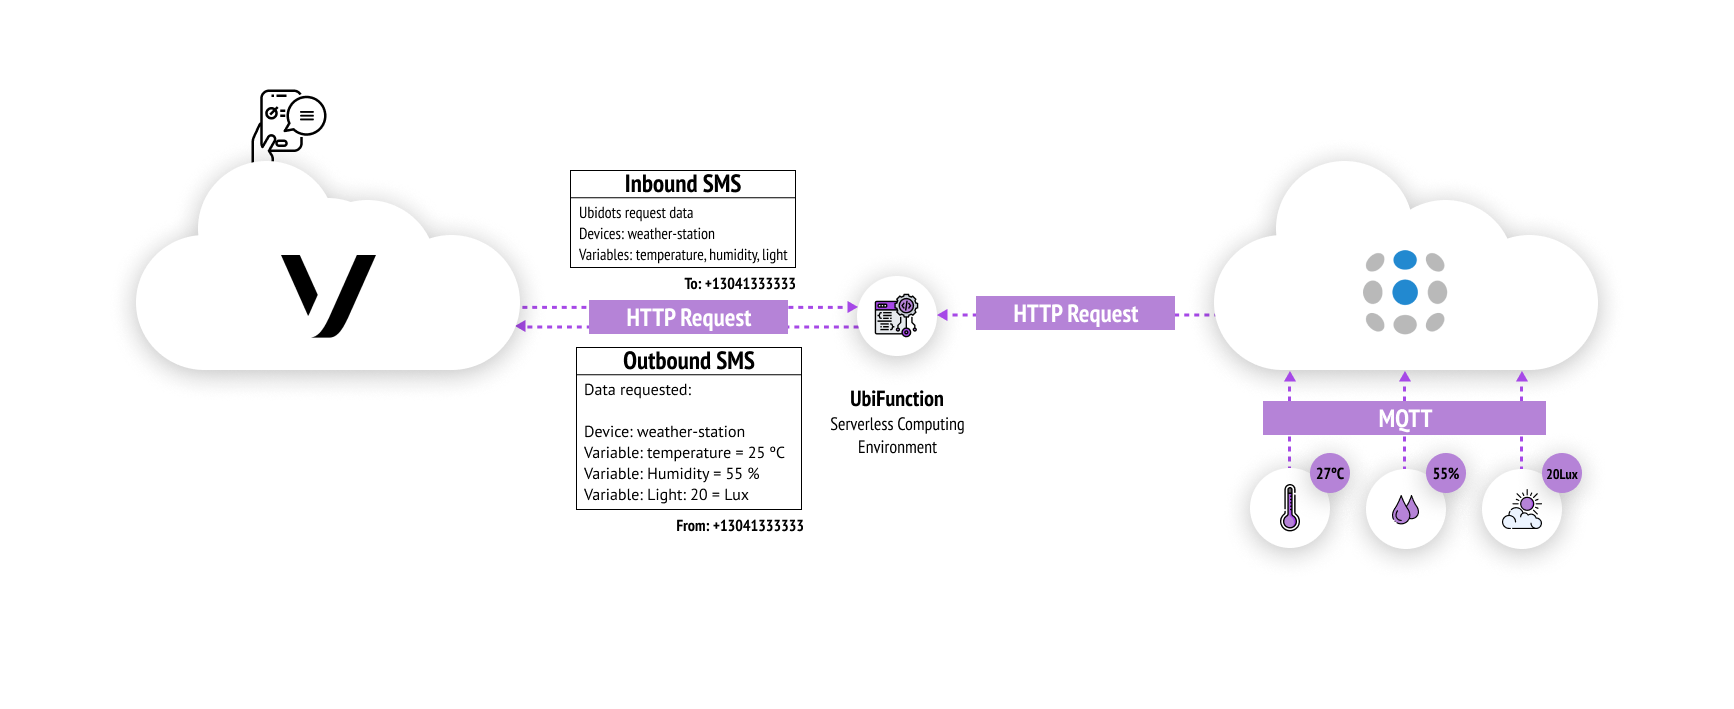 illustration of architecture
The integration of these services is made through an UbiFunction, a Serverless Computing Environment which will allow us to receive the message sent to our virtual number over an HTTP request. We're then able to analyze it to identify the devices and the variables requested in order to send the last value received for each requested variable as a reply.
Undoubtedly, this system will be useful for different use cases. Just get a little bit creative to identify where it can be useful for the project you are working on. Without further ado, let's get started!
Any device with internet access
Ubidots allows you to rapidly assemble and launch IoT applications without having to write many lines of code—it's simple yet powerful. To start using it, we only need an account and any device with an internet connection to transmit data to the Ubidots API.
For this project, I used a Pycon SiPy and PySense 1, which allows us to monitor environmental variables such as temperature, humidity, light intensity, and pressure. However, if you have any other hardware that supports HTTP, MQTT, or TCP/UDP as a communication protocol it can be integrated as well. You can visit the Ubidots help center for tutorials on how to send and control data to and from the platform using any IoT device.
The Pycom team is adding additional features every week on their products, so before you start developing, make sure your board is running under the last firmware update. In addition, if you're using Windows as an OS, you must install the required drivers.
*NOTE: If this is your first time developing with Pycom boards, I highly recommend you check out the getting started guide to familiarize yourself with all the details.*
Install the Pymakr, a plug-in available for Atom and Visual Studio Code, to run and sync projects on any Pycom board. Pymakr also adds a REPL console to the terminal that connects to the board.
Next, establish communication between Pymakr and your board via Serial or Telnet, depending on your preference. Check out the setup guides based on your code editor:
This project requires a couple of external libraries that must be downloaded and centralized in one place to work as it should. If you'd like to grab them all along with the main code, you can download here.
If you'd like to start from scratch, create a new project with a name of your preference. I decided to name it **_pysense-ubidots-mqtt_**.
In the **_pysense-ubidots-mqtt_** project, we're going to manage the libraries required and add the main code. To manage this, create a new folder called **_lib_**, as well as a new file called **_main.py_**
From the pycom libraries repository, download the following libraries and place them into the **_lib_** folder just created:
After downloading these libraries, you should have the following structure in the project folder:
- lib
    - LTR329ALS01.py
    - MPL3115A2.py
    - pycoproc.py
    - pysense.py
    - SI7006A20.py
    - umqtt
        - robust.py
        - simple.py
- main.pyThese libraries allow us to communicate with the main board (in my case SiPy), with the PySense, and to manage the data with Ubidots over MQTT.
Copy the following code into the main.py file. This code constantly publishes temperature, humidity, pressure, and altitude values to Ubidots:
#!/usr/bin/python

# Include Libraries
from umqtt.robust import MQTTClient
import machine
import time
import pycom
import json
import ubinascii
from network import WLAN
from pysense import Pysense
from LIS2HH12 import LIS2HH12
from SI7006A20 import SI7006A20
from LTR329ALS01 import LTR329ALS01
from MPL3115A2 import MPL3115A2,ALTITUDE,PRESSURE
import gc
gc.collect()

# Define network constants
wifi_ssid = "xxxx" # Set Network's SSID
wifi_password = "xxxx" # Set Network password

# Define Ubidots constants
mqtt_server = "industrial.api.ubidots.com" # 169.55.61.243
mqtt_clientID = ubinascii.hexlify(machine.unique_id(),'').decode()
mqtt_username = "BBFF-xxxx" # Set your Ubidots TOKEN
ubidots_dev_label = "weather-station" # ubinascii.hexlify(machine.unique_id(),':').decode() # Set a device labe

# Constants to manage data rate
last_message = 0
message_interval = 5

'''
Establishes connection with the MQTT server defined
'''
def connect_mqtt():
  global mqtt_clientID, mqtt_server
  client = MQTTClient(mqtt_clientID, mqtt_server, user=mqtt_username, password=mqtt_username)
  client.connect()
  print("\nConnected to {} MQTT broker".format(mqtt_server))
  return client


'''
Reset the device to restore the connection with the MQTT Server
'''
def restart_and_reconnect():
  print("\nFailed to connect to MQTT broker. Reconnecting...")
  time.sleep(10)
  machine.reset()


'''
Establish network connection
 @arg ssid [Mandatory] Network SSID
 @arg psw [Mandatory] Network Password
'''
def wifi_connect(ssid, psw):
  attempts = 0

  print("Starting attempt to connect to WiFi.", end="")
  wlan.connect(ssid, auth=(WLAN.WPA2, psw), timeout=5000) # Connect to the WiFi AP provided

  # Check network status
  while not wlan.isconnected():
    time.sleep(0.5)
    print(".", end="")
    attempts += 1
    machine.idle() # Safe power while waiting

    if attempts >= 10:
      print("\nssid: {}, psw: {}".format(wifi_ssid, wifi_password))
      print("\nCould not establish connection with the network provided. Please check the network crendentials or status, and try again.");
      time.sleep(0.5)
      attempts = 0
      machine.reset()

  # Network interface parameteres logs
  network_settings =  wlan.ifconfig()
  print("\nWLAN connection succeeded!")
  print("IP address: {}".format(network_settings[0]))
  print("Subnet: {}".format(network_settings[1]))
  print("Gateway: {}".format(network_settings[2]))
  print("DNS: {}".format(network_settings[3]))

  return True

'''
Reads temperature, humidity, pressure, altitude, and light sensors
 @return data, JSON object with sensors readings
'''
def read_sensors():
  # Barometric sensor constructor (Pressure (Pascals), Altitud (meters), Temperature (celsius ))
  mpl_pressure = MPL3115A2(py, mode=PRESSURE)
  mpl_altitude = MPL3115A2(py,mode=ALTITUDE)
  # Humidity & Temperature sensor constructor (Humidity (relative humidity), Temperature (celsius))
  si = SI7006A20(py)
  # Ambient light sensor consturctor (Light levels(luxes))
  ltr = LTR329ALS01(py)
  # Sensors readings
  pressure = mpl_pressure.pressure()
  altitude = mpl_altitude.altitude()
  temperature_mpl = mpl_altitude.temperature()
  temperature_si = si.temperature()
  relative_humidity = si.humidity()
  ambient_humidty = si.humid_ambient(temperature_si)
  dewpoint = si.dew_point()
  light = ltr.light()

  # Readings logs
  print("\nMPL3115A2 | Pressure: {} Pa, Altitude: {} m, Temperature: {} ºC".format(pressure, altitude, temperature_mpl))
  print("SI7006A20 | Temperature: {} ºC, Relative Humidity: {} %RH, Ambient Humidity: {} %RH, Dew point: {}".format(temperature_si, relative_humidity, ambient_humidty, dewpoint))
  print("LTR329ALS01 | Light (channel Blue lux, channel Red lux): {}\n".format(light))
  # JSON build
  data = b'{ "pressure" : %s,"altitude" : %s, "temp_mpl" : %s, "temp_si" : %s, "rel_hum" : %s, "amb_hum" : %s, "dew_point" : %s, "lux_blue" : %s, "lux_red" : %s }' % (pressure, altitude, temperature_mpl, temperature_si, relative_humidity, ambient_humidty, dewpoint, light[0], light[1])

  return data


# Network's inizalitation
wlan = WLAN(mode=WLAN.STA) # Set STA (Station Aka Client, connects to an AP) as WLAN network interface 'STA_IF' (Station aka client, connects to upstream WiFi Access points)
wlan.antenna(WLAN.EXT_ANT) # Set antenna type (INT_ANT: Internal, EXT_ANT: External)
wifi_connect(wifi_ssid, wifi_password)

# Sensors' inizalitation
py = Pysense()

# Establishes connection with the MQTT server
try:
  client = connect_mqtt()
except OSError as e:
  restart_and_reconnect()

# Main function
while True:
  try:
    # Network reconnection
    if wlan.isconnected() != True:
      wifi_connect(wifi_ssid, wifi_password)

    # Publish sensor data every 5 seconds
    if (time.time() - last_message) > message_interval:
      data = read_sensors()
      client.publish(b"/v1.6/devices/%s" % (ubidots_dev_label), data)
      last_message = time.time()

  except OSError as e:
    restart_and_reconnect()
Rather than just copy and paste, we can also look at how the code works. First, the required libraries must be imported:
from umqtt.robust import MQTTClient
import machine
import time
import pycom
import json
import ubinascii
from network import WLAN
from pysense import Pysense
from LIS2HH12 import LIS2HH12
from SI7006A20 import SI7006A20
from LTR329ALS01 import LTR329ALS01
from MPL3115A2 import MPL3115A2,ALTITUDE,PRESSURE
import gcThen in the following variables, we assign the network credentials to establish the connection:
wifi_ssid = "xxxx"
wifi_password = "xxxx"To establish communication with an Ubidots account over MQTT, we have to define the broker address, as well as the client, and the username for communication authentication:
MQTT Broker:
industrial.api.ubidots.comor169.55.61.243.MQTT Client: unique identifier for the client-server communication. It is recommended to use the device's MAC address as identifier for the client since it's a unique value per device.
MQTT Username: Authenticate the communication with the broker. In case of Ubidots, we must assign the account token as username.
mqtt_server = "industrial.api.ubidots.com" # 169.55.61.243
mqtt_clientID = ubinascii.hexlify(machine.unique_id(),'').decode()
mqtt_username = "BBFF-xxxx" # Set your Ubidots TOKENNext, assign the device label. This label is the unique identifier that will allow us to communicate with Ubidots, either to publish or to subscribe data to/from a topic. It can be a string unique value or the device's MAC address. In my case, I assigned weather-station as a device label:
ubidots_dev_label = "weather-station"To finish with declarations, assign the data rate desired as message_interval. The variable is set to five seconds by default. The last_message variable will hold the last time a message was sent.
last_message = 0
message_interval = 5Now, it's time to connect the board to the local network. First, we create a WLAN network interface object. As you can see below, the object is created under the wlan variable and is configured to use the external antenna, since I have the device deployed a little bit far away from the router. If you want to use the internal antenna, just use wlan.antenna(WLAN.INT_ANT).
wlan = WLAN(mode=WLAN.STA)
wlan.antenna(WLAN.EXT_ANT)Then, the function wifi_connect() establishes communication with the network specified:
wifi_connect(wifi_ssid, wifi_password)But what exactly is the wifi_connect function doing? As you can see below, it takes on the task of establishing the network connection, and returns the network parameters only if the connection was established successfully. In case of a problem, it will be reported, and the device will be restarted to retry the connection.
def wifi_connect(ssid, psw):
  attempts = 0

  print("Starting attempt to connect to WiFi.", end="")
  wlan.connect(ssid, auth=(WLAN.WPA2, psw), timeout=5000)

  while not wlan.isconnected():
    time.sleep(0.5)
    print(".", end="")
    attempts += 1
    machine.idle()

    if attempts >= 10:
      print("\nssid: {}, psw: {}".format(wifi_ssid, wifi_password))
      print("\nCould not establish connection with the network provided. Please check the network crendentials or status, and try again.");
      time.sleep(0.5)
      attempts = 0
      machine.reset()

  network_settings =  wlan.ifconfig()
  print("\nWLAN connection succeeded!")
  print("IP address: {}".format(network_settings[0]))
  print("Subnet: {}".format(network_settings[1]))
  print("Gateway: {}".format(network_settings[2]))
  print("DNS: {}".format(network_settings[3]))

  return True
Then, initialize the PySense board as py
py = Pysense()To prevent communication problems with the broker, the connection will be established before entering the while. However, in case of any communication problem, the umqtt library will manage an automatic reconnection. In case the connection cannot be established for another reason, such as the broker is down, the board will be restarted to try to establish the connection again.
try:
  client = connect_mqtt()
except OSError as e:
restart_and_reconnect()The function connect_mqtt() opens a new MQTT connection to the specified broker:
def connect_mqtt():
  global mqtt_clientID, mqtt_server
  client = MQTTClient(mqtt_clientID, mqtt_server, user=mqtt_username, password=mqtt_username)
  client.connect()
  print("\nConnected to {} MQTT broker".format(mqtt_server))
return clientTo finish, as you can see below, the main code is actually in charge of three processes.
First, check the network connection:
if wlan.isconnected() != True:
wifi_connect(wifi_ssid, wifi_password)Then publish sensor data to Ubidots every 5 seconds:
    if (time.time() - last_message) > message_interval:
      data = read_sensors()
      client.publish(b"/v1.6/devices/%s" % (ubidots_dev_label), data)
      last_message = time.time()
Here, the function read_sensors() is in charge of taking readings from all the sensors and building a JSON payload to be sent to Ubidots:
def read_sensors():
  mpl_pressure = MPL3115A2(py, mode=PRESSURE)
  mpl_altitude = MPL3115A2(py,mode=ALTITUDE)
  si = SI7006A20(py)
  ltr = LTR329ALS01(py)

  pressure = mpl_pressure.pressure()
  altitude = mpl_altitude.altitude()
  temperature_mpl = mpl_altitude.temperature()
  temperature_si = si.temperature()
  relative_humidity = si.humidity()
  ambient_humidty = si.humid_ambient(temperature_si)
  dewpoint = si.dew_point()
  light = ltr.light()

  print("\nMPL3115A2 | Pressure: {} Pa, Altitude: {} m, Temperature: {} ºC".format(pressure, altitude, temperature_mpl))
  print("SI7006A20 | Temperature: {} ºC, Relative Humidity: {} %RH, Ambient Humidity: {} %RH, Dew point: {}".format(temperature_si, relative_humidity, ambient_humidty, dewpoint))
  print("LTR329ALS01 | Light (channel Blue lux, channel Red lux): {}\n".format(light))
  # JSON build
  data = b'{ "pressure" : %s,"altitude" : %s, "temp_mpl" : %s, "temp_si" : %s, "rel_hum" : %s, "amb_hum" : %s, "dew_point" : %s, "lux_blue" : %s, "lux_red" : %s }' % (pressure, altitude, temperature_mpl, temperature_si, relative_humidity, ambient_humidty, dewpoint, light[0], light[1])

return dataFinally, restart the board if an error with the broker occurs:
except OSError as e:
restart_and_reconnect()The function restart_and_reconnect() restarts the board to reconnect the connection with the broker.
def restart_and_reconnect():
  print("\nFailed to connect to MQTT broker. Reconnecting...")
  time.sleep(10)
machine.reset()Once you have the code in Pymakr, you can upload the code into the board by pressing the Upload button. Wait a couple of seconds until the device finishes its compilation.
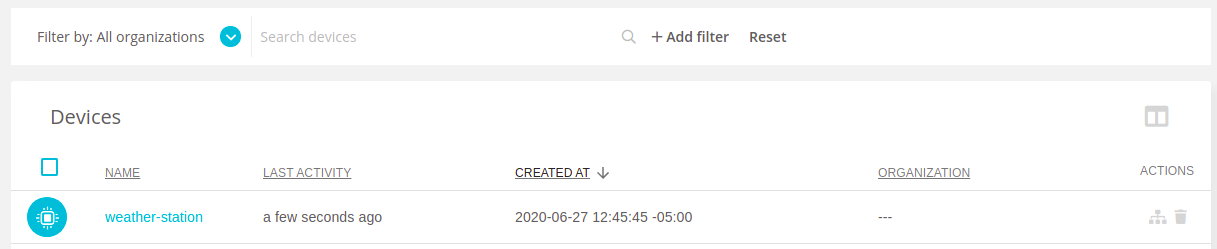
From the Ubidots account, go to Devices > Devices section and see how a weather-station device was automatically created once the sensor data was received:
 Ubidots New Device
OPTIONAL Ubidots allow us to customize devices and variables with friendly names, colors, icons, and descriptions. Just be aware that the devices and variables labels can not be changed since the label is the one that handles the communication between the devices and the platform.
In my case, I customized the variable names, icons, units, and colors.
Before customization:
 Ubidots Generic Device
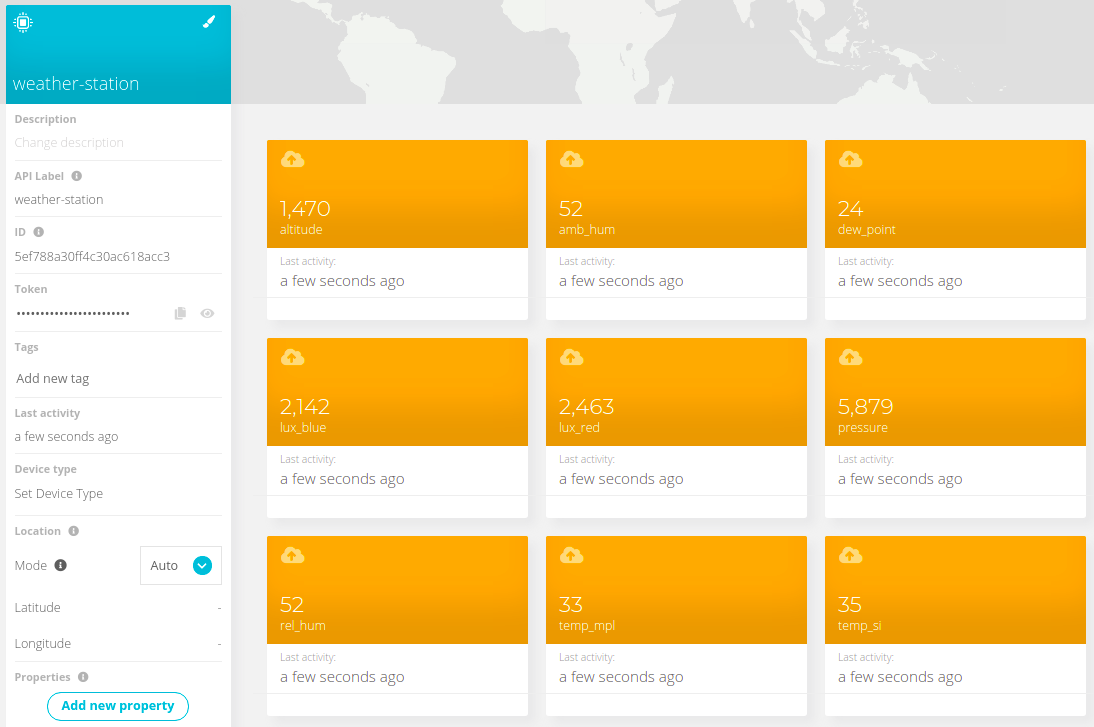
After customization:
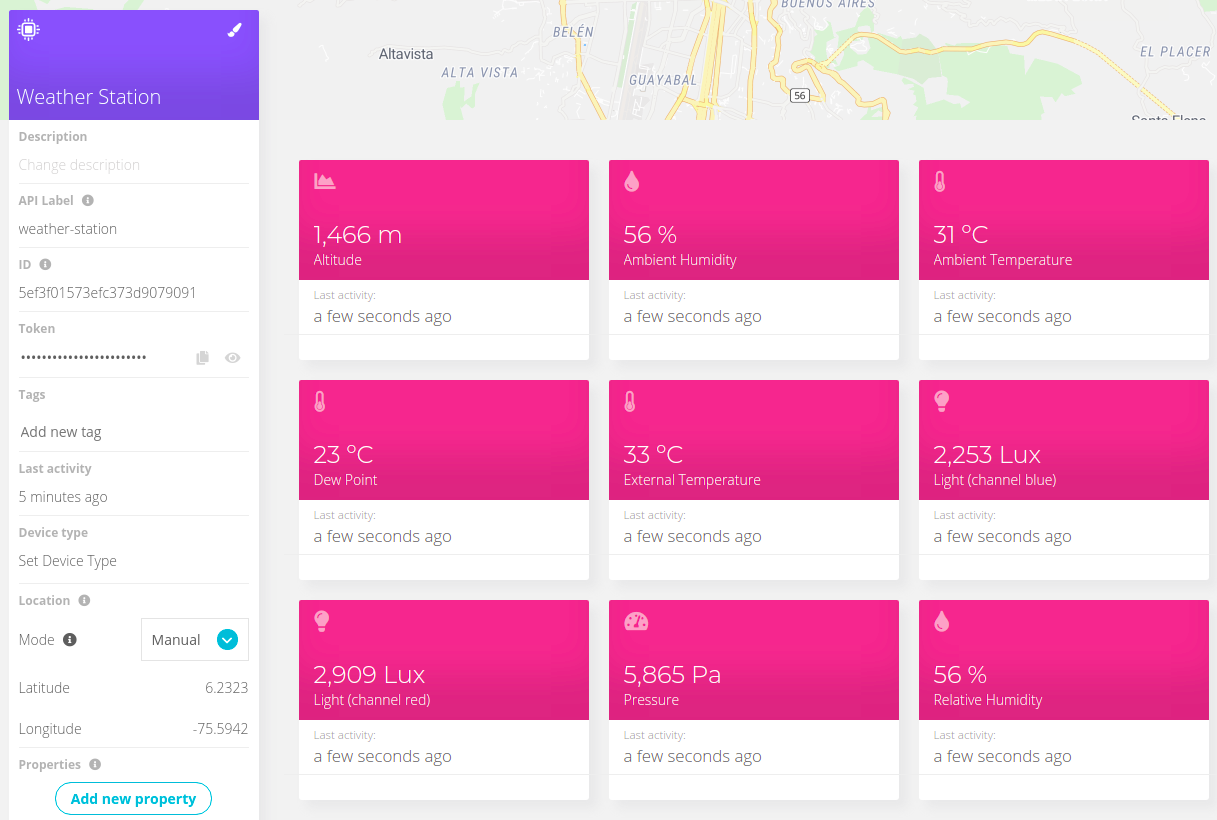 Ubidots Custom Device
One of the things I love when working with Ubidots is the catchy visualizations they provide. They also have a wide variety of widgets that allow you to fully customize how you want your dashboard to look. Dashboards are a very important part of IoT solutions, since we can access all of the data from our devices from anywhere in the world, but...only if we have an internet connection.
To create a dashboard, navigate to the Data > Dashboard_section. Then, click on _New Dashboard and assign the desired name.
To add new widgets, just click on the blue plus icon, select the widget type, set a few visualization customizations. At this point, it's time to be creative and start exploring the different widgets that Ubidots offer.
Here's what my dashboard looks like!
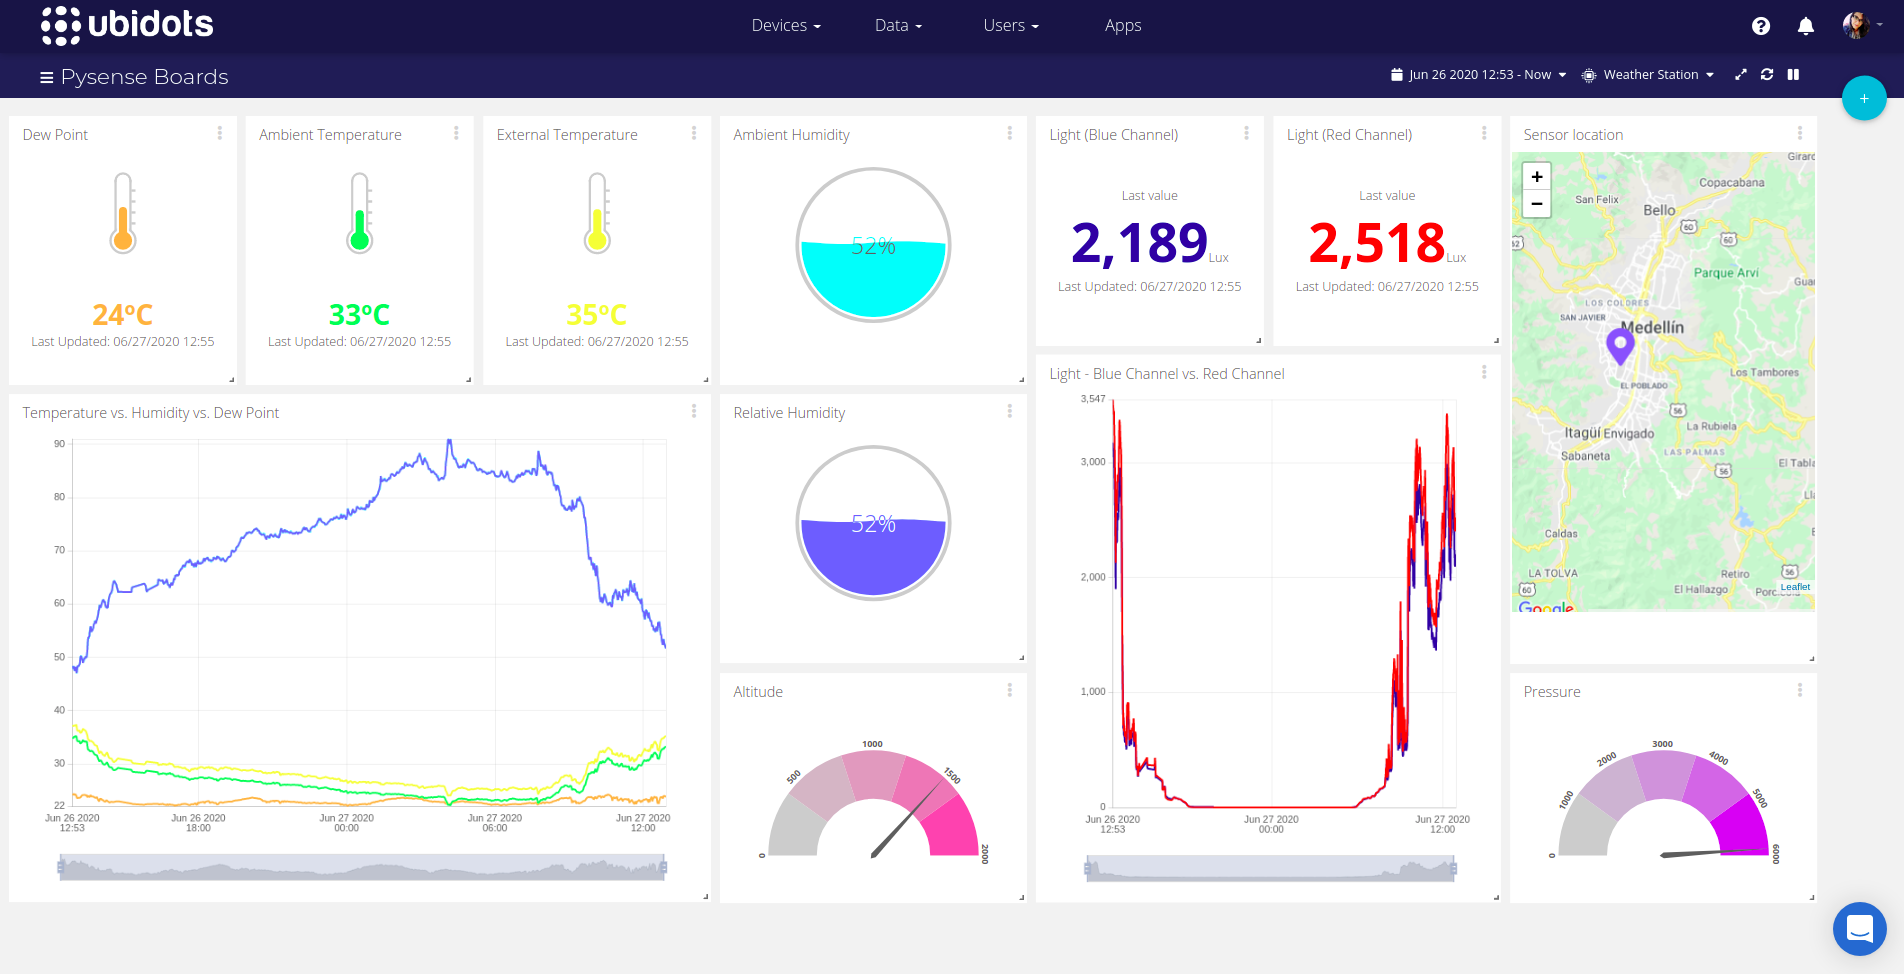 Ubidots Dashboard
For more info on dashboards and widget settings, I highly recommend you check out the following guides:
Thanks to the Vonage Messages API, we can enable different messaging strategies in a simple way. Not only does it allow us to send SMS, it also allows communication through different channels including MMS, Whatsapp, Facebook Messenger, and Viber. For this project I'll use the SMS channel, as I want to demonstrate how to request data when you don't have internet access.
Let's look at the steps below to set up our Vonage account:
Access your Vonage account. If you don't have one already, sign up and start building today.
Once signed in, find the API Key & API Secret for your account at the top of the Vonage API Dashboard. These credentials are required when establishing communication from external services such as Ubidots. Be aware that these credentials should always be kept secure and never shared.
Create a new application. You can do this by using the Vonage API Dashboard—just go to our applications > + Create a new application and assign a name for it—or by sending an HTTP request. In order to make this guide user-friendly, I decided to do it straight from the dashboard. You just need to handle a few clicks, assign a name, and that's it!
To receive inbound messages, you'll need to rent a virtual number. The number can be rented using the developer dashboard, Nexmo CLI, or API.
Link the rented number to the application previously created by clicking on the link button in the application's number section.
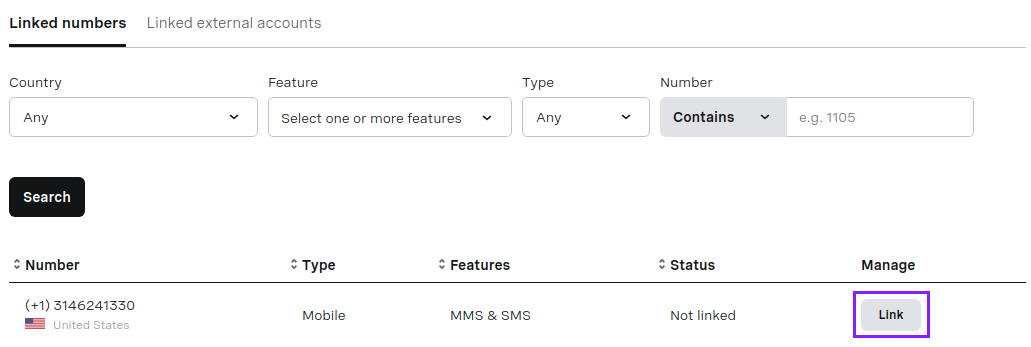 Vonage Virtual Number
On the Ubidots account, go to the Device > Functions section and click the plus icon located on the top right side of the site to create a new function. To create the function you must assign the following parameters:
Name:
Vonage Messages APIHTTP Method:
POSTRuntime:
NodeJs 10
*NOTE: The UbiFunction can also be programmed in Python, but the code provided in this guide is in NodeJS.*
Once configured, press the Make it live button. At this point, we'll see the HTTPS Endpoint URL field auto-complete with the endpoint that will receive the messages from Vonage.
In my case, the generated URL was: https://parse.ubidots.com/prv/{ubidots_username}/vonage-messages-api.
Then on the Vonage Developer Portal, navigate to the Settings section, click on your username, then assign the following parameters under the Default SMS Setting option. To finish, save the changes.
Delivery receipts: HTTPS Endpoint URL generated +
/webhooks/delivery-receipts:
https://parse.ubidots.com/prv/{ubidots_username}/vonage-messages-api/webhooks/delivery-receipts
Inbound messages: HTTPS Endpoint URL generated +
/webhooks/inbound-message:
https://parse.ubidots.com/prv/{ubidots_username}/vonage-messages-api/webhooks/inbound-message
HTTP Method:
POST
When a message is sent to the virtual number, it will forward the information to this endpoint.
Now go back to the UbiFunction created, and replace the default code with the code below:
// Import the 'request-promise' library to handle HTTP requests
var request = require("request-promise");

// Ubidots constants
const UBIDOTS_TOKEN = "BBFF-xxxx";
// Vonage constants
const VONAGE_API_SECRET = "xxxxxx";

/*
 * Main function - runs every time the UbiFunction is executed
 *
 * @arg args, dictionary containing Vonage request data
 */
async function main(args) {
  // When sending SMS, delivery receipts will be returned
  // status: submitted, delivered,
  if (args["status"]) {
    return args;
  }

  // Parses incoming values
  var api_key = args["api-key"];
  var keyword = args["keyword"];
  var msisdn = args["msisdn"];
  var text = args["text"];
  var to = args["to"];
  var msg_type = args["type"];
  //var message_timestamp = args['message-timestamp'];
  //var messageId = args['messageId'];

  // Verify the keyword received to request the data
  if (keyword == "UBIDOTS") {
    text = text.toLowerCase(); // Converts the text received to lowercase letters

    // Filter the requested devices
    const devices = /Devices:(.*)/i.exec(text);
    const deviceList = devices[1].split(",").map((device) => device.trim());
    // Filter the requested variables
    const variables = /Variables:(.*)/i.exec(text);
    const variableList = variables[1]
      .split(",")
      .map((variable) => variable.trim());

    // "msg" stores the response to be sent
    var msg = "Data requested:\n";

    // Iterates the deviceList previously filtered
    for (const device of deviceList) {
      msg = msg.concat("\nDevice: ", device);
      // Iterates the variableList previously filtered
      for (const variable of variableList) {
        // Handle GET request to Ubidots
        try {
          var response = await ubidots_get_request(
            UBIDOTS_TOKEN,
            device,
            variable
          );
          msg = msg.concat("\nVariable: ", variable, " = ", response);
        } catch (error) {
          // Send a reply back in case any error is presented
          var vonage_response = await vonage_messages(
            api_key,
            msg_type,
            msisdn,
            to,
            "The requested data cannot be found. Please verify it and try again."
          );
          // Pass the error message caught as the function's response
          return { message: error.message };
        }
      }
      msg = msg.concat("\n");
    }
  }

  // Send a reply back with the requested data
  /*  Reply example for multiple devices and variables:

      Data requested:

      Device: balcony
      Variable: humidity = 50.87
      Variable: temperature = 36.39

      Device: kitchen
      Variable: humidity = 55.72
      Variable: temperature = 29.45
  */
  //var vonage_response = await vonage_messages(api_key, msg_type, msisdn, to, msg);
  var vonage_response = await vonage_messages(
    api_key,
    msg_type,
    msisdn,
    to,
    msg
  );

  // Pass Vonage's API Response as the function's reponse
  return vonage_response;
}

/*
 * Handle an HTTP POST request to Vonage Messaging API
 * API Documentation: https://developer.nexmo.com/api/messages-olympus#overview
 *
 * @arg api_key [Mandatory], Nexmo account's API Key
 * @arg msg_channel [Mandatory], type of message that you want to send.
 * @arg recipient [Mandatory], phone number of the message recipient
 * @arg sender [Mandatory], phone number of the message sender
 * @arg msg [Mandatory], text of the message
 *
 * @return message_uuid, UUID of the message
 */

async function vonage_messages(api_key, msg_type, recipient, sender, msg) {
  // Base64 encoded API key and secret joined by a colon
  var auth =
    "Basic " +
    Buffer.from(api_key + ":" + VONAGE_API_SECRET).toString("base64");

  var options = {
    method: "POST",
    url: "https://api.nexmo.com/v0.1/messages",
    headers: {
      Authorization: auth,
      "Content-Type": "application/json",
      Accept: "application/json",
    },
    json: {
      from: {
        type: "sms",
        number: sender,
      },
      to: {
        type: "sms",
        number: recipient,
      },
      message: {
        content: {
          type: msg_type,
          text: msg,
        },
      },
    },
  };

  // Pass UUID of the message sent
  return await request.post(options);
}

/*
 * Handle an GET request to Ubidots API
 * API Documentation: https://ubidots.com/docs/sw/
 *
 * @arg token [Mandatory], Ubidots account's Token
 * @arg device_label [Mandatory], single and unique label of device
 * @arg variable_label [Mandatory], single and unique label of variable
 *
 * @return last_value, variable last value
 */
async function ubidots_get_request(token, device_label, variable_label) {
  var options = {
    method: "GET",
    url:
      "https://industrial.api.ubidots.com/api/v1.6/devices/" +
      device_label +
      "/" +
      variable_label +
      "/lv",
    json: true,
    headers: {
      "Content-Type": "application/json",
      "X-Auth-Token": token,
    },
  };

  var last_value = await request.get(options);

  return last_value;
}

/*
 * Handle an POST request to Ubidots API
 * API Documentation: https://ubidots.com/docs/sw/
 *
 * @arg token [Mandatory], Ubidots account's Token
 * @arg device_label [Mandatory], single and unique label of device
 * @arg variable_label [Mandatory], single and unique label of variable
 *
 * @return last_value, variable last value
 */
async function ubidots_post_request(token, label, body) {
  var options = {
    method: "POST",
    url: "https://industrial.api.ubidots.com/api/v1.6/devices/" + label,
    body: body,
    json: true,
    headers: {
      "Content-Type": "application/json",
      "X-Auth-Token": token,
    },
  };

  var response = await request.post(options);

  return response;
}
Then, we must replace the UBIDOTS_TOKEN constant with the Ubidots TOKEN, and the VONAGE_API_SECRET with the Vonage API Secret to allow communication between the UbiFunction and both services.
// Ubidots constants
const UBIDOTS_TOKEN = "BBFF-xxxx";
// Vonage constants
const VONAGE_API_SECRET = "xxxxxx";Don't forget to press the Make it live button to save the changes made!
The code provided is commented in detail for each of its processes and functions, so understanding it should not be too difficult. However, let's highlight how it works:
The UbiFunction main code is in charge of receiving the payload sent by Vonage when a new SMS is sent, or when another SMS status is reported.
Then, the received SMS is analyzed to identify the API key, keyword, received SMS, and the sender.
If the keyword received is equal to Ubidots, the text received will be filtered to create a list of the devices and variables to be requested.
The lists created are iterated to request the last value of each of the variables to Ubidots.
The requested data is concatenated into a string, which is sent as a reply to the sender once all the data has been correctly requested.
For the request of data to be done satisfactorily via SMS, we must use the following templates:
For a single device:
SMS Request:
Ubidots request data
Devices: {device_label}
Variables: {variable_label_1}, {variable_label_2}, {variable_label_n}SMS Reply:
Data requested:

Device: {device_label}
Variable: {variable_label_1} = 23
Variable: {variable_label_2} = 246
Variable: {variable_label_n} = 85For mutiple devices:
SMS Request:
Ubidots request data
Devices: {device_label_1}, {device_label_2}, {device_label_n}
Variables: {variable_label_1}, {variable_label_2}, {variable_label_n}SMS Reply:
Data requested:

Device: {device_label_1}
Variable: {variable_label_1} = 23
Variable: {variable_label_2} = 246
Variable: {variable_label_n} = 85

Device: {device_label_2}
Variable: {variable_label_1} = 23
Variable: {variable_label_2} = 246
Variable: {variable_label_n} = 85

Device: {device_label_n}
Variable: {variable_label_1} = 23
Variable: {variable_label_2} = 246
Variable: {variable_label_n} = 85*IMPORTANT NOTE: Multiple device requests will be supported only for devices containing the same variables.*
To check that everything is working as it should, let's send two messages to the rented number, one with the device created (weather-station), and another with a device that does not exist to differentiate the replies:
Request #1:
Ubidots request data
Devices: weather-station
Variables: dew_point, lux_blue, amb_hum, temp_mplRequest #2:
Ubidots request data
Devices: ws
Variables: dew_point, lux_blue, amb_hum, temp_mplThe replies received were:
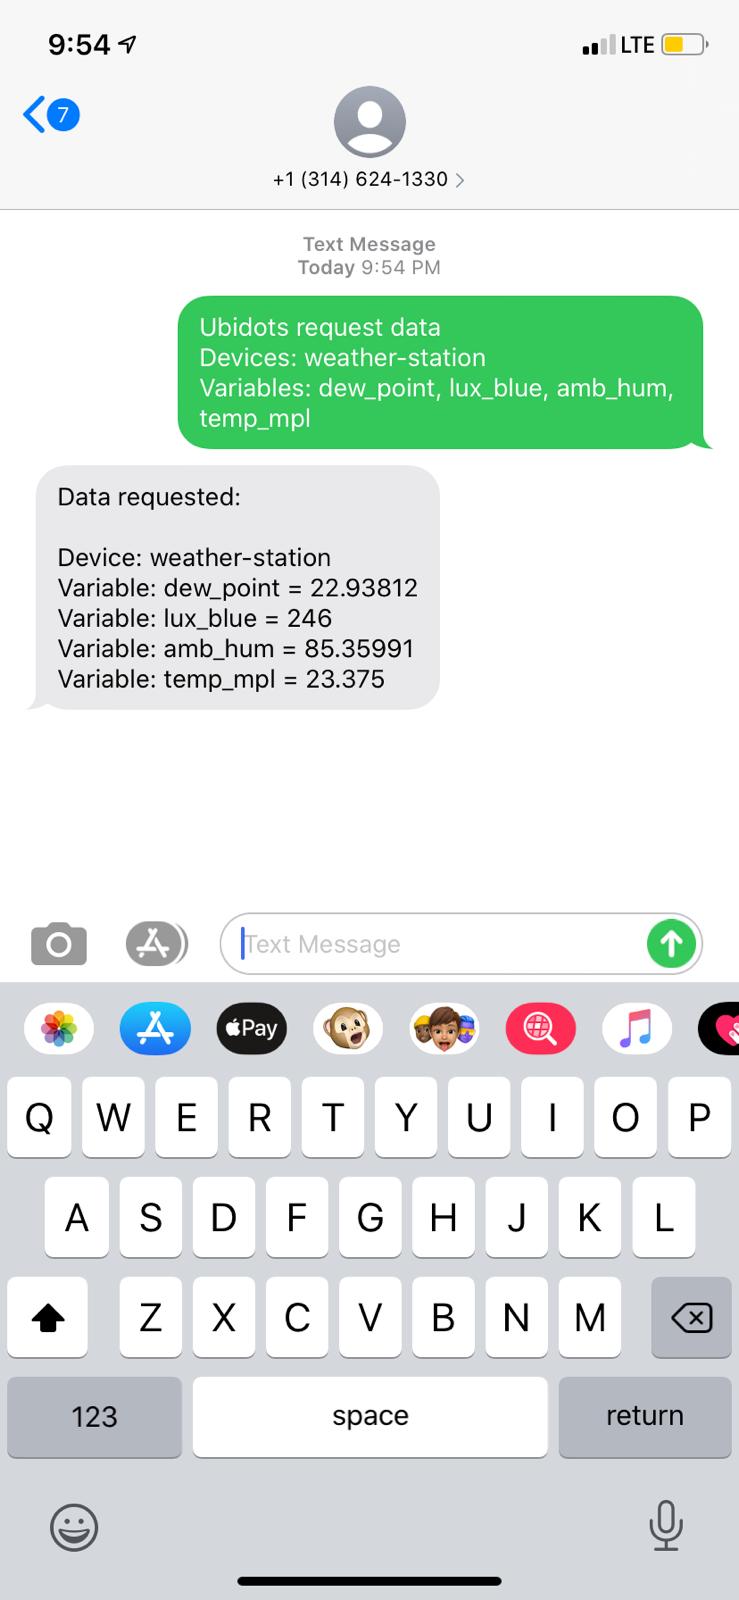 Satisfactory reply
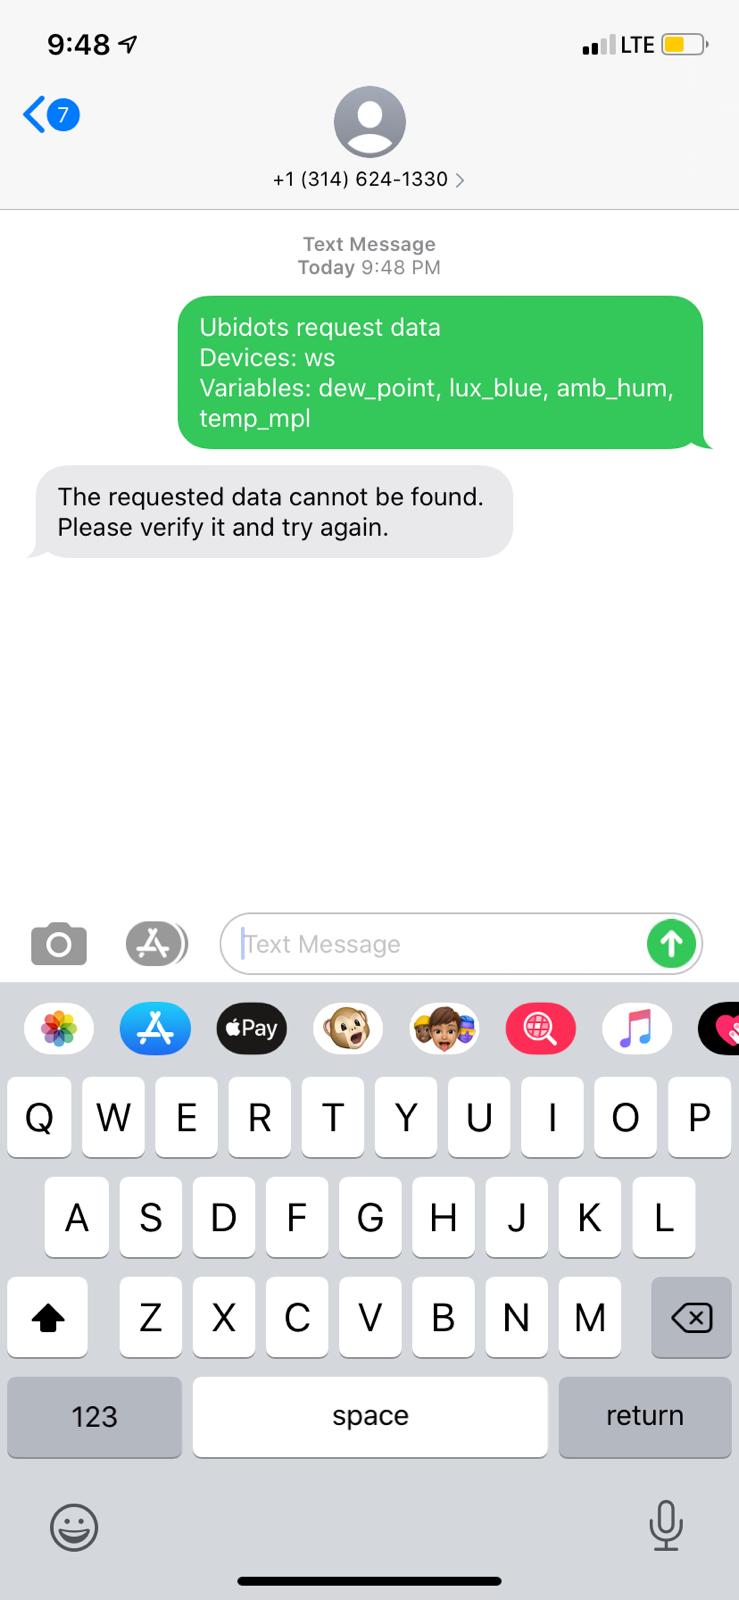 Device not found
As expected, it works correctly! Now if we compare the received values with the values of our dashboard we can see that they are the same:
 Ubidots Final Dashboard
When we talk about the Internet of Things, the first thing that comes to our mind is "Internet", but the reality is that there are other alternatives that allow us to have access to that data even if we do not have access to the Internet at some point.
In this guide, we have covered everything you need to know to communicate with the Vonage Messages API and Ubidots to request data via an SMS. However, you can expand this development and customize it to any IoT application you can have in mind, whether it's a home light control application, community networks for sensors, custom chatbot, and more.
In addition, you can explore the other channels offered by the Vonage Messages API, I'm quite sure that with it, you can start working on your next superhero. :)