Share:
Chris is the Developer Relations Tooling Manager and leads the team that builds your favorite tools. He has been programming for more than 15 years across various languages and types of projects from client work all the way up to big-data, large scale systems. He lives in Ohio, spending his time with his family and playing video and TTRPG games.
Talk to Your Database With Directus
Time to read: 10 minutes
"Play to your strengths" is an important part of software development. Many issues and bugs are caused when someone builds something that is not in their wheelhouse. Authentication and Databases are two of those things that can be incredibly hard to figure out, and if you are building an app, why should you spend a bunch of time on stuff that isn't directly related to your app?
Directus allows us to offload database management to an external system and make it easier to work with our data. Not only can it be used to store data, but it can be used to expose our data in multiple ways other than our application. You can check out their 100+ More Things To Build article to get a feel for everything they do.
Let's take a look at their database offering. We'll walk through a sample application that allows users to buy and cancel movie tickets, and we will use Directus to handle the data storage. We can then use the Vonage Voice API to allow users to call in, manage their tickets, and let Directus or other services handle displaying things on the web.
A Vonage Developer account. Click Sign Up to create one if you don't have one already.
A Directus account.
A tunneling system like ngrok.
If you have not already done so, head on over to the Directus Quickstart Guide and follow their directions for either setting up a Directus Cloud account (which we are using for this demo), or to set up Directus locally. You will need a GitHub account to sign up for a cloud account.
We need to set up the data sources that we will be accessing from Directus. We will set up a "Movies" collection, which is a list of movies that are currently showing. We will also have a "Showtimes" collection that contains all the individual showtimes a movie may have. We will then also have a "Tickets" collection, which are the individual tickets that have been purchased.
Movies will be related to Showtimes, and Tickets will be related to Showtimes.
To create a new collection in Directus, click on the Gear icon in your sidebar and select "Data Model."
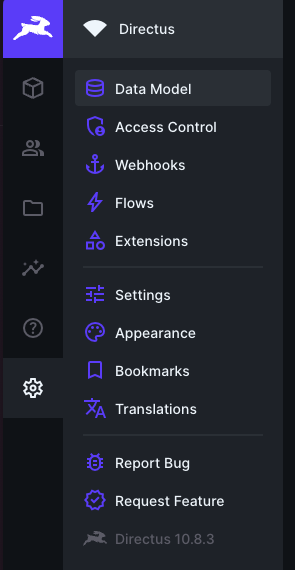 Directus Sidebar - Settings
This will give you a list of the models you currently have. Click on the large "+" (Plus) button in the upper-right-hand corner of the screen to create a new model.
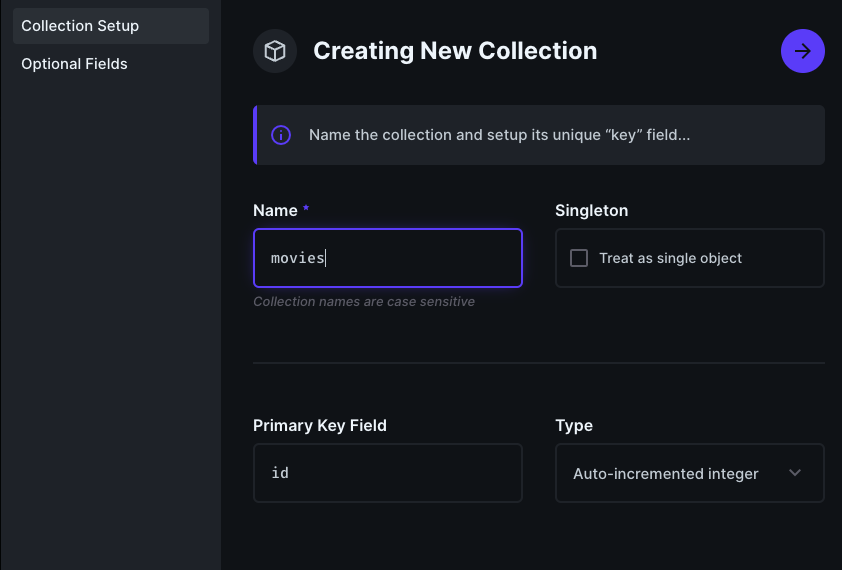 Creating a new collection in Directus
Give the model a name, in this case, "movies". This will be the name we will reference the collection by when calling via the Directus SDK. Click the right arrow button to continue.
You can add additional fields, but we will leave these unselected for now. Click the Checkmark icon in the upper-right-hand corner to generate the model.
This will take you to the edit screen of the model.
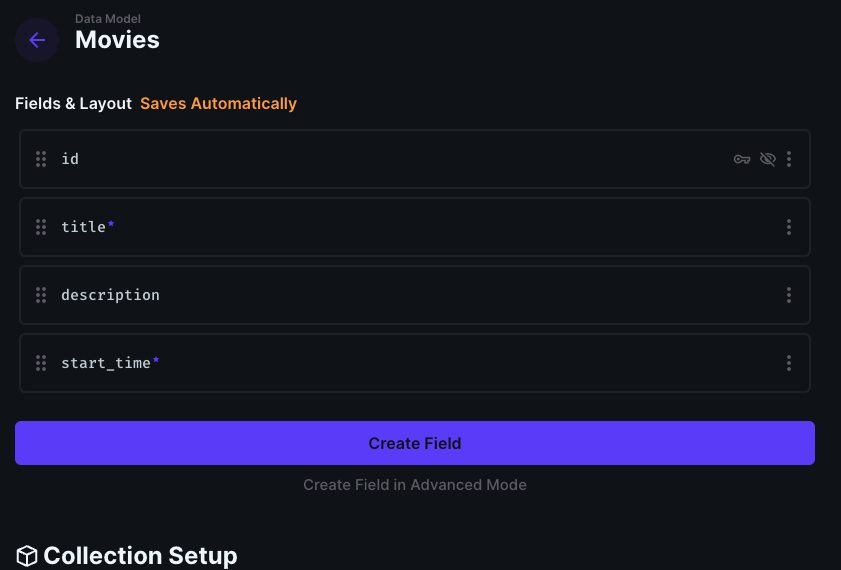 Movie Collection Edit Screen
Here, we can create new fields and add them to the model. The "Movies" collection is fairly simple, so click on "Create Field" and we will add the following fields:
title - Select "Input", the type is "String", and select "Required"
description - Select "Datetime", the type is "Datetime", and select "Required"
start_time - Select "Input", the type is "String", and select "Required"
We will also need to create two more models and their associated fields:
showtimes
movie_id - Select "Many to One" under Relational, and under "Related Collection" enter "movies"
start_time - Select "Datetime", the type is "Datetime", and select "Required"
tickets
showtime_id - Select "Many to One" under Relational, and under "Related Collection" enter "showtimes"
user - Select "Many to One" under Relational, and under "Related Collection" enter "directus_users"
Once you have those collections created, you can enter a few movies into the Movie collection and some associated showtimes.
For our demo, we will also want to create a user that will interact with our collections on behalf of the user. We do this because someone calling in will not be able to enter a username and password, so we will take advantage of the setToken() composable on the Directus client.
Click the Users icon on the sidebar to go to the Users page. Click the "+" (Plus) icon in the upper-right-hand corner to create a new user. Be careful not to click the "Invite" button right next to it.
Fill out the user form, and then down near the bottom under "Admin Options," give the user the role of "Application User", and then click on "+" inside the "Token" box. Keep track of this token, as we will need it to configure our application.
Click the Checkmark button in the upper-right-hand corner to save the user.
We will need some way to have the Vonage servers contact our application, and the easiest way to do this is using a tunneling system like ngrok. Head on over to ngrok, sign up for an account and follow their quickstart guide to get it installed on your PC.
Once it's installed, we can start it with:
ngrok http 3000This will open a tunnel to the outside world through ngrok's servers, including a URL that has SSL enabled. When running ngrok it will give you a nice little status output so you can check the events that flow through the system. We will need to grab the "Forwarding" address on the left-hand side of the ->, which is our public URL. We will need this URL in just a moment.
We will be using the Vonage Voice API to allow a user to call into our "Movie Phone System," so we will need to set up a Vonage Application. Vonage Applications are essentially groups of configurations that will interact with applications. For most of our services, these will be "callbacks", or URLs that we will use to send information to your application. For Voice, these callbacks are used to do things like letting you know a call event or a URL to handle starting a call.
Log into your Developer Dashboard, and then head to "Applications" under "Build & Manage." We will create a new application, so click on "+ Create a new application."
Let's give our application a name like "Directus IVR" so that we can find it later. Since we are using a Vonage Application, we need to generate a Private Key to sign our JWT. For more information on how Vonage JWT Authentication works, check out our Authentication documentation. Save this private key file as we will need it here in a bit.
Scroll down a bit and toggle the button next to "Voice" to open the voice configuration. Using the ngrok URL, we copied a moment ago,
Answer URL - Set to "HTTP POST", and the value to
<ngrok URL>/Event URL - Set to "HTTP POST", and the value to
<ngrok URL>/eventsFallback URL - Leave on "HTTP GET" and the value blank
Then go ahead and scroll down and click on "Generate new application."
Once the application is created, it will drop you to the information page for the new application. At the top is an Application ID we will need to configure our code, so go ahead and copy it down. We will also need a phone number, so under the "Linked Numbers" section, link one of your numbers by clicking the "Linked" button for a number you own. If you don't have a number already, head on over to the "Buy Numbers" page under "Build & Manage" and "Numbers." Note that some countries may have restrictions on buying numbers.
If you would like to follow along, you can grab the code.
We need to get some information that is specific to you into our application. Copy the .env.dist file to a new file named .env, and open it up to edit it. There are four variables we need to assign in this file that our application will need:
DIRECTUS_INSTANCE - This is the URL for your Directus instance. This will look something like "https://my-instance.directus.app/"
DIRECTUS_TOKEN - The static token we generated for our Directus user earlier
API_APPLICATION_ID - The Vonage Application ID that we generated
PRIVATE_KEY - A base64 encoded version of the private key we downloaded for our application. Check out our article on private keys in environment variables for how to turn the
private.keyfile into a base64 string
Save this file.
Directus offers a JavaScript SDK that we will use to access our Directus database instance. Full information can be found on the Directus JavaScript SDK documentation, but we will create an instance of the client. Since we will be using a system user to access our Directus database we can skirt the issue of per-user authentication, so we create a reusable Directus client to use throughout the application.
# src/Directus.js

export function getDirectusClient() {
    return createDirectus(process.env.DIRECTUS_INSTANCE)
        .with(staticToken(process.env.DIRECTUS_TOKEN))
        .with(rest());
}The Directus SDK is composable, which means you start with a client that needs to be configured for your use. In our case, we are going to use a staticToken() for authentication and use the rest() method to configure access through the REST API instead of the GraphQL API.
Throughout our application, we will call this getDirectusClient() method to use this composed client in our code.
Since we are using the REST API, our client will expose a request() method that allows us to interact with their API. This is done through a combination of methods we pass into the request() method, like readItems() or deleteItem().
const directus = getDirectusClient();
const tickets = await directus.request(readItems(
    // Collection we are accessing
    'tickets',
    // Options for what we return and search for
    {
        'fields': [
            'id',
            'showtime_id.*.*'
        ],
        'sort': [
            'showtime_id.start_time'
        ],
        'filter': {
            'user': {
                '_eq': user.id
            }
        }
    }
));
When the user dials our Vonage number assigned to our application, the Vonage servers grab the Answer URL for our application and make a call to our server. For our application, this is the src/routes/CallStart.js file. The Answer URL returns an NCCO or a Call Control Object. An NCCO is simply a JSON blob with directions for the Vonage servers to take. When starting an initial call, we return an NCCO that has a Talk action and an Input action. We ask the user what they want to do, and then wait for them to tell us.
We also hit the Directus API to see if they already have a ticket. If they do, we remind them of the upcoming movie.
// src/routes/CallStart.js

router.post('/', async (req, res) => {
    const builder = new NCCOBuilder();
    const directus = getDirectusClient();

    const user = await getUserFromPhone(req.body.from);
    const tickets = await directus.request(readItems(
        'tickets',
        {
            'fields': [
                'showtime_id.*.*'
            ],
            'sort': [
                'showtime_id.start_time'
            ],
            'filter': {
                'user': {
                    '_eq': user.id
                }
            }
        }
    ));

    let openingMessage = "Welcome! What can we help you with?";

    if (tickets.length > 0) {
        const startTime = new Date(tickets[0].showtime_id.start_time);
        const timeString = `${startTime.getFullYear()} ${startTime.getMonth() + 1} ${startTime.getDay()} at ${startTime.getHours()} ${startTime.getMinutes()}`;
        openingMessage = `Welcome back! We look forward to seeing you on ${timeString} for ${tickets[0].showtime_id.movie_id.title}. What can we help you with?`;
    }

    const domain = getDomain(req);
    return res.send(
        builder
            .addAction(new Talk(openingMessage))
            .addAction(new Input(
                null,
                {
                    'context': ['cancel ticket']
                },
                `${domain}/determine_action`))
            .build()
    );
});In addition to calling the Directus API, we use the NCCOBuilder that ships with the Vonage Node SDK to help us build the JSON we need for the NCCO. We add a Talk action to give the welcome message, and then an Input action that listens for the user's voice and turns it into a string. We could also do DTMF or input via the dial pad, but for now, we will use voice-to-text.
When the user tells us what they want to do (and since this is a demo, we only support canceling a ticket), the Vonage servers take that voice input and turn it into a JSON request that sends it to the URL determined by our Input action, which is <ngrok URL>/determine_action. The incoming request will look something like this:
{
    "speech": {
        "timeout_reason": "end_on_silence_timeout",
        "results": [
            {
                "confidence": "0.7276162",
                "text": "cancel ticket"
            }
        ]
    },
    "dtmf": {
        "digits": null,
        "timed_out": false
    },
    "from": "15556661234",
    "to": "18005556666",
    "uuid": "ee9d7f5daa81673b5461c6f5XXXXXXXX",
    "conversation_uuid": "CON-baa6dcee-6750-4cde-82d2-XXXXXXXXXXXX",
    "timestamp": "2023-12-22T03:47:55.378Z"
}This JSON blob is posted to our server and handled by src/routes/DetermineAction.js.
// src/routes/DetermineAction.js
router.post('/determine_action', async (req, res) => {
    const builder = new NCCOBuilder();

    if (req.body.speech?.results[0].text === 'cancel ticket') {
        const directus = getDirectusClient();
        const user = await getUserFromPhone(req.body.from);
        const tickets = await directus.request(readItems(
            'tickets',
            {
                'fields': [
                    'id',
                    'showtime_id.*.*'
                ],
                'sort': [
                    'showtime_id.start_time'
                ],
                'filter': {
                    'user': {
                        '_eq': user.id
                    }
                }
            }
        ));

        if (tickets.length === 0) {
            builder
                .addAction(new Talk('We do not see any tickets for you at the moment. Would you like to hear a list of available movies to purchase a ticket?'))
                .addAction(new Input(
                    null,
                    {
                        'context': ['yes', 'no']
                    },
                    `${getDomain(req)}/list_movies`)
                )
        } else if (tickets.length === 1) {
            builder
                .addAction(new Talk(`Would you like to cancel your ticket for ${tickets[0].showtime_id.movie_id.title}?`))
                .addAction(new Input(
                    null,
                    {
                        'context': ['yes', 'no']
                    },
                    `${getDomain(req)}/confirm_cancel?id=${tickets[0].id}`)
                )
        } else {
            // Ask which upcoming tickets to cancel
        }
    } else if (req.body.speech.results[0].text === 'buy ticket') {
        builder
            .addAction(new Talk('Would you like to hear a list of available movies to purchase a ticket?'))
            .addAction(new Input(
                null,
                {
                    'context': ['yes', 'no']
                },
                `${getDomain(req)}/list_movies`)
            )
    } else {
        builder.addAction(new Talk('Sorry, I do not understand what you would like to do.'));
        builder.addAction(new Notify(
            {
                action: 'restart',
                from: req.body.from,
            },
            `${getDomain(req)}/notify`
        ));
    }

    return res.send(builder.build());
});This route is a bit more complicated as we try to figure out what the user did. The demo code supports canceling a ticket, as well as purchasing a new ticket.
When canceling a ticket, we pull up the current tickets the user has purchased. If they haven't purchased any, we ask if they would instead like to purchase one. If they do, we push them to the purchase workflow.
If they only have one ticket, we ask if they would like to cancel the ticket. This is the workflow we are detailing in this post, so we send back an NCCO with another Talk and Input just confirming the cancellation, and if the user confirms the cancellation, we call the Directus API again to delete the ticket.
We also pass the movie ID along in the URL as a query parameter. HTTP itself is stateless, and normally, we would use a Session to keep track of the flows. Since the Voice API will not work with sessions, we keep state the old way by passing query parameters around. We pass the ticket ID to the confirm route via a query parameter.
If the user had more than one ticket, we would ask them to select which ticket they would like to cancel, but for now, we'll leave that logic out since it makes the demo more complicated.
// src/routes/ConfirmCancel.js

router.post('/confirm_cancel', async (req, res) => {
    const builder = new NCCOBuilder();

    if (req.body.speech.results[0].text === 'yes') {
        const directus = getDirectusClient();
        directus.request(deleteItem('tickets', req.query.id));

        builder
            .addAction(new Talk('We have removed your ticket'))
            .build();
    }

    builder.addAction(new Notify(
        {
            action: 'restart',
            from: req.body.from,
        },
        `${getDomain(req)}/notify`
    ));
return res.send(builder.build());When we hit the cancel route, we take the ticket ID from the query parameters and send a deleteItem() request back to Directus. That removes the ticket from the Directus database, and we let the customer know we canceled their ticket.
We could end the call right there, but to be helpful, we transfer the user back to the beginning of the workflow. We do this by sending a Notify action as an NCCO, which allows us to inject an NCCO into the flow.
// src/routes/Notify
router.all('/notify', async (req, res) => {
    const builder = new NCCOBuilder();

    const domain = getDomain(req);
    return res.send(
        builder
            .addAction(new Talk('What else can we help you with?'))
            .addAction(new Input(
                null,
                {
                    'context': ['cancel ticket', 'buy ticket']
                },
                `${domain}/determine_action`))
            .build()
    );
});This Notify NCCO just asks the user if there is anything else we can help them with and forwards that answer back to the route to determine the action they want to take, just like if the user had just called in. The user can hang up at any point to end the call.
When building an application, play to your strengths. Worry about building out the logic of your application and let other services handle the other parts of your application that aren't your strengths. Directus is a great way to handle data, and Vonage's Voice APIs take the fuss out of dealing with telephony. Join the conversation on our Vonage Developer Community Slack or send us a message on X, formerly known as Twitter.
Share:
Chris is the Developer Relations Tooling Manager and leads the team that builds your favorite tools. He has been programming for more than 15 years across various languages and types of projects from client work all the way up to big-data, large scale systems. He lives in Ohio, spending his time with his family and playing video and TTRPG games.