Share:
Software Developer who loves building awesome tools and products. I currently work with Laravel, PHP and Vue.
Stripe SMS Notifications Using Laravel
In this tutorial, we will create a simple application that sends SMS notifications using Nexmo whenever Stripe sends out a charge succeeded event.
Stripe sends out various webhook events whenever anything happens with your account occurs. Sometimes, for some of these events, such as a new purchase, you would like to be notified instantly when they occur.
Let's get started!
We will be using Laravel 5.8 in this tutorial and using Composer to install and manage all dependencies.
You will also need to have an account with Stripe so that we can send out test webhook events.
Finally, you’ll need to have Ngrok installed to allow the application we’ll be developing locally to be accessible over the web so we can receive webhook events.
We’ll be using Composer to install a new Laravel project. From the command line, use the following command:
Laravel provides support for sending SMS notifications using Nexmo. However, from Laravel 5.8 and above, this has been extracted into a first-party package so we first need to pull in that package as well by running the following command:
Open the root of your project in your favourite editor and edit the .env file to add the Nexmo API key and secret credentials you noted earlier.
Set the SMS_FROM variable to the number you purchased earlier (make sure to keep it in the E.164 format).
We also added a SMS_TO variable which is the phone number that will receive the SMS notification, you can set this to your own number.
Next, we will reference the environment variables we just defined through our config file. Head over to the config\services directory and add a new Nexmo array.
'nexmo' => [
    'key' => env('NEXMO_KEY'),
    'secret' => env('NEXMO_SECRET'),
    'sms_from' => env('SMS_FROM'),
    'sms_to' => env('SMS_TO')
]
Let’s add the webhook endpoint Stripe will make a POST request to whenever a charge succeeds.
Edit the routes/api.php to add the following code:
Route::post('/stripe/webhook', 'WebhookController@handle');
Next, generate a new WebhookController from the command line by running the following command:
This will add a new WebhookController file for us in the App\Http\Controllers directory. Edit the file with the following code:
<?php

namespace App\Http\Controllers;

use Illuminate\Http\Request;
use Illuminate\Support\Facades\Notification;
use App\Notifications\NewSaleOccurred;

class WebhookController extends Controller
{
    public function handle(Request $request)
    {
        $payload = $request->all();

        if($payload['type'] == 'charge.succeeded'){
           Notification::route('nexmo', config('services.nexmo.sms_to'))
                        ->notify(new NewSaleOccurred($payload));
        }

        return response('Webhook received');
    }
}
The handle() method on the controller checks to see if the event sent from Stripe is the one we’re expecting, which in this case is the charge.succeeded event. Then using on-demand notifications via the Notification Facade that Laravel provides, we trigger a notification to be sent.
The first parameter that the route method accepts is the delivery channel for this notification, which in this case is Nexmo, while the second parameter is the phone number we would like to send the SMS notification to.
The notify method receives a NewSaleOccurred notification instance, which we will create next.
Using artisan, run the following command:
php artisan make:notification NewSaleOccurredThis will generate a new notification class for us under the App\Notifications directory. Edit the file with the following code:
<?php

namespace App\Notifications;

use Illuminate\Bus\Queueable;
use Illuminate\Notifications\Notification;
use Illuminate\Contracts\Queue\ShouldQueue;
use Illuminate\Notifications\Messages\NexmoMessage;

class NewSaleOccurred extends Notification implements ShouldQueue
{
    use Queueable;

    public $payload;

    /**
     * Create a new notification instance.
     *
     * @return void
     */
    public function __construct($payload)
    {
        $this->payload = $payload;
    }

    /**
     * Get the notification's delivery channels.
     *
     * @param  mixed  $notifiable
     * @return array
     */
    public function via($notifiable)
    {
        return ['nexmo'];
    }

    /**
     * Get the Nexmo representation of the notification.
     *
     * @param  mixed  $notifiable
     * @return \Illuminate\Notifications\Messages\NexmoMessage
     */
    public function toNexmo($notifiable)
    {
        $amount = $this->payload['data']['object']['amount'] / 100;

        $message = 'Hello, you just made a sale of $' .$amount. ' in your store';

        return (new NexmoMessage())
                    ->content($message);
    }

}
The payload of the event from Stripe is passed to the constructor of this notification. The via() method receives a notifiable instance which is an instance of the class to which the notification is being sent to while returning an array consisting of the different delivery channels to use for this notification which in this case is just Nexmo.
The toNexmo() receives a notifiable entity. We get the amount from the payload and then divide by 100 to convert from cents to dollars. We also define the custom message we’d like to send along with the amount and then return a Illuminate\Notifications\Messages\NexmoMessage which handles the actual sending of the SMS notification.
To test that our application works as expected, we’ll need to set up Ngrok. This will make our app publicly accessible so that it can be reached by Stripe. To serve our application locally, run php artisan serve and then run the following command in a separate terminal window:
This will generate a new terminal similar to the one below.
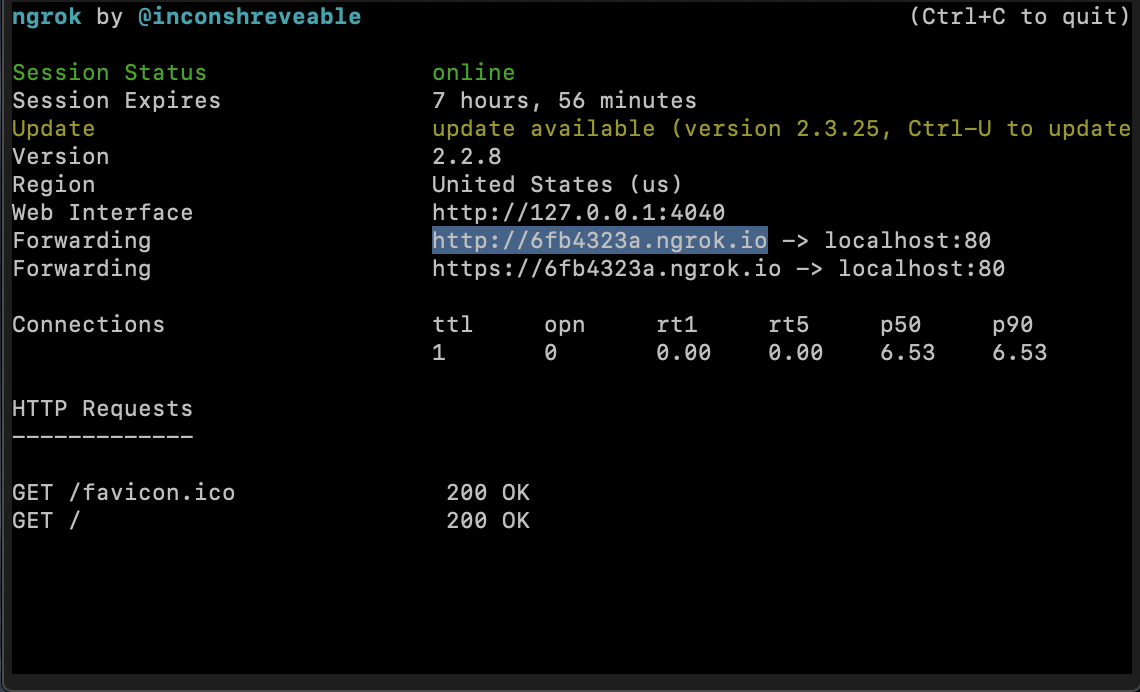 The ngrok terminal
Copy the first forwarding URL as this is what will be using to configure our Stripe webhook.
The next step is to configure an endpoint in our Stripe account to send data to our application. Head over to your Stripe dashboard and then set the environment to test mode so that we can send out a test event to our webhook endpoint.
Under the Developers > Webhooks section, select Add Endpoint and then configure it using the ngrok url you copied earlier. The complete URL will look like this, http://6fb4323a.ngrok.io/api/stripe/webhook, only your alphanumeric ID at the start of the address will be different.
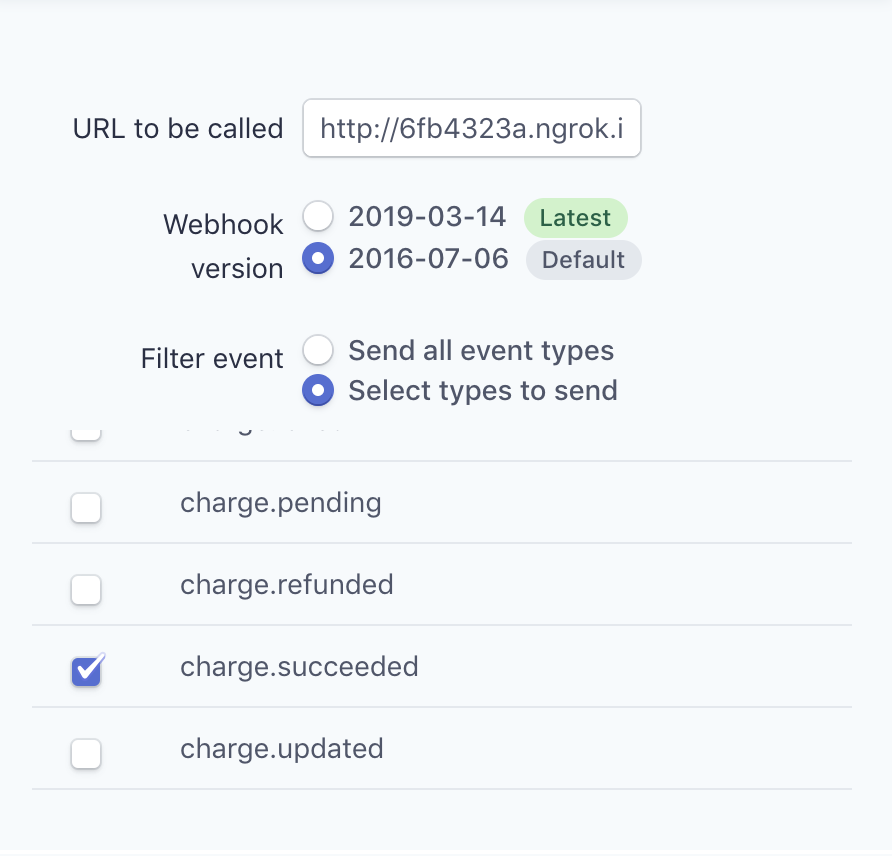 Stripe Webhook Setup
Under Stripe webhook settings, click the Send Test Webhook button. This will send a test charge.succeeded event to the webhook endpoint we added earlier.
You should receive a text similar to the one below:
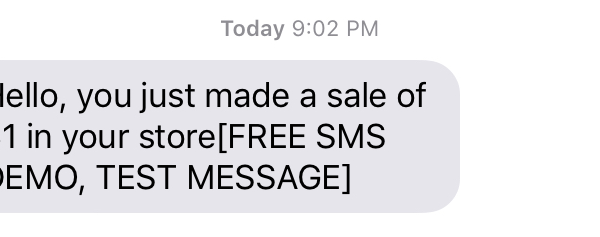 SMS Notification
We’ve seen how we can receive instant SMS notifications from Stripe using Nexmo. This is important, as we are always kept up to date with what’s happening in our application.
There are other different scenarios for which you would like to receive SMS notifications from Stripe and you can decide how you would handle these by looking at all the events Stripe provides and deciding whether to alert about those as well.
This tutorial can serve as a great starting guide for how to add more notifications if you wish to do so and you can find all the code featured above on GitHub.