Share:
Former Director of Developer Education at Vonage. With a background as a creative developer, product manager, and hack day organizer, Martyn has been working as a technology advocate since 2012 having previously spent time in broadcasting and major record companies. Educating and empowering developers all over the world.
Speech-To-Text with Nexmo and Microsoft Azure
Time to read: 6 minutes
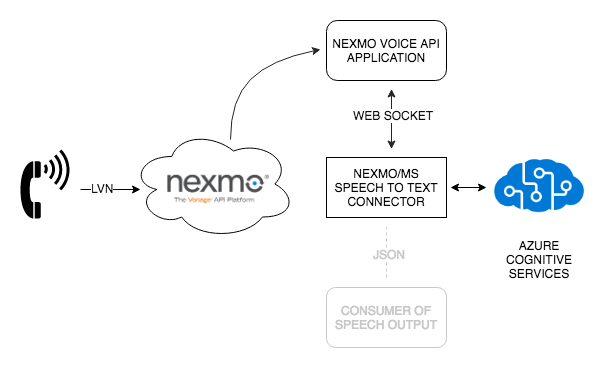
If you've ever found yourself in need of something to help you receive inbound phone calls and automatically transcribe them in real time you're in luck, because you can do that using our newly updated Nexmo-to-Azure Speech Service connector.
We've recently updated the code and deployment options for this connector, so it's now even easier to deploy, modify or extend if this matches a problem you've found yourself trying to solve.
If that has already sold you on it, and you're eager to get going, you can check out more details in our nexmo-community Github repository.
Microsoft's Azure platform provides a great set of Cognitive Services via API that allows you to work with Speech, Vision, Language and more. This app uses their Speech-To-Text API to recognise audio being streamed in real time via a websocket from a phone call facilitated by a Nexmo Call Control Object.
Put simply, you literally call the API and talk to it. Azure Speech performs recognition on the audio, and the phrases returned to the console.
This app falls under our Nexmo Extend programme, where we create useful and reusable applications to help you get up and running using Nexmo with other great service providers like Microsoft Azure, Google Cloud and Amazon Web Services.
We've made it easy for you to deploy, and immediately use your own instance of this application, in as little as one click.
You have the option of deploying the app to Heroku, or Azure via the buttons at the top of the Readme in the GitHub repository.
However, if you'd like to deploy it and have a safe (breakable!) way of working with the code directly from your browser, try remixing the app on Glitch instead and start extending the codebase straight away.
This app is also available to run or deploy with Docker. The quickest way to do this is to clone the repository, and from within the root directory use Docker Compose to set things in motion by running:
docker-compose upWhichever deployment option you choose, you'll end up with a new hostname where the app is running, so you'll need to link your Nexmo virtual number to it to complete the setup.
Add the event URL -
https://<your_new_hostname>/nccoAdd the answer URL -
https://<your_new_hostname>/eventClick
Create ApplicationClick
Numbersand link the recently created virtual number.Copy the virtual number for use in the next step.
You can install the CLI by following these instructions. Then create a new Nexmo application that also sets up your answer_urland event_url for the app running locally on your machine.
This will return an application ID. Make a note of it.
If you don't have a number already in place, you will need to rent one. You can achieve this using the CLI:
Finally, link your new number to the application you created by running:
Now, with your app running - wherever you deployed it, call the number you assigned to it and start speaking. After a brief pause, you will see whatever you say written out to the console, in real time.
The next logical step would be to start pushing the phrases returned by Azure Speech Service out to another service that will consume them and act on what is received.
You can do this by modifying the on_return_message function, which currently ends like this:
if data['RecognitionStatus'] == "Success":
    # Extend From here to handle your transcription messages
print(data["DisplayText"])Using the Requests library (which is already a dependency, so no need to install it again), you could POST the phrases as a JSON object to another API where they would be consumed, and subsequently acted upon. To add this functionality, change the ending if statement in on_return_message so something like this:
if data['RecognitionStatus'] == "Success":
    # Extend From here to handle your transcription messages
    print(data["DisplayText"])

    url = "http://<another_api>/<endpoint>"
    headers = {'Content-Type': 'application/json'}

    resp = requests.post(url, headers=headers, data=json.dumps({'phrase': data["DisplayText"]}))

    if resp.status_code == 200:
        print(resp.content)
    else:
        print(resp.status_code)
        print(resp.content)
Each time a new phrase is returned by the Azure Speech Service, a {"phrase":"Words returned by the app."} object will be sent.
What you do with it next is up to you!
If you do extend this application, or you have questions about how it works then please head over to the Nexmo Community Slack channel where we'll be more than happy to help you out with any queries and listen to any suggestions.
Share:
Former Director of Developer Education at Vonage. With a background as a creative developer, product manager, and hack day organizer, Martyn has been working as a technology advocate since 2012 having previously spent time in broadcasting and major record companies. Educating and empowering developers all over the world.