Share:
Yonatan has been involved in some awesome projects in the academy and the industry - from C/C++ through Matlab to PHP and javascript. Former CTO at Webiks and Software Architect at WalkMe. Currently he is a software architect at Vonage and an egghead instructor.
Setting up CI/CD with Github Actions
Time to read: 7 minutes
Continuous integration and continuous deployment are must-haves for organizations that wish to scale and deliver high quality software at a high velocity. This article walks you through the process of using github actions to build CI/CD flows.
CI/CD is a process that connects development to deployment through an automated integration process. The idea is to allow developers to push code changes as the only step needed to deploy those changes.
The CI pipeline enables teamwork to progress smoothly by automating standards and ensuring software quality. Tools like linters and automated tests provide feedback upon which one can merge the changes to the main branch. These integrated changes eventually get shipped to the end users (production).
The CD pipeline receives the tested and approved code. It confirms that all needed artifacts are being deployed to the right place. Some examples: deploying a web application on a server, publishing a library to a package manager repository, or publishing a mobile app to the app store.
Automating these processes ensures two important things: the process happens fast, and the process is a lot less error-prone.
Want to learn how teams speed up their development, integration and deployment processes? Ready to build a new CI/CD pipeline? Let’s go!
Push a change to a feature branch.
Create a Pull Request for this change
The CI kicks in and runs the following:
Lint, Test, Build
Once the CI finishes, it marks the PR as valid and a Code Review process begins
When the PR is approved, the code is merged into master
After the merge, the CD process kicks in:
Lint, Test, Bump version, Deploy
We'll build a CI/CD for a simple application, which you can clone here.
Create a .github/workflows folder. We'll be adding our github actions within this folder. The actions are set in yaml files in a fairly straightforward structure that consists of three parts:
name: the name of the workflow, in our case Test and Build
on: the trigger that starts the workflow when conditions are satisfied. In our case, we want the workflow to run when a pull request is created and pushed. We'll see examples of other triggers later in the tutorial.
jobs: the actual commands that run in the flow. These can be multiple jobs that run in parallel or jobs that are dependent on one another. In this example there is one job called build-testthat runs only on ubuntu-latest OS.
name: Test and Build
on:
 pull_request:
   branches:
     - main
jobs:
 build-test:
   runs-on: ubuntu-latest
   steps:
     - name: Checkout
       uses: actions/checkout@v2
       with:
         fetch-depth: 0
     - name: Setup NodeJS 14
       uses: actions/setup-node@v1
       with:
         node-version: 14
     - name: Install yarn
       run: npm install -g yarn
     - name: Install dependencies
       run: yarn install
     - name: Test
run: yarn testThe first step checks out the repository, using a pre-made action actions/checkout@v2 from the actions marketplace. We pass the fetch-depth: 0 variable using the with property, which tells the checkout process will fetch the repository with its entire history. The following steps are for installations and running bash commands.
Trigger the flow with a Pull Request
Launch the machine
Install nodeJs on the machine
Checkout the repository
Install dependencies
Test, Lint, Build
Show the results in the PR page
If you haven't yet forked and cloned the repository, do that now and create a branch "add-ci".
Create a file
.github/workflows/ci.ymland copy the contents of this file to the new file.Commit the changes and push to the new branch. Open a pull request from the new branch to the main branch.
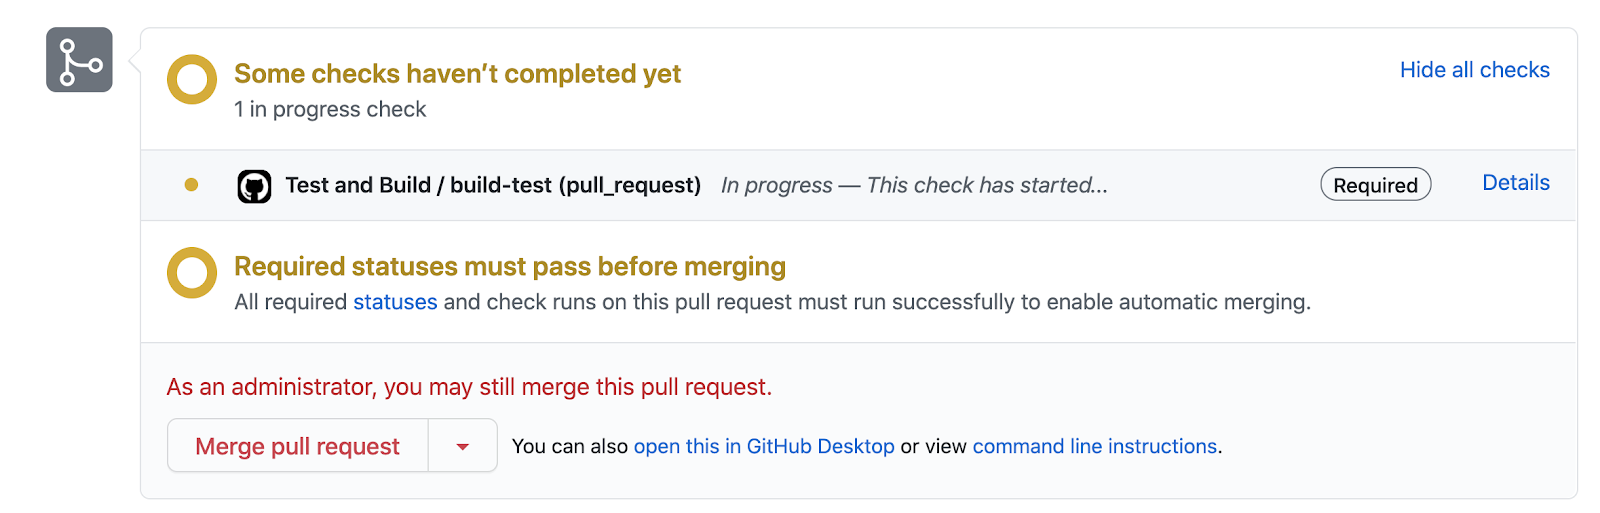
If you look at the pull request on github, you should see the tests running:
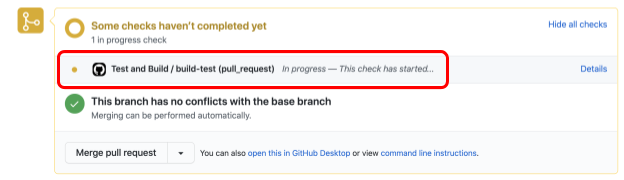
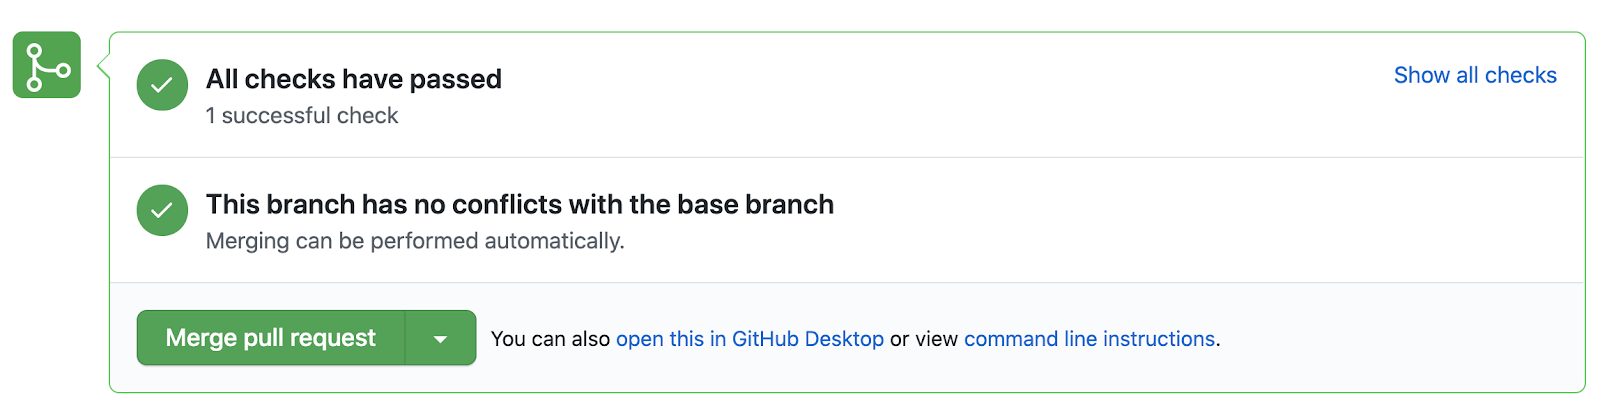
You'll notice that github already knows the name of the workflow, the name of the job, and the trigger. Once completed, it should look like this:
Can you spot a problem in the process?
The first issue is that the Merge pull request button was already available during the CI process, when we only want the merge to be available if all of the required workflows have completed.
We can fix this in the repo settings by going to: Settings>Branches>Add Rule
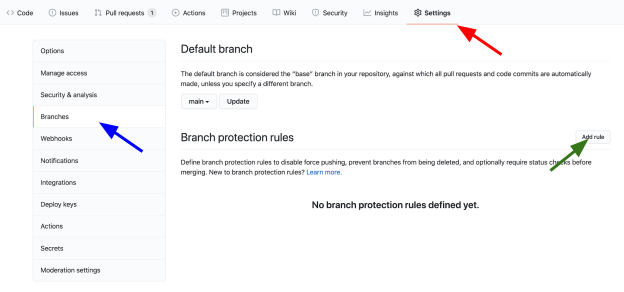
Here we'll select Require status checks to pass before merging and check everything underneath it. You'll see all workflows that are required to enable merge - in our case we only have build-test.
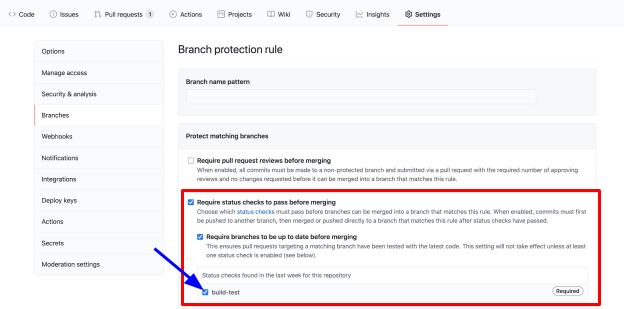
For Branch name pattern insert main and create the rule. And if you go back to the pull request page, you'll see that no pull requests can be merged before the tests pass, unless of course you have admin privileges.
Before moving on, we also need to decide how to handle passing Pull Requests. There are three main approaches:
Allow anyone to merge once tests have passed
Automatically merge once tests have passed
Require a code review in order to merge
We'll go with the first option, which is the most common, which we can change by editing the branch rule we just created. At the top of the list check Require pull request reviews before merge and hit save.
That it for continuous integration! Now all new Pull Requests will be tested and reviewed before they are merged into main! Next step is deployment.
Deployment can be anything from uploading static files to github, to publishing npm packages, to deploying a whole microservices mesh. Here's the process we'll follow for our application once code is merged to main repository:
Install dependencies
Test
Bump version
Build
Tag the release
Publish to npm
Deploy the demo app
Let's examine different parts of the yaml file that handles the actions:
These are the conditions in which our deployment code will run. It will trigger on a pull request that's been closed and merged.
name: Test, Build and Deploy

on:
 pull_request:
   types: [closed]

jobs:
 build-test-release:
   if: github.event.action == 'closed' && github.event.pull_request.merged == true
   runs-on: ubuntu-latest
In the checkout step, we'll add an extra line that we didn't have in the previous yaml file:
steps:
  - name: Checkout
    uses: actions/checkout@v2
    with:
      fetch-depth: 0
token: ${{ secrets.CI_REPOSITORY_ACCESS_TOKEN }}We need to explicitly set the token so that we can do things that the default token, secrets.GITHUB_TOKEN, doesn't have permissions for. In our case, we'll want to push a change to main without a code review, so we need a token with admin privileges. We set this token in Settings -> Secrets.
This step differs from project to project. The idea is to raise the version of the package you intend to publish to the packages repository. We'll do this by going over all of the libraries that have changed in this branch, and raise their NPM version:
- name: Raise version of affected libraries
  run: |
    LATEST_TAG=$(git tag -l "v*" --sort=-version:refname | head -n 1)
    LIBS=$(yarn nx affected:libs --base=$LATEST_TAG --head=HEAD --plain | awk 'NR > 2 && $1 != "Done" { print $1 }')
    for LIBRARY in $LIBS
    do
      cd ./libs/$LIBRARY
      npm version minor --no-git-tag-version --no-push
      echo "Bumping $LIBRARY"
      cd ..
      cd ..
    done
    npm version minor --no-git-tag-version --no-push
Note that we're using NX, a monorepo management framework, that helps make builds and development much faster. We use the affected feature, which tells us which libraries were "affected" by the PR.
The build process uses the affected feature as well. It builds the changed libraries that have changed from the main branch with production presets:
- name: Build components
  run: yarn nx affected:build --prod --with-deps --base=main
Release tagging is done with two steps:
The first, get-npm-version, uses an action from the marketplace that extracts the version of the main package. The second step commits the changes made in the Raise version step mentioned above, creates a tag with the version from the new package.json, and pushes the change.
Remember the CI_REPOSITORY_ACCESS_TOKEN secret? This is where it comes into play. Because we prevent merging to master without a pull request review, we need an admin token for this part, which will allow us to bypass the rule and push the changes automatically.
- name: get-npm-version
  id: package-version
  uses: martinbeentjes/npm-get-version-action@master

- name: Tag the release
  run: |
    git fetch
    git config user.email "unicorn.ci@yonatankra.com"
    git config user.name "Unicorn CI"
    git add --all
    git commit -m "update versions to ${{ steps.package-version.outputs.current-version }}"
    git push

- name: Tag release
  run: |
    git tag -a v${{ steps.package-version.outputs.current-version }} -m "tag release v${{ steps.package-version.outputs.current-version }}"
    git push --follow-tags
Lastly, we build our app and deploy it:
- name: Build Demo
  run: yarn build:deploy

- name: Deploy 🚀
  uses: JamesIves/github-pages-deploy-action@3.7.1
  with:
    GITHUB_TOKEN: ${{ secrets.GITHUB_TOKEN }}
    BRANCH: gh-pages # The branch the action should deploy to.
    FOLDER: dist/apps/unicorn-hunt # The folder the action should deploy.
CLEAN: true # Automatically remove deleted files from the deploy branchYou can find the complete yaml code here
If you've followed along and created the CI/CD flow, you might notice that it's taking a while to run. An easy fix for that is to use the cache and save on dependency installation times, which we can also do with github actions.
Caching works by checking for a cache hit, and if found, skip the install-dependencies step. Here's what the code looks like:
- name: Install yarn
  run: npm install -g yarn

- name: Get yarn cache directory path
  id: yarn-cache-dir-path
  run: echo "::set-output name=dir::$(yarn config get cacheFolder)"

- name: Cache yarn dependencies
  uses: actions/cache@v2
  id: yarn-cache
  with:
    path: |
      ${{ steps.yarn-cache-dir-path.outputs.dir }}
      **\node_modules
    key: ${{ runner.os }}-yarn-${{ hashFiles('**/yarn.lock') }}
    restore-keys: |
      ${{ runner.os }}-yarn-

- name: Install dependencies
  if: steps.yarn-cache.outputs.cache-hit != 'true'
run: yarn installThe first step installs yarn globally. The second gets the yarn cache folder path. Then, the actual caching step uses the cache action and passes the paths to the cache (node_modules and the yarn cache folder) and gives it a cache key by hashing the yarn.lock file. This way, if we installed a new dependency or upgraded a dependency, it would cause a cache miss. The final step sets a condition on the install-dependencies step using the cache-hit variable set by the cache action.
So the CI/CD is running. It's using the cache. Earlier we mentioned we'd also like to publish our two libraries to the libs folder in npm. We can technically add another step to our CD process, but that might make it cumbersome and hard to maintain.
Instead, we split the process into separate workflows that are triggered by the CD main process. The CD would then raise a version, which would trigger the other processes, causing deployment and publish to NPM.
Besides better maintainability, this also allows for better error handling. Because assume the versioning succeeded, and publishing succeeded, but deployment failed? This allows us to just run the deployment again and debug until it succeeds.
The full code for the solution can be found here.
In this article we've built a CI/CD process using github actions.
We started by adding the CI process which runs the tests and tells our code reviewers that the Pull Request is ready for review. We also learned how to block the merge into a branch without passing tests and a review. We looked at a simplified CI code, but you can add more bash commands to the testing phase, or even add more steps like linting or prettier.
We then created a CD process that bumps versions and deploys the demo. We learned how we can cache the dependencies installation in order to save time, and how to modularize the CD process to gain more control and maintainability.
There is so much more that can be done with github actions. We hope this tutorial got you started with building a CI/CD process that is helpful and meaningful for your team.
Share:
Yonatan has been involved in some awesome projects in the academy and the industry - from C/C++ through Matlab to PHP and javascript. Former CTO at Webiks and Software Architect at WalkMe. Currently he is a software architect at Vonage and an egghead instructor.