Share:
Michael Crump works at Vonage on the Developer Experiences team and is a coder, YouTuber, and frequent speaker of various .NET and cloud/communication development topics. He’s passionate about helping developers understand the benefits of each in a no-nonsense way.
How to Send and Receive SMS Messages with Node.js
Time to read: 9 minutes
This article has been updated in June 2025.
The Vonage Messages API allows you to send and receive messages over SMS, MMS, Facebook Messenger, Viber, WhatsApp, and now even RCS! So you can communicate with your customers on whichever channel they love most.
In this article, we'll focus on how to send and receive SMS messages with Node.js and Express.
To begin, we'll perform the most straightforward implementation of the API and send an SMS message with Node.js and the Vonage Messages API.
Next, we'll build a Webhook that can receive SMS messages from your phone using Express and perform an action once the text message has been received.
Finally, we'll wrap up a couple of steps that you can take to extend the application.
You can refer to the documentation for more details.
Before you begin, make sure you have the following:
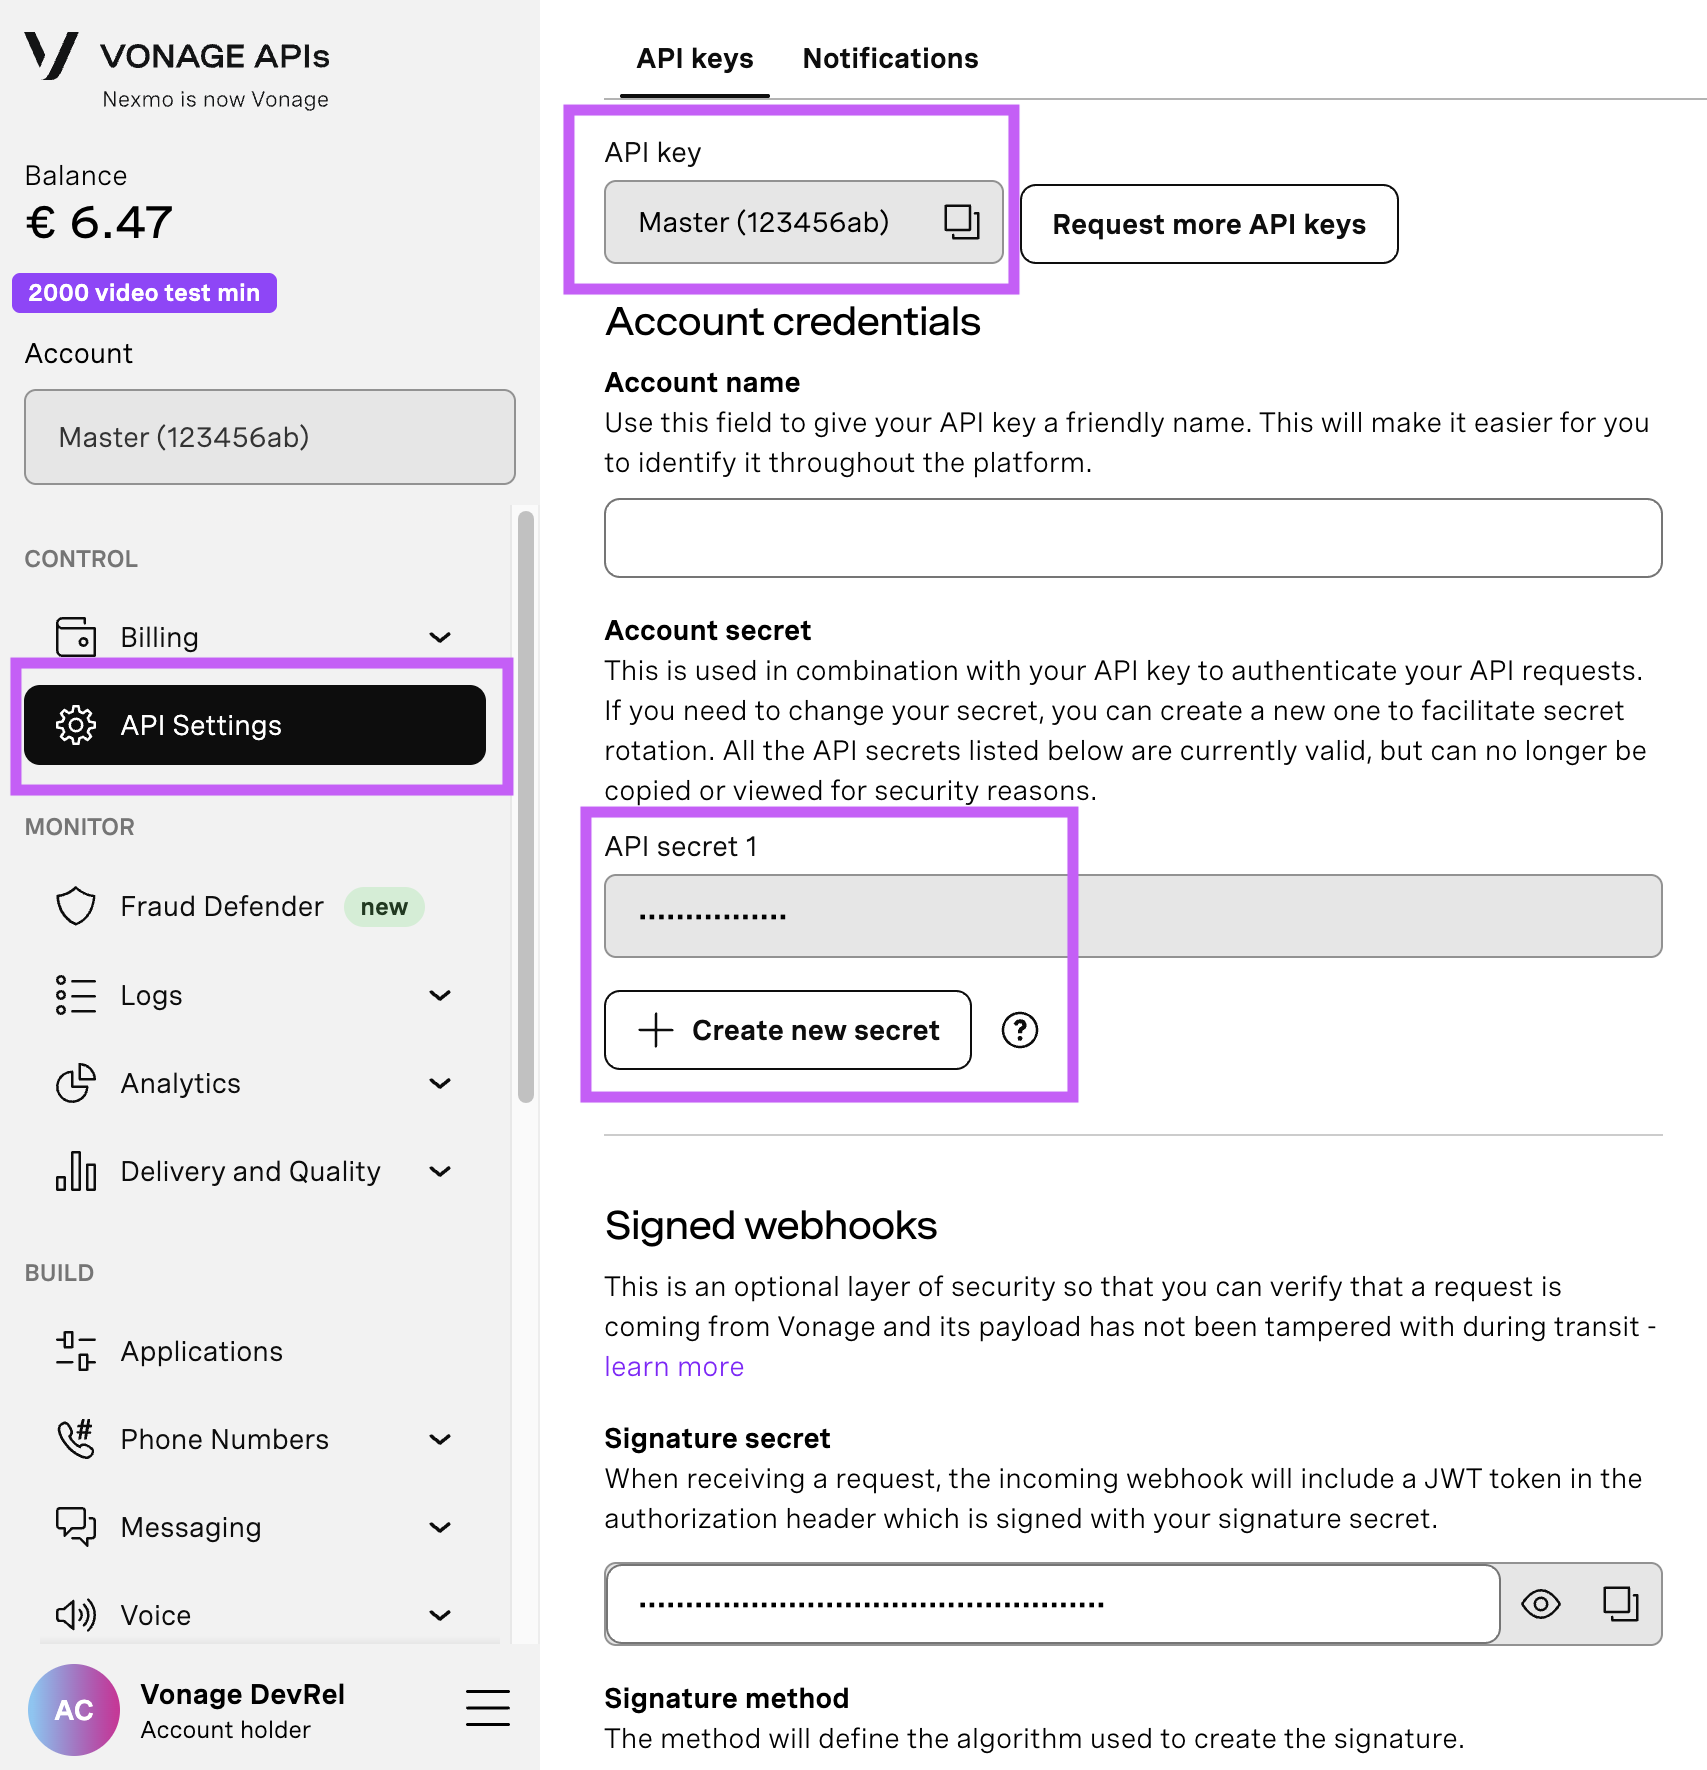
Open your API Settings Page to access your Vonage API Key and Secret, both of which are displayed as shown in the screenshot below. The API Key is located at the top of the page, and to access your API Secret, please refer to the “Account secret” subsection.
Note: In case you cannot remember your previously created API Secret, click on “+ Create new secret” and save it securely.
Node.js installed - Node.js is an open-source, cross-platform JavaScript runtime environment.
ngrok - A free account is required. This tool enables developers to expose a local development server to the Internet.
Vonage CLI - Once Node.js is installed, you can use
npm install -g @vonage/clito install it. This tool allows you to create and manage your Vonage applications.
For the first part of this tutorial, we’ll cover how to send text messages with Node.js. We’ll be using the Vonage Messages API to work with Node.js and handle SMS messages. To send an SMS with Node.js and the Vonage Messages API, follow these steps:
Install the Vonage Node.js SDK
Run ngrok
Create an SMS-Enabled Application
Send the SMS Message
With the Messages API, it’s easy to send an SMS with Node.js. To use it, we'll need to install the Vonage Node.js SDK.
npm install @vonage/server-sdkWhile Vonage has two different APIs capable of sending and receiving SMS, you can only use one at a time because it will change the format of the webhooks you receive.
Ensure that the Messages API is set as the default under API keys, then SMS settings of your account.
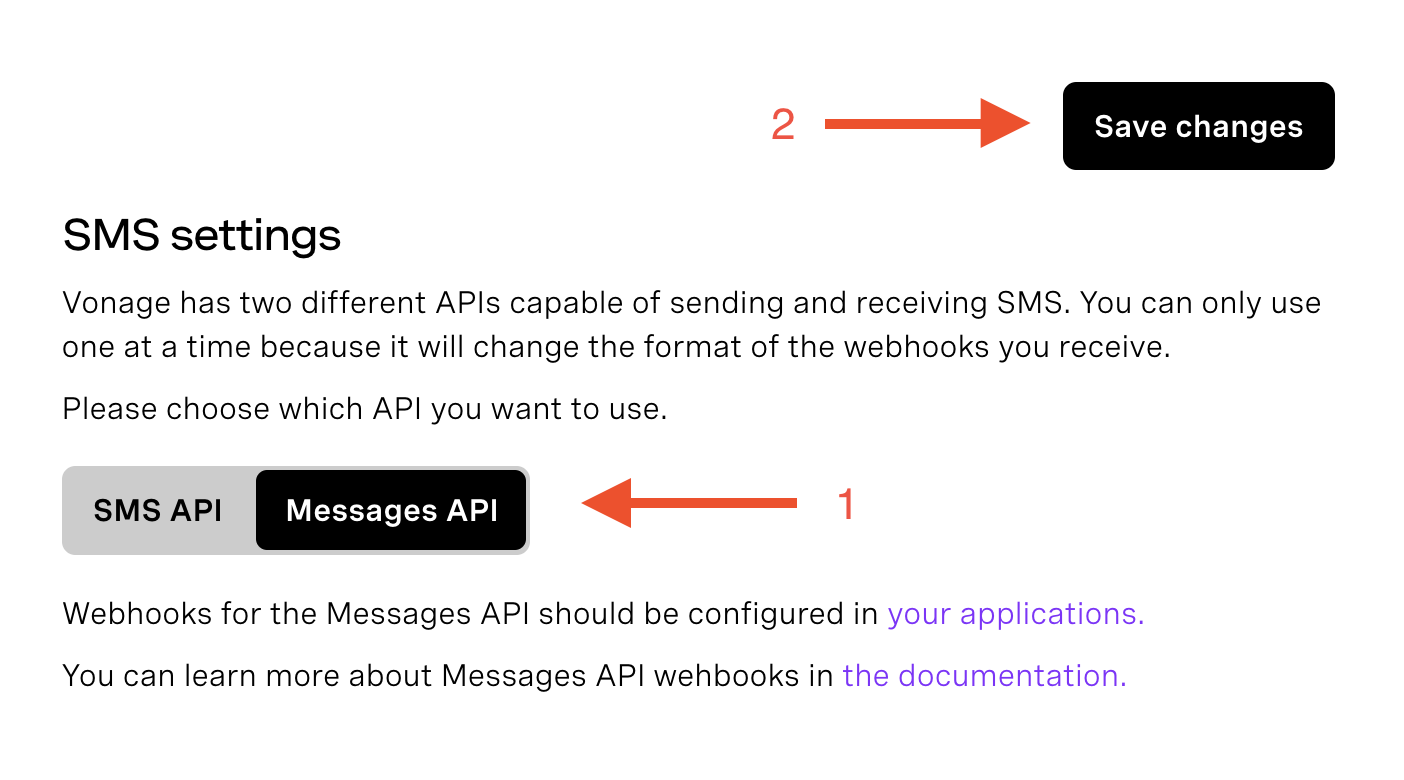 Set Messages API as the default API for sending SMS messages Toggle the setting to Messages API, and then press Save changes.
Once the Messages API is installed, the next step is to run ngrok.
ngrok is a cross-platform application that enables developers to expose a local development server to the Internet with minimal effort. We'll be using it to expose our service to the Internet. If you haven't used ngrok before, there is a blog post that explains it in more detail. Once you have ngrok set up and are logged in (again, the free account is acceptable), run the following command:
ngrok http 3000After ngrok runs, it will give you a Forwarding URL that we'll use as the base for our Webhooks later in the article.
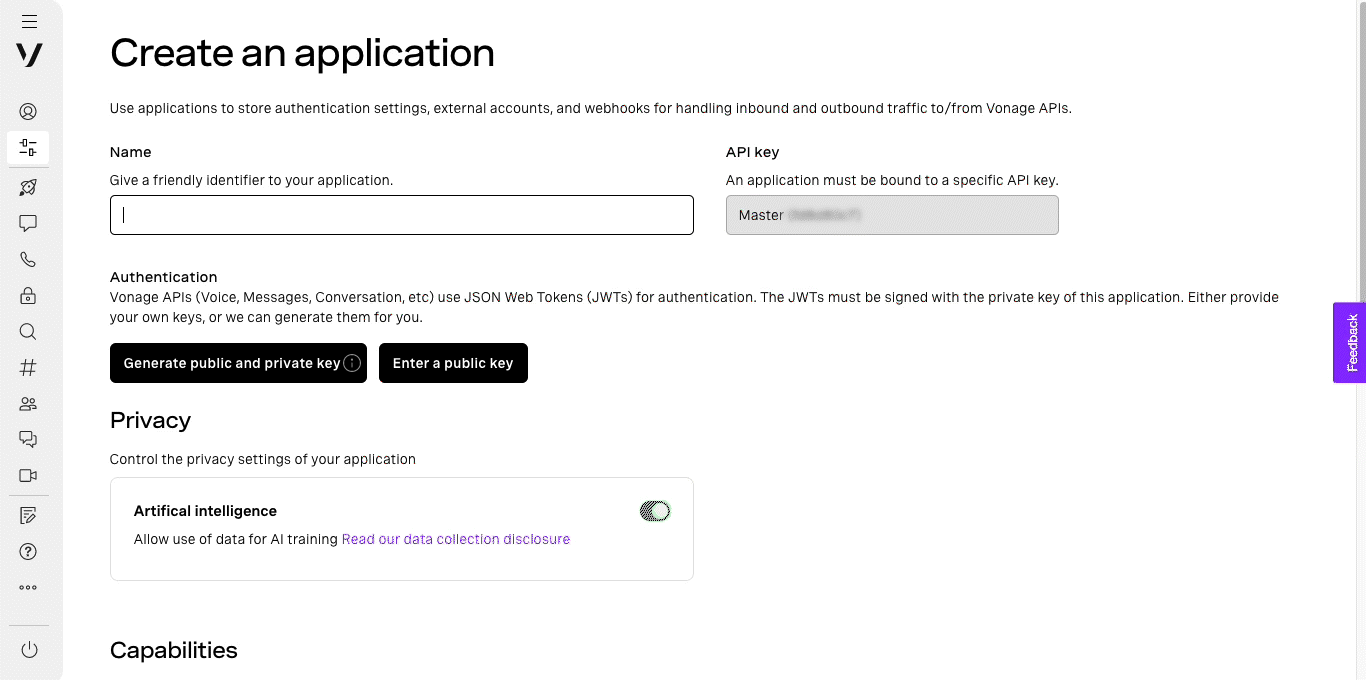
To interact with the Messages API, we'll need to create a Vonage API application to authenticate our requests.
Think of applications more like containers and metadata to group all your data on the Vonage platform. We'll create one using the Vonage API Dashboard.
Provide a name (such as "Send and Receive SMS Messages") and click on Generate public and private key. You'll be prompted to save a keyfile to disk—the private key. It's usually a good call to keep it in your project folder, as you'll need it later. Applications work on a public/private key system, so when you create an application, a public key is generated and kept with Vonage, and a private key is generated, not kept with Vonage, and returned to you via the creation of the application. We'll use the private key to authenticate our library calls later on.
Next, you need to enable the Messages capability and provide an Inbound URL and a Status URL.
Use the ngrok URL you got in the previous step and fill in each field, appending /webhooks/inbound and /webhooks/status, for the Inbound URL and Status URL.
When a message reaches the Messages API, the data about it is sent to the Inbound URL. When you send a message using the API, the data about the message status gets sent to the Status URL.
Finally, link one or more of your virtual numbers to this application. Any messages received on these numbers will be passed along to your Inbound URL.
 Create Messages enabled Vonage Application
Finally, we’ll create the code in Node.js to send SMS messages.
Create a new folder where you'd like to store the source code for the application that we are creating. Once complete, type npm init to initialize a new Node.js application. Finally, create an index.js file and initialize the Vonage node library installed earlier.
const { Vonage } = require('@vonage/server-sdk');

const vonage = new Vonage({
  applicationId: VONAGE_APPLICATION_ID,
  privateKey: VONAGE_APPLICATION_PRIVATE_KEY_PATH
});As good practice, you should use environment variables when including the following values in your code.
Replace the VONAGE_APPLICATION_ID with the Application ID provided for the Vonage application you created. Replace the VONAGE_APPLICATION_PRIVATE_KEY_PATH with the path to the private key that was automatically downloaded for you. Note: I copied my private.key file to the root of my application and can access it by specifying that the privateKey is equal to './private.key'
To send an SMS message with the Messages API, we'll use the vonage.messages.send method of the Vonage Node.js library. This method accepts objects as parameters, with information about the recipient, sender, and content. They vary for the different channels, so you'll need to check the API documentation for the other channels mentioned.
For SMS, we'll need to specify a recipient and sender. Finally, the content object accepts a type of text and a text message. The callback returns an error and response object, and we'll log messages about the success or failure of the operation.
const text = "👋Hello from Vonage";

vonage.messages
  .send({
    text: text,
    message_type: "text",
    to: TO_NUMBER,
    from: FROM_NUMBER,
    channel: "sms",
  })
  .then((resp) => console.log(resp.message_uuid))
.catch((err) => console.error(err));Replace TO_NUMBER with the destination phone number as a string and add your assigned phone number to the FROM_NUMBER field, then run the code with:
node index.jsThat's it; you've just sent an SMS using Node.js and the Vonage Messages API!
You might notice that the Messages API is a bit more verbose, yet it still needs just one method to verify if the incoming message came from Vonage. Include the following:
const verifyJWT = (req) => {
// Verify if the incoming message came from Vonage
const jwtToken = req.headers.authorization.split(" ")[1];
if(!verifySignature(jwtToken, process.env.VONAGE_API_SIGNATURE_SECRET)) {
console.error("Unauthorized request");
throw new Error('Not a messages API request');
}

console.log('JWT verified');
}
When a Vonage number receives an SMS message, Vonage will pass that message along to a predetermined Webhook. You've already set up the webhook URL when you created the Messages-enabled Vonage application: YOUR_NGROK_URL/webhooks/inbound
To receive SMS messages using Node.js, follow the steps below:
Create a Web Server
Create a Webhook for the Inbound URL
Send and Receive a Test Message
We'll create our web server using Express because it's one of the most popular and easy-to-use Node.js frameworks for this purpose. We'll also be looking at the request bodies for the inbound URL, so we'll need to install express from npm.
npm install express --saveLet's create a new file for this and call it server.js. This can live in the same folder that we created earlier.
We'll create a basic express application that uses the JSON parser from express and sets the urlencoded option to true. Let's fill out the server.js file we created. We'll use port 3000 for the server to listen to, and we already have ngrok running on port 3000.
const express = require("express");

const { json, urlencoded } = express;

const app = express();

app.use(json());

app.use(
  urlencoded({
    extended: true,
  })
);

app.listen(3000, () => {
  console.log("Server listening at http://localhost:3000");
});
We will create a POST request handler for /webhooks/inbound for the inbound URL, and we'll log the request body to the console. Because Vonage has a retry mechanism, it will keep resending the message if the URL doesn't respond with 200 OK, so we'll send back a 200 status.
app.post("/webhooks/inbound", (req, res) => {
  console.log(req.body);

  res.status(200).end();
});You can run the code with the following:
node server.js
Now send an SMS message from your phone to your Vonage number. Check your terminal—you should see something like this if everything is working:
And just like that, you’ve sent your first SMS! Now that you have learned how to send and receive SMS messages with the Vonage Messages API and Node.js, you could extend this project to reply to incoming SMS messages or include more complex, interactive elements for your current or future SMS needs.
Have a question or want to share what you're building?
Subscribe to the Developer Newsletter
Follow us on X (formerly Twitter) for updates
Watch tutorials on our YouTube channel
Connect with us on the Vonage Developer page on LinkedIn
Stay connected and keep up with the latest developer news, tips, and events.
Thanks again for reading, and I will catch you on the next one!
Share:
Michael Crump works at Vonage on the Developer Experiences team and is a coder, YouTuber, and frequent speaker of various .NET and cloud/communication development topics. He’s passionate about helping developers understand the benefits of each in a no-nonsense way.