
Share:
Benjamin Aronov is a developer advocate at Vonage. He is a proven community builder with a background in Ruby on Rails. Benjamin enjoys the beaches of Tel Aviv which he calls home. His Tel Aviv base allows him to meet and learn from some of the world's best startup founders. Outside of tech, Benjamin loves traveling the world in search of the perfect pain au chocolat.
Restaurant Is Now Delivering: a Facebook Bot in Node.js
Time to read: 14 minutes
Often when I'm coding, I get hungry. And everyone knows the best developers are lazy, so instead of shopping and cooking and cleaning, I usually use a food delivery app and simply order a tasty meal. The problem is that too often my favorite restaurants are offline. Sometimes they are closed for business; other times they are too busy and stop accepting online orders. So I'm forced to wait and remember to check if they're back online, and then actually open the app and look to see if they're back online. And sometimes check again, and again, and again. It's truly a grave injustice 😆.
There must be a better, more innovative way! Thankfully I recently discovered my favorite food delivery app, Wolt, has an API that lets me know if a restaurant is online. So using the Vonage Messages API, I created a Facebook Messenger Bot that will alert me when my favorite restaurant is back online!
(This example is built around a use case of food delivery, but the same code can be repurposed to create a Facebook bot that will alert users for any boolean case change.)
This app requires the following:
Before I get started with any coding task, I like to think out the logic. Let's breakdown the steps needed to build this app:
Setup an Express Server
Connect to Vonage Messages API Sandbox
Call the Wolt API for a requested restaurant
Check if the received restaurant is online
Send a message to the user based on the restaurant status
If the restaurant is offline, add to a list of offline restaurants
Continuously check the list of offline restaurants for a status change
If a restaurant goes online, send a user message and remove it from the list of offline restaurants
Let's begin will by creating our project:
Then move inside the project directory:
Initialize the node project:
Install our required Node packages:
And finally, create the files where our code will live:
You'll notice that we are using the Vonage Node Server SDK to access the Messages API. Because the Messages API is currently in Beta, we require the Beta version of our SDK.
To set up our server, we're going to need some information from the Vonage Developer Dashboard. First, we'll create a new Vonage Application. Give it a nice name like isItDelivering. And then click "Generate public and private key".
 Generate Public/Private Key
This will automatically generate a key for authentication, which we will use later. Move the generated key into the root of your local project.
At this point, your project should contain your index file, node modules, package.json, and your ENV file. If you run the command ls, your project should look like this:
 Project Should Include index.js, node_modules, pack.json, private.key
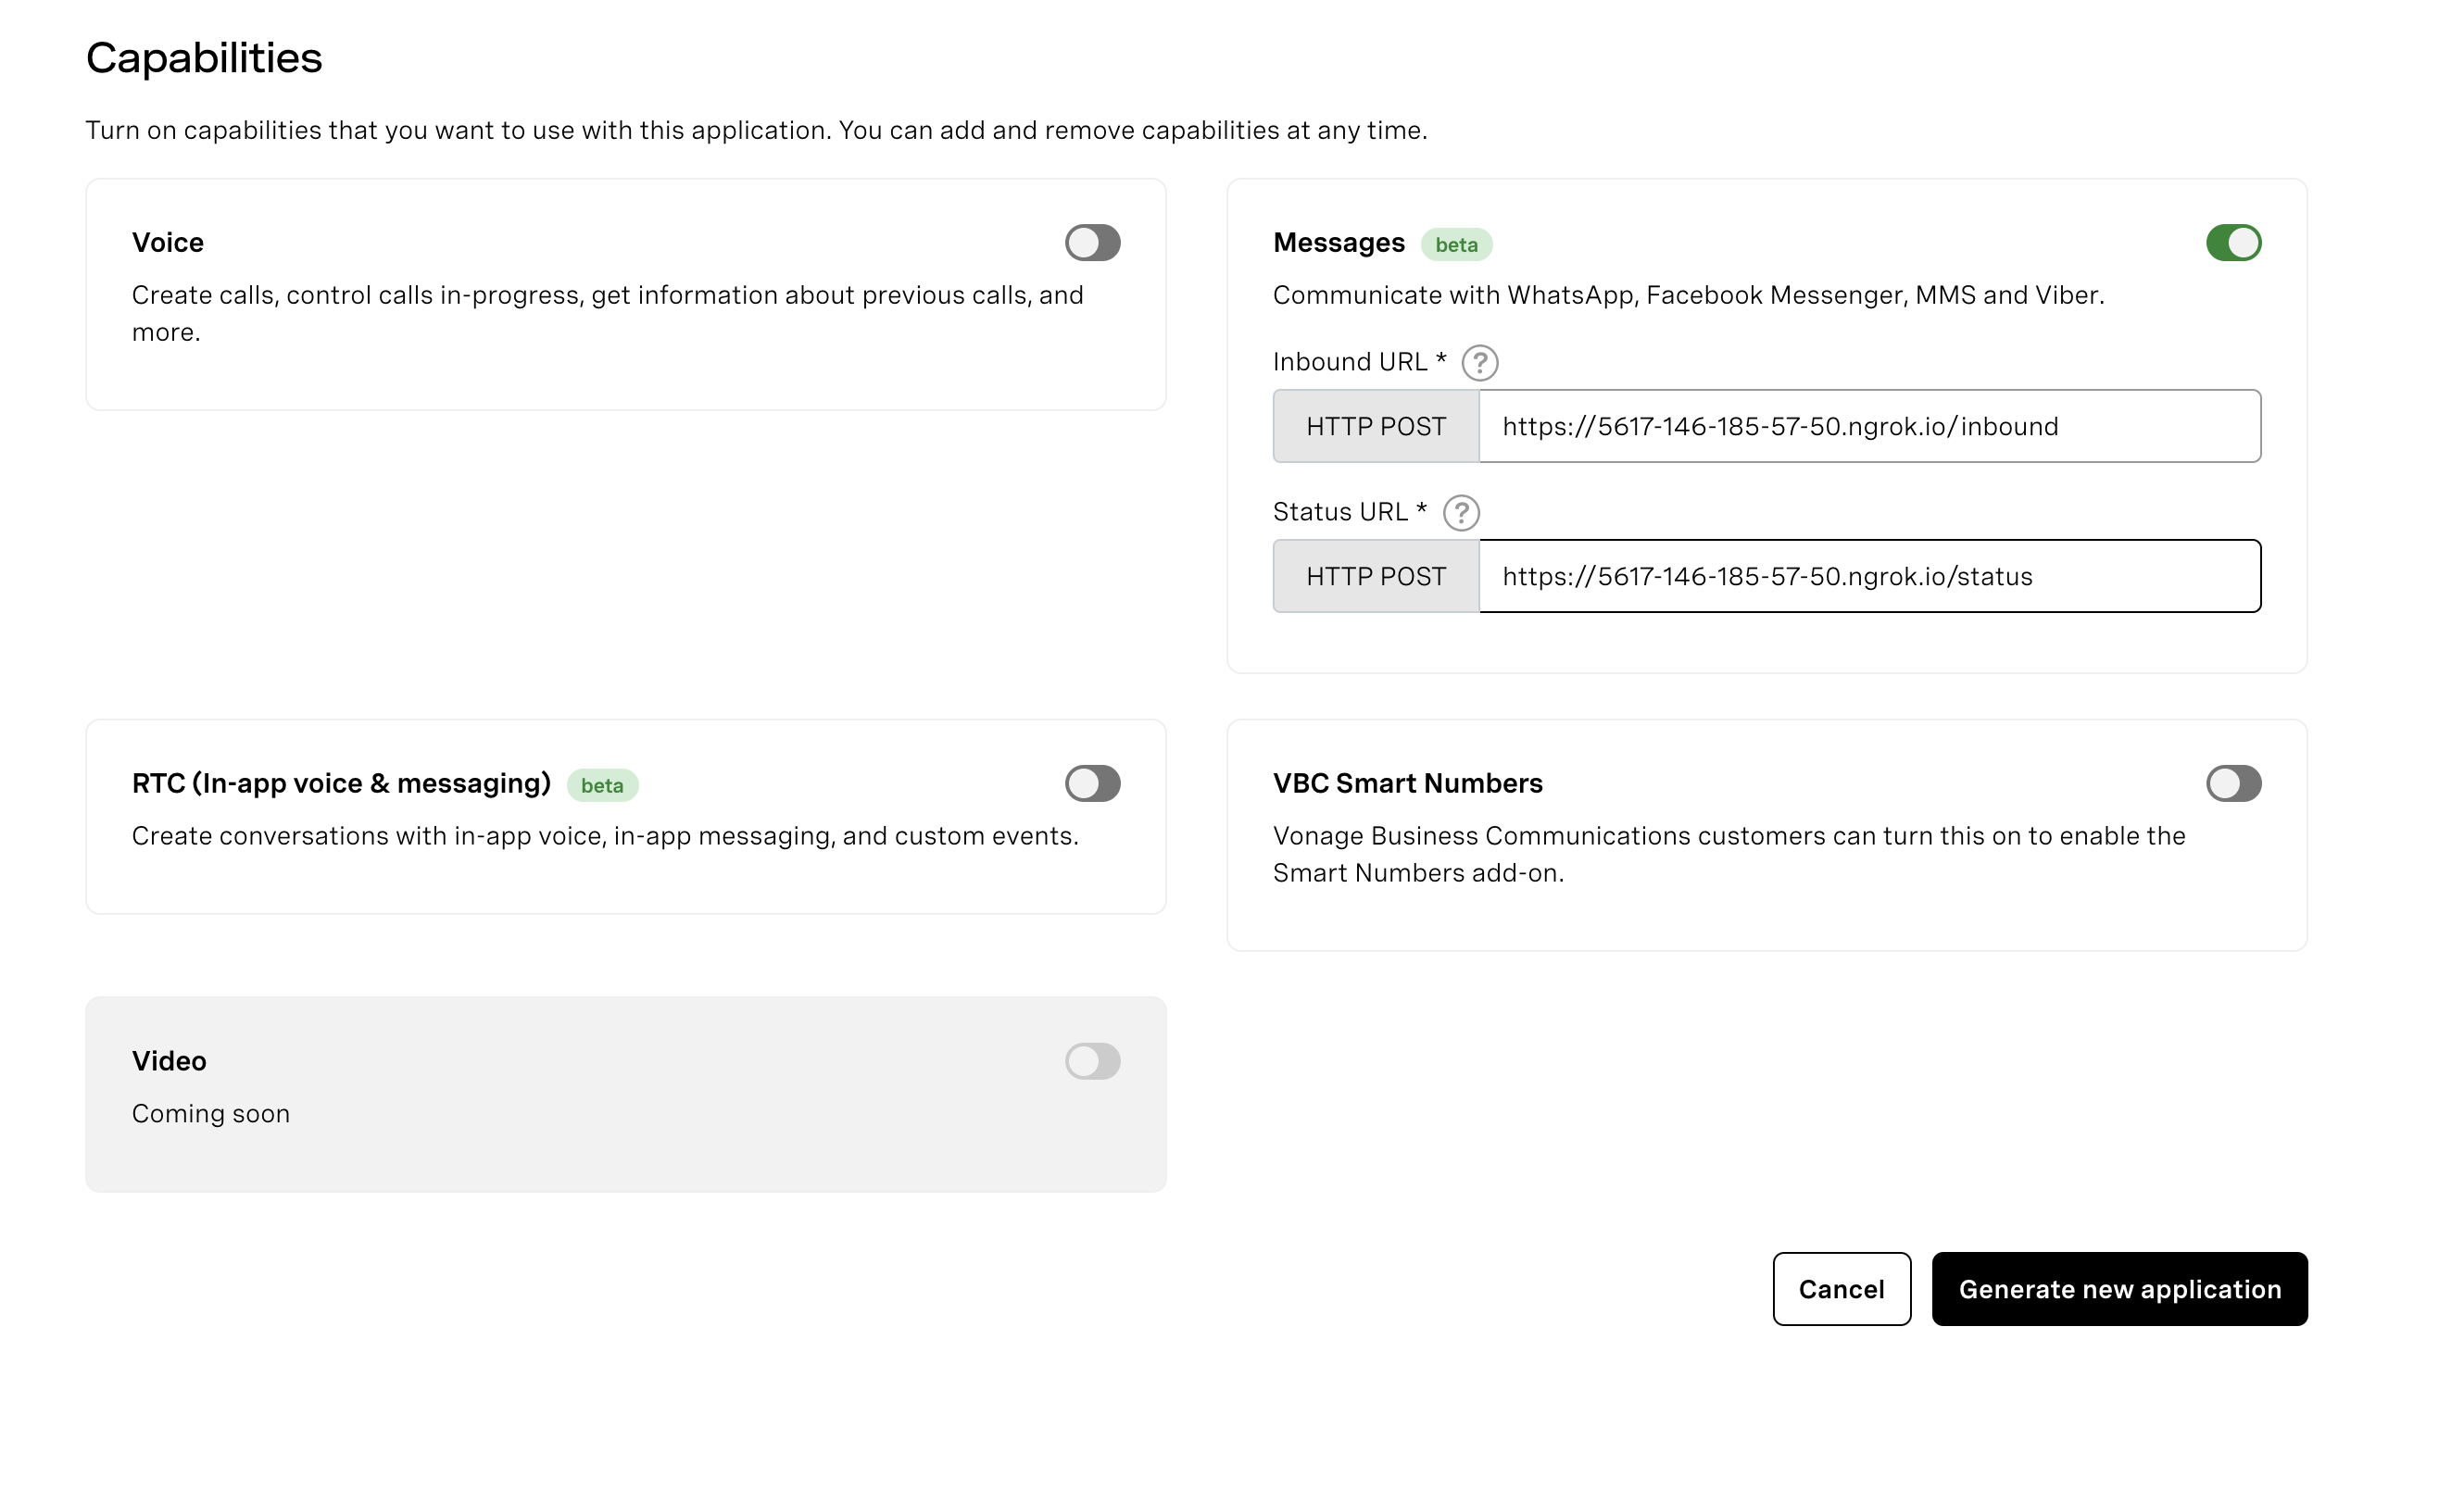
As you can see, our Vonage Application allows us to turn on/off various capabilities through the different Vonage APIs. We'll want to switch on the Messages capabilities. We'll now be asked for two URLs corresponding to webhooks that the Messages API will use to interact with our bot application.
There are several ways to make our local development server externally accessible, but one of the simplest ways is with ngrok. You can read this article for a more detailed explanation of how ngrok works.
For our purposes, we just need to get it running and copy the URL that it provides us.
After having ngrok installed on your machine, we'll need to start it. In order to start ngrok, open up a new terminal window and execute the following from the command line:
$ ngrok http 3000You will now see a ngrok logging interface in your terminal window. Near the top of the interface is a line that begins with Forwarding and contains two URLs. The first is the externally accessible ngrok URL, which ends with ngrok.io followed by http://localhost:3000, that being your local development server. Now, when you or Vonage contacts the ngrok.io URL, it will forward it to your local server.
Now in our Vonage Dashboard we will add our ngrok URLs and add the appropriate URL routes. Once your URLs look like this you can hit the "Generate new application" button.
 Webhook URLs
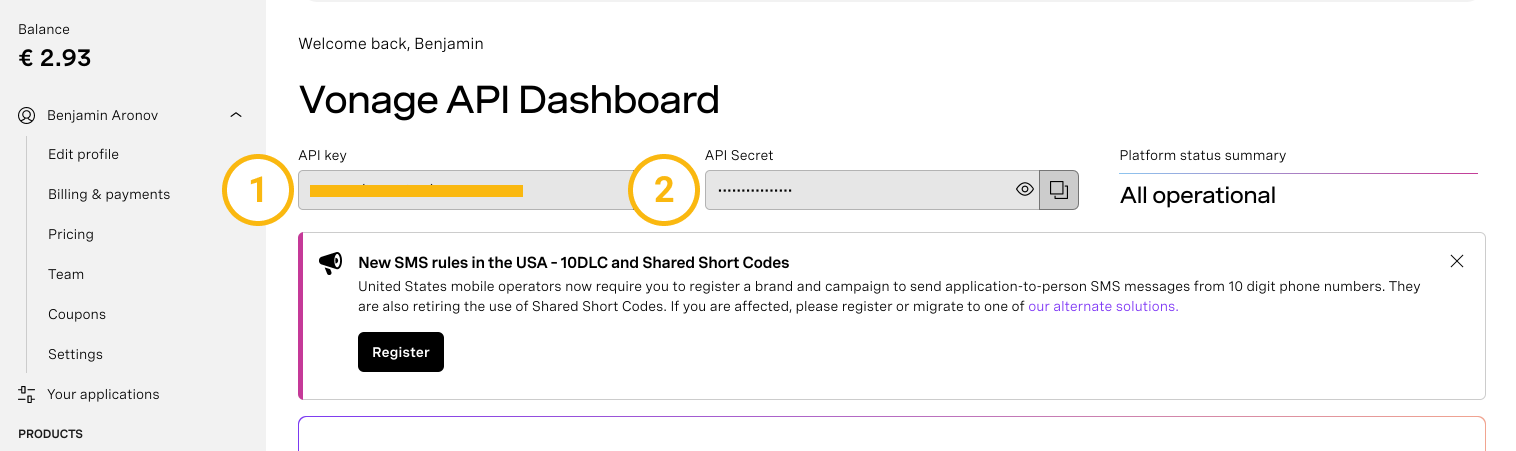
In your ENV file in your project, you will need to add 3 environment variables; API_KEY , API_SECRET, and APP_ID.
You can find your API_KEY and API_SECRET in the home page of your Vonage Dashboard:
 Dashboard ENV Variables
Your APP_ID is found on the configuration page for the application you generated. You will find your application under Your Applications in the left-hand navigation bar. Your APP_ID will look like this:
 APP_ID in Dashboard
Once you've copy/pasted those into your project, your ENV file should look something like this:
API_KEY="XXXXXXXXX"
API_SECRET="XXXXXXXXX"
APP_ID="XXXXXXXXX"
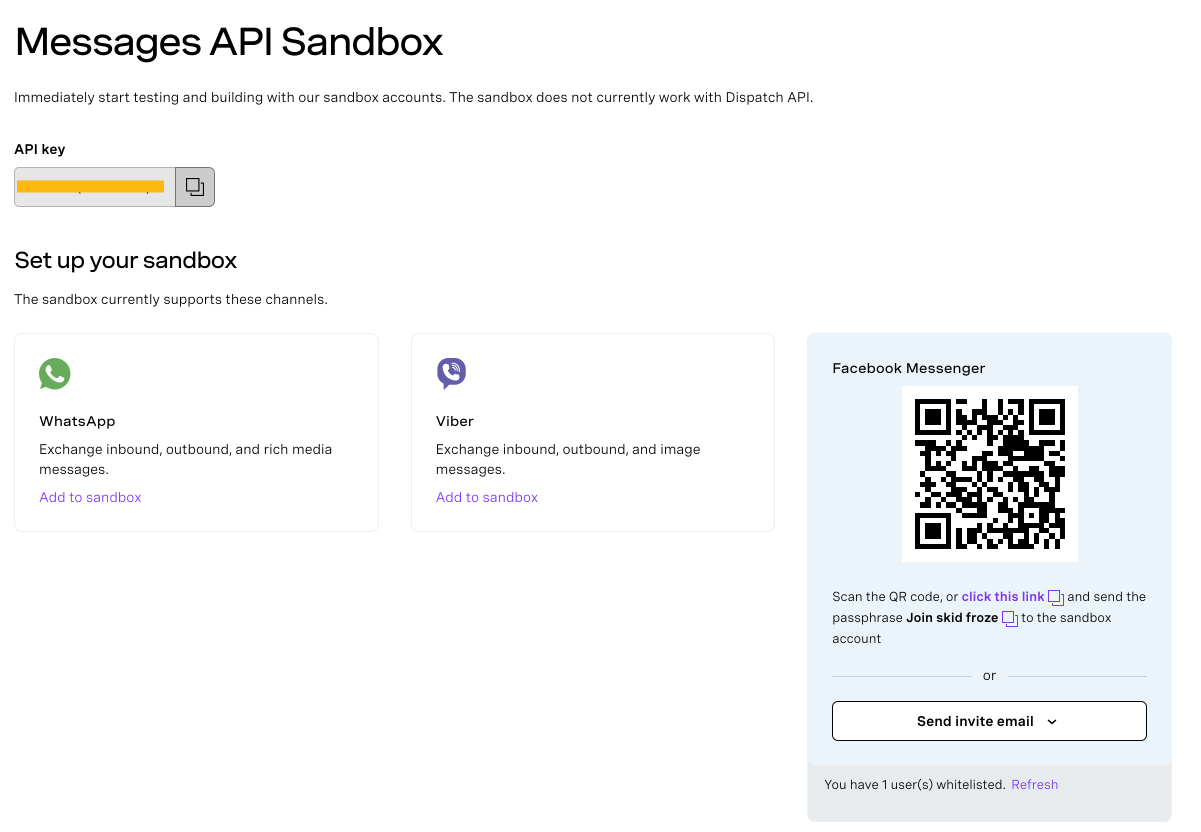
We’ll be making use of the Vonage Facebook Sandbox. You can find the Sandbox in your Vonage Dashboard under Messages and Dispatch tab on the left-hand side, or click here. Once you click Add to Sandbox for the Facebook Messenger tab, your screen should look like this:
 Set up your sandbox
The Messages API Sandbox allows for quick testing of applications without having to wait for Business Account Approval. The Sandbox uses a whitelist approach for allowing test users. You can invite additional users to the whitelist through the Send invite email button or by sending them the hyperlink click this link. The link will open a Facebook Messenger session. The user will then need to send the passphrase to be added to the whitelist. Full details can be found here.
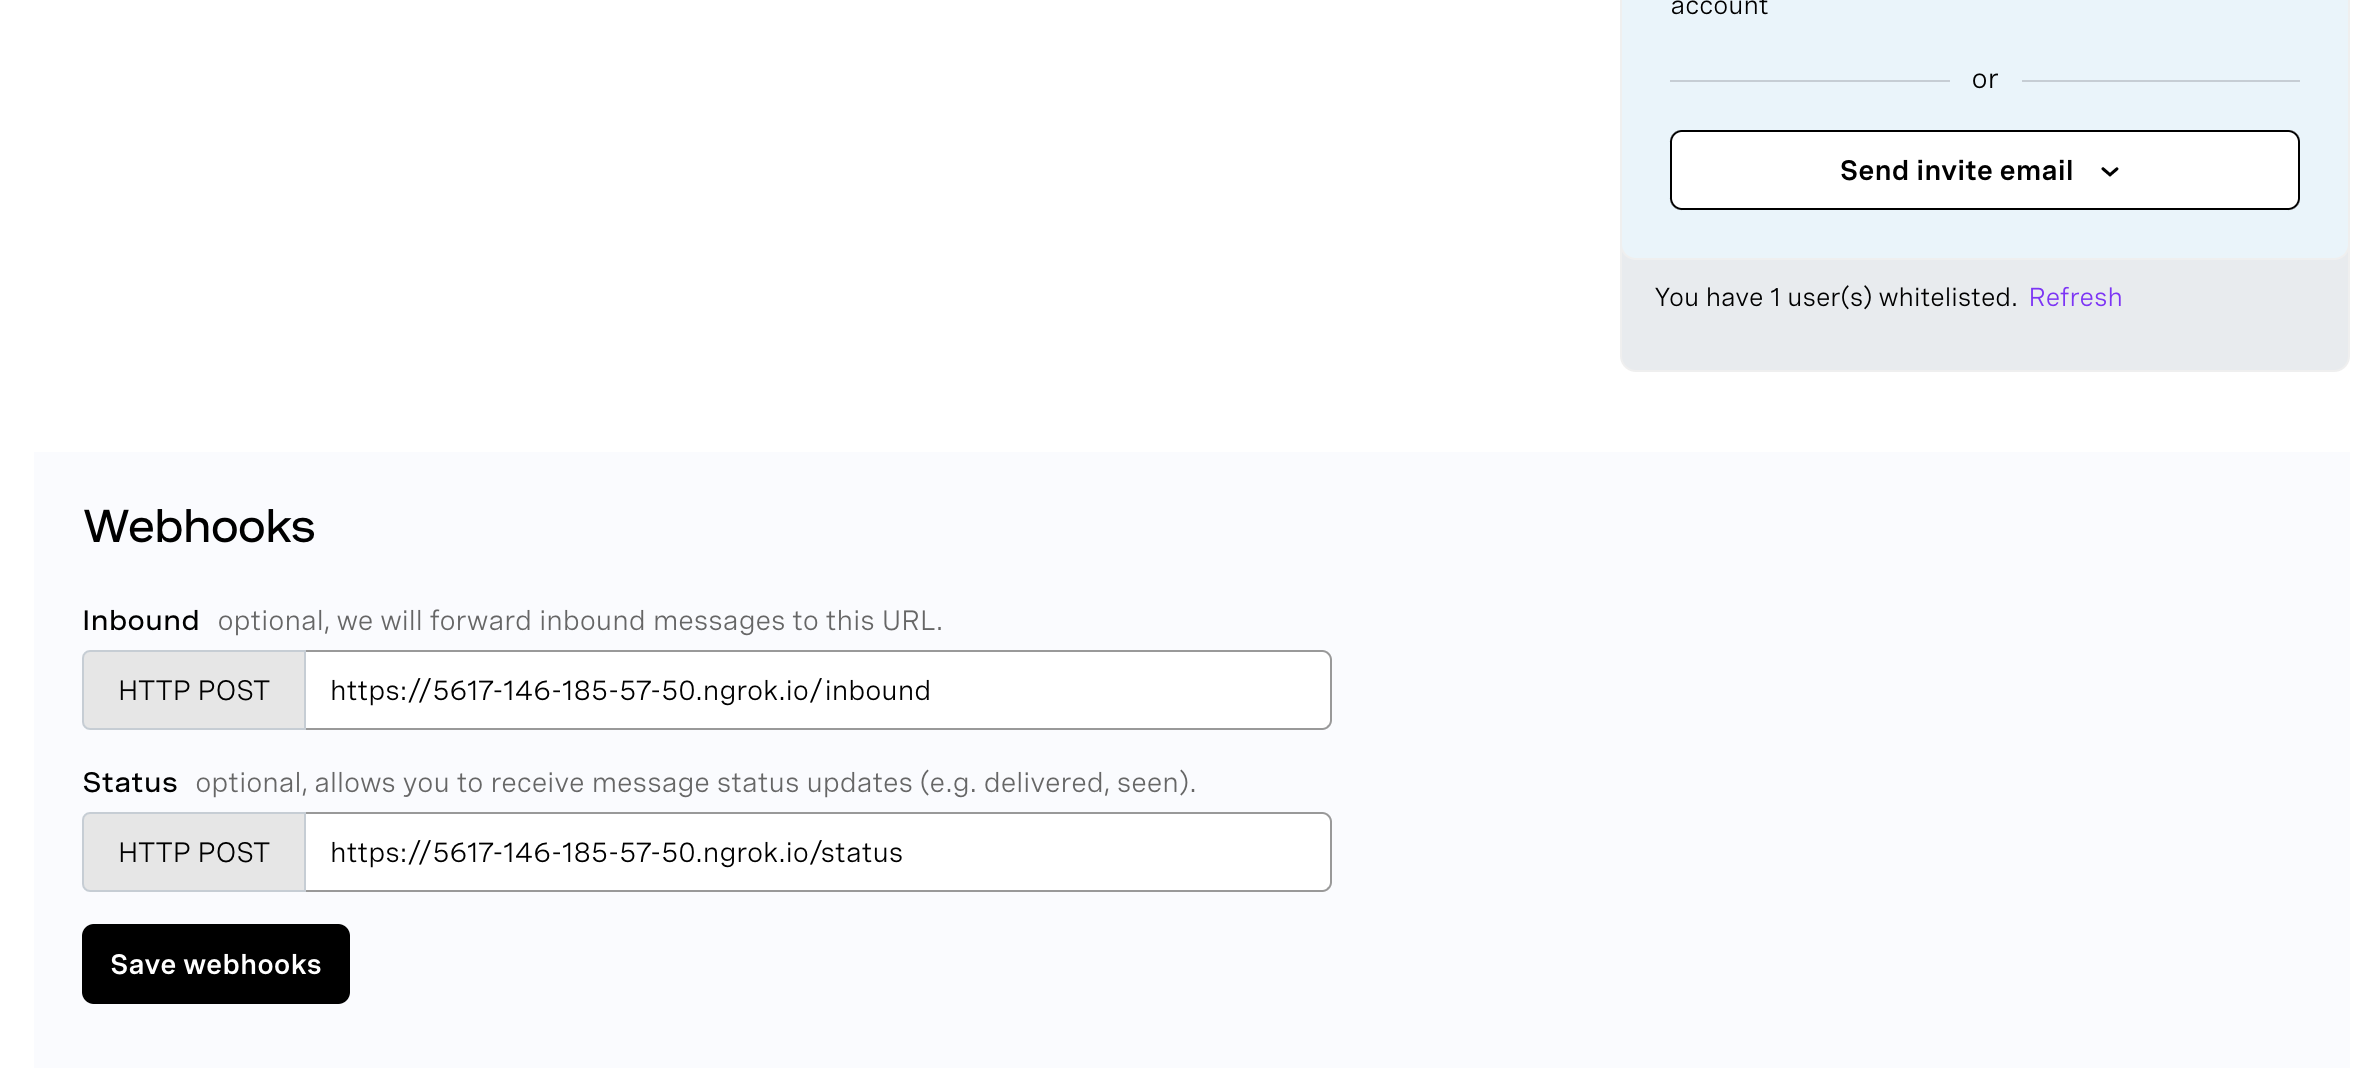
We will now need to tell our Sandbox to listen to requests from our Application and deliver them to Facebook Messenger. This is done through our ngrok URLs. We'll need to add the same ngrok URLs from before, like this:
 Messages API Sandbox ngrok URLS
Once we hit the Save webhooks button, we're now complete with our setup and we can start to code!
All subsequent code will go in our index.js file.
First, let's set up a boilerplate Express server in our index.js file that will import our required libraries and simply run on port 3000:
// access our environment variables
require('dotenv').config();
// access the Vonage SDK so we can use the Voange object and API
const Vonage = require('@vonage/server-sdk');
// access Got library which allows us to make HTTP request to WOLT API
const got = require('got');

// boilerplate Express setup
const express = require('express');
const app = express();
app.use(express.json());
app.use(express.urlencoded({ extended: false }));

app.listen(3000);
We need to initialize a Vonage instance, passing our ENV variables, and then tell it to use the Vonage Sandbox as the host used for making the HTTP requests. We can copy the following code int our
// initialize a new Vonage instance, with ENV variables/keys
const vonage = new Vonage(
  {
    apiKey: process.env.API_KEY,
    apiSecret: process.env.API_SECRET,
    applicationId: process.env.APP_ID,
    privateKey: './private.key'
  },
  {
    apiHost: 'https://messages-sandbox.nexmo.com/',
  }
);Next, we actually use that Vonage object to send out a POST request on our /inbound route and we need to provide to minimal parameters: type and text.
// Basic Sandbox Messaging
app.post('/inbound', (req, res) => {
  vonage.channel.send(
    req.body.from,
    req.body.to,
    {
      content: {
        type: 'text',
        text: 'You must be hungry! 🍕'
      },
    },
    (err, data) => {
      if(err){
        console.log(err);
      } else{
          console.log(data.message_uuid);
      }
    }
  );
  res.send('ok');
});

app.post('/status', (req, res) => {
  res.send('ok');
});
So now in a second terminal window, separate from our ngrok server, we need to fire up our Express Server:
$ node index.jsAnd we can interact with our Facebook Bot!
 Basic Facebook SandBox Message
Using the https://restaurant-api.wolt.com/v3/venues/slug/{restaurant} endpoint, we know that we can receive all kinds of information about the restaurant. The returned JSON looks like this:
 Wolt Returned JSON
We can see that inside index zero, there is a property called name of type array. At the zero index of name is a boolean called online, which gives the current delivery status of the restaurant. So we can create a function that takes the name of a restaurant and returns the restaurant object from Wolt:
// call Wolt API for restaurant info
const getRestaurant = async (reqRestaurant) => {
  const response = await got.get(`https://restaurant-api.wolt.com/v3/venues/slug/${reqRestaurant}`)
      .json();
  return response.results[0];
}
Using the property online inside the restaurant object, we want to create some logic that will determine what message we send to the user. We can write the following function:
const firstStatusCheck = (restaurant, recipient) => {
  if (restaurant.online) {
    sendFacebookMessage(`Hey, ${restaurant.name[0].value} is now accepting orders!!`, recipient);
  } else {
	  sendFacebookMessage(`Sorry, ${restaurant.name[0].value} is currently offline. I'll ping you when it's open again!`, recipient);
    }
}
The firstStatusCheck function has abstracted our Vonage code to send the Facebook Message into a function called sendFacebookMessage. This function now can send any message from our Sandbox account as long as we pass it two parameters text and recipient.
We can use a constant variable SENDER to pass through the sender id information of the Sandbox account. First, we'll declare it.
let SENDER;And then we assign it when we receive the req from the /inbound endpoint:
app.post('/inbound', async(req, res) => {
  SENDER = req.body.from;
Now the sendFacebookMessage should look like this:
const sendFacebookMessage = async (text, recipient) => {
  vonage.channel.send(
    SENDER,
    recipient,
    {
      content: {
        type: 'text',
        text: text,
      },
    },
    (err, data) => {
      if (err) {
        console.log(err);
      } else {
        console.log(data.message_uuid);
      }
     }
   );
 }
Combining our new functionality we can update our simple Sandbox Messaging to tell the user whether the requested restaurant is currently online or not.
// Enhanced Sandbox Messaging
app.post('/inbound', async(req, res) => {
	SENDER = req.body.from;
	const recipient = await req.body.to;
	const requestedRestaurant = await req.body.message.content.text.split('/').pop();
	const restaurant = await getRestaurant(requestedRestaurant);
	firstStatusCheck(restaurant, recipient);
	res.send('ok');
});
Now that we've created the logic based on the restaurant's status, we want to continue checking that status until the restaurant finally comes back online. So we need to build out the last three steps of our pseudocode:
If the restaurant is offline, add to a list of offline restaurants
Continuously check the list of offline restaurants for a status change
If a restaurant goes online, send the user a message and remove it from the list of offline restaurants
At this point we'll be using our LokiJS library. LokiJS is an in-memory database that will allow us to keep track of each restaurant that gets requested in a simple, runtime fashion. If you've used MongoDB, LokiJS will look very familiar.
First, we need to include Loki with our other dependencies:
const loki = require('lokijs');Then we'll need to instantiate our database:
let db = new loki("restaurants.db");
let restaurants = db.addCollection("restaurants");Each restaurant entry will contain 4 data points: name, online status, recipient, and slug. Name is the name of the restaurant. Online status is a boolean whether the restaurant is currently online. Recipient is the user information from the Messages API, which will allow us to track who needs to be notified. And finally, slug is the URL ending that the Wolt API uses to find a restaurant.
Now that we have a database, we can start adding our offline restaurants to it! We can use the following function to add restaurants to our offline list:
 const addRestaurantToDb = (restaurant, recipient) => {
  restaurants.insert({name: restaurant.name[0].value, online: restaurant.online, recipient: recipient, slug: restaurant.slug});
 }
We'll now need to update our firstStatusCheck to add restaurants to the offline list.
// Check initially whether restaurant is online or should it be added to list of offline restaurants to check
const firstStatusCheck = (restaurant, recipient) => {
  if (restaurant.online) {
    sendFacebookMessage(`Hey, ${restaurant.name[0].value} is now accepting orders!!`, recipient);
  } else {
      sendFacebookMessage(`Sorry, ${restaurant.name[0].value} is currently offline. I'll ping you when it's open again!`, recipient);
      addRestaurantToDb(restaurant, recipient);
    }
}
Now that we have a list of offline restaurants, we want to check if they go back online. Because we want to do this regularly and continuously, we'll use the built-in setInterval function:
setInterval(function(){offlineRestaurantLookup(req)} , INTERVAL);The INTERVAL constant tells setInterval how often it should run the offlineRestaurantLookup function. We define this at the top of the file next to SENDER. By default, let's check every 60 seconds:
const INTERVAL = 60000;The offlineRestaurantLookup will retrieve all restaurants in the offline database and then for each restaurant it will check that the restaurant is still offline.
const offlineRestaurantLookup = async () => {
  let offlineRestaurants = restaurants.data;
  offlineRestaurants.forEach(await checkIsStill0ffline);
}
The checkIsStill0ffline function in turn checks if a restaurant is now online. If the restaurant has gone online then it will message the correct user and then delete this restaurant from the list of offline restaurants.
const checkIsStill0ffline = async (restaurant) => {
  const checkedRestaurant = await getRestaurant(restaurant.slug);
  if (checkedRestaurant.online) {
    sendFacebookMessage(`Hey, ${restaurant.name} is now accepting orders!!`, restaurant.recipient);
    restaurants.chain().find({'name': restaurant.name}).remove();
  }
}
Now we can add the setInterval functionality below our Sandbox Messaging logic:
// Enhanced Sandbox Messaging
app.post('/inbound', async(req, res) => {
  SENDER = req.body.from;
  const recipient = await req.body.to;
  const requestedRestaurant = await req.body.message.content.text.split('/').pop();
  const restaurant = await getRestaurant(requestedRestaurant);
  firstStatusCheck(restaurant, recipient);
  res.send('ok');
});

app.post('/status', (req, res) => {
  res.send('ok');
});

setInterval(function(){offlineRestaurantLookup()} , INTERVAL);

app.listen(3000);
And now we can run the program, seeing that when a restaurant is offline we receive a message notifying so, and when restaurants go online we are updated to the new status. I suggest trying the app in the morning and seeing as restaurants suddenly open for lunch. It's amusing to get the push notifications from Facebook Messenger to arrive on your phone!
 Enhanced Facebook SandBox Message
In this tutorial, we used the Facebook Messenger functionality of the Messages API, but we could extend this application to provide omnichannel capabilities with WhatsApp and SMS. Imagine a very urgent use case (I have a particular bagel shop on Saturday mornings in mind) that you would want to be immediately notified about a status change; omnichannel alerts would be useful.
We could extend this code to make the alerts smarter based on delivery schedules, user proximity to restaurants, and more. We could also hold multiple jobs.
We could take the app out of the Sandbox and connect it to a business Facebook Account.
The final code for the tutorial can be found on GitHub. I would love to hear what you built using the Vonage Messages API! Please join the conversation on our Community Slack and share your story!
Share:
Benjamin Aronov is a developer advocate at Vonage. He is a proven community builder with a background in Ruby on Rails. Benjamin enjoys the beaches of Tel Aviv which he calls home. His Tel Aviv base allows him to meet and learn from some of the world's best startup founders. Outside of tech, Benjamin loves traveling the world in search of the perfect pain au chocolat.