Share:
Former technical writer at Vonage. Loves playing with and documenting APIs.
Receiving SMS Delivery Receipts with Java and Spark
You've learned how to send a text message from your Vonage virtual number using the SMS API. Everything looks good: your application is error-free and the API returns status: 0, so you're pretty confident that your message has been sent.
But, unless you have direct access to the device associated with that number, how can you be sure that it was delivered?
Well, the good news is that many of the networks that Vonage uses to carry your message will provide a delivery receipt. You can access that delivery receipt programmatically, and that's what we'll show you how to do in this post.
The bad news is that not all networks' delivery receipts are definite proof that your message was actually delivered, with operators in some countries being more reliable than others.
Some carriers will tell you that they received your message, but won't confirm if it arrived at the destination. Some will generate fake receipts. Others won't send any receipt at all.
So, before you rely on delivery receipts as being a source of truth, check out the Vonage Knowledge Base for country-specific information.
To request a delivery receipt you must create a publicly-accessible webhook and configure your Vonage account to use it. We will be using Java and the Spark web framework to create the webhook. You can find the code for this tutorial on GitHub.
The JDK or its open source equivalent OpenJDK. This tutorial was written using OpenJDK 11, but version 8 or above of either should be fine.
Gradle (version 3.4 or later) to build your project and manage its dependencies.
ngrok to make your webhook available over the public Internet.
Create a directory for your project called get-delivery-receipt, change into that directory and then use gradle to initialize the project:
Accept all the defaults, then open the generated project in your IDE.
Locate the build.gradle file and change the dependency repository from jcenter() to mavenCentral():
repositories {
    mavenCentral()
}Replace the dependencies section with the following:
dependencies {
    // Spark framework
    implementation 'com.sparkjava:spark-core:2.8.0'

    // Vonage client library
    implementation 'com.nexmo:client:4.4.0'

    // To display formatted JSON
    implementation 'com.cedarsoftware:json-io:4.10.1'
}
Gradle created the App class in the src/main/java/get/delivery/receipt folder.
Open App.java in your IDE. Remove the getGreeting() method that gradle created for you and add the necessary import statements for the spark and JsonWriter packages.
Then, call Spark's port method to indicate that your application is listening for requests on port 3000.
Your App.java should look like this:
package get.delivery.receipt;

import static spark.Spark.*;
import com.cedarsoftware.util.io.JsonWriter;

public class App {

    public static void main(String[] args) throws Exception {

        port(3000);

        // Your code goes here
    }
}
When Vonage receives a delivery receipt from a carrier, it checks your account configuration to see if you have provided the URL of a webhook endpoint. If so, Vonage makes a request to this endpoint with the delivery receipt information.
By default, this is a GET request, so we'll code that first. The endpoint we will expose is /webhooks/delivery-receipt.
Add the following to your main method:
get("/webhooks/delivery-receipt", (req, res) -> {
    System.out.println("DLR received via GET");
    for (String param : req.queryParams()) {
        System.out.printf("%s: %s\n", param, req.queryParams(param));
    }
    res.status(204);
    return "";
});
This code intercepts GET requests on your endpoint, strips out the delivery receipt information from the query string and writes it to stdout. It then returns HTTP status code 204 to tell Vonage's APIs that the request was successful, but not to expect any content in the response.
You can also configure your Vonage account so that Vonage supplies the delivery receipt by a POST request: either as a URL-encoded form or a JSON payload.
So that your application can accept either GET or POST requests, add the following code to App.java:
post("/webhooks/delivery-receipt", (req, res) -> {
    if (req.contentType().startsWith("application/x-www-form-urlencoded")) {
        System.out.println("DLR received via POST");
        for (String param : req.queryParams()) {
            System.out.printf("%s: %s\n", param, req.queryParams(param));
        }
    } else {
        System.out.println("DLR received via POST-JSON");
        String prettyJson = JsonWriter.formatJson(req.body());
        System.out.println(prettyJson);
    }
    res.status(204);
    return "";
});
That's all the code you need to capture delivery receipts regardless of the HTTP method Vonage uses to send them.
You must make your webhook accessible to Vonage's APIs. A great way to do this during development is to use ngrok. To learn more, read our blog post on ngrok.
Download and install ngrok, then execute the following command to expose your application on port 3000 to the public Internet:
Make a note of the public URLs that ngrok provides and leave it running for the duration of this tutorial (because it gives you a new random URL every time you run it, unless you sign up for a paid plan):
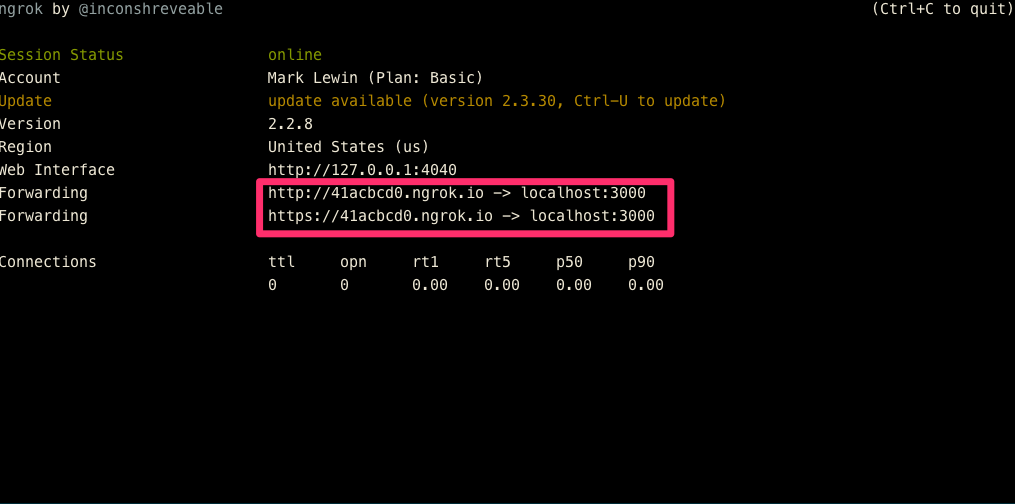 Terminal showing the ngrok URLs
Now that you have a URL for your webhook, you must tell Vonage to use it.
Log into the developer dashboard and under your account name in the left-hand navigation menu, select "Settings".
On the right-hand side of that page, under "Default SMS Setting", enter the full URL for your webhook (ngrok URL plus /webhooks/delivery-receipt) and click "Save changes". Note the option to be notified of delivery receipts via POST instead of the default GET HTTP method:
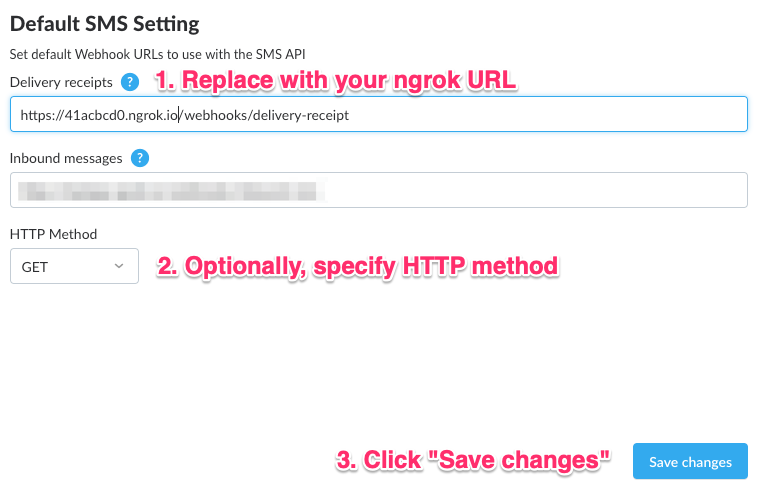 Setting the delivery receipt webhook URL in the developer dashboard
You're all set! Now you can test it.
Run your Java application from within your application directory:
Send a test message to your personal mobile number.
Once Vonage receives a delivery receipt from the network, it forwards this to your application which then displays it:
Change the HTTP Method in the dashboard settings page to one of the POST methods and send another SMS to ensure that your application can still retrieve the delivery receipt information. For example, POST-JSON:
DLR received via POST-JSON
{
  "msisdn":"447700900005",
  "to":"NEXMOTEST",
  "network-code":"23420",
  "messageId":"140023462904E8",
  "price":"0.03330000",
  "status":"delivered",
  "scts":"1907171217",
  "err-code":"0",
  "message-timestamp":"2019-07-17 11:17:52"
}
In this tutorial, you learned how to create a Java application with the Spark framework to retrieve a delivery receipt from Vonage using the SMS API. The webhook that you coded was able to extract the delivery receipt regardless of which HTTP method was used to make the request.